
DIY: Lower Steering Shaft U-Joint Replacement


Thread Starter
Registered
iTrader: (2)
Joined: Oct 2007
Posts: 16,684
Likes: 267
From: Pacific Northwest
DIY: Lower Steering Shaft U-Joint Replacement
Does your steering feel "lumpy"? Where it has hard and soft points, and the points that it is hard at are 90 degrees from where it is soft at in the steering rotation? You probably have a failing lower U-joint bearing, and it is making 1 axis bind. It could be a few other things, but the easiest diagnosis is to spray some WD 40 on the joint. If it's your problem, the steering will immediately get smooth(er) again. It won't stay that way though. A failing bearing is a failing bearing, no amount of lubrication will get it right again. Don't ignore it. At some point it will fail completely, and who knows what will happen. I know I didn't want to be driving when I found out.
A dealer charges at least ~$700 to do this replacement. It's actually quite easy. Some hard forces involved with getting the u-joint off the steering shaft, but much easier than any other car I can think of.
(I'll edit this as needed, I'm sure it isn't ideal yet, but already had 1 PM asking more info about how to do it. I am guessing more people need this done, most probably don't realize it).
Tools needed:
- 10mm socket (recommend deepwell socket, but any -should- do)
- 12mm deepwell socket (deepwell required)
- Racket
- Breaker bar
- Needle nose plies (makes several clips alot easier
- Small flat-head screwdriver
- Large flat-head screwdriver (For lots of leverage, mine is ~3/8th of an inch shaft. I've never used it for actually turning a screw )
)
- #2 Phillips screwdriver
Another set of hands is really handy, but not really required.
To start with, you don't need to lift up the car. I did at first, but it's not needed.
Unless you are going to drop the steering rack, but due to the bolt position of the rack bolts, I'd recommend a lift if you are going to be doing that. Large bolts + limited room under car + jack stands isn't very safe imo. Going the steering column route isn't as "simple", but it's safer, and you can still do it fairly easily.
I would also recommend moving the driver's seat the whole way back. I didn't, and it made some of the later things quite a pain. Do it before you disconnect the battery if you have a GT trim.
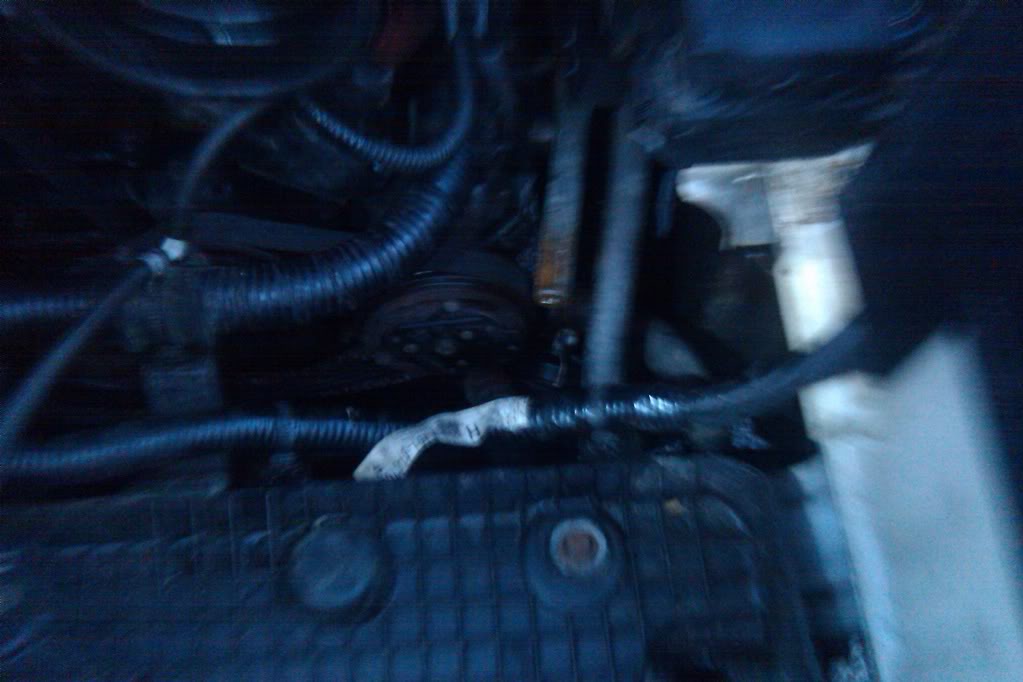
1) Pop the hood, disconnect the battery (for airbag later), and remove the OEM air box. If you have an aftermarket intake, you may be able to do this without touching the intake, I don't know. You just need to get down behind where the OEM air box sits
Look for the u-joint under the right side of where the air box sits. It's behind and down from the cross-brace under the air box, right under the oil cooler hoses and AC lines, to the right of the AC belt/pulley.
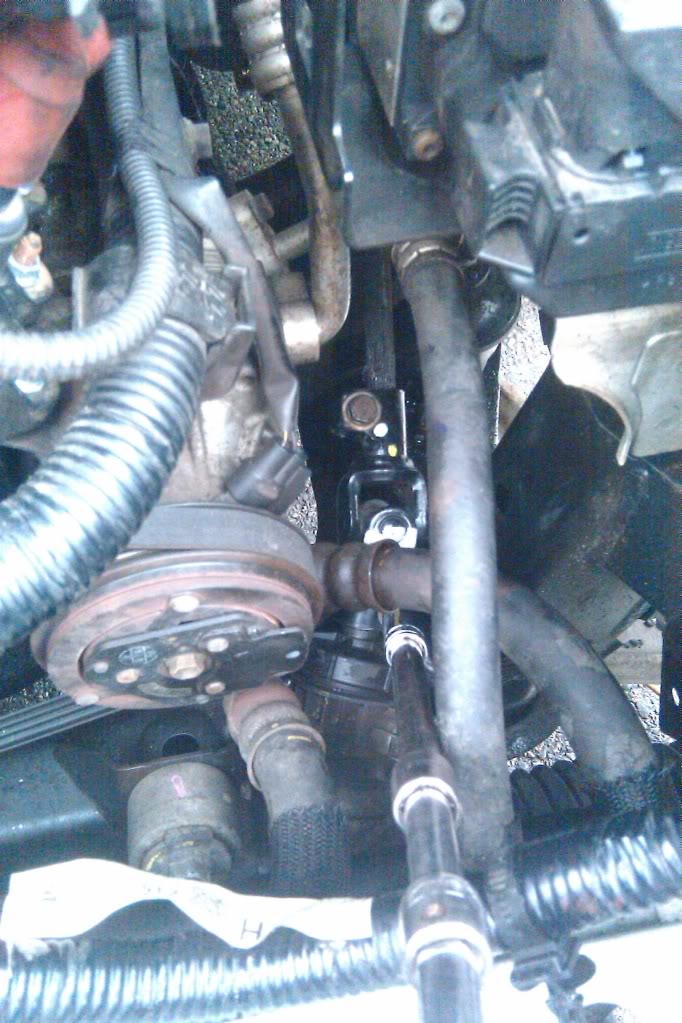
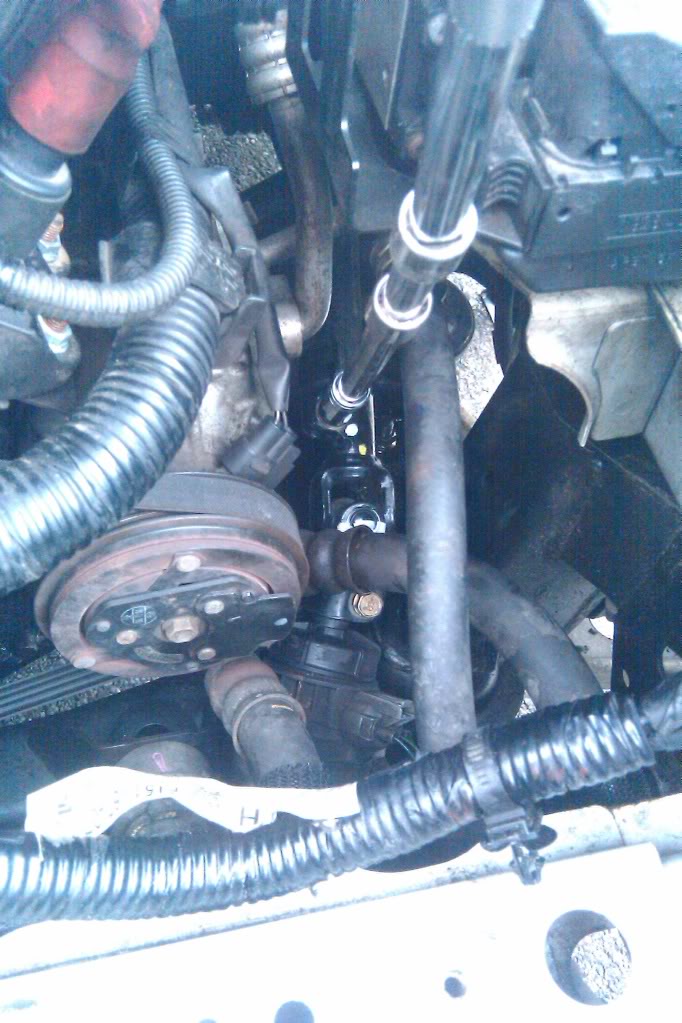
2) Rotate the steering wheel until you can see both u-joint bolts. If the wheels are pointed straight, the bolts are pointing downwards toward an opening under the car. This is probably intentional on Mazda's part so that if it's on a lift you can access the bolt heads easily while keeping the wheels straight. Takes about 150 degrees to the left to get the shaft rotated so you can access the bolts through the engine bay
3) using the 12mm socket and at least 12 inches of extensions and the breaker bar, break both bolts free. You may want to go ahead and remove them. I used 15 inches of extensions, and could wish for a bit more room to work with in the air box area, but doable.
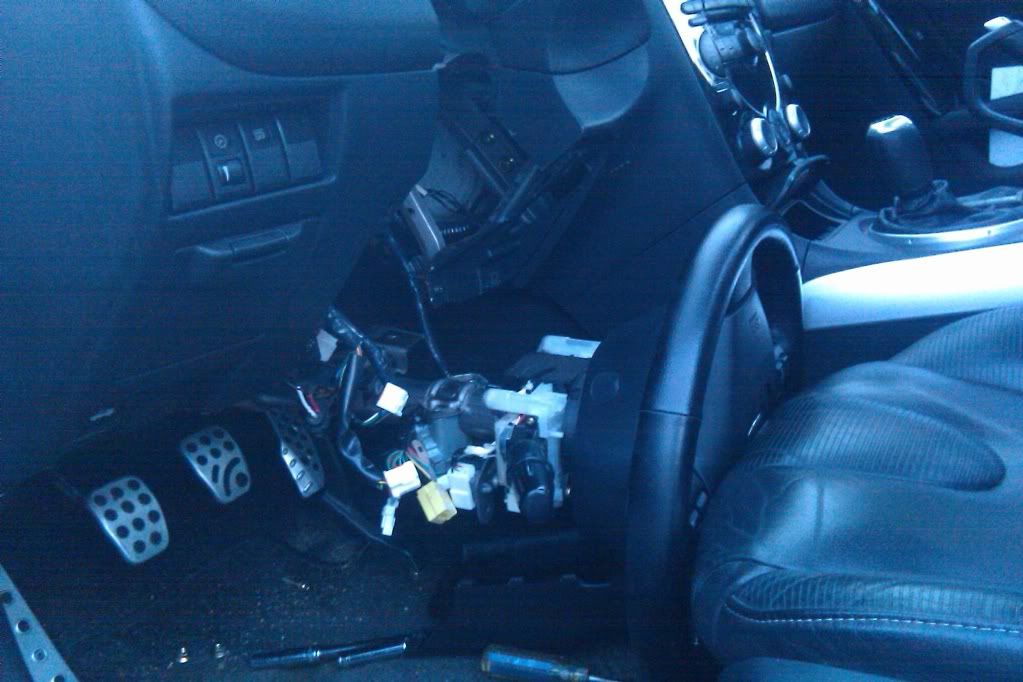
Move to inside the car
4) remove the 3 screws holding the bottom of the steering column plastic shielding in place (in deep holes on the bottom of the column)
5) Remove the plastic piece of the "dash" under the column. Pull the top down, pops free, then rotate it down and pull out. No screws
6) Remove the metal brace behind that, 4 easily accessed screws
7) give a sharp yank on the bottom shielding piece of the steering column, it pops free, let it hang by the ignition light cable
8) remove the upper shield through/above the steering wheel.
9) release the tension on the tilt steering mechanism (just move the lever all the way down and leave it)
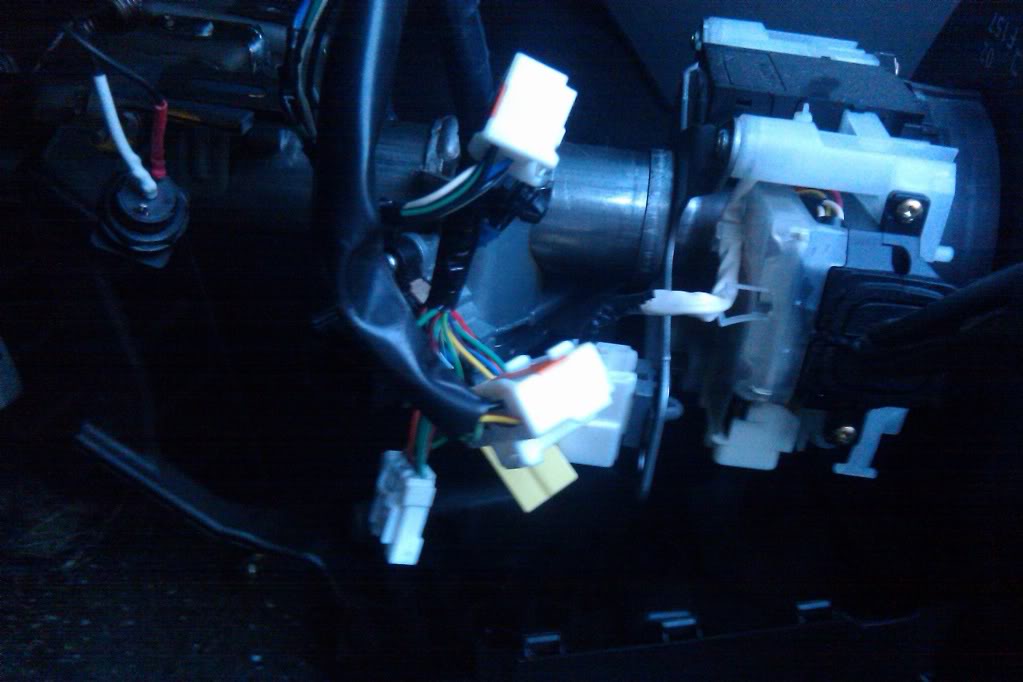
10) Disconnect all connectors leading to the steering column. There are 8 total. All unique, don't worry about getting them mixed up. No disconnecting them will cause the column to hang on the wires, and I wouldn't recommend it at all. Also can't get the range of motion you are likely to need.
11) Remove the 4 nuts holding the steering column in place. They are paired and in 2 different spots. One set is part of the tilt steering mechanism, they hold the base plate in place, the other is the main mount, and includes the pivot point that the tilt steering operates on.
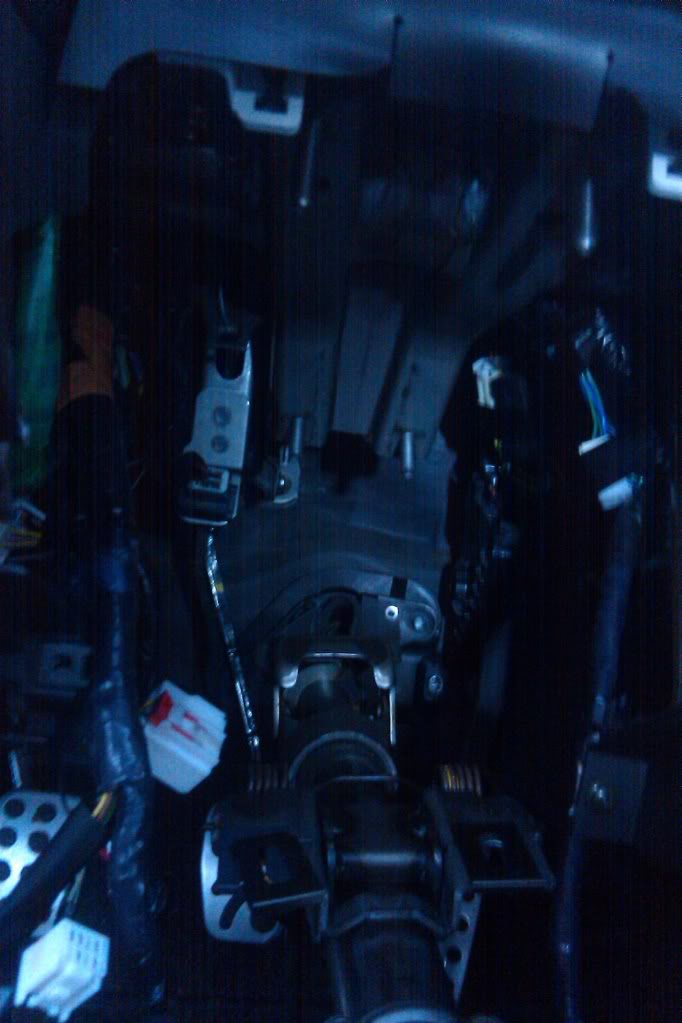
The entire steering column will be completely free and lay on the seat/floor.
12) Now comes the hard'ish part. Yanking the u-joint free of the rack. This took me about 2 hours of yanking, messing with etc... I didn't know what I was doing though, so it can probably be done WAY faster, especially if you have someone helping. Mine finally came free when my wife got home, I asked for her help, she walked over and looked at it and it just fell out as I showed her what I wanted her to do.
13) In the engine bay, you should now see the u-joint hanging on the end of the steering shaft. Finagle the joint up into the engine bay. You can get it up into the air box area if you are smart about it, give you some room to work with.
14) Now the hardest part, getting the u-joint free of the shaft. This was a pain. The method I ended up using was turning the shaft so that the flat side of the shaft was up, and the inner side of the clamp was exposed, then getting my large flat head screwdriver and placing the tip against the bottom of the end of the shaft inside the clamp, and using the u-joint itself as the pivot and just hauling on it. It finally broke free and slide slightly (and I badly scraped both arms on the air box tray's lip in the process) After that, holding the screwdriver in place AND pulling on the u-joint with 1 hand, I used a hammer with the other and tapped the shaft out of the u-joint. A 2nd person would be immensely helpful here.
Halfway done.
15) grab some grease and apply a little bit to the inside splines of the new u-joint and both the shaft and rack splines. Make things easier to put back together, a bit of protection, and if you have to keep removing to get everything aligned later, makes that a ton easier.
16) fit the new u-joint onto the steering shaft, and using a hammer, lightly tap it into place. I used the screwdriver again, placing the tip against the nook of the clamp end. DO NOT hit the bearing or the opposite side of the joint. Don't screw up what you are trying to fix.
17) maneuver the joint and shaft back down into the lower engine bay near the rack, moving the steering column as needed forward and backwards.
18) Assuming that the wheels have not turned at all since you rotated the wheels to get access to the bolts, you need to orient the steering wheel to the same point. You should still have the same access to the bolts. Most of my issues came from the fact that I had the car in the air, left front wheel off, and there was nothing holding the wheels in place.
19) slide the joint onto the rack splines.
20) replace the bolts onto both sides of the u-joint.
21) re-mount the steering column via the 4 bolts/nuts
22) reconnect all of the connectors
23) re-assemble the air intake if needed, reconnect the battery.
24) drive at least 50 feet or so and feel where the steering wheel is at. If it's straight, congratulations, you are better than me and you can finish reassembling everything else. If it's not, continue reading:
My steering was, predictably, off. No longer centered. Combination of everything I did really. I reassembled EVERYTHING before I figured this out. But I went driving anyway to feel out the new u-joint. I also stupidly completely forgot about how the steering position sensor is used in the DSC system.
WARNING:
If you have DSC, and your steering is off, do not exceed ~20mph until you get it fixed or turn off DSC. And I don't really recommend the latter. Get it fixed first.
I didn't.
And I entered a slight right followed by a quick transition to a harder left at speed's the 8 is enjoyable at, with my DSC enabled and my steering 1 spline off to the right. The DSC system detected a spin when there wasn't one and applied full ABS to the right front wheel. Scared the hell out of me, and I am EXTREMELY fortunate I didn't plow into the guardrail.
Don't do this. Please.
25) If the steering is off, disconnect the battery, disconnect all of the connectors in the column, un-mount the steering column again, remove the lower bolt at the rack side of the joint, and definitely get a 2nd person if you don't already have one.
26) remove the air bag from the steering wheel (leave the connects connected if you wish, you just need to see behind it. Behind the air bag you can see the black ring in the column. There are 2 indentation arrows in the ring, one fixed showing top dead center on the column, the other on the disc showing where the wheel should be pointing. These will only be pointing together if the wheels are straight, and the splines are on right. Assuming you turned the steering wheel to the left to access the u-joint bolts, they won't be. But it is useful to see them, to help verify later.
26) with 1 person at the steering wheel, and 1 person at the joint, carefully slide the joint off the rack (it can orient any direction on the rack, but only 1 way on the shaft, besides it's easier to slide on/off the rack), and rotate about 10 degrees in the direction needed to straighten the steering wheel, then slide the joint back onto the rack splines.
27) reassemble everything and carefully drive again to test.
If you are still off, then come to a stop with the wheels straight, start disassembling everything again, but before you turn the wheels to access the bolt, pull off the air bag and make some marks on the disc where the top dead center is. THEN turn the wheel to access the bolts, and then make a mark on the column through the steering wheel where your mark on the disc is. That is where you now want your steering wheel top dead center arrow to point. Continue as before.
I attempted to get it right by myself, and failed 4 times in a row. Got my wife to help, and it only took us 2 more tries, every time disassembling and reassembling everything.
But steering feels like new again, problem gone.
A dealer charges at least ~$700 to do this replacement. It's actually quite easy. Some hard forces involved with getting the u-joint off the steering shaft, but much easier than any other car I can think of.
(I'll edit this as needed, I'm sure it isn't ideal yet, but already had 1 PM asking more info about how to do it. I am guessing more people need this done, most probably don't realize it).
Tools needed:
- 10mm socket (recommend deepwell socket, but any -should- do)
- 12mm deepwell socket (deepwell required)
- Racket
- Breaker bar
- Needle nose plies (makes several clips alot easier
- Small flat-head screwdriver
- Large flat-head screwdriver (For lots of leverage, mine is ~3/8th of an inch shaft. I've never used it for actually turning a screw
)- #2 Phillips screwdriver
Another set of hands is really handy, but not really required.
To start with, you don't need to lift up the car. I did at first, but it's not needed.
Unless you are going to drop the steering rack, but due to the bolt position of the rack bolts, I'd recommend a lift if you are going to be doing that. Large bolts + limited room under car + jack stands isn't very safe imo. Going the steering column route isn't as "simple", but it's safer, and you can still do it fairly easily.
I would also recommend moving the driver's seat the whole way back. I didn't, and it made some of the later things quite a pain. Do it before you disconnect the battery if you have a GT trim.
1) Pop the hood, disconnect the battery (for airbag later), and remove the OEM air box. If you have an aftermarket intake, you may be able to do this without touching the intake, I don't know. You just need to get down behind where the OEM air box sits
Look for the u-joint under the right side of where the air box sits. It's behind and down from the cross-brace under the air box, right under the oil cooler hoses and AC lines, to the right of the AC belt/pulley.
2) Rotate the steering wheel until you can see both u-joint bolts. If the wheels are pointed straight, the bolts are pointing downwards toward an opening under the car. This is probably intentional on Mazda's part so that if it's on a lift you can access the bolt heads easily while keeping the wheels straight. Takes about 150 degrees to the left to get the shaft rotated so you can access the bolts through the engine bay
3) using the 12mm socket and at least 12 inches of extensions and the breaker bar, break both bolts free. You may want to go ahead and remove them. I used 15 inches of extensions, and could wish for a bit more room to work with in the air box area, but doable.
Move to inside the car
4) remove the 3 screws holding the bottom of the steering column plastic shielding in place (in deep holes on the bottom of the column)
5) Remove the plastic piece of the "dash" under the column. Pull the top down, pops free, then rotate it down and pull out. No screws
6) Remove the metal brace behind that, 4 easily accessed screws
7) give a sharp yank on the bottom shielding piece of the steering column, it pops free, let it hang by the ignition light cable
8) remove the upper shield through/above the steering wheel.
9) release the tension on the tilt steering mechanism (just move the lever all the way down and leave it)
10) Disconnect all connectors leading to the steering column. There are 8 total. All unique, don't worry about getting them mixed up. No disconnecting them will cause the column to hang on the wires, and I wouldn't recommend it at all. Also can't get the range of motion you are likely to need.
11) Remove the 4 nuts holding the steering column in place. They are paired and in 2 different spots. One set is part of the tilt steering mechanism, they hold the base plate in place, the other is the main mount, and includes the pivot point that the tilt steering operates on.
The entire steering column will be completely free and lay on the seat/floor.
12) Now comes the hard'ish part. Yanking the u-joint free of the rack. This took me about 2 hours of yanking, messing with etc... I didn't know what I was doing though, so it can probably be done WAY faster, especially if you have someone helping. Mine finally came free when my wife got home, I asked for her help, she walked over and looked at it and it just fell out as I showed her what I wanted her to do.
13) In the engine bay, you should now see the u-joint hanging on the end of the steering shaft. Finagle the joint up into the engine bay. You can get it up into the air box area if you are smart about it, give you some room to work with.
14) Now the hardest part, getting the u-joint free of the shaft. This was a pain. The method I ended up using was turning the shaft so that the flat side of the shaft was up, and the inner side of the clamp was exposed, then getting my large flat head screwdriver and placing the tip against the bottom of the end of the shaft inside the clamp, and using the u-joint itself as the pivot and just hauling on it. It finally broke free and slide slightly (and I badly scraped both arms on the air box tray's lip in the process) After that, holding the screwdriver in place AND pulling on the u-joint with 1 hand, I used a hammer with the other and tapped the shaft out of the u-joint. A 2nd person would be immensely helpful here.
Halfway done.
15) grab some grease and apply a little bit to the inside splines of the new u-joint and both the shaft and rack splines. Make things easier to put back together, a bit of protection, and if you have to keep removing to get everything aligned later, makes that a ton easier.
16) fit the new u-joint onto the steering shaft, and using a hammer, lightly tap it into place. I used the screwdriver again, placing the tip against the nook of the clamp end. DO NOT hit the bearing or the opposite side of the joint. Don't screw up what you are trying to fix.
17) maneuver the joint and shaft back down into the lower engine bay near the rack, moving the steering column as needed forward and backwards.
18) Assuming that the wheels have not turned at all since you rotated the wheels to get access to the bolts, you need to orient the steering wheel to the same point. You should still have the same access to the bolts. Most of my issues came from the fact that I had the car in the air, left front wheel off, and there was nothing holding the wheels in place.
19) slide the joint onto the rack splines.
20) replace the bolts onto both sides of the u-joint.
21) re-mount the steering column via the 4 bolts/nuts
22) reconnect all of the connectors
23) re-assemble the air intake if needed, reconnect the battery.
24) drive at least 50 feet or so and feel where the steering wheel is at. If it's straight, congratulations, you are better than me and you can finish reassembling everything else. If it's not, continue reading:
My steering was, predictably, off. No longer centered. Combination of everything I did really. I reassembled EVERYTHING before I figured this out. But I went driving anyway to feel out the new u-joint. I also stupidly completely forgot about how the steering position sensor is used in the DSC system.
WARNING:
If you have DSC, and your steering is off, do not exceed ~20mph until you get it fixed or turn off DSC. And I don't really recommend the latter. Get it fixed first.
I didn't.
And I entered a slight right followed by a quick transition to a harder left at speed's the 8 is enjoyable at, with my DSC enabled and my steering 1 spline off to the right. The DSC system detected a spin when there wasn't one and applied full ABS to the right front wheel. Scared the hell out of me, and I am EXTREMELY fortunate I didn't plow into the guardrail.
Don't do this. Please.
25) If the steering is off, disconnect the battery, disconnect all of the connectors in the column, un-mount the steering column again, remove the lower bolt at the rack side of the joint, and definitely get a 2nd person if you don't already have one.
26) remove the air bag from the steering wheel (leave the connects connected if you wish, you just need to see behind it. Behind the air bag you can see the black ring in the column. There are 2 indentation arrows in the ring, one fixed showing top dead center on the column, the other on the disc showing where the wheel should be pointing. These will only be pointing together if the wheels are straight, and the splines are on right. Assuming you turned the steering wheel to the left to access the u-joint bolts, they won't be. But it is useful to see them, to help verify later.
26) with 1 person at the steering wheel, and 1 person at the joint, carefully slide the joint off the rack (it can orient any direction on the rack, but only 1 way on the shaft, besides it's easier to slide on/off the rack), and rotate about 10 degrees in the direction needed to straighten the steering wheel, then slide the joint back onto the rack splines.
27) reassemble everything and carefully drive again to test.
If you are still off, then come to a stop with the wheels straight, start disassembling everything again, but before you turn the wheels to access the bolt, pull off the air bag and make some marks on the disc where the top dead center is. THEN turn the wheel to access the bolts, and then make a mark on the column through the steering wheel where your mark on the disc is. That is where you now want your steering wheel top dead center arrow to point. Continue as before.
I attempted to get it right by myself, and failed 4 times in a row. Got my wife to help, and it only took us 2 more tries, every time disassembling and reassembling everything.
But steering feels like new again, problem gone.
Last edited by RIWWP; May 23, 2011 at 07:03 AM.

Thread Starter
Registered
iTrader: (2)
Joined: Oct 2007
Posts: 16,684
Likes: 267
From: Pacific Northwest
I got mine from Mazmart. If you think this is your problem, lubricate the joint first. If lubrication fixes it briefly, then this is your problem. If not, it's probably something else.

Would you mind posting a picture of what a damaged U-joint looks like. I have been looking at mine and it is a fairly odd looking design that has me believe it could be damaged...
Thread Starter
Registered
iTrader: (2)
Joined: Oct 2007
Posts: 16,684
Likes: 267
From: Pacific Northwest
There was no visible damage. On the road right now, but it would need a video of motion, or rather resistance to motion, to see the difference.
Other joints might fail differently than this.
Other joints might fail differently than this.
 , I think I'm gonna send him a message too
Registered User
Joined: Nov 2009
Posts: 8
Likes: 0
great DIY, just did this fix. Aside from getting the usually Mazda Canada "deal" on parts (around $130 for the u-joint) a fairly painless job.
More tips: I used a paint marker on the u-joint to steering column shaft (and then transferred the mark to new ujoint) and snapped some phone pics of the same and the wheel and u-joint at full left lock (where the bolts where in accessible position) before starting, this was very helpful in lining it back up after. Also note on re-assembly the washer/nut marks on the column bracket line up as they are slotted holes in the brackets, this helps ensure you have fully splined together the u-joint...joints.
Cheers

Registered
Joined: Jul 2010
Posts: 287
Likes: 1
From: Wood River, IL
I have access to a floor lift, would it be easier to try to get in from underneath that or would you still recommend just doing it through the top? I am not sure if this is my problem yet, but I am just planning ahead and getting an idea of what I may be dealing with.
Thread Starter
Registered
iTrader: (2)
Joined: Oct 2007
Posts: 16,684
Likes: 267
From: Pacific Northwest
You MAY have an easier time getting at it from the bottom. Maybe. You would still either have to remove the steering rack (an option since you can get at it from the bottom), or the steering column to separate the shaft and the joint. Depends on what you feel more comfortable with.

Just a heads up, I got the part at JOINT,STEERING (NE51-32-850) - $96.81 - NE5132850
^ I had tried PMing Paul, but no answer. This was a couple of months ago. I still haven't installed it yet, just either no time, or too lazy.. But I'm pretty sure this will solve my "free play" from left to right while driving. I've already had the tie rods replaced, I might even luck out and get the stupid DSC to work again!

Resu Deretsiger
Joined: Feb 2004
Posts: 369
Likes: 0
From: United Kingdom, for now
Great DIY! Your specifics made me confident to do the job! But... Just wanted to add my $.02 for the next guy. I opted to leave the interior alone, and pull the bottom end off. Dropped the airbox and the bellypan, removed the lower rad supports, and the bolts holding the steering rack in place. Removal of the worn joint took some "gentle coaxing" with some penetrating lube and a hammer. Once new one was in place with some white lithium grease, and everything was reassembled, I was able to fine tune the placement of the joint on the steering shaft from above. The joint will slide up beyond normal placement, allowing the lower end to be removed/reinserted onto the rack very easily (one person job). VERY glad to find the WAS the culprit to my steering issues. Would not have been safe to take her out on the Nurburgring next month otherwise. Thanks for the insight, RIWWP!

Registered
Joined: Nov 2007
Posts: 13
Likes: 0
From: West Chicago, IL
My dealer was completely unfamiliar with this issue. I ordered the part direct from Mazda (Racer support program) and had it installed yesterday. The improvement is like night and day. Glad I found this thread -- saved me from replacing the electric steering rack.

So my friend and I did this last night and it worked great. We got the u-joint replaced and the steering is pretty much dead centered. The original u-joint has massive amounts of play, so I'm glad we got that replaced, but I'm having another issue.
I went out to drive it today and found an issue. When I turn the wheel it makes a metal on metal grinding noise that I believe I sourced to be coming from the upper u-joint inside the car on the steering column itself. When I shake the steering wheel back and forth, I hear the grinding. I noticed that when I lowered the steering column adjustment, the position of the noise shifted 90 degrees from turning the wheel.
The question is how do I fix this? My friend is coming over tonight to help me figure this out, but is it possible we need to reposition the lower u-joint on the steering spline itself?
Any help would be greatly appreciated. Thanks
Super Moderator
Joined: Apr 2005
Posts: 10,880
Likes: 340
From: Australia
NE51-32-850 U-Joint actually originates from the MX-5/Miata (2005 NC), the original RX-8 (FE01-32-850) U-Joint supersedes back to the Miata unit and is Left Hand Drive only specific.
For Right Hand Drive owners do not use this L.H.D U-Joint as both bolts fix on the opposite side of this Steering U-Joint...
R.H.D RX-8 is F151-32-850 U-Joint.
BTW: I think it was Jon who said 'cleaning/lubricating' of original U-Joint can actually take some of the lumpy feeling out of Steering (if you have this condition).


I wonder if I can find some type of boot to put around the joint to protect it and keep the grease in? Before I go crazy looking, would there be any reason to believe this is a bad idea?
Thread Starter
Registered
iTrader: (2)
Joined: Oct 2007
Posts: 16,684
Likes: 267
From: Pacific Northwest
I don't know the answer to that.
I was wondering the same thing though, since both of my Miata's have had a rubber boot around the joint that appears to be successful at keeping it clean and free of grit. Mazda deliberately deleted this for the RX-8, and I don't know the reason. It could be something as simple as cost reduction (the Mazda2 had the steering lock removed for cost savings), or there might have been a problem with latent heat or other interference? I wouldn't think there would be any reason that electric PS vs fluid pump PS would make a difference here, but maybe there is something I'm not thinking about.
I was wondering the same thing though, since both of my Miata's have had a rubber boot around the joint that appears to be successful at keeping it clean and free of grit. Mazda deliberately deleted this for the RX-8, and I don't know the reason. It could be something as simple as cost reduction (the Mazda2 had the steering lock removed for cost savings), or there might have been a problem with latent heat or other interference?
I wouldn't think there would be any reason that electric PS vs fluid pump PS would make a difference here, but maybe there is something I'm not thinking about.
Super Moderator
Joined: Apr 2005
Posts: 10,880
Likes: 340
From: Australia
Mike, as I said (in the US) Mazda is now supplying to the Miata (NC) U-Joint for all LHD RX-8's instead of using the OE RX-8 Part, the Miata (NC) has Hydraulic PS, so I do not see how this would be an issue.
NE51- is 'a' Miata Parts LHD Model Code.
FE01- is 'a' RX-8 USA LHD Model Code.
As far as a Boot, I don't see why it would not work OK?..
The NB Miata has an intermediate U-Joint on Shaft and then a final U-Joint 'similar' to the RX-8 and NC Miata....I can see the top dust boot for NB intermediate U-Joint, but not one for the final looking Joint??
Perhaps I am not looking at the right EPC location?
Thread Starter
Registered
iTrader: (2)
Joined: Oct 2007
Posts: 16,684
Likes: 267
From: Pacific Northwest
Understood on the NC u-joint. I would presume that they are doing that simply for the cost reduction of not having separate parts.
Hmm... I've got pics somewhere. Pulling the engine on my 99 (NB) twice, I remember dealing with that rubber boot on the joint right above the steering rack, both times...
From the OE documentation:
Attachment:
NB Miata, steering gear and linkage removal on the left, shaft on the right. The dust boot I dealt with is visible on the left image though small, it's close fit around the joint.
I looked up the NC's steering shaft and the diagram looks identical to the RX-8s (which is completely understandable). The diagram ends at the tip of the shaft though, no joint attached, and the rack likewise ends with that shaft, no joint attached.