
DIY: INSTALLING the HKS Racing Suction


Thread Starter
The Former PSNTLSS
iTrader: (3)
Joined: Jun 2007
Posts: 1,094
Likes: 0
From: South Plainfield, NJ/ Center Valley, PA
DIY: INSTALLING the HKS Racing Suction
As requested by Member Fanning522.
I scanned the instructions from HKS for the Racing Suction. Might as well have it up here posted for other members who are looking for these as well.
__________________________________________________ _________
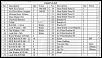
"Maintenance" Sheet
MAINTENANCE:
Maintenance of this product is necessary in order to maintain the safety, reliability, and function of this product.
Maintenance is the responsibility of the driver/owner.
- If work needs to be performed outside the scope of this manual, consult a professional.
- In order to maintain the performance of the kit, routine filter replacement is necessary. (Recommended replacement intervals) Every 3,000-S,000kml2,000-3,200miles or every 3-6 months. However, there are certain conditions where, depending on dirt buildup, the filter may need to be cleaned/replaced earlier than the above recommended intervals. Replacement filters are sold separately.
- If the vehicle becomes damaged, have the repairs performed by a professional.
- If you experience abnormal noises, scents, or vibrations from the vehicle while driving, reference the vehicle's Owner's Manual.
- If this product is ever sold, please hand over this Instruction Manual to the new owner. When removing this product from the vehicle, please consult a professional.
ADVICE:
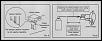
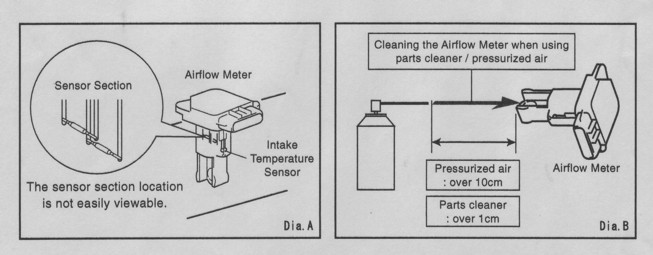
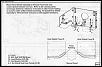
If the airflow meter intake temperature sensor (Diagram A below) is dirty (blackened, no visible shine) it can be assumed that the sensor itself is also dirty. Using an automotive parts cleaner, carefully clean the sensor in the method below.
CLEANING METHOD:
1) With the engine turned off (wait at least 5 minutes for the engine and airflow sensor to cool), disconnect and remove the airflow meter from the vehicle.
2)As shown below in Diagram B, spray a fast-drying parts cleaner on the airflow meter sensor section for 5-10
seconds. (To avoid sensor damage, keep a distance of over l cm from the sensor and spray tip)
3)Immediately afterward, spray the sensor section with air for 5-10 seconds to blow away the dirt/grime and the
parts cleaner solvent. (To avoid sensor damage, keep a distance of over l Ocm from the sensor and spray tip)
4) Let dry for at least 5 minutes. Reinstall on the vehicle once the airflow meter is completely dry.
Page 1 Instructions
HKS
Racing Suction Reloaded Intake Kit
70020-BZ005
Mazda RX-8 (SE3P) `04
Engine Type: 13B-MSP
Ver. 062206
NOTICE
This manual assumes that you have and know how to use the tools and equipment necessary to safely perform service operations on your vehicle. This manual assumes that you are familiar with typical automotive systems and basic service and repair procedures. Do not attempt to carry out the operations shown in this manual unless these assumptions are correct. Always have access to a factory repair manual. To avoid injury, follow the safety precautions contained in the factory repair manual.
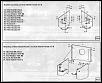
1. Removal of Stock Parts
Remove the parts in accordance with the service manual.
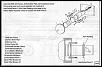
1) Remove factory Engine Cover and Battery Cover indicated in diagram 1.
2) Disconnect the negative terminal from the battery.
3) Unplug Electrical Harness from Airflow Meter Sensor. (Dia. 2)
4) Disconnect the 4mm Hoses from the Solenoid Valve and the Vacuum Chamber. (Dia. 2)
5) Remove Air Filter Case Assembly and Airflow Meter Sensor save for later use. (Dia. 3)
6) Disconnect and remove 4mm Hoses and Joint Pipe from Shroud Panel. (Dia.4)
7)Remove Nuts and Bolts from Point A, B, C & D and retain Nuts from Point A & B for later use. (Dia. 4)
Page 2
8) Carefully remove Airflow Meter Sensor & gasket from Air Filter Case Assembly and retain for later use.(Dia.5)
9) Remove two factory Grommets from Air Filter Case Assembly and retain for later use. (Dia.5)
2. Installation of Racing Suction Intake Kit
Install the parts in accordance with diagrams below.
Heat Shield. Assembly
I scanned the instructions from HKS for the Racing Suction. Might as well have it up here posted for other members who are looking for these as well.
__________________________________________________ _________
"Maintenance" Sheet
MAINTENANCE:
Maintenance of this product is necessary in order to maintain the safety, reliability, and function of this product.
Maintenance is the responsibility of the driver/owner.
- If work needs to be performed outside the scope of this manual, consult a professional.
- In order to maintain the performance of the kit, routine filter replacement is necessary. (Recommended replacement intervals) Every 3,000-S,000kml2,000-3,200miles or every 3-6 months. However, there are certain conditions where, depending on dirt buildup, the filter may need to be cleaned/replaced earlier than the above recommended intervals. Replacement filters are sold separately.
- If the vehicle becomes damaged, have the repairs performed by a professional.
- If you experience abnormal noises, scents, or vibrations from the vehicle while driving, reference the vehicle's Owner's Manual.
- If this product is ever sold, please hand over this Instruction Manual to the new owner. When removing this product from the vehicle, please consult a professional.
ADVICE:
If the airflow meter intake temperature sensor (Diagram A below) is dirty (blackened, no visible shine) it can be assumed that the sensor itself is also dirty. Using an automotive parts cleaner, carefully clean the sensor in the method below.
CLEANING METHOD:
1) With the engine turned off (wait at least 5 minutes for the engine and airflow sensor to cool), disconnect and remove the airflow meter from the vehicle.
2)As shown below in Diagram B, spray a fast-drying parts cleaner on the airflow meter sensor section for 5-10
seconds. (To avoid sensor damage, keep a distance of over l cm from the sensor and spray tip)
3)Immediately afterward, spray the sensor section with air for 5-10 seconds to blow away the dirt/grime and the
parts cleaner solvent. (To avoid sensor damage, keep a distance of over l Ocm from the sensor and spray tip)
4) Let dry for at least 5 minutes. Reinstall on the vehicle once the airflow meter is completely dry.
Page 1 Instructions
HKS
Racing Suction Reloaded Intake Kit
70020-BZ005
Mazda RX-8 (SE3P) `04
Engine Type: 13B-MSP
Ver. 062206
NOTICE
This manual assumes that you have and know how to use the tools and equipment necessary to safely perform service operations on your vehicle. This manual assumes that you are familiar with typical automotive systems and basic service and repair procedures. Do not attempt to carry out the operations shown in this manual unless these assumptions are correct. Always have access to a factory repair manual. To avoid injury, follow the safety precautions contained in the factory repair manual.
1. Removal of Stock Parts
Remove the parts in accordance with the service manual.
1) Remove factory Engine Cover and Battery Cover indicated in diagram 1.
2) Disconnect the negative terminal from the battery.

3) Unplug Electrical Harness from Airflow Meter Sensor. (Dia. 2)
4) Disconnect the 4mm Hoses from the Solenoid Valve and the Vacuum Chamber. (Dia. 2)

5) Remove Air Filter Case Assembly and Airflow Meter Sensor save for later use. (Dia. 3)
6) Disconnect and remove 4mm Hoses and Joint Pipe from Shroud Panel. (Dia.4)
7)Remove Nuts and Bolts from Point A, B, C & D and retain Nuts from Point A & B for later use. (Dia. 4)
Page 2
8) Carefully remove Airflow Meter Sensor & gasket from Air Filter Case Assembly and retain for later use.(Dia.5)
9) Remove two factory Grommets from Air Filter Case Assembly and retain for later use. (Dia.5)

2. Installation of Racing Suction Intake Kit
Install the parts in accordance with diagrams below.
Heat Shield. Assembly
Last edited by PSTNLSS; Mar 18, 2009 at 05:20 PM.
Thread Starter
The Former PSNTLSS
iTrader: (3)
Joined: Jun 2007
Posts: 1,094
Likes: 0
From: South Plainfield, NJ/ Center Valley, PA
Page 3
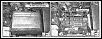
Heat Shield Assembly- Con't
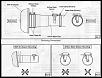
Air Filter Assembly
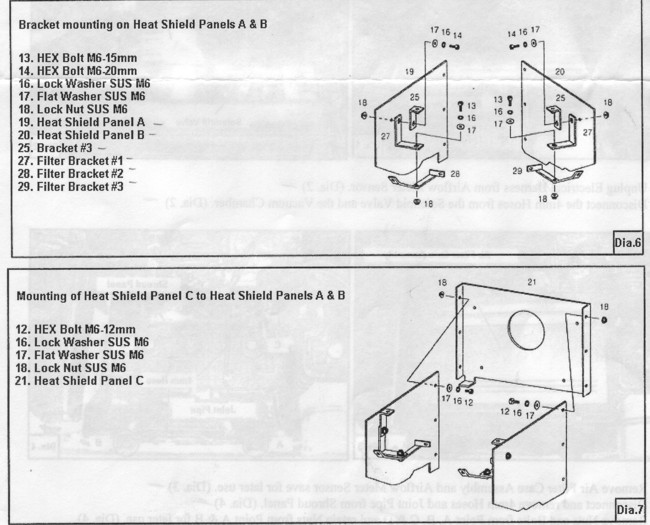
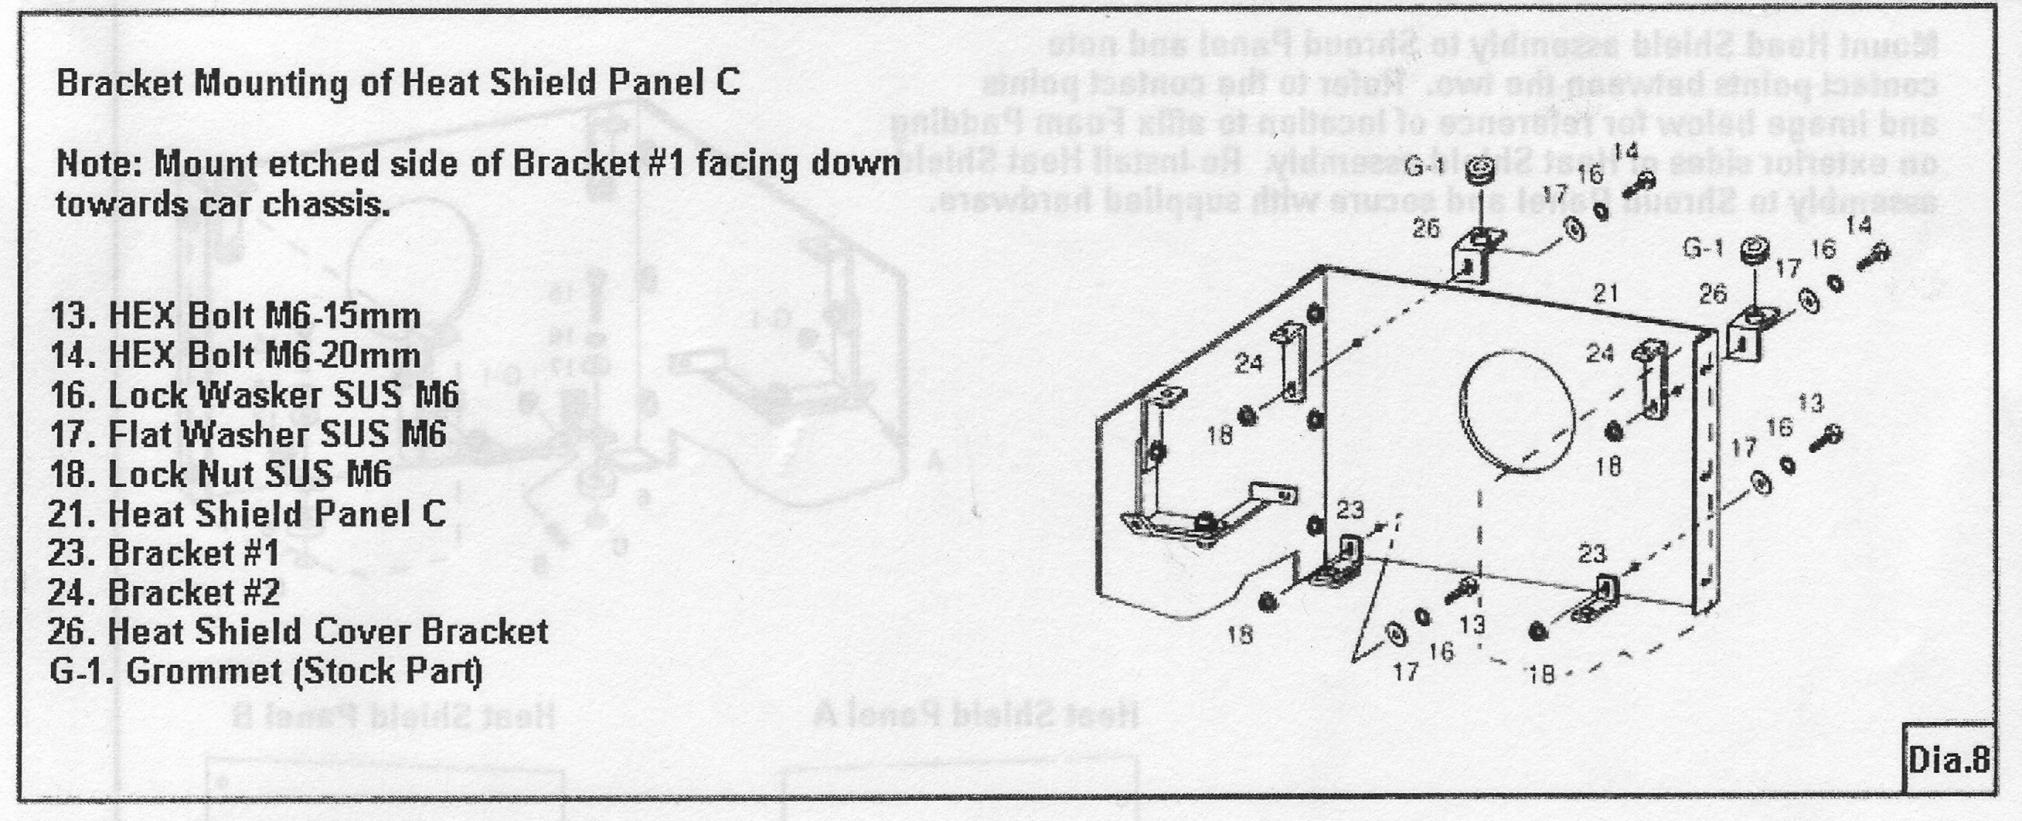
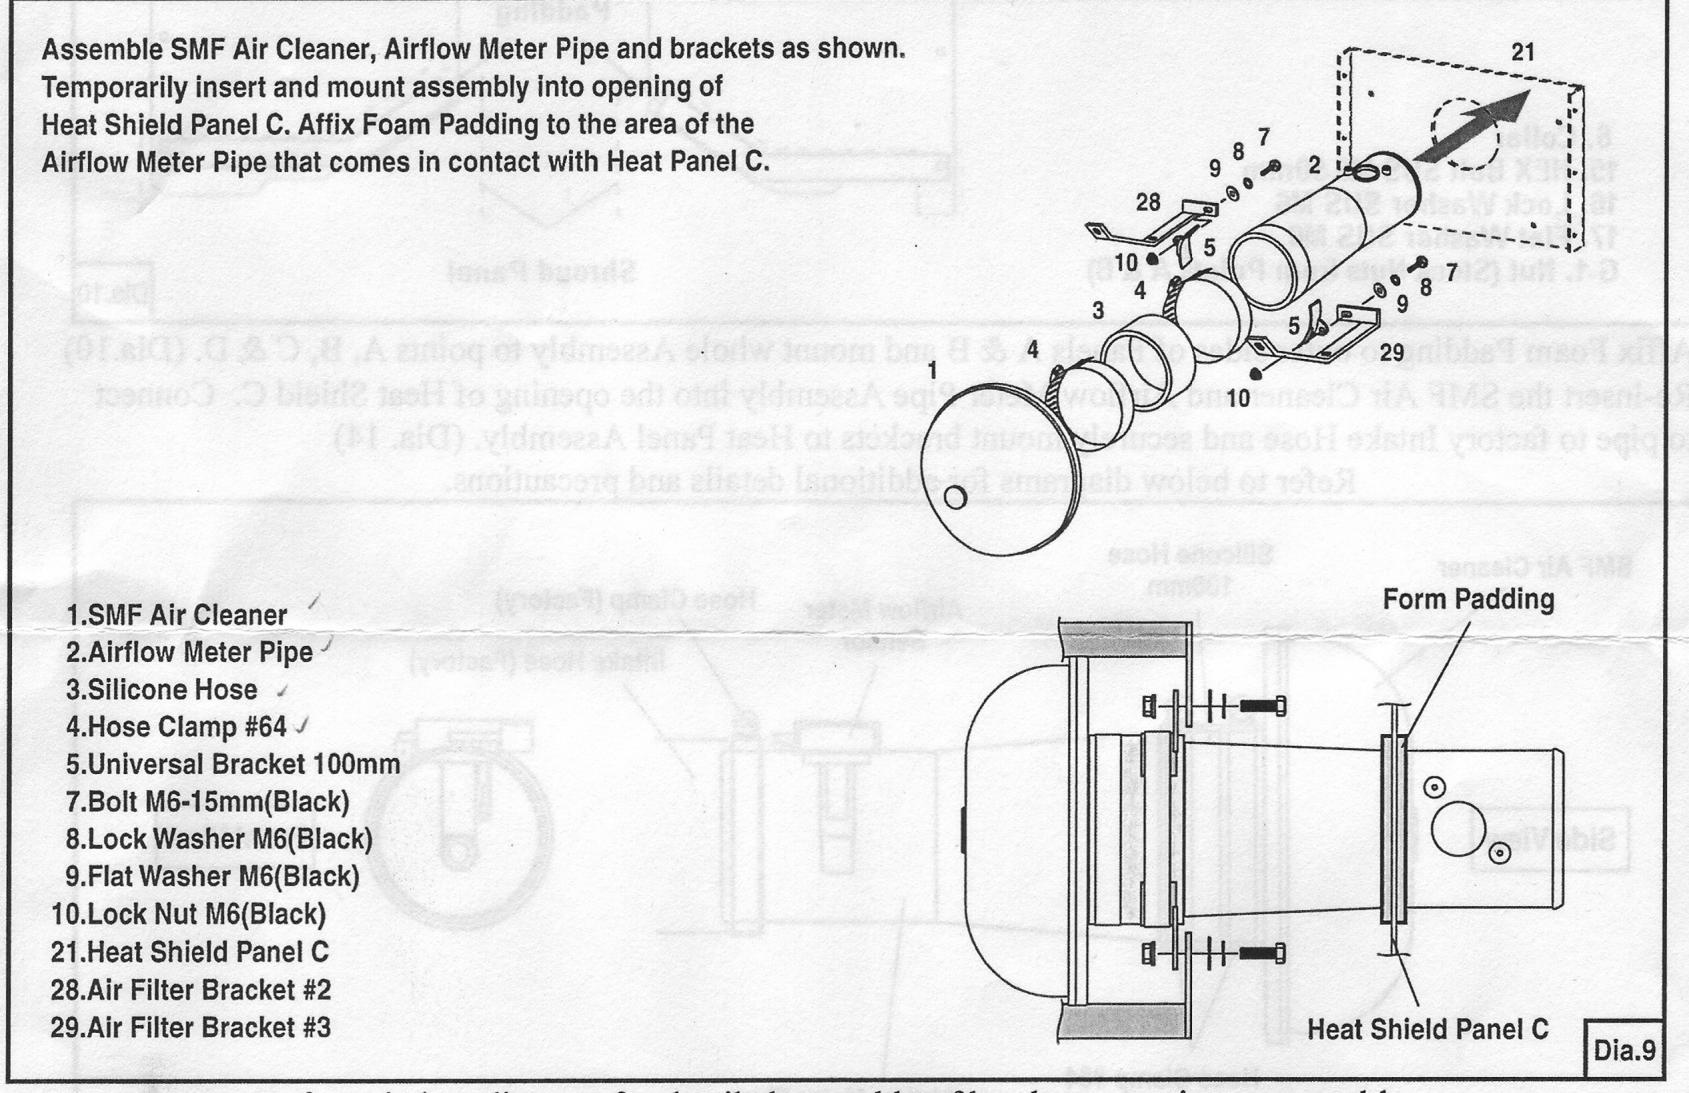
Refer to below diagram for detailed assembly of bracket mounting to assembly
Page 4
1) Affix Foam Padding to outer sides of Panels A & Band mount whole Assembly to points A, B, C & D. (Dia.10)
2) Re-insert the SMF Air Cleaner and Airflow Meter Pipe Assembly into the opening of Heat Shield C. Connect
to pipe to factory Intake Hose and securely mount brackets to Heat Panel Assembly. (Dia. 14)
Refer to below diagrams for additional details and precautions.
Heat Shield Assembly- Con't
Air Filter Assembly
Refer to below diagram for detailed assembly of bracket mounting to assembly

Page 4
1) Affix Foam Padding to outer sides of Panels A & Band mount whole Assembly to points A, B, C & D. (Dia.10)
2) Re-insert the SMF Air Cleaner and Airflow Meter Pipe Assembly into the opening of Heat Shield C. Connect
to pipe to factory Intake Hose and securely mount brackets to Heat Panel Assembly. (Dia. 14)
Refer to below diagrams for additional details and precautions.

Thread Starter
The Former PSNTLSS
iTrader: (3)
Joined: Jun 2007
Posts: 1,094
Likes: 0
From: South Plainfield, NJ/ Center Valley, PA
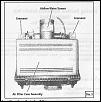
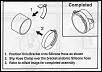
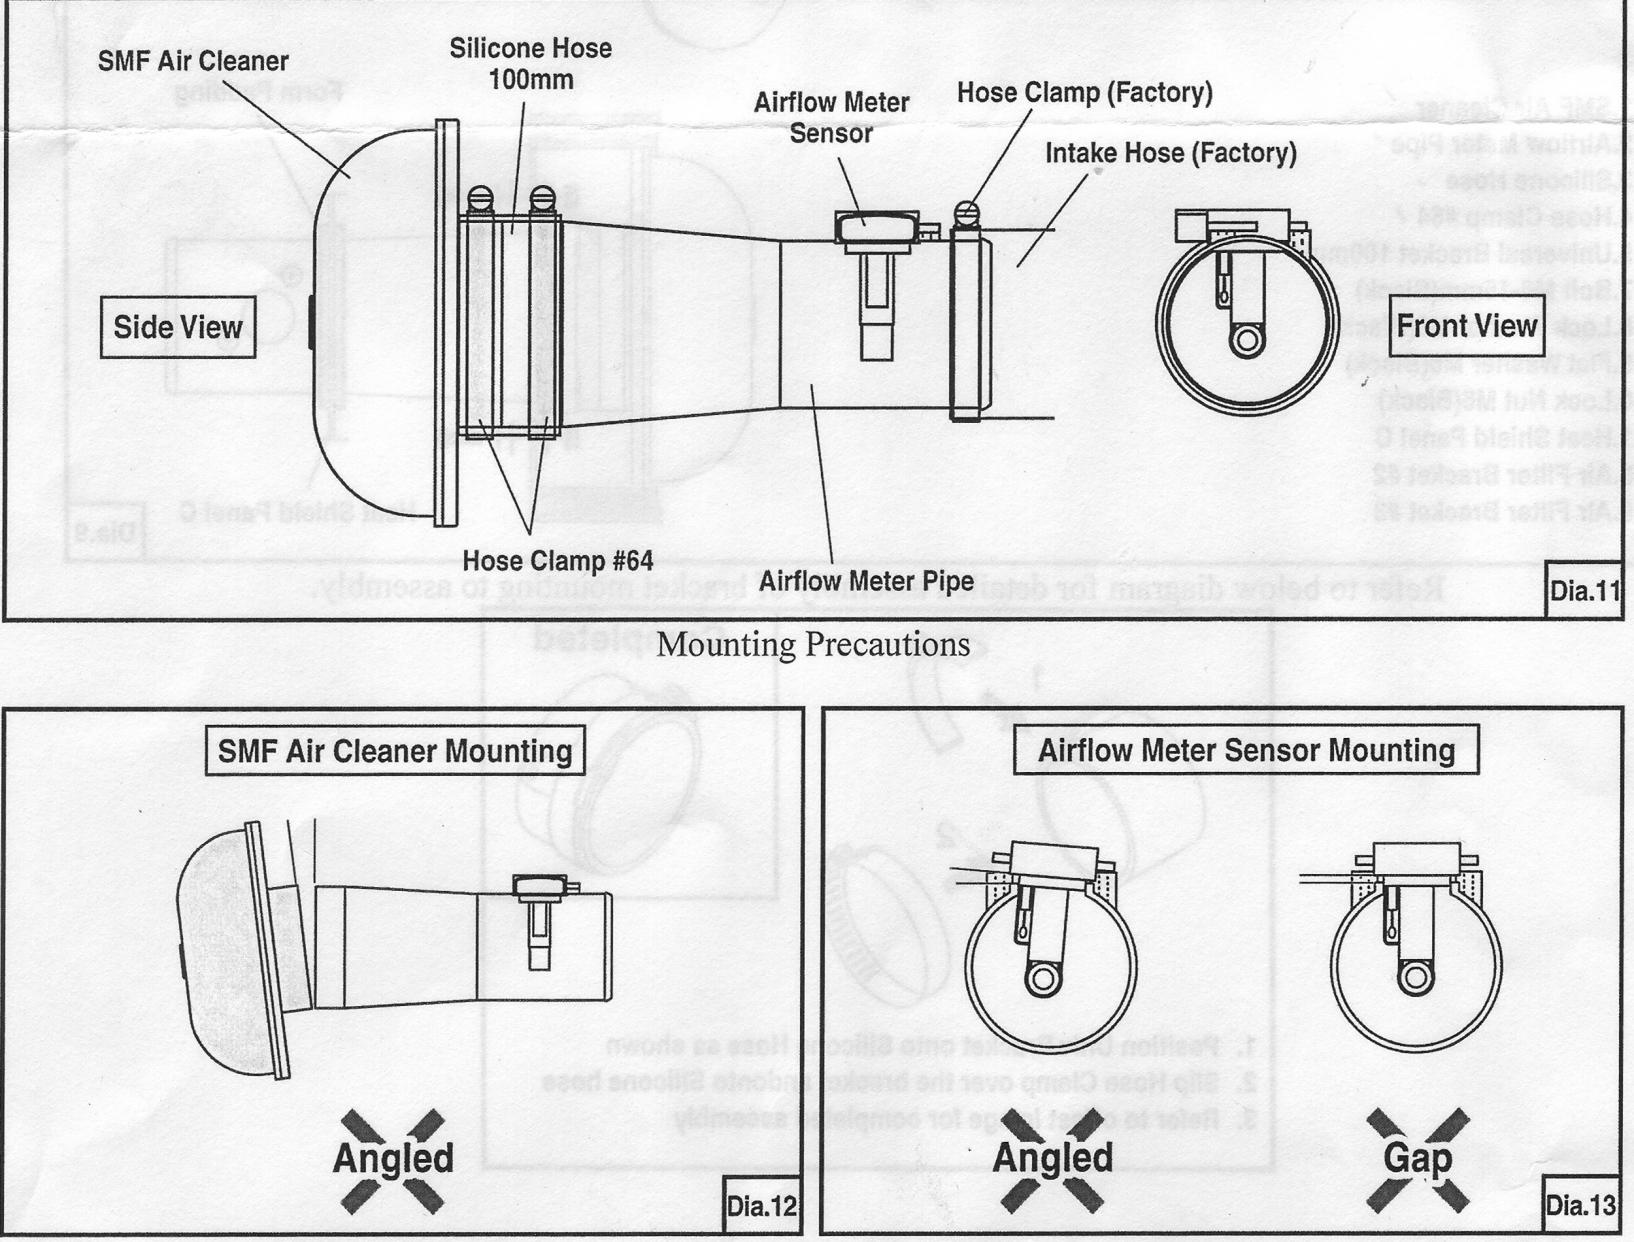
3) Using the supplied Screws (Part #30) and the factory gasket, mount Airflow Meter Sensor into Airflow Meter Pipe and plug in Electrical Harness to Airflow Meter Sensor. Note: previous diagram for mounting precautions of the Airflow Meter Sensor.

4) Attachh and secure 4mm. Rubber Caps to the vacuum port and white check valve from the earlier steps. (Dia. 14)
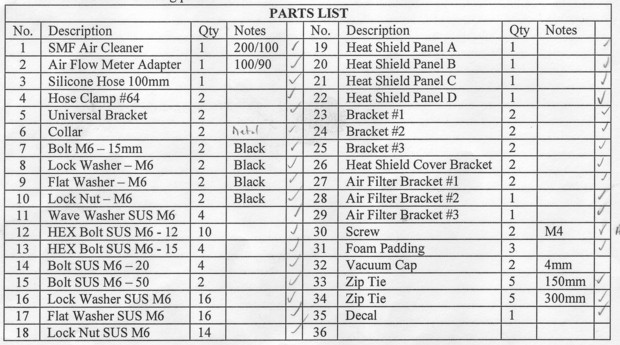
5) Recheck to assure that all bolts, hoses, hose clamps and brackets are secure. 6) Mount Heat Shield D to enclose the Racing Suction Intake Assembly (Dia. 15). Make sure the bolts are aligned
properly. Note: It is recommended to apply a small amount of grease to the bolt before threading.
7) Reconnect negative terminal to the battery. (Reset radio, clock, etc.)
8) Re-Install factory Engine Cover and Battery Cover
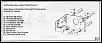
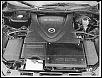
9) Completed assembly should look as image below.
10) Start engine and warm up to normal operating temperature, rev engine a few times to check that there is no contact from surrounding parts.
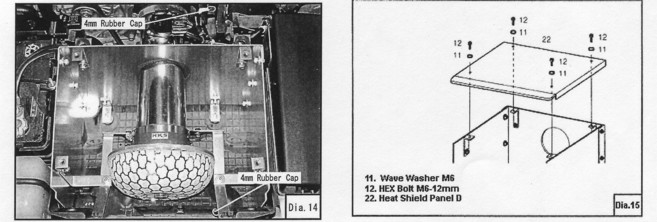
4) Attachh and secure 4mm. Rubber Caps to the vacuum port and white check valve from the earlier steps. (Dia. 14)
5) Recheck to assure that all bolts, hoses, hose clamps and brackets are secure. 6) Mount Heat Shield D to enclose the Racing Suction Intake Assembly (Dia. 15). Make sure the bolts are aligned
properly. Note: It is recommended to apply a small amount of grease to the bolt before threading.
7) Reconnect negative terminal to the battery. (Reset radio, clock, etc.)
8) Re-Install factory Engine Cover and Battery Cover
9) Completed assembly should look as image below.

10) Start engine and warm up to normal operating temperature, rev engine a few times to check that there is no contact from surrounding parts.


Registered User
Joined: Jun 2008
Posts: 5
Likes: 0
I was looking at buying a used one also found a great deal but im reading they are for manual apps only is this correct.I was looking forward to putting one on my slow a$$ automatic, yes it will still b slow but i want it.Is it possible to use this intake on a at?


IT works on Automatic too, its just that you dont have to cap the VFAD vacuum tube. everything else is the same.
Nope, keep the undertray, you need it for install.

Thread
Thread Starter
Forum
Replies
Last Post
jay_tibo
Series I Aftermarket Performance Modifications
22
Sep 13, 2016 08:10 PM
RenzoRx-8
RX-8 Parts For Sale/Wanted
1
Aug 25, 2015 10:29 PM
N0P1st0ns
Series I Aftermarket Performance Modifications
4
Jul 30, 2015 09:45 AM