
DIY: Filling the RX-8 engine (motor) mounts with urethane


If you did it the way I explained then it doesn't really seem possible to me to trap any large air pockets. That's what the drilled holes are for. Maybe 60A is too soft. It could allow too much movement which could then possibly unbond or tear internally.
I can offer to do the next set for you. Just let me know.
I can offer to do the next set for you. Just let me know.


I've had three poly filled mounts fail. All were well used before filling but appeared to be in good condition. I now have a Mazdaspeed mount on the passenger side, which feels similar to a poly mount from the driver's seat. Disclaimer: I also have delrin diff mounts. YMMV, etc
Last edited by BRODA; Nov 27, 2012 at 10:05 AM.

Broda, did only your right side mounts fail? I am asking because the right side is the most prone for failure due to obvious heat, but also it goes through plenty of elongation and torsional shear stress (much more than the left side).
My mounts look fine in exterior appearance. Though I suspect that just filling mounts with urethane can lead to separation of adhesion between the urethane and the rubber hat of the mount, that is if the entire hat doesn't tear off entirely. Once there is no adhesive, it obviously allows extensive play, especially so if there are air pockets in the mount. This applies for the right mount. The left mount mostly goes through compressive stress.
As said before, using 60A may be too soft as well. I did cleanse and dry the innards of the mount properly prior to filling them with urethane.
Taking consideration of all this. I am going to attempt bse50's suggestion of drilling and embedding nuts and washers inside the mount and filling it with urethane. Then of course using a longer bolt. This distributes the stress throughout the mount.
Yes, all three failures were on the passenger side.
Your situation is a bit tough to figure out. I'd say that most likely the engine mounts are fine if the rubber hats look good. The poly inside the mount won't likely fail, and like Team mentioned, air bubbles seem unlikely. I'd re-torque all the bolts and check your diff mount bushings. If your diff bushings failed, they would add some slop to the drivetrain. Unfortunately, they are not easy to inspect.
Your situation is a bit tough to figure out. I'd say that most likely the engine mounts are fine if the rubber hats look good. The poly inside the mount won't likely fail, and like Team mentioned, air bubbles seem unlikely. I'd re-torque all the bolts and check your diff mount bushings. If your diff bushings failed, they would add some slop to the drivetrain. Unfortunately, they are not easy to inspect.
The heat isn't the only issue with the passenger mount. It is the fact that it is prone to more damaging stress than the driver side even though both are practically designed with the same strength.
It could only help. Maybe early/late next spring I can have my brother give me a hand who has access to a laser cutter. I'm thinking of something that would utilize the OEM bolt hole mounting locations.
A heat shield for the passenger side motor mount I feel would be very crucial for turbo'd applications too.
If I were to eventually go that route I'd get everything ceramic coated though too. I ceramic coated the header and midpipe for the underseat exhaust on my 600RR and it helped drastically with reducing radiant heat to my leg and the seat(s)!

Zoom Frickin Zoom
Joined: May 2010
Posts: 408
Likes: 0
From: Jacksonville, Fl
I've had three poly filled mounts fail. All were well used before filling but appeared to be in good condition. I now have a Mazdaspeed mount on the passenger side, which feels similar to a poly mount from the driver's seat. Disclaimer: I also have delrin diff mounts. YMMV, etc
Right. In the top of the mount the oil really likes to sit in those little pockets. Perhaps it makes poor adhesion there if not cleaned thoroughly. Also it says to scuff the application before applying it. Hmm

I think what happens is the mount gets tightened to the bracket before the weight of the motor holds it still, this causes the top of the mount to twist as you tighten the bolt  . also a good reason to embed the nuts internally if urethane thus extending the depth of the mounting bolt.
. also a good reason to embed the nuts internally if urethane thus extending the depth of the mounting bolt.
This has always been the main failure mode on the OE mounts, but until now I hadn't seen any filled mounts fail this way.
I was warned not to use solid mounts because the stress would cause the aluminum engine mount brackets to break. It might be the solid diff mounts you are using.
I was warned not to use solid mounts because the stress would cause the aluminum engine mount brackets to break. It might be the solid diff mounts you are using.
I think what happens is the mount gets tightened to the bracket before the weight of the motor holds it still, this causes the top of the mount to twist as you tighten the bolt . also a good reason to embed the nuts internally if urethane thus extending the depth of the mounting bolt.
. also a good reason to embed the nuts internally if urethane thus extending the depth of the mounting bolt. This has always been the main failure mode on the OE mounts, but until now I hadn't seen any filled mounts fail this way.
I was warned not to use solid mounts because the stress would cause the aluminum engine mount brackets to break. It might be the solid diff mounts you are using.
I was warned not to use solid mounts because the stress would cause the aluminum engine mount brackets to break. It might be the solid diff mounts you are using.
EDIT: Added quoted text for clarity
Last edited by BRODA; Nov 30, 2012 at 12:16 PM.
huh? the top of the mount has 4 pegs on it to prevent it from turning when tightening the bolts. Why would you tighten the bolt without the engines weight on the mount anyway ... sure maybe at first to align the bolt but if you are torquing it down, it should be with the engine's full weight on the mount.

I plan on doing this same mod in the next few days, however I don't seem to have a good passenger side mount to start with but I have 2 good drivers side,
are there any differences between the LH and RH mounts besides the diameter of the bolt holes?
according to this thread it is only the holes
https://www.rx8club.com/tech-garage-...mounts-239435/
I'll leave this here in case someone else runs into the same issue when finding used mounts
are there any differences between the LH and RH mounts besides the diameter of the bolt holes?
according to this thread it is only the holes
https://www.rx8club.com/tech-garage-...mounts-239435/
I'll leave this here in case someone else runs into the same issue when finding used mounts
Last edited by FazdaRX_8; Mar 7, 2013 at 10:25 PM.
So our oem engine mounts are floating mounts. The internal media is an oil whose main purpose is not only to reduce NVH, but essentially to suspend the engine from the chasis. This allows the engine to freely twist and vibrate along its virtual axis that sees the most vibrations.
Now when you harden the mounts, this causes the vibrating frequencies to find the path of least resistance, therefore they start to move towards the top of the engine. This generates the same resonance as grabbing the lower half of a ruler and shaking... the top goes bananas. Shake hard enough and you may break the ruler .. but where the break occurs is exactly where the mounting arms are on our engine relative to the mount (the break occurs just slightly above your grip).
Now on a perfectly healthy install, this isn't going to cause any immediate issues, but on worn components there is surely some stresses that could cause an increase in cracking and fracturing.
An 'easy' fix here (which may not work for you Team since I know you are bound by classing rules) is to create a solid mount near the top of the engine. This brings that virtual axis back down where it needs to be. The easiest way to do this is to throw on one of those Ingalls Torque Dampers.
Hope that makes some sense.

Registered
Joined: Apr 2006
Posts: 674
Likes: 0
From: Cali
Hay guys I was dong some thinking on this.. I just completed this mod but I had some down time because when i took my OE mounts out the Top Screw in part was broken (rubber failed) I was thinking about the Top rubber part and how it fails AS I was doing this mod.. I ordered a new mount and practice doing everything else with the failed mount... But I began to notice something... When we fill the rest of the mount with 60A or 80A poly urethane The Old rubber that sits on top of the mount is Still kinda soft compared to the urethane.. I think with the added stresses of having harder mounts that rubber will fail sooner or later... I began to think there needs to be some way to support that softer rubber more with the rest of the mount or eventually end up like BRODA's mounts.. ...
My solution.. Running a Bolt and washer through the mount to the head screw THEN filling it...
What needs to be done is drill a hole through the end of the threaded part of the mount at top then through the rubber then having the bolt long enough at the end to rest on that brown part with a washer.. This will give it more of a "spine" to prevent over movement by the softer rubber... I have added pictures so you can get a look at what i am thinking... Im going to save this extra mount I have so if my right one fails I will throw it in and give it a try..
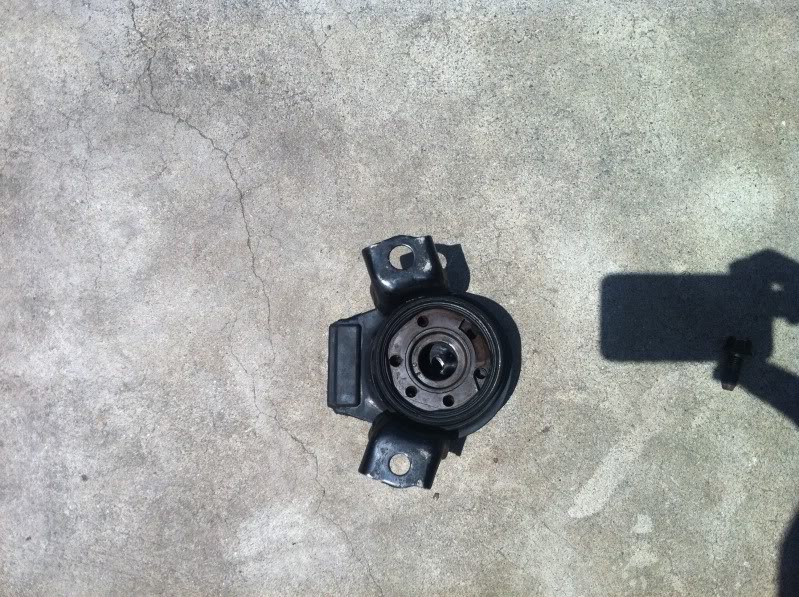
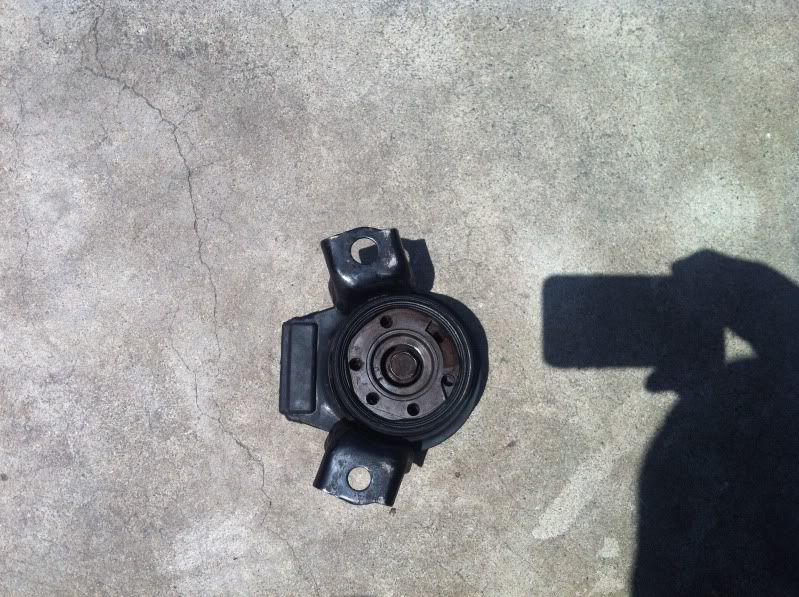
This is what I started With..
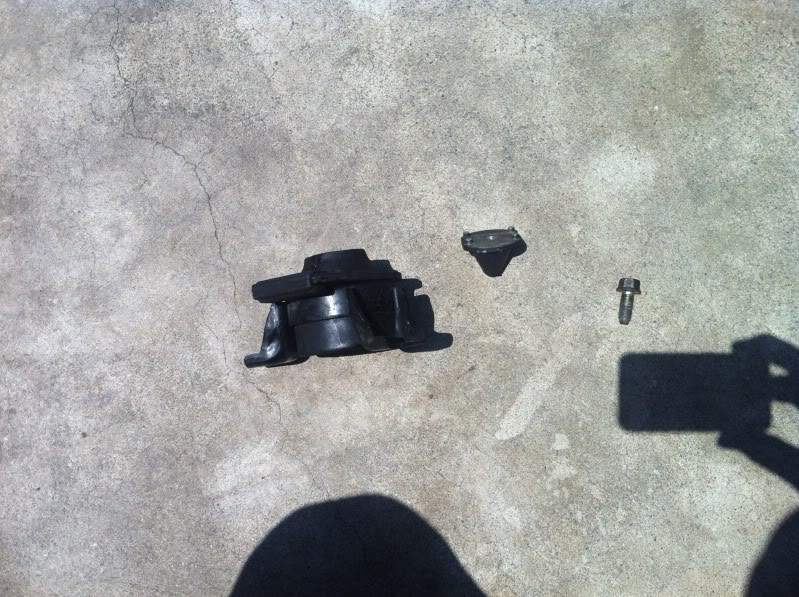
Carefully drill through the hole Fist a small hole then drill through the rubber side with a bit as big as the bolt.. Be sure not to damage too much of the threads...
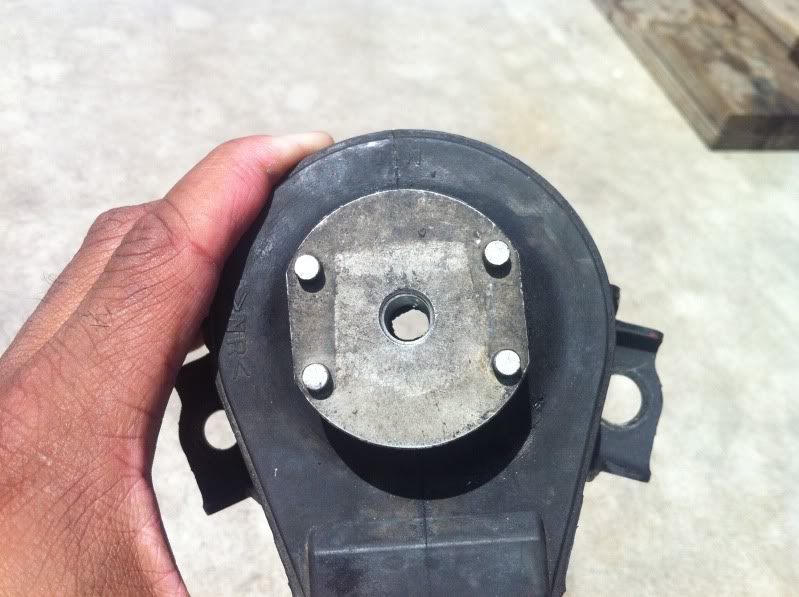
After making sure you can thread a longer bolt... thread it about half way up the treaded part Fill it with urethane and try it... Imagine if you will the washer resting on the brown part as the bolt goes through.. This will more connect the soft rubber at top to the urethane filled cavity.
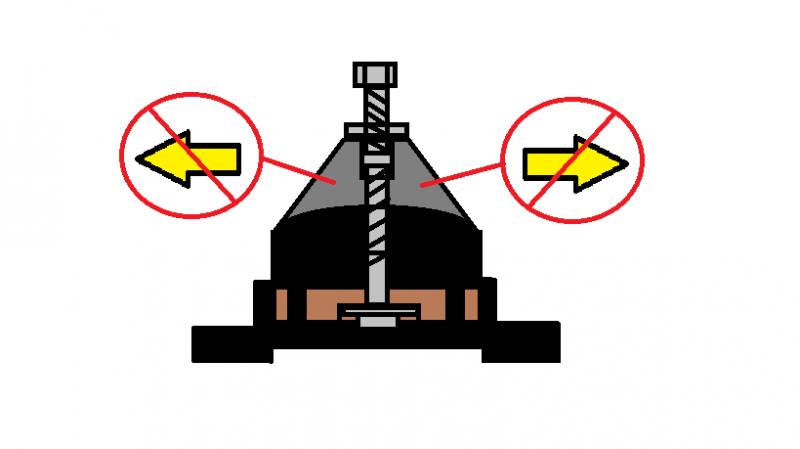
My solution.. Running a Bolt and washer through the mount to the head screw THEN filling it...
What needs to be done is drill a hole through the end of the threaded part of the mount at top then through the rubber then having the bolt long enough at the end to rest on that brown part with a washer.. This will give it more of a "spine" to prevent over movement by the softer rubber... I have added pictures so you can get a look at what i am thinking... Im going to save this extra mount I have so if my right one fails I will throw it in and give it a try..
This is what I started With..
Carefully drill through the hole Fist a small hole then drill through the rubber side with a bit as big as the bolt.. Be sure not to damage too much of the threads...


After making sure you can thread a longer bolt... thread it about half way up the treaded part Fill it with urethane and try it... Imagine if you will the washer resting on the brown part as the bolt goes through.. This will more connect the soft rubber at top to the urethane filled cavity.


Last edited by WreakLoosE; Apr 28, 2013 at 03:18 PM.
Registered
Joined: Apr 2006
Posts: 674
Likes: 0
From: Cali
^ Yep I see that now.. I plan on completing this soon.. gotta buy more urethane.. FYI.. everybody.. when you purchase the poly urethane if you use the full hardener in the can of urethane you will have a LOT left over... this was probably mentioned too i missed it.. But DAM.. all that urethane gone to waste..
I plan on completing this soon.. gotta buy more urethane.. FYI.. everybody.. when you purchase the poly urethane if you use the full hardener in the can of urethane you will have a LOT left over... this was probably mentioned too i missed it.. But DAM.. all that urethane gone to waste..