Racing Beat Gauge Pod Update
 08-22-2007, 10:39 AM
#326

i have a few drips of oil coming from my car, and I see oil on the top of the engine just under the blue sandwich plate. So I think I have the same as you. All the threads have tape to seal them, the exception is for the oil filter and the blue plate.
 08-22-2007, 11:16 AM
#327
He's as bad as Can

The o-ring under the RB plate did require some attention when installing. It easily came out of the grove as I was handling it. It was also somewhat thin, could it have degraded??
08-22-2007, 01:10 PM
#328
Registered

Can't really have degraded as it's only been there for 2 months (i know it's cold and wet here but.......)
The mechanic who pointed out to me today also remarked that the seal seemed very thin.
Maybe a bigger seal is required.?????
I've emailed racing beat direct about it, we'll see what they say.
It's not gushing out, but over time it'll build up and look very bad..........especially on my brand new replaced engine (another story)
Ah well, at least I'm not alone
08-22-2007, 02:41 PM
#329
Registered
Racing Beat have emailed back
""We have confirmed that the bottom surface of the oil filter adaptor fitting is indeed "flat" and meets specifications, but the problem may be with the installation.
There is an oil ring that fits into a groove on the underside of the adaptor. If this O-ring becomes unseated while the adaptor is being lowered into place, or during the installation process, it is possible to tighten the retaining stud with such force that it "bends" the aluminum adaptor fitting.
It also possible that the O-ring is simply out of place and can be re-positioned. We have since revised the installation instructions slightly to read as follows:
"2. Coat the O-ring with a medium-body grease and position the O-ring in the recess in the underside of the adapter. (This will allow the O-ring to remain in the recess during the final installation process.) All possible fittings should already be installed in the adapter.
3. Position the adapter over the threads which the oil filter screws onto.
Verify that the O-ring has remained in place!"
So they basically think it's installation error. However both the fitting garage and a main dealer have fitted it and it's leaky both times.
3rd time lucky, I guess
Also now that I have a new engine, the oil temp is taking forever to move off the bottom reading (30 minutes plus)in fact I thought it had been broken, but I've now detected some movement.
It previously mirrored the water temp give or take a couple of minutes/peaks.
Normal?
I suppose it only starts to move at 60'C+ (140'F) but it used to move within 7-8 minutes of start off.
Confused
08-22-2007, 02:56 PM
#330
I thought mine was broken, I was actually on the phone with them about it not working. The first few times it took 20+ minutes to start moving. After that they started to move normally. Oil first, then coolant.
 08-25-2007, 01:08 AM
#332

My whole problem was fitting. I bought the one without the gauges and it really sucked. I had to reshape the whole thing so that the side of my gauges didnt show. For me it was totally a waste of money becouse I prettymuch redid the whole thing.

08-25-2007, 07:35 AM
#333
Registered

Yikes!... yea, I'd agree with you. That was a waste of time. Can't believe you went to all that trouble. There is a gap on either side of mine that let light through and it looked pretty bad at night. I just took mine out and shaped a black paper to fit in and taped it to either side. When I slid it into place it works fine and no one ever sees the gap problem now.
Damn your shifter **** is warn more that any I've ever seen. You must have abrasive hands.
Damn your shifter **** is warn more that any I've ever seen. You must have abrasive hands.
08-25-2007, 07:47 AM
#334
Pettit fangurl <3
Join Date: Mar 2005
Location: Aston, PA
Posts: 5,386
Likes: 0
Received 0 Likes
on
0 Posts
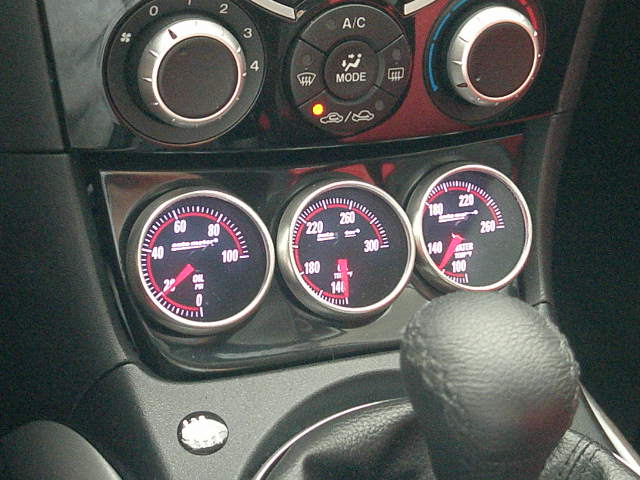
all the gauge pods are the same....you will always see a tad bit of the sides of the gauges...but thats ONLY if you look at it from the side..ie when the gauges are mounted in the pod before you actually install it in the car...
I was slightly worried about that...read that some people put black tape or marker around the sides of the gauges...but when i installed them it was a non issue...
im running the autometer cobalt series gauges with a water temp, A/F wideband and boost/vac...

I was slightly worried about that...read that some people put black tape or marker around the sides of the gauges...but when i installed them it was a non issue...
im running the autometer cobalt series gauges with a water temp, A/F wideband and boost/vac...
08-25-2007, 08:29 AM
#337
Yea they look great..... From the front.
I like my things neet specially when you pay $100 for a piece of fiberglass that probably cost them 25 c ents tu build. The least they can do is make sure everything is fine. If you see the original pic from racing beat on the left side PHOTOSHOP... checkl in Shinka213 looks Hot specially with the cobalts but What about from the sides??? . Becouse I could have gotten an extreme case of Crap in mine (who knows) and thats why I'm a little pissed with RB. And Shinka yours DO look HOT
I like my things neet specially when you pay $100 for a piece of fiberglass that probably cost them 25 c ents tu build. The least they can do is make sure everything is fine. If you see the original pic from racing beat on the left side PHOTOSHOP... checkl in Shinka213 looks Hot specially with the cobalts but What about from the sides??? . Becouse I could have gotten an extreme case of Crap in mine (who knows) and thats why I'm a little pissed with RB. And Shinka yours DO look HOT
 08-27-2007, 03:14 AM
#339
Registered
 08-27-2007, 12:15 PM
#341
Administrator
iTrader: (7)

I'm thinking about getting this pod. Now the every lasting question of which guages....
Those Cobalts look sexy Shinks! You got a night time pic?
Those Cobalts look sexy Shinks! You got a night time pic?
08-27-2007, 01:03 PM
#342
Thanks shinka. If yours is opk from the side Im going to be happy for you and PISSED for me. Mines showed like 1/2 inch of the back of the gauge. But thank you for taking the time to take the pics
08-27-2007, 03:57 PM
#343
Pettit fangurl <3
Join Date: Mar 2005
Location: Aston, PA
Posts: 5,386
Likes: 0
Received 0 Likes
on
0 Posts
08-27-2007, 04:13 PM
#344
Pettit fangurl <3
Join Date: Mar 2005
Location: Aston, PA
Posts: 5,386
Likes: 0
Received 0 Likes
on
0 Posts
autometer cobalt series at nite
hey Jedi..
this is the best pic i have so far...without a tripod...
i just bought a tripod the other day to get some night shots...
prolly i'll post some up this weekend..

this is the best pic i have so far...without a tripod...
i just bought a tripod the other day to get some night shots...
prolly i'll post some up this weekend..
 08-27-2007, 04:39 PM
#346
Administrator
iTrader: (7)
shinks: those look pretty bright! How are they driving at night?
 08-27-2007, 06:05 PM
#348
Pettit fangurl <3
Join Date: Mar 2005
Location: Aston, PA
Posts: 5,386
Likes: 0
Received 0 Likes
on
0 Posts
Hey Jedi:
pic doesnt really do them justice...the camera is using a really slow shutter speed
to make up for the lack of light...consequently they look really bright....
to me, the lightning is just right...not too bright not too dark..
pic doesnt really do them justice...the camera is using a really slow shutter speed
to make up for the lack of light...consequently they look really bright....
to me, the lightning is just right...not too bright not too dark..
08-27-2007, 06:07 PM
#349
Pettit fangurl <3
Join Date: Mar 2005
Location: Aston, PA
Posts: 5,386
Likes: 0
Received 0 Likes
on
0 Posts
that area worked well for me logistically for the install of the boost and water temp
sensors...
08-30-2007, 04:21 PM
#350
Registered User

Join Date: Mar 2003
Location: Raleigh/Durham, North Carolina
Posts: 4
Likes: 0
Received 0 Likes
on
0 Posts
Just got everything back from Autometer. The guage, sensor module, and remote all tested out okay. They sent me new wiring harness and antother sender. After swapping out the wiring harness between the sender and sensor module, it works. It kind of wierd as I ohmed out all the wires and everything checked out okay. But here's some pics.
Any night shots of these?
Last edited by iam1ru12; 08-30-2007 at 04:24 PM. Reason: added pics