FD and 8 Battle. (illustrator)


Thread Starter
space reserved for shirt
Joined: Aug 2007
Posts: 668
Likes: 1
From: Pasadena,ca for school SD for home
FD and 8 Battle. (illustrator)
well today we had a project (my major is Visual Communications)
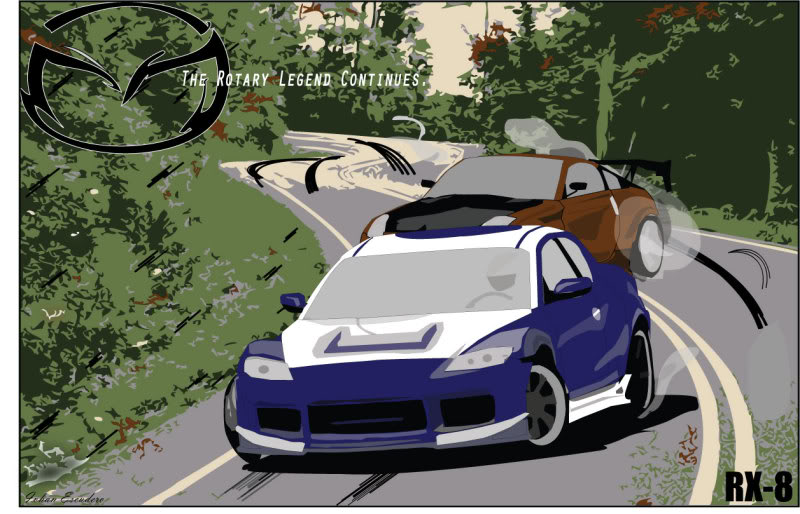
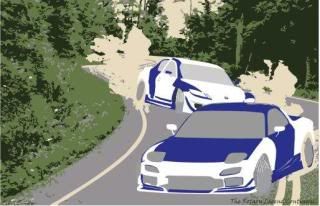
Final PROJECT FINISHED.
Mazda Rx-8 full spread AD
BEFORE IDEA's


FINAL WORK.
Changes: Scrapp'd both cars changed alot of the background and added alot more effects.
Both cars we made with the pen and pencil tool.
changed fd to 350z. just because , made the 350z into a cool poop color because i have a sense of humor.
I took alot of the feedback from the forum and did my best to use it.


Final PROJECT FINISHED.
Mazda Rx-8 full spread AD
BEFORE IDEA's
FINAL WORK.
Changes: Scrapp'd both cars changed alot of the background and added alot more effects.
Both cars we made with the pen and pencil tool.
changed fd to 350z. just because , made the 350z into a cool poop color because i have a sense of humor.
I took alot of the feedback from the forum and did my best to use it.
Last edited by ShinkaTeen; Dec 18, 2008 at 12:52 AM.


This is awesome, given the handicaps, you're doing a great job. I just think there should be a better sense of speed, the 8 def looks like it moving but the 7 not so much so. If you incorporate the FC in the back, just coming into frame, it wouldn't be a focal point imho. Once again great job.
Thread Starter
space reserved for shirt
Joined: Aug 2007
Posts: 668
Likes: 1
From: Pasadena,ca for school SD for home
Yeah , im going to try to get a better sense of speed like you said, but your right the fd does look very stationary.
im probably gonna end up trying to mimic some animes with alot of speed and racing
Cough* initial d Cough*.
i also was wondering if the FC should go in the back but it would just look to cluttered then.
im probably gonna end up trying to mimic some animes with alot of speed and racing
Cough* initial d Cough*.
i also was wondering if the FC should go in the back but it would just look to cluttered then.

nice dude. im a graphic design major, soon to be Communications Design (graphic design, illustration, advertising). looks pretty good so far. are you just pen-tooling all of this by eye or are you "tracing?" is the background image made with photoshop? personally, i would leave out the FC. feels alot more focused with just the 2. cant wait to see it finished. i wish i got cool projects. im going to a terrible school right now.

i would turn the wheels of the fd in the other direction, you gave the 8 good motion by using the tire tread blur(?) which you cant do with the FD bc the wheels are turned in the other direction, kinda makes it look like the fd is parked for a photo rather than drifting


Thread Starter
space reserved for shirt
Joined: Aug 2007
Posts: 668
Likes: 1
From: Pasadena,ca for school SD for home
hmmmm, ill have to play with the wheel, but i do think its suppose to be going in the direction i put it in, because the driver would just be starting to put the rear out and diving into the corner, but like i said i have to play.
more depth is a great idea, due to my time constraints i did cut some corners, but i will get on that tomorrow.
Like i said EVERYTHING was done in adobe ILLUSTRATOR the cars were traced with a pen tool (which was kinda difficult due to all the cars were in mid drift with ALOT of smoke covering alot of the line). the background was LIVE TRACED with 4 colors.
the school im going to is WeSTwood college of technology and design in Anaheim,CA

Thread Starter
space reserved for shirt
Joined: Aug 2007
Posts: 668
Likes: 1
From: Pasadena,ca for school SD for home
o i had forgotten to answer the tool i used on the 8 wheel.
we are not allowed to play with opacity, so the blur tool was unusable .
so instead i drew up 2 layers of shade with the pencil tool.
we are not allowed to play with opacity, so the blur tool was unusable .
so instead i drew up 2 layers of shade with the pencil tool.


Thread Starter
space reserved for shirt
Joined: Aug 2007
Posts: 668
Likes: 1
From: Pasadena,ca for school SD for home
Update on what i did today got an extended time to work on it so i played with a little line shading. i hate how it looks incomplete.
::imaged moved to the top::
::imaged moved to the top::
Last edited by ShinkaTeen; Dec 17, 2008 at 09:29 PM.
I like your approach, but if I may suggest the sense of speed comes not from the cars themselves but from their surroundings, if you apply this same line shading to the background instead of the cars you will get the desired effect.
The front of the picture should have the most amount of blur and slowly decrease this blur until the back of the pic is static, also the front wheel of the FD should be blurred, and I think you can achieve this blur effect with proper use of your line shading.
The front of the picture should have the most amount of blur and slowly decrease this blur until the back of the pic is static, also the front wheel of the FD should be blurred, and I think you can achieve this blur effect with proper use of your line shading.