Big Willy! Puddle Lights


 01-13-2010, 11:07 AM
#54

I'm trying to find a vendor within today or tomorrow to order LEDs. Currently out of red and white. Blue I have plenty of. Amber, I keep a low supply as not many people order amber puddle lights.
I'll update you today if I can secure a LED vendor.
I'll update you today if I can secure a LED vendor.


 01-15-2010, 11:39 AM
#61
Updated list.
Payment received:
1. PTDragon - red
2. Chad D. - red
3. rowlettrx8er - white
4. Raidboss - blue/white
5. goose guy - blue
6. jskirx8 - blue/white
7. discomonkey - red
8. ShellDude - blue
9. elf - white
10. spence15 - red
------------------------------------
Shipped:
1. JinDesu - white
2. AlexB - white
4. Douglas D - amber
5. Darkpoison187 - blue/white
6. Brandon M. - blue
7. Erik H. / Peter S - white
8. batangisip89 - white
9. Rotr8 - white
10. jbritt - blue
 01-17-2010, 11:07 AM
#69
went back to srsly broke
iTrader: (2)

Join Date: Mar 2009
Location: Flushing, NY
Posts: 2,040
Likes: 0
Received 0 Likes
on
0 Posts
Got mine installed! And then my camera died, so no pics yet.
Just want to point out a few things:
1) Step 8 - Disconnecting the speaker. I couldn't get mine disconnected (both sides). Instead, I realize you can just put it on top of the door frame hanging. The magnet in the speaker would prevent too much stress on the wire.
2) Step 14 - Disconnecting connectors to the window controls etc - The driver side was impossible for me to pull off. You can unscrew the 3 screws that hold the window controls + door lock button assembly. It'll fit through the big hole left by the panel.
3) Step 16 - One or two clips are bound to break. I'll attribute it to the fact that the clips on my doors are old (06). Most of them remain, and the door panel will hold with the remainder. In fact, it'll help taking off the door panel next time.
4) Step 36 - In installing the wire connectors, I found out two things. First, I'm used to splicing wires by cutting them and soldering them together. I did not notice your connectors at first, so I cut one of mine. If anyone else did that too, don't be worried. You can easily strip the ends and tie into the wire connectors provided.
Also, I would HIGHLY suggest using a knife or some tool to remove some of the insulation so the metal piece in the connector can actually make contact. Shaz, can you clarify if this is a good or bad idea? I realize the connector was unable to penetrate the insulation on both the stock wire and the wires you provided. Since the wires are practically sealed in the connector (via pressure), I wouldn't worry about corrosion.
That's about all I figured would be helpful as additional information. Oh, one more piece of advice: Double check every step before you continue. I actually routed the wires in my driver side in the mirror through the slot where the mirror cover clips into, and found that out AFTER I reassembled everything. Thankfully, the clip still fits and holds the mirror in.
01-17-2010, 11:56 AM
#70
Also, I would HIGHLY suggest using a knife or some tool to remove some of the insulation so the metal piece in the connector can actually make contact. Shaz, can you clarify if this is a good or bad idea? I realize the connector was unable to penetrate the insulation on both the stock wire and the wires you provided. Since the wires are practically sealed in the connector (via pressure), I wouldn't worry about corrosion.
01-17-2010, 02:05 PM
#73
 01-19-2010, 11:50 AM
#74
The Black Pearl
iTrader: (2)
Join Date: Jan 2009
Location: Houston, Texas
Posts: 212
Likes: 0
Received 0 Likes
on
0 Posts
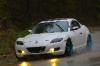
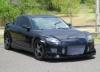
Here is a quick pic of what they look like on a BB with blue interiors and blue puddles at night... super long description and set up huh!?!?
Ignore my sig below as I thought it would be cool to screw with the colors and whatnot. can't really see the detail in the sig , but the first pic looks pretty good.

Ignore my sig below as I thought it would be cool to screw with the colors and whatnot. can't really see the detail in the sig , but the first pic looks pretty good.
01-19-2010, 12:36 PM
#75
I'm just waiting on my small batch of LED lights order to arrive. It should be sometime this week. As soon as I get those, I'll ship out your puddle lights and let you know.
I ordered some different LEDs too so I can compare with the current light output. I'll let you guys know what I find when they arrive.
I ordered some different LEDs too so I can compare with the current light output. I'll let you guys know what I find when they arrive.

