
DIY: Deflooding ,For the average Joe the plumber.


Thread Starter
Registered
Joined: Apr 2006
Posts: 5,027
Likes: 0
From: Austin, Texas
DIY: Deflooding ,For the average Joe the plumber.
well while i was out of town, i asked a friend to watch my car for me. even though i warned not turn off the car while the engine is cold, they proceded to do so. they ended up doing the owners manual for an hour. so my spark plugs where drenched. you would think they shoud just gaven up. but oh well, problem is resolved.
now i havent flooded a car ever since i was 17 yrs old ( i am 33 now) back in okinawa. now i can tell you, it was the most crappiest day of my life. all my friends back home are huge nissan fanboys, and me the only person driving a FC . so i had to hear, you should of gotten a silvia or a 180sx during that time period 92-97. but i can tell you, once you flood your car, you seem to learn alot from that experience.
well today i decided to post my own DIY to deflood. in fact is so easy. i also used this time to clean out carbon build up with seafoam, but you can skip that process all together. but if you want to , NYCPS has a good DIY for that which you can find here. https://www.rx8club.com/series-i-do-yourself-forum-73/diy-mazda-zoom-power-engine-cleaner-engine-cleaning-seaform-142852/
step one- go to your fuse box take the cover off. flip the cover over and look for FUel Pump fuse which should be 20A ( i have a 04) . but i hear its also 22 which i dont have.
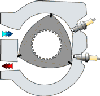
step 2. go to Air pump and disconnect it. (which you find the picture down below) it would be to the left of the Bright yellow oil cap .
step 3. now i put in a new set of spark plugs, becuase it was my time to tune up any ways. but if you want to a easy DIY for that you can find that here https://www.rx8club.com/series-i-do-yourself-forum-73/diy-spark-plug-change-31872/ . but you want to skip all that,
then i should continue. get anothe car (unless you hve a battery charger) so you can do a jump. reason is, there is going to be alot of cranks , which will eat up your battery (also reason why i disconnected the air pump, it tends to use more power). after your 2 cars are set up for jump. start car 2 and let it run while you do the crank process. we will move to step 4.
step 4. you will need to crank your car for 4-5 secs , then turn back off for about 6 seconds (to save your starter) . you repeat this process for 50 -60secs.
step 5, get out your car start doing jumpings jacks for a minute or so
step 6- REPEAT STEP 4
step 7. put back in your fuel pump fuse, and crank the car. it should start wanting to turn on. if the car turns on let it warm up to correct temp. in my case since i did seafoam, i had to press the gas a bit to save it from turning off.
If your car almost starts, but after a few cranks it feels like its not wanting to start. go back to step 4 and work your way down the steps, till your car starts. then reconnect your airpump
now i am not a mechanic, but i do tinker a bit, especially when i was growin up back home. but the reason why i decided to post my own thread is, the DIY that i seen, never really told you how long you should try to crank your car, or you need so and such tool or item for the process, that you may not have while out in about. so i can see a person feeling like they are beating a dead horse, if they dont see progress etc.
only item you really need is car 2 and jumper cables, and that is pretty much it.
now i am not saying my DIY works 100%, but its the process that i learned back when i was in okinawa japan.
any ways, i hope this thread helps you in the future.
now i havent flooded a car ever since i was 17 yrs old ( i am 33 now) back in okinawa. now i can tell you, it was the most crappiest day of my life. all my friends back home are huge nissan fanboys, and me the only person driving a FC . so i had to hear, you should of gotten a silvia or a 180sx during that time period 92-97. but i can tell you, once you flood your car, you seem to learn alot from that experience.
well today i decided to post my own DIY to deflood. in fact is so easy. i also used this time to clean out carbon build up with seafoam, but you can skip that process all together. but if you want to , NYCPS has a good DIY for that which you can find here. https://www.rx8club.com/series-i-do-yourself-forum-73/diy-mazda-zoom-power-engine-cleaner-engine-cleaning-seaform-142852/
step one- go to your fuse box take the cover off. flip the cover over and look for FUel Pump fuse which should be 20A ( i have a 04) . but i hear its also 22 which i dont have.
step 2. go to Air pump and disconnect it. (which you find the picture down below) it would be to the left of the Bright yellow oil cap .
step 3. now i put in a new set of spark plugs, becuase it was my time to tune up any ways. but if you want to a easy DIY for that you can find that here https://www.rx8club.com/series-i-do-yourself-forum-73/diy-spark-plug-change-31872/ . but you want to skip all that,
then i should continue. get anothe car (unless you hve a battery charger) so you can do a jump. reason is, there is going to be alot of cranks , which will eat up your battery (also reason why i disconnected the air pump, it tends to use more power). after your 2 cars are set up for jump. start car 2 and let it run while you do the crank process. we will move to step 4.
step 4. you will need to crank your car for 4-5 secs , then turn back off for about 6 seconds (to save your starter) . you repeat this process for 50 -60secs.
step 5, get out your car start doing jumpings jacks for a minute or so
step 6- REPEAT STEP 4
step 7. put back in your fuel pump fuse, and crank the car. it should start wanting to turn on. if the car turns on let it warm up to correct temp. in my case since i did seafoam, i had to press the gas a bit to save it from turning off.
If your car almost starts, but after a few cranks it feels like its not wanting to start. go back to step 4 and work your way down the steps, till your car starts. then reconnect your airpump
now i am not a mechanic, but i do tinker a bit, especially when i was growin up back home. but the reason why i decided to post my own thread is, the DIY that i seen, never really told you how long you should try to crank your car, or you need so and such tool or item for the process, that you may not have while out in about. so i can see a person feeling like they are beating a dead horse, if they dont see progress etc.
only item you really need is car 2 and jumper cables, and that is pretty much it.
now i am not saying my DIY works 100%, but its the process that i learned back when i was in okinawa japan.
any ways, i hope this thread helps you in the future.
Last edited by alfy28; Sep 13, 2009 at 11:00 PM.

My brother flooded my car about 3 months ago....instead of removing the Fuel Pump fuse, all he had to do was hold down the gas pedal to the floor.....i didn't think it would work...but it did. All other steps were the same.
Thread Starter
Registered
Joined: Apr 2006
Posts: 5,027
Likes: 0
From: Austin, Texas
i see, glad you pointed that out. that also helps alot. what i done is waited for the oil meter to hit the middle then pumped on the gas. but the way your bro did it, makes it easier.
also like to add, if you got to step 7 and your car started but died.. then you go back to step 4 (cranking the engine with out fuel pump fuse) and you notice your car wants to start up , let it die any ways. continue with the 4-5sec crank pattern.you will notice after awhile the car will give up wanting to start once you get to Step 7, try the method that Rotarykillz posted.
remember even though car starts to show signs of starting (which is a good sign) dont get excited. stay with the pattern listed above, and you will get your car started.
Last edited by alfy28; Sep 14, 2009 at 09:46 AM.


Registered
Joined: Jun 2006
Posts: 52
Likes: 0
From: San Francisco, Ca
I tried searching and i can see the picture of the air pump, just not sure if you're talking about the thing closer to the oil cap (further back in the picture) or closer to the front of the picture? lastly, how do I disconnect it? I'm guessing if it's the round thing closer to the front of the picture to pull out that cable right in front of us? Thanks

Registered
Joined: Oct 2008
Posts: 22
Likes: 0
Had an episode of flooding in my son's '04 this weekend.
The procedures here were very helpful in clearing the car to start.
I added one variation at the end.
After purging the raw fuel as outlined here, I introduced a couple of squirts of starting fluid just before the throttle body.
Worked like a charm.
The procedures here were very helpful in clearing the car to start.
I added one variation at the end.
After purging the raw fuel as outlined here, I introduced a couple of squirts of starting fluid just before the throttle body.
Worked like a charm.

Registered User
Joined: Jan 2008
Posts: 5
Likes: 0
I still had issues after trying the above steps, so just got a tow rope, my mates pick up truck and towed the RX8 around the block in third gear until it started, simple as. I have used this technique twice now with great success 

Registered User
Joined: May 2009
Posts: 1
Likes: 0
Pedal
So, according to the mechanic I asked at the Mazda dealership, pushing the pedal to the floor will actually not inject fuel in the engine before it is cranked, which is why that is useful to flush the oil & fuel flooding out of there (although, disconnecting the fuel pump also does the trick) . I'm not sure what "xun4gvn4everx" was saying above, but floor it & turn it over, then let it sit and air out a few & then fire it up.
Hope the winter weather doesn't get you too much.
Hope the winter weather doesn't get you too much.

Flood the engine last night and didn't finds out till this morning. I had to pull the out all the plugs, clean it really good with WD-40, blow dry it with air then put it back in. It start right up. I've try doing the gas pedal thing but it didn't work. It a little longer process, but it solve the problem. It's just my way hope it help.

Registered
Joined: Aug 2006
Posts: 5,027
Likes: 5
From: Northern Virginia
So, according to the mechanic I asked at the Mazda dealership, pushing the pedal to the floor will actually not inject fuel in the engine before it is cranked,
Ken

Registered User
Joined: Nov 2007
Posts: 280
Likes: 0
From: Naperville, IL
I flooded mine bad last weekend. I was out of town for a week, so just got it started Saturday.
Here's what I did, it worked pretty well
1. remove plugs,dry off gas (I sprayed them with some starter fluid to dry them off). Remove fuel pump fuse
2. follow alfy's steps 4-5 a few times (you will see a nice mist of gas spraying out)
3. thread in a plug (DONT connect) & crank it. Remove the plug to see if you've gotten most of the fuel out
4. Once the fuel seems to be mostly out, put it all back together & start it up. If it was flooded really bad like mine, Id suggest some starter fluid. I had a friend spray some into the intake after the air filter (more or less a constant stream while cranking).
The starter fluid seemed to be what did the trick

Unbalanced & Unmedicated
Joined: Dec 2003
Posts: 262
Likes: 1
From: PACNORWEST
Had always heard about it, frequently read about it, and today after 5+ years of ownership, finally got smacked with it. . . Thanks to the DIY contributors, I was filling the neighborhood with billows of smoke, and she's running again! Thanks again all!

Registered User
Joined: Jun 2009
Posts: 5
Likes: 0
From: S Cali
Much thanks for So Cali
To Alfy28 and ndhoffma,
Thank you for your awesome DIY. I recently was a victim to flooding of my engine. I followed Alfy's guide first and added in ndhoffma's slight variation (starter fluid) and my car started up in a poof of white smoke and now is running as it was before. Thank you so much for this DIY, you saved me big $$$ and not mention a lot of the guess work on how to get to the spark plugs and so forth. So simply put thank you Alfy and Ndhoffma.
Thank you for your awesome DIY. I recently was a victim to flooding of my engine. I followed Alfy's guide first and added in ndhoffma's slight variation (starter fluid) and my car started up in a poof of white smoke and now is running as it was before. Thank you so much for this DIY, you saved me big $$$ and not mention a lot of the guess work on how to get to the spark plugs and so forth. So simply put thank you Alfy and Ndhoffma.

Registered User
Joined: Dec 2008
Posts: 56
Likes: 0
From: CHERRY POINT, NC
this DIY is awwwsome.....it worked just like you said...on the second try though..it was easy enough that i walked my Army brother through the steps..hahahaha..being a Marine i was skeptic...but the DIY was easy..awesome work man!! greatly appreciated..my baby lives!!!

4theride1
Joined: Feb 2008
Posts: 97
Likes: 0
From: San Antonio
Recovered from my first flooding today. Who knew it would get cold enough in San Antonio. It was a two day ordeal, but after a couple of spark plug cleanings, battery charger purchase, and some good luck, I finally brought it back to life. Just wanted to send a shout out to all the folks who have posted on the subject. Was so excited, I washed it, clay bar, and wax. All in time to leave it parked in the garage for my trip to see the folks and in-laws

Registered
Joined: Apr 2003
Posts: 9,134
Likes: 26
From: Houston
My deflooding method is much faster. This is for use with standard transmission cars.
Step 1: Install tow hook on front.
Step 2: Connect tow strap to tow hook.
Step 3: Connect other end of tow strap to another vehicle.
Step 4: With car in 2nd gear, hold clutch in. Ignition must be on.
Step 5: Pull with another vehicle to about 25 mph.
Step 6: Slowly let clutch out allowing engine to spin until it starts.
Step 7: Stop car
Step 8: Unhook tow strap and put everything away.
Step 9: Go about life as normal.
There is obviously a bit of sarcasm in this but if you have a standard transmission and can use another vehicle as your tow truck, this is a sure fire way to get it to start every single time. I've started blown engines this way. Sometimes they'll fire up after a fraction of a second and other times you'll need to pull them a ways. My record is 2 miles but that was for the blown engine. Usually it is within seconds of letting the clutch out. Go drive it like you stole it to clean the engine out. Then do a steam cleaning. You don't need to replace plugs or do any other maintanence. If your car does not start with this method, flooding is not your problem.

Registered User
Joined: Dec 2009
Posts: 1
Likes: 0
From: Greenville, SC
Had my first flooding incident this weekend  I tried the way above for several hours, charging battery, do it again, charge battery and so on and on. I even took the plugs out, cleaned them and dried them and still couldn't get it to fire and run at all. So I did a little more research and found out what they do at the dealer for just a flood. Worked right away and was a lot less stressful on the battery so I just thought I'd share it for future reference.
Disconnect the fuel pump harness, located on top of the front passenger side strut tower.
Turn the key for 15 seconds..... stop
Wait 5 seconds.... depress gas pedal... turn key for 15 seconds
Repeat one or two times, and it fires up every time.
Just dont forget to connect the fuel pump when your finished.
I tried the way above for several hours, charging battery, do it again, charge battery and so on and on. I even took the plugs out, cleaned them and dried them and still couldn't get it to fire and run at all. So I did a little more research and found out what they do at the dealer for just a flood. Worked right away and was a lot less stressful on the battery so I just thought I'd share it for future reference.Disconnect the fuel pump harness, located on top of the front passenger side strut tower.
Turn the key for 15 seconds..... stop
Wait 5 seconds.... depress gas pedal... turn key for 15 seconds
Repeat one or two times, and it fires up every time.
Just dont forget to connect the fuel pump when your finished.

Last to the Finish line
Joined: Sep 2006
Posts: 102
Likes: 0
From: Lakewood, CA
Well I also have finally flooded my 8....sweet!.. alright well its flooded pretty good and I have been attempting various forms of de-flood techniques but have yet to try the in depth one which I suppose will be tried tonight. I haven't cleaned the plugs or dicked around with the whole intake windshield cleaner stuff yet. Tempted to just pop the clutch but the car is in a good spot to work on so I figure I might as well learn how to do this assuming I still have a motor hehe....
Lets see I pulled the fuel pump fuse didn't work, did the whole depressed pedal deal didn't work pulled the connection on the top of the passenger strut didn't work. God knows if I'm doing any of these methods correctly. And to top it off there's allot of fuel in the air not sure if thats normal or not any advice on what I may be doing wrong?
BTW thanks for this thread its at least giving me allot of insight on what may be going on here.
Last edited by 4g63Rotary; Dec 29, 2009 at 03:21 PM.

Lubricious
Joined: Oct 2003
Posts: 3,425
Likes: 4
From: SF Bay Area, California
...
Disconnect the fuel pump harness, located on top of the front passenger side strut tower.
Turn the key for 15 seconds..... stop
Wait 5 seconds.... depress gas pedal... turn key for 15 seconds
Repeat one or two times, and it fires up every time.
Just dont forget to connect the fuel pump when your finished.

Registered User
Joined: Aug 2008
Posts: 2
Likes: 0
Thanks for this DIY. I came home from a week long trip to discover my car flooded. I did the procedures the mazda DVD had in it but it didn't work. I did Exactly what you said and it WORKED!!! Thanks a ton, the mazda dealer said they had to come look at is $95, to tow my car to dealer $150, put new sparkplugs $170. and then w/e the labor cost. Rip off

My deflooding method is much faster. This is for use with standard transmission cars.
Step 1: Install tow hook on front.
Step 2: Connect tow strap to tow hook.
Step 3: Connect other end of tow strap to another vehicle.
Step 4: With car in 2nd gear, hold clutch in. Ignition must be on.
Step 5: Pull with another vehicle to about 25 mph.
Step 6: Slowly let clutch out allowing engine to spin until it starts.
Step 7: Stop car
Step 8: Unhook tow strap and put everything away.
Step 9: Go about life as normal.
There is obviously a bit of sarcasm in this but if you have a standard transmission and can use another vehicle as your tow truck, this is a sure fire way to get it to start every single time. I've started blown engines this way. Sometimes they'll fire up after a fraction of a second and other times you'll need to pull them a ways. My record is 2 miles but that was for the blown engine. Usually it is within seconds of letting the clutch out. Go drive it like you stole it to clean the engine out. Then do a steam cleaning. You don't need to replace plugs or do any other maintanence. If your car does not start with this method, flooding is not your problem.
Step 1: Install tow hook on front.
Step 2: Connect tow strap to tow hook.
Step 3: Connect other end of tow strap to another vehicle.
Step 4: With car in 2nd gear, hold clutch in. Ignition must be on.
Step 5: Pull with another vehicle to about 25 mph.
Step 6: Slowly let clutch out allowing engine to spin until it starts.
Step 7: Stop car
Step 8: Unhook tow strap and put everything away.
Step 9: Go about life as normal.
There is obviously a bit of sarcasm in this but if you have a standard transmission and can use another vehicle as your tow truck, this is a sure fire way to get it to start every single time. I've started blown engines this way. Sometimes they'll fire up after a fraction of a second and other times you'll need to pull them a ways. My record is 2 miles but that was for the blown engine. Usually it is within seconds of letting the clutch out. Go drive it like you stole it to clean the engine out. Then do a steam cleaning. You don't need to replace plugs or do any other maintanence. If your car does not start with this method, flooding is not your problem.

Registered User
Joined: May 2007
Posts: 107
Likes: 0
From: Pensacola, FL
Just wanted to thank the op for the deflooding procedure. My car sat in the drive for about 5 days on a weak battery. When it came time to start it was too weak to get her started and flooded. I had to repeat the procedure 3 or 4 times until it fired and STAYED running but it ultimately did the trick. I was not able to pull my plugs to ensure they were dry. I simply pulled my fuel pump fuse and while jumping from another running vehicle attempted to crank for about 45 sec - 1min total in 5-10 second intervals. Replaced fuse and crank again. The first couple attempts it acted like it wanted to fire but couldn't keep itself running and reflooded. This is probably because my batt was out of the car for over a day. After a few attempts, everything seems back to normal now. 