Oil Cooler Grills and Fog Light Accent Strakes - Production Pics.
 09-05-2004, 09:52 PM
#1
Moderator with a mycocardium
Thread Starter
Oil Cooler Grills and Fog Light Accent Strakes - Production Pics.
Between sanding and finishing polyurethane side strakes, I took some time today to finish up the project that I have been long awaiting.
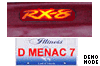
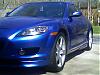
Here are the pictures of the Production of Front Fog Light Accent Strakes and the Oil Cooler Grills that I have designed. They are installed on my RX-8 for modeling.
Here are the pictures of the Production of Front Fog Light Accent Strakes and the Oil Cooler Grills that I have designed. They are installed on my RX-8 for modeling.
 09-05-2004, 09:56 PM
#2
Moderator with a mycocardium
Thread Starter
The Fog Light Accent Strakes are held in place with aluminum pins which insert into small holes drilled into the fog light outer housing and have 3M VHB acrylic mounting adhesive tape around the pins and also on the oposite edge of the strake against the bumper cover side. After a day the acrylic mounting tape adhesive cures and will ensure that they stay put.
When installed with the Oil Cooler Grills they are held in place with a single pin and a small screw on the fog light side that attaches them to the Oil Cooler Grill frame and 3M VHB acrylic adhesive tape on the oposite end of the strake.
When installed without the Oil Cooler Grills, two small aluminum pins keep them in place and at the right angle on the fog light housing side. Small mounting holes will have to be drilled.
A template will be provided with instructions.
These do not have to be installed with the Oil Cooler Grills as they can be installed without them with the alternative mounting instructions which will be provided.
Last edited by D MENAC 7; 09-20-2004 at 12:50 PM.
09-05-2004, 10:16 PM
#3
Moderator with a mycocardium
Thread Starter
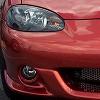
Here is how the oil cooler grills mount:
The first pic is of the mounting stanchions used to attach the frame and mounts to.
The second pic is the first step and is of the upper inside mount. This has to be mounted first because the screw stanchion will not allow access when the grill and frame is in place.
The third pic is of attaching the frame and screen to the front bumper cover. When this is put in place, the frame and screen also goes under the 1st mount. This pulls the frame across the side of the fog light.
The fourth pic is of the bottom mounts. This is an older pic with a different screen but still the same otherwise. These hold the frame and screen in place against the fog light and sides of the front bumper cover opening.
Each mount is attached to the grill with stainless steel screws to hold everything secure.
The rear of the grill is aluminum, the front is black and is covered with a synthetic rubber compound that is impervious to chemicals and the elements. It is flexible and will stand the test of time. The grill material is held in place with 5 aluminum pop rivets with aluminum washers on the grill side.
If one wanted, the bright aluminum grill can be ordered without the black coating.
Last edited by D MENAC 7; 09-20-2004 at 12:38 PM.


 09-24-2004, 11:02 AM
#16
Registered User
Join Date: Dec 2003
Location: Hotlanta
Posts: 448
Likes: 0
Received 0 Likes
on
0 Posts
Originally Posted by Spyder_doo
yeah man those look great. How do we go about ordering these things?
Thanks,
jamie
Thanks,
jamie
You can order here:
https://www.rx8club.com/dls-customs-closed-89/rx8fun-products-pricing-37845/
All pricing, shipping and ordering info is there.

Thread
Thread Starter
Forum
Replies
Last Post
SayDfuse
Series I Exterior Appearance and Body Kits
3
08-03-2015 10:41 PM