Dual vent gauge pod for Rx8


 04-30-2011, 07:16 AM
#104
Registered User

Join Date: Mar 2009
Location: Adelaide, Australia
Posts: 112
Likes: 0
Received 0 Likes
on
0 Posts
Hi guys,
I have just placed my order for the RHD dual 60mm peanut pod (it looks like peanut to me) from Ben. Now I need to do a bit of planning, how did you guys wire your gauges?
I need to know where you tap the power from? I have two Shadow Gauges (water temp & oil temp), the gauges have night mode, means when I turn on the driving light, the gauge will go from bright to dim, I don't know what yours gauges like, but I'd like to find out where to tap the +12V continuous, +12V ACC and +12V driving light.
Here's my video of the Shadow gauge testing for faults.
Thanks,
K
http://www.youtube.com/watch?v=kvWt7Gp_jvU
05-07-2011, 10:25 AM
#106
Registered User
Join Date: Mar 2009
Location: Adelaide, Australia
Posts: 112
Likes: 0
Received 0 Likes
on
0 Posts
Do you drill through the air vent?
I'm still waiting for my pod from Ben.
Cheers,
K
05-07-2011, 10:35 AM
#107
Surf Hard, Drive Hard

Join Date: Feb 2007
Location: Indialantic, Florida
Posts: 7,840
Likes: 0
Received 11 Likes
on
9 Posts
Kusanagi,
While my installation was a little unique, let me go link how I am wired.
Check back in this post in 5 minutes time.
This will not address all of your power questions, but might help some.
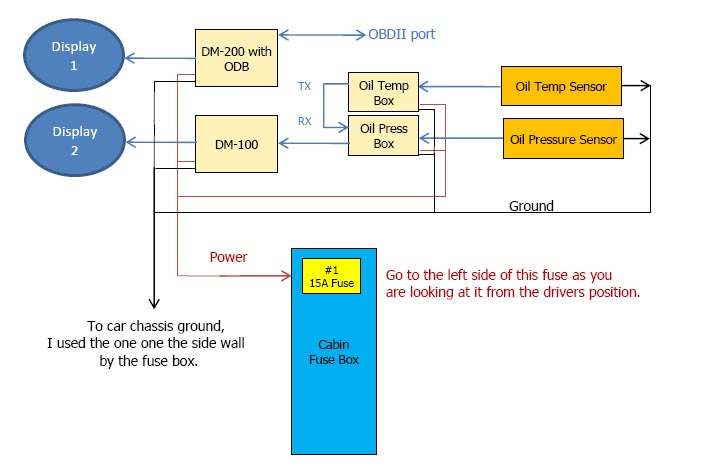
It comes from this thread. https://www.rx8club.com/showthread.p...89870#poststop I started out with a single pod and then went to a dual.
What you see in this picture is what you referred to in your earlier post as ACC power.
Now, since you are where you are, this is likely to be backwards in that you will probably want the right side of this fuse for ACC, but
fuse #1 is basically for the cigarette lighter and is only on when car is on.
If you have a meter, it will be really easy to tell where you need to tap into at the fuse box for all three conditions you require.
While my installation was a little unique, let me go link how I am wired.
Check back in this post in 5 minutes time.
This will not address all of your power questions, but might help some.
It comes from this thread. https://www.rx8club.com/showthread.p...89870#poststop I started out with a single pod and then went to a dual.
What you see in this picture is what you referred to in your earlier post as ACC power.
Now, since you are where you are, this is likely to be backwards in that you will probably want the right side of this fuse for ACC, but
fuse #1 is basically for the cigarette lighter and is only on when car is on.
If you have a meter, it will be really easy to tell where you need to tap into at the fuse box for all three conditions you require.
Last edited by Mazurfer; 05-07-2011 at 11:33 AM.
05-07-2011, 11:38 AM
#109
Surf Hard, Drive Hard
Join Date: Feb 2007
Location: Indialantic, Florida
Posts: 7,840
Likes: 0
Received 11 Likes
on
9 Posts
Should have pointed out that I chose NOT to take the wiring down through the A/C vent, and that the thread link should explain why.
I know those that have, but it will be dependent on how much(big) wiring you have and a little bit of how stealth you want/need it, as compared to the potential hassle in doing so.
I know those that have, but it will be dependent on how much(big) wiring you have and a little bit of how stealth you want/need it, as compared to the potential hassle in doing so.
05-07-2011, 12:44 PM
#110
Registered User
Join Date: Mar 2009
Location: Adelaide, Australia
Posts: 112
Likes: 0
Received 0 Likes
on
0 Posts
Hi Mazurfer, thanks so much for the help, with my RHD 8, the fuse box is still at the same location, that is my passenger side (or your driverside), I found the following pic somewhere:

If you look at the layout of the fuse box, there are two sections, top and bottom, all the fuses on the top belongs to ACC (you will find the air cond fuse has no power when key is at ACC until you turn on the air cond ****), and the bottom section belongs to +12V constant. Hope this help others.
For the gauges I have (Shadow BF 60mm), there are four wires for power, GND, +12V constant, +12V ignition, +12V driving light. I know where to tap +12V constant (fuse box) and GND, however I wonder if you guys know where to tap +12V ignition, +12V ignition (ON) is when you turn your key TWO clicks from OFF, so OFF > ACC > ON. I know a lot of people just use the ACC, but I don't want to turn on my gauges when I just want to listen to my radio when engine off, I want it on only when all the OEM gauges are turned on. Next would be the driving light 12V, the gauges I have got a dimmer, so when I turn the stalk for the driving light, the gauges will dim down, any ideas which wires?
The wires coming out of the gauges are very thin, so I won't have issues getting them through the air vent, how do you guys drill hole in the vent? as my electric drill won't get in the confine space, do you need to take out the front circular vent too?
Note: my gauges have memory functions (warning preset and brighness setting), that's why it needs constant power to keep the memory, and only turn on when it detects the ignition (ON) power.
Cheers,
K
Last edited by Kusanagi; 05-07-2011 at 12:51 PM.
05-07-2011, 12:48 PM
#111
Surf Hard, Drive Hard
Join Date: Feb 2007
Location: Indialantic, Florida
Posts: 7,840
Likes: 0
Received 11 Likes
on
9 Posts
^................not originally my pic, but I'm the one that labeled it for someone! 
I would never put my fuses in like that, I'm so ****!
Will try to answer more later, but gotta run out for awhile now.
Would just linking the electrical pdf help you?
Can you read a schematic?
It may be too big to attach, but if you PM me your E-mail address I will send it that way in the coming day or two.
It's also available online, but don't have time to go and find the link.
Gotta run!
05-07-2011, 12:59 PM
#112
Registered User
Join Date: Mar 2009
Location: Adelaide, Australia
Posts: 112
Likes: 0
Received 0 Likes
on
0 Posts
Thanks again for the quick reply, haha I see, but funny thing is my fuses are exactly like that in the picture!! the same fuses upsidedown with the numbers. I will PM you my email for the PDF. Unfortunately I am not smart enough to read schematic and don't think they actually tell me which colour wire to splice, my way of finding things out would be to blow a few things and get myself electrocuted, but any info that helps I will give it a go.
I will be doing my coolant flush and oil change tomorrow, at the same time I'll be installing RaceRoot's oil filter relocation kit and coolant temp sensor adaptor, will try and get all wiring ready so when Ben's peanut pod comes I can quickly put them in.
Thanks,
K
I will be doing my coolant flush and oil change tomorrow, at the same time I'll be installing RaceRoot's oil filter relocation kit and coolant temp sensor adaptor, will try and get all wiring ready so when Ben's peanut pod comes I can quickly put them in.
Thanks,
K
Last edited by Kusanagi; 05-07-2011 at 01:10 PM.
05-07-2011, 07:39 PM
#113
Surf Hard, Drive Hard
Join Date: Feb 2007
Location: Indialantic, Florida
Posts: 7,840
Likes: 0
Received 11 Likes
on
9 Posts
Busy day.....good luck...take your time!
PDF was sent and I included a second one that will tell you the wire code scheme.
Lucky me............ attached that before I even read this reply.
PDF was sent and I included a second one that will tell you the wire code scheme.
Lucky me............ attached that before I even read this reply.
05-08-2011, 06:36 PM
#114
Registered User
Join Date: Mar 2009
Location: Adelaide, Australia
Posts: 112
Likes: 0
Received 0 Likes
on
0 Posts
Thank you Mazurfer! attachments received!!
I've done my coolant flush, oil change, put in water temp sensor adaptor on upper radiator hose (not the racing beat one that uses cabin heater hose which is much easier), and put in oil filter relocation kit and oil temp sensor, now my back is aching and bruises/cuts everywhere on my arms from jamming arms into tight spaces... 6 hours later I decided to call it quick and to do the wiring another day, may be wait till the peanut pod arrive... I will take pics after getting everything done, so it'll help the next RHD person doing the same thing.
Cheers,
K
Last edited by Kusanagi; 05-08-2011 at 06:40 PM.
 05-10-2011, 12:46 AM
#116
Registered User
Join Date: Mar 2009
Location: Adelaide, Australia
Posts: 112
Likes: 0
Received 0 Likes
on
0 Posts
Cheers Ben! good timing too as I'll be busy for the next two weeks and have no time for the 8, the pod should be here by the time I'm free again.
Ket
Ket
05-24-2011, 07:27 PM
#117
Registered User
Join Date: Mar 2009
Location: Adelaide, Australia
Posts: 112
Likes: 0
Received 0 Likes
on
0 Posts
Ok, received my vent pod yesterday, thanks Ben! USPS is hopeless outside of the US as they stopped tracking delivery when item is out of the country.
I've installed the pod right after I got it, took me from 8:45pm to 10:30pm, most of the time was spent on figuring out where exactly I need to drill the hole in the vent and tidy up the wiring so it's professional, used zip tie and heat shrink tube at every join.
Let's see the video, I will post pics later on:
http://www.youtube.com/watch?v=KSFZzBnOGYE
It's actually much easier than I thought, the space between the dash hood and A-pillar is small enough to prevent me from using my electric drill, so I had to use one of these, a butane gas solder with a knife tip:

The heated knife works so good and quick that it only took me 10 second to poke a hole through the vent, then I rotate the knife 360� a few time to make a round hole, I was very careful not to touch the hot knife anywhere on the interior parts, then I used something similar to this to clean up the hole, a hand countersunk tool:

Then it's only the matter of sticking a wire through the hole and catch it from underneath.
When you drill through the vent, it won't go through to the aircond duct below, they're separate ducting, but be very careful with the hot knife though.
I will post more pics later on...
I've installed the pod right after I got it, took me from 8:45pm to 10:30pm, most of the time was spent on figuring out where exactly I need to drill the hole in the vent and tidy up the wiring so it's professional, used zip tie and heat shrink tube at every join.
Let's see the video, I will post pics later on:
http://www.youtube.com/watch?v=KSFZzBnOGYE
It's actually much easier than I thought, the space between the dash hood and A-pillar is small enough to prevent me from using my electric drill, so I had to use one of these, a butane gas solder with a knife tip:
The heated knife works so good and quick that it only took me 10 second to poke a hole through the vent, then I rotate the knife 360� a few time to make a round hole, I was very careful not to touch the hot knife anywhere on the interior parts, then I used something similar to this to clean up the hole, a hand countersunk tool:
Then it's only the matter of sticking a wire through the hole and catch it from underneath.
When you drill through the vent, it won't go through to the aircond duct below, they're separate ducting, but be very careful with the hot knife though.
I will post more pics later on...
05-24-2011, 09:57 PM
#119
Registered User
Join Date: Mar 2009
Location: Adelaide, Australia
Posts: 112
Likes: 0
Received 0 Likes
on
0 Posts
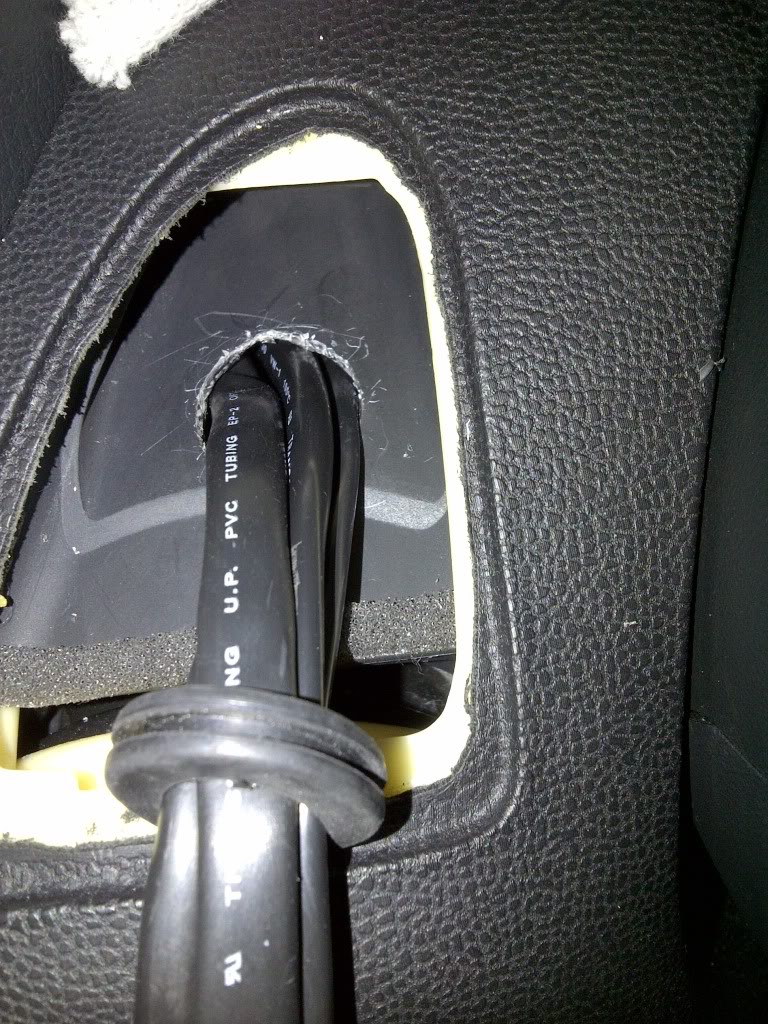
Here's the pic, I took this pic outside the car directly above the vent, couldn't get the camera to focus due to the bad lighting, as you can see, this is right after the hot knife surgery before using the countersunk tool to clean off the edges, it looks much cleaner, almost like a machine cut hole after bore out further with the countersunk tool.

05-24-2011, 10:54 PM
#121
Registered User
Join Date: Mar 2009
Location: Adelaide, Australia
Posts: 112
Likes: 0
Received 0 Likes
on
0 Posts
Did a quick drawing to help people who's doing this:
To see the hole from under the dash however, required special Yoga skill, yes... I'm a Yoga master after doing all these wiring and craps.

To see the hole from under the dash however, required special Yoga skill, yes... I'm a Yoga master after doing all these wiring and craps.
Last edited by Kusanagi; 05-24-2011 at 11:14 PM.
05-24-2011, 11:11 PM
#122
Registered User
Join Date: Mar 2009
Location: Adelaide, Australia
Posts: 112
Likes: 0
Received 0 Likes
on
0 Posts
 05-26-2011, 06:03 AM
#124
Thanks Mazurfer and Kusanagi for all your help!
Special thanks to Block8head for making a great product.
Kusanagi, I wish I could have found one of those hot knife things (I didn't look that hard).
I the effort to prevent me driving all over the place I just ended up using a "Step Drill bit" I had laying around.
As mentioned above, the drill and bit were to big to get a straight down angle at the vent. Of course this was going to give me a oblong hole.
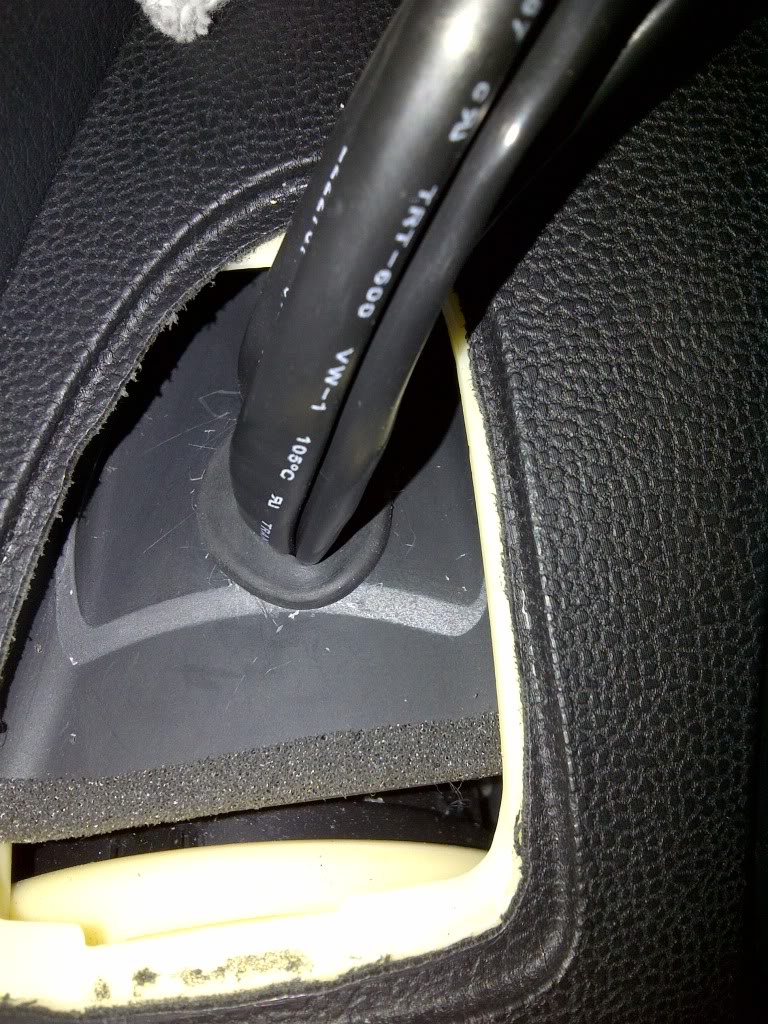
I used a small utility knife to round the hole and used a 3/4" rubber grommet to finish it off.
1)
2)
3)
Special thanks to Block8head for making a great product.
Kusanagi, I wish I could have found one of those hot knife things (I didn't look that hard).
I the effort to prevent me driving all over the place I just ended up using a "Step Drill bit" I had laying around.
As mentioned above, the drill and bit were to big to get a straight down angle at the vent. Of course this was going to give me a oblong hole.
I used a small utility knife to round the hole and used a 3/4" rubber grommet to finish it off.
1)
2)
3)
05-26-2011, 07:47 AM
#125
Registered User
Join Date: Mar 2009
Location: Adelaide, Australia
Posts: 112
Likes: 0
Received 0 Likes
on
0 Posts
Thanks Mazurfer and Kusanagi for all your help!
Special thanks to Block8head for making a great product.
Kusanagi, I wish I could have found one of those hot knife things (I didn't look that hard).
I the effort to prevent me driving all over the place I just ended up using a "Step Drill bit" I had laying around.
As mentioned above, the drill and bit were to big to get a straight down angle at the vent. Of course this was going to give me a oblong hole.
I used a small utility knife to round the hole and used a 3/4" rubber grommet to finish it off.
1)
2)
3)
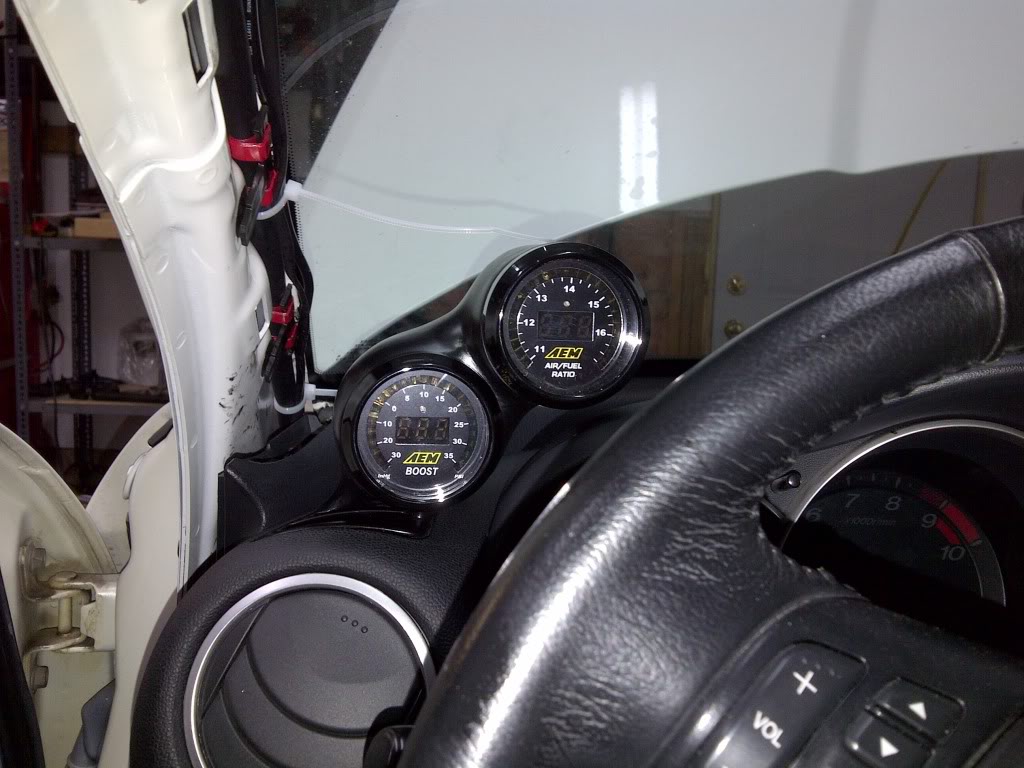
Gauge pod looks great!! why are you taking the A-pillar cover off?
You could use a screw driver and just heat it up with a candle or something then just poke a hole with it, all done anyway... I didn't even use a grommet myself, as the hole I cut is only under 15mm.