
HU Replacement and Air Cond. controls


Thread Starter
Registered User
Joined: Jan 2005
Posts: 21
Likes: 0
HU Replacement and Air Cond. controls - with finished Pic
Need a little help from the experts out there who have done this. (scudrunner and devoid, I know you have done this). I am haing the headunit replaced with an Alpine. They will do a custom dash replacment like the one scudrunner has.
The one problem they have hit on is that the old radio also has the controls for the air conditioning run through it. They are getting around this by moving the old head unit into the trunk in the custom enclosure for the amp. They have run into problems with the resistence running wires this far. What did they rest of you do to get around this???")
Got the car back with the new setup: See the pics with the final results on page 2 of this thread.
The one problem they have hit on is that the old radio also has the controls for the air conditioning run through it. They are getting around this by moving the old head unit into the trunk in the custom enclosure for the amp. They have run into problems with the resistence running wires this far. What did they rest of you do to get around this???
Got the car back with the new setup: See the pics with the final results on page 2 of this thread.
Last edited by Tazman; Apr 22, 2005 at 08:59 AM.

Registered User
Joined: Jun 2004
Posts: 143
Likes: 0
From: NY
Originally Posted by Tazman
Need a little help from the experts out there who have done this. (scudrunner and devoid, I know you have done this). I am haing the headunit replaced with an Alpine. They will do a custom dash replacment like the one scudrunner has.
The one problem they have hit on is that the old radio also has the controls for the air conditioning run through it. They are getting around this by moving the old head unit into the trunk in the custom enclosure for the amp. They have run into problems with the resistence running wires this far. What did they rest of you do to get around this???
The one problem they have hit on is that the old radio also has the controls for the air conditioning run through it. They are getting around this by moving the old head unit into the trunk in the custom enclosure for the amp. They have run into problems with the resistence running wires this far. What did they rest of you do to get around this???


Registered User
Joined: Jan 2004
Posts: 9
Likes: 0
From: Quebec
Metra is on the way of delivering a single din unit system for the 6. They are actually late, but it should be produced this summer, after a 3-4 month delay.
http://www.metraonline.com/i/METRAHANDOUT_2005.pdf
Max
Mazda6
http://www.metraonline.com/i/METRAHANDOUT_2005.pdf
Max
Mazda6


Attracts tree branches
Joined: Jun 2004
Posts: 5,940
Likes: 3
this is a lot easier then you think
all you need to keep intact is the HU core...which is a small pcb that just happens to be surrounded by a huge steel cage
simply remove the core from the cage...discard the cd player unit of course...and take out eh AC dials...then relocate the HU core to the back of where the HU was housed...if you want protect the core with simple casing to prevent a short...it does not get very hot unless you are running the audio and even then it isn't bad so don't worry to much about ventalation
then mount your knew system away and keep us updated with the install maybe we'll all be inspired finally :D
Attracts tree branches
Joined: Jun 2004
Posts: 5,940
Likes: 3
ask Devoid...his team figured it out...no probelm...you can even create more room by cutting away some of the housing in there...even mount the HU core in the glove compartment if you really need to (no reason though)

Normality is Obscene
Joined: Aug 2003
Posts: 1,053
Likes: 0
From: AL/GA...you pick
there is plenty space after you remove the actual HU..the PCB is not much larger than a cassette tape...depending on where you plan on mounting your "new" unit would dictate where you place the A/C pcb..if you don't have Nav there is plenty space up top unless you need it for a unit...or the center cavity is plenty deep...

Registered User
Joined: Apr 2005
Posts: 544
Likes: 0
From: CFB Comox, BC, Canada
Thanks for the pm's guys. Here is what I have tried and the results. (and then I had one of my guys find this forum). It would be nice to know if the results you had are the same as what we have found.
I used a stranded cat5 wire to extend the HVAC wires (four runs in total) to the trunk area. The customer also wanted the display to still operate as far as the outside temp and time went so we also extended the display harness with the same cat 5 wire (3 runs) and the hazard light switch (1 run).
- When we started to plug in the unit, the hazard lights would start to flash and would not turn off. When the key was turned to the on position, the hazard lights would operate normally until key off, then they would turn on again.
- No illumination in the climate control cluster.
- No mode setting in the climate control cluster.
- Clock was working.
- Start up sequence on display reading Mazda RX8 was working
- No outside temp on the display.
- Radio was engaged in the circuit and disengaged incase there was something looping through it.
- The factory 6 disc was left attached to the unit.
From what I can tell, we do not need the factory 6 disc and can remove it from the equation. It seems that we do need the primary board in the amp unit and definitely need the board on the switch panel.
- Did you guys unsolder the primary connections from the main radio board to the secondary board in the amp module or leave it plugged in and relocated as one unit?
- How long have you made the extension lines for the HVAC wiring?
- Have you also kept the factory display active?
- If so does the outside temp setting and clock still show.
I am around pretty much all day today and tomorrow. I have a RCMP exam tonight and will not be available but my primary installer, Jade, will be. Thanks in advance for the help with this. If someone has digital pics of this job, send them to me please at forbidden@telus.net
A big case of beer to the people who help us out with this.
Rob Atkinson
Forbidden Audio Ltd.
Courtenay, BC, Canada
www.the12volt.com - user name is forbidden
I am currently going to set it back to factory to see if all functions work again.
Attracts tree branches
Joined: Jun 2004
Posts: 5,940
Likes: 3
I sent this to forbidden (Rob):
first off you definitely do not need the CD rom unit whatsoever (I've run my system with just the auxilary in through a PIE box before
I think you may be over complicating things...and so I hope we (we as in forum members ) can save you time.
I have taken the entire HU apart to the core but I have not abandon it for an aftermarket unit
really look at it this way...
1. remove the hu
2.dissasemble the steel cage surrounding it down to a PCB
3.dissamble the face plate
4.get the parts down to the 3 acc controls, HU core PCB, and cut out the hazard lights button
5. everything should still work just fine except everything will be exposed
6. now relocate the HU PCB core to the back or side of where the HU was housed...if you want you can mount it under the steering console or behind the glove compartment or under the HU housing (may require some cutting that will not be seen)...make sure the PCB is protected from shorting
7.leave the hazard warning lights button sticking out and the acc controls...figure a way to mount the hazard button in a different location...maybe extend the wires to have the button mounted in the center console or in a dummy blank
8.hookup the LCD display connecter to the HU PCB core
9. install your aftermarket HU...probably much better to use all that space with a larger touch screen display controlled HU instead of a retractable din style HU.
10. Good luck!
Best thing to do is as Devoid he has been through this mess (and mroe) http://devoid.mine.nu
first off you definitely do not need the CD rom unit whatsoever (I've run my system with just the auxilary in through a PIE box before
I think you may be over complicating things...and so I hope we (we as in forum members
) can save you time.I have taken the entire HU apart to the core but I have not abandon it for an aftermarket unit
really look at it this way...
1. remove the hu
2.dissasemble the steel cage surrounding it down to a PCB
3.dissamble the face plate
4.get the parts down to the 3 acc controls, HU core PCB, and cut out the hazard lights button
5. everything should still work just fine except everything will be exposed
6. now relocate the HU PCB core to the back or side of where the HU was housed...if you want you can mount it under the steering console or behind the glove compartment or under the HU housing (may require some cutting that will not be seen)...make sure the PCB is protected from shorting
7.leave the hazard warning lights button sticking out and the acc controls...figure a way to mount the hazard button in a different location...maybe extend the wires to have the button mounted in the center console or in a dummy blank
8.hookup the LCD display connecter to the HU PCB core
9. install your aftermarket HU...probably much better to use all that space with a larger touch screen display controlled HU instead of a retractable din style HU.
10. Good luck!
Best thing to do is as Devoid he has been through this mess (and mroe) http://devoid.mine.nu
Registered User
Joined: Apr 2005
Posts: 544
Likes: 0
From: CFB Comox, BC, Canada
Time would be good thing to save to keep my customers (and installers) happy. I would like to hear some replies of the issues that I have found and some replies as to what has been done in their RX8's as far as the end result goes. This is a full dvd / nav / amplified system being installed and a new dash bezel being created. I am doing a build up on this and would like to see if anyone has some digital pics of what they did in the dash area. Thanks for the info that was sent already, keep it coming please.
The issues we have found most certainly seem to be resistance based. I imagine that some of you have found the same thing.
The issues we have found most certainly seem to be resistance based. I imagine that some of you have found the same thing.
Last edited by forbidden; Apr 19, 2005 at 03:30 PM.

Registered User
Joined: Feb 2005
Posts: 2
Likes: 0
From: Denton, TX
Any idea how much that would cost to duplicate just the installation? Seems like once someone has completed a project of such substance and if proper documentation was made, that it would become less expensive, but it still looks like quite a bit of work.
Thread Starter
Registered User
Joined: Jan 2005
Posts: 21
Likes: 0
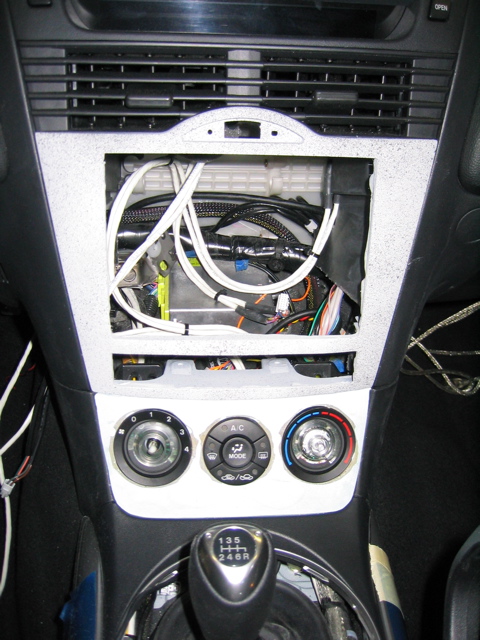
La Jolla Audio finally got the HU and air condition contols all working (including the steering wheel controls for the radio). I have my 8 back with a new Alpine head unit, new Alpine amp, sub-woofer, and all new Alpine speakers (components in the front).
The new fabricated dash looks factory. I will post pictures as soon as I can. La Jolla also photographed the work as they went along and promised to send me a disk so I will post those when I get it. The ipod connections comes out of the center console and easily hides away with the IPOD in the console storage area. The sub-woofer and amp enclosure in the back looks factory too. The only control I have lost is the ability to reset the factory clock, but since there is a clock in the radio, no big loss.
They finally gave up on moving the old HU to the trunck and have it buried under the dash for control of the air conditioning.
Thanks to all for their input and help.
I am going to try to go to the next SD RX-8 meeting on the first Saturday in May, so if you live in SD and want to see the work, be there.
Thread Starter
Registered User
Joined: Jan 2005
Posts: 21
Likes: 0
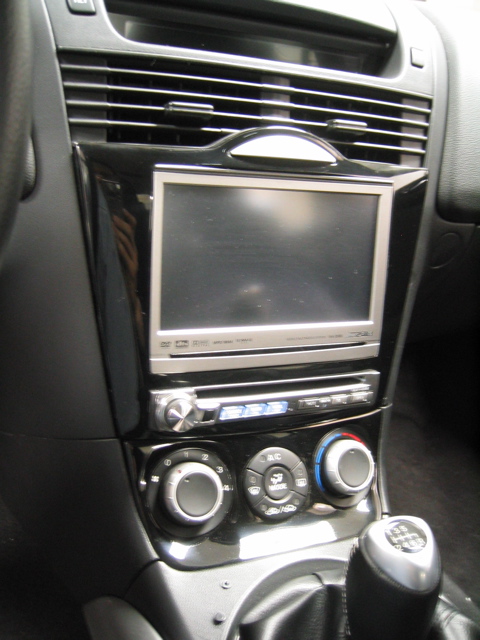
Its done - here are the initial pics
Ok, here are some pics of the final results.
No pics of the speakers because there is nothing to see. When I get pics of the installation from La Jolla Audio, I will post them.
Here is what went in
No pics of the speakers because there is nothing to see. When I get pics of the installation from La Jolla Audio, I will post them.
Here is what went in

Thread
Thread Starter
Forum
Replies
Last Post
drebbrnator
Series I Trouble Shooting
11
Dec 27, 2018 07:02 PM