Footwell Lights Install/Wiring Diagram?
 07-15-2005, 04:35 PM
#1
Registered User
Thread Starter

Join Date: Oct 2004
Posts: 1,090
Likes: 0
Received 0 Likes
on
0 Posts
I bought the footwell lights and I want to wire them so that they turn on with my headlights. Has anyone done this? I think when installed, they have a timer and such so I'll probably have to do some rigging anyway. I'm also wondering if anyone had a copy of the wiring diagram so I know which wires to tap into. Help is appreciated!!!
 07-15-2005, 05:14 PM
#2
ShinkaMan #748 SV6P

Join Date: May 2005
Location: Lake Worth, FL
Posts: 536
Likes: 0
Received 0 Likes
on
0 Posts
Hey, I second this... I like for the lights to come on with either the parking lights or headlight switch.
Dazygirl, my footwell light stays on as long as the door is open which mean the timer is not tripped until there is no longer any current from the door (closed). The way I see it based on the footwell wiring schematic, if we tap the door switch wiring (I think its the black/blue wire) to one that is activated by the parking light/headlight then the footlights should stay on as long as there is current. Anybody care to agree/disagree on this?
Anyway, what we need is to figure out which wire is the parking light or headlight switch controlled under the driver footwell wiring harnesses (too many wires!)
07-15-2005, 05:26 PM
#3
Registered User
Join Date: Jul 2004
Location: Broomfield, Colorado
Posts: 88
Likes: 0
Received 0 Likes
on
0 Posts
Isn't this what you wanted?
https://www.rx8club.com/series-i-interior-audio-electronics-24/need-alternate-footwell-light-wiring-65762/
Mine will come on as soon as I turn the key. I didn't attach mine to the headlight circuit, because I wanted the footlights "on" when I am parked, without headlights on.
They are on in the daytime too, but that's okay with me.
07-15-2005, 05:36 PM
#4
Registered User
Thread Starter
Join Date: Oct 2004
Posts: 1,090
Likes: 0
Received 0 Likes
on
0 Posts
Sorta kinda. I've read that before but it doesn't exactly state how to hook it up to the headlight lamps and "fishing around" until I find the right wire doesn't sit well with me, ESPECIALLY since I'm an electronics noob to begin with.
I don't want it to come on during the day unless I turn my lights on, I don't want a separate switch and I don't want it rigged to the door.
I agree with Wedge and think that if we tap into the headlight lamp, the footwell lights will turn on with the headlights. The headlights are already grounded so the "on" issue is taken care of there. I just need to know which wire this is and peferrably in a diagram format instead of just "red wire" or "blue wire." I haven't been near the wiring panel just yet, but I would assume that the wires are not simply plug and play, where unplugging one wire would tell you exactly what it was for b/c that function no longer worked.
07-15-2005, 10:25 PM
#5
ShinkaMan #748 SV6P
Join Date: May 2005
Location: Lake Worth, FL
Posts: 536
Likes: 0
Received 0 Likes
on
0 Posts
I guess wiring it to go on with the parking lights (first turn of the light stalk switch) is better than wiring it to the headlight (2nd turn) since we may not want the headlights on.. WTH, it doesn't matter. Can someone please tell us if there is any wire behind the driver-side kick panel that is energized by turning the light stalk switch???
There are 2 main wire harnesses behind the panel, one close to the fuse box and one closer to the firewall. Tell us which wire color and which harness.
Pretty please???
p.s. I'll take some pics for DIY for you Dazygirl.
There are 2 main wire harnesses behind the panel, one close to the fuse box and one closer to the firewall. Tell us which wire color and which harness.
Pretty please???
p.s. I'll take some pics for DIY for you Dazygirl.
Last edited by wedge357; 07-15-2005 at 10:28 PM.
07-15-2005, 11:12 PM
#8
Registered User
Thread Starter
Join Date: Oct 2004
Posts: 1,090
Likes: 0
Received 0 Likes
on
0 Posts
:D They're being wiring diagram hogs. Don't they know that this could benefit EVERYBODY?!?! :D
Pretty please? With sugar on top? And a few candy sprinkles with chopped nuts, whipped cream and a cherry? I'll be your best friend forever. :D
Pretty please? With sugar on top? And a few candy sprinkles with chopped nuts, whipped cream and a cherry? I'll be your best friend forever. :D
07-16-2005, 12:22 AM
#10
503wtq Boosted Bimmer
iTrader: (2)
Join Date: Oct 2004
Location: Los Angeles, California
Posts: 3,038
Likes: 0
Received 0 Likes
on
0 Posts
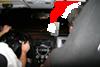
Okay, so I took pictures for everbody; only because dazygirl asked me to. (you better be my friend now) 
So here is the deal. The red neons go on with the head lights. The blue LEDs go on when a door is open, they also shut off after a few minutes with the interior lights.
So here is the deal. The red neons go on with the head lights. The blue LEDs go on when a door is open, they also shut off after a few minutes with the interior lights.
07-16-2005, 12:27 AM
#11
503wtq Boosted Bimmer
iTrader: (2)
Join Date: Oct 2004
Location: Los Angeles, California
Posts: 3,038
Likes: 0
Received 0 Likes
on
0 Posts
The wire you want to connect to is the one that loops over my multimeter probe. It is a red wire with a yellow strip. You can connect a few LEDs or neons without a relay. However, if you plan on anything more, a relay is a must.
-Rodger
-Rodger
07-16-2005, 12:43 AM
#13
ShinkaMan #748 SV6P
Join Date: May 2005
Location: Lake Worth, FL
Posts: 536
Likes: 0
Received 0 Likes
on
0 Posts
Originally Posted by Rotary Rasp
The wire you want to connect to is the one that loops over my multimeter probe. It is a red wire with a yellow strip. You can connect a few LEDs or neons without a relay. However, if you plan on anything more, a relay is a must.
-Rodger
-Rodger
Last question, this is the trigger wire linked to the light stalk switch, right?
Thanks a lot for your help, Rotary Rasp.
BTW, I think its cool how it looks with blue and red lighting together. I think it will go well with my Shinka color.
07-16-2005, 01:06 PM
#16
ShinkaMan #748 SV6P
Join Date: May 2005
Location: Lake Worth, FL
Posts: 536
Likes: 0
Received 0 Likes
on
0 Posts
dazygirl, i think its easy... i need to do some stuff around the house then i'll tackle this. i'll take some step by step pictures. i may have to buy additional wires but i may be able to make do with what comes with the light kit. Stay tuned...
07-16-2005, 04:40 PM
#18
Original Turbo 'd Auto !!
https://www.rx8club.com/showthread.p...ght=neon+light
Try this thread. Really sinple. The neons come on with the parking/headlights.
scroll down to the bottom.
I do like the blu one with open door and red on with the headlights. Cool idea RR
Try this thread. Really sinple. The neons come on with the parking/headlights.
scroll down to the bottom.
I do like the blu one with open door and red on with the headlights. Cool idea RR
07-16-2005, 07:51 PM
#19
ShinkaMan #748 SV6P
Join Date: May 2005
Location: Lake Worth, FL
Posts: 536
Likes: 0
Received 0 Likes
on
0 Posts
no, I got it done. Thanks RR for pointing out where to tap into. DIY to follow later.
DIY's are done. One is for people without the Mazda light kit and the other is for those that currently have the footlamp and would like to rewire them to be controlled via headlight/parking light switch instead of the door.
DIY's are done. One is for people without the Mazda light kit and the other is for those that currently have the footlamp and would like to rewire them to be controlled via headlight/parking light switch instead of the door.
Last edited by wedge357; 07-17-2005 at 01:58 AM. Reason: Check out the 2 DIYs for the footlamps
07-18-2005, 02:50 AM
#20
503wtq Boosted Bimmer
iTrader: (2)
Join Date: Oct 2004
Location: Los Angeles, California
Posts: 3,038
Likes: 0
Received 0 Likes
on
0 Posts
Originally Posted by wedge357
no, I got it done. Thanks RR for pointing out where to tap into. DIY to follow later.
DIY's are done. One is for people without the Mazda light kit and the other is for those that currently have the footlamp and would like to rewire them to be controlled via headlight/parking light switch instead of the door.
DIY's are done. One is for people without the Mazda light kit and the other is for those that currently have the footlamp and would like to rewire them to be controlled via headlight/parking light switch instead of the door.
07-18-2005, 08:50 AM
#21
ShinkaMan #748 SV6P
Join Date: May 2005
Location: Lake Worth, FL
Posts: 536
Likes: 0
Received 0 Likes
on
0 Posts
Originally Posted by Rotary Rasp
Wasn't it simple?
Everything worked out well though, last night was the first time I tested driving at night and it looked awesome! Next step is to hook up another set with blue bulbs to really matchup with the shinka's color...
Thanks again RR.
 07-18-2005, 09:27 PM
#22
Registered User
Thread Starter
Join Date: Oct 2004
Posts: 1,090
Likes: 0
Received 0 Likes
on
0 Posts
Good News and Bad News
Good News: I installed these and I did it all by myself and I did it correctly!!
Bad News: The lights I installed don't work. It's not my wiring b/c they don't work when powered directly by the battery.
Maybe I'll get some LED's and try something else... maybe make a switch? I'm feeling confident and adventerous. :D Thanks Wedge and Rotary Rasp for ya'lls help. I couldn't have done it without you!! :D