
EVO-R Front Lip - Pics and Install (Help)


Thread Starter
I'm Delaware Fast
iTrader: (1)
Joined: Dec 2007
Posts: 450
Likes: 0
From: Blacksburg VA/Dover DE
EVO-R Front Lip Updated and Installed - Pics
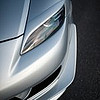
So after a long but worthwhile wait, I finally received my new 2010 Evo-R lip! It's of a very high quality and the pics below don't do it great justice.
Anyway, it came with a mount kit but I'm not sure exactly how to go about doing it. I had a ShineAuto lip before so I remember how that was mounted, but I wanted to make sure that the fitment was tight. The kit comes with double-sided tape, 4 small screws with big washers and 2 bolts with matching nuts. If anyone has put on their own front lip, please post with a brief description. I should be able to knock this thing out in like 2 hours. Thanks in advance.


Bonus Pic: My vLEDS LED 6k Fogs came in as well. I'll post pics of everything after it is installed.

Anyway, it came with a mount kit but I'm not sure exactly how to go about doing it. I had a ShineAuto lip before so I remember how that was mounted, but I wanted to make sure that the fitment was tight. The kit comes with double-sided tape, 4 small screws with big washers and 2 bolts with matching nuts. If anyone has put on their own front lip, please post with a brief description. I should be able to knock this thing out in like 2 hours. Thanks in advance.
Bonus Pic: My vLEDS LED 6k Fogs came in as well. I'll post pics of everything after it is installed.
Last edited by SilverHokie; Aug 11, 2010 at 10:17 AM.

RX8 Club OG
Joined: Aug 2004
Posts: 2,459
Likes: 0
From: Clinton NJ
its very easy.... should be very similar to your other front lip... u may have not have to do anything different but oh-well
the 2 screws go on each side of the front lip... they go on the flat part that will be in the wheel well... just make sure that before u drill into the lip and the bumper u test fit the lip and line everything up, once that's complete drill small holes first, then go up in size
the double sided tape goes on the top part of the front of the lip that will make contact with the front bumper... I have no idea what the bolts are for... i guess u can use them instead of the screws...
front lips are pretty much as stated before... very easy.... just take ur time
my r-magic went on how i stated, it came with instructions but they were in Japanese so i had to figure it out by the pictures
Last edited by Alucard; Jul 28, 2010 at 06:09 PM.
Yep pretty much exactly like your old setup.
Screws on the sides and tape at the top portion that touches your car.
Glad to see you get a lip again. I cracked mines real bad hitting some plastic piece on the highway .I am going to repair it and add a little twist since I am tired of riding with my new temporary bumper.
Screws on the sides and tape at the top portion that touches your car.
Glad to see you get a lip again. I cracked mines real bad hitting some plastic piece on the highway
.I am going to repair it and add a little twist since I am tired of riding with my new temporary bumper.
Thread Starter
I'm Delaware Fast
iTrader: (1)
Joined: Dec 2007
Posts: 450
Likes: 0
From: Blacksburg VA/Dover DE
Yep pretty much exactly like your old setup.
Screws on the sides and tape at the top portion that touches your car.
Glad to see you get a lip again. I cracked mines real bad hitting some plastic piece on the highway.I am going to repair it and add a little twist since I am tired of riding with my new temporary bumper.
Screws on the sides and tape at the top portion that touches your car.
Glad to see you get a lip again. I cracked mines real bad hitting some plastic piece on the highway
.I am going to repair it and add a little twist since I am tired of riding with my new temporary bumper.


Thread Starter
I'm Delaware Fast
iTrader: (1)
Joined: Dec 2007
Posts: 450
Likes: 0
From: Blacksburg VA/Dover DE
Thanks, I'll post a pic from the front in a few. I'm having a slight issue with my fogs at the moment. I got a pair from a member on the board, and the tint on them doesn't look right with the car. I'll have to obtain some clear ones again. You'll see what I'm talking about when I post.
The lip I got from EVO-R. A guy named Jay sells them. He has about 3 of these left in stock. Which is quite rare. I had to wait about 3 1/2 months for this...you'll wait about a week.
http://www.evo-r.net
If you look up, he already posted in this thread as "FD...."
The lip I got from EVO-R. A guy named Jay sells them. He has about 3 of these left in stock. Which is quite rare. I had to wait about 3 1/2 months for this...you'll wait about a week.
http://www.evo-r.net
If you look up, he already posted in this thread as "FD...."


Thread Starter
I'm Delaware Fast
iTrader: (1)
Joined: Dec 2007
Posts: 450
Likes: 0
From: Blacksburg VA/Dover DE
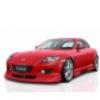
I will tell you something, the ShineAuto lip had to be adjusted/shaved in order to fit correctly. The EVO-R lip fits on the bumper without doing ANYTHING to it. I got it bolted and all that from the bodyshop, but they didn't do anything to it.
I could have driven around without bolts, that's how tight of a fit it is. I loved both of them however. ShineAuto lip is made out of a way more durable material. I could have bent that thing around a pole.
I could have driven around without bolts, that's how tight of a fit it is. I loved both of them however. ShineAuto lip is made out of a way more durable material. I could have bent that thing around a pole.

whines all the way home
iTrader: (2)
Joined: Oct 2004
Posts: 7,402
Likes: 2
From: Towson/Baltimore, MD
requires removing the bumper, the AP is screwed into the front bottom face of the bumper. Once those 6 bolts or so are removed then there are another set in the air dam area, the area that has the support struts that bridge the air dam, all of that comes off as one piece.
I have those H11 LED's also. To make them fit, I had to drill out the reflector cover inside the lights to get them to fit, because they were to long to fit. Also, in my State, we cannot run Blue, Green, or Red lights up front. Only White, Yellow, or Orange is permitted. Ask me how I know... 

He mentioned it before.. =)
Thanks, I'll post a pic from the front in a few. I'm having a slight issue with my fogs at the moment. I got a pair from a member on the board, and the tint on them doesn't look right with the car. I'll have to obtain some clear ones again. You'll see what I'm talking about when I post.
The lip I got from EVO-R. A guy named Jay sells them. He has about 3 of these left in stock. Which is quite rare. I had to wait about 3 1/2 months for this...you'll wait about a week.
http://www.evo-r.net
If you look up, he already posted in this thread as "FD...."
The lip I got from EVO-R. A guy named Jay sells them. He has about 3 of these left in stock. Which is quite rare. I had to wait about 3 1/2 months for this...you'll wait about a week.
http://www.evo-r.net
If you look up, he already posted in this thread as "FD...."