
Dark Strakes


Guest
Posts: n/a
I don't like them. It's too many colors - now you have yellow on the car, black on the vent and dark grey on the strake. At least when they are brushed aluminum, they match the other aluminum accents in the car, like the headlights and taillights. The only thing I could see doing is painting them to match the color of your car, so in your case...yellow.


Registered User
Joined: Jan 2004
Posts: 184
Likes: 0
Here you go� sunlight silver with black strakes. Sorry for the unprofessional pictures
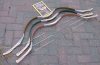
I made mine out of 3/8� dark gray nylon and painted black. I could have gotten overboard by adding a third or fourth one in each side but I decided to go with two instead. I could have bought the strakes but for me is more fun to make my own. I used nylon because is easier to work with than aluminum.
Here are the steps.
- Get some thin cardboard and cut it as close as the fender profile. Its ok if you have some gaps for now.
- With a technique used by carpenters, with your pencil lay as flat as possible to the fender and trace the profile. After that, you can cut the cardboard with scissors. It might still have some gaps but you can adjust that by trimming it. Make sure to label each profiles like Right upper, Right lower, etc.
- Once you have the profiles you can design the strakes as long and protruded as you want. I my case I wanted to have a close copy of the originals. Feel free to experiment! I tried several designs even a serrated one but it will look like I came from Mad Max movie. Use the pencil so that you can erase the lines if you don�t like them.
- When you are satisfy with your design, cut the cardboards patterns and recheck with your car. Then lay the patterns on the material, in my case nylon and trace it. Then start cutting them with a jigsaw or band saw.
- Here is the most time consuming of the project. With a belt sander, start contouring the outside edge to make it a round edge. More into the elliptical shape. Then with a demmel tool start, to reshape the profile to match the compound angles of the fender. Have a lot of patience.!!
-Once done, use different grids of sand paper from medium, fine, and ultra fine to take any marks. Then prime them and paint them. To install them use the techniques in the DYI section on installing the aluminum strakes. By the way, you have to get screws about 1 1/ 4 long. If you use aluminum, make sure to drill and tap the holes. As for my case I just predrilled the holes.
I made mine out of 3/8� dark gray nylon and painted black. I could have gotten overboard by adding a third or fourth one in each side but I decided to go with two instead. I could have bought the strakes but for me is more fun to make my own. I used nylon because is easier to work with than aluminum.
Here are the steps.
- Get some thin cardboard and cut it as close as the fender profile. Its ok if you have some gaps for now.
- With a technique used by carpenters, with your pencil lay as flat as possible to the fender and trace the profile. After that, you can cut the cardboard with scissors. It might still have some gaps but you can adjust that by trimming it. Make sure to label each profiles like Right upper, Right lower, etc.
- Once you have the profiles you can design the strakes as long and protruded as you want. I my case I wanted to have a close copy of the originals. Feel free to experiment!
I tried several designs even a serrated one but it will look like I came from Mad Max movie. Use the pencil so that you can erase the lines if you don�t like them.- When you are satisfy with your design, cut the cardboards patterns and recheck with your car. Then lay the patterns on the material, in my case nylon and trace it. Then start cutting them with a jigsaw or band saw.
- Here is the most time consuming of the project. With a belt sander, start contouring the outside edge to make it a round edge. More into the elliptical shape. Then with a demmel tool start, to reshape the profile to match the compound angles of the fender. Have a lot of patience.!!
-Once done, use different grids of sand paper from medium, fine, and ultra fine to take any marks. Then prime them and paint them. To install them use the techniques in the DYI section on installing the aluminum strakes. By the way, you have to get screws about 1 1/ 4 long. If you use aluminum, make sure to drill and tap the holes. As for my case I just predrilled the holes.
Last edited by romulus; Apr 29, 2004 at 06:12 PM.
Registered User
Joined: Jan 2004
Posts: 184
Likes: 0
I see, I am guessing that the color of the strakes are based on each individual taste. Just like when picking the car color. Yeah I also noticed that the strakes blends in with the side grill. If I paint them silver, it will bend in with the body. Maybe I should try like a champange shade. Beside of the color, any other comments about the "hand made strakes"?


Registered
Joined: Oct 2001
Posts: 7,966
Likes: 4
From: Boulder County, Colorado
Well done, romulus!!! Couple of things...
First, could you post a much closer close-up of the strakes you made? And secondly, you have the makings of an AWESOME "DIY" thread here... if you could take your step-by-step directions, and add some illustration photos along the way, it would be a real help to the community!
First, could you post a much closer close-up of the strakes you made? And secondly, you have the makings of an AWESOME "DIY" thread here... if you could take your step-by-step directions, and add some illustration photos along the way, it would be a real help to the community!
Registered User
Joined: Jan 2004
Posts: 184
Likes: 0
Criticisms are always welcome They make me a better person.
No problem! It might take me a couple of days to do the DIY thread since I might remove one side for pictures and review the istructions for more step by step process. By the way I still have the cardboard patterns with me I will scan them and mark the dimmensions to save some time in the process.
Regarding a closer view of the pictures I just got a new camera and I plan to use it intead of the POS at work.
Stay tunned :D
They make me a better person. No problem! It might take me a couple of days to do the DIY thread since I might remove one side for pictures and review the istructions for more step by step process. By the way I still have the cardboard patterns with me I will scan them and mark the dimmensions to save some time in the process.
Regarding a closer view of the pictures I just got a new camera and I plan to use it intead of the POS at work.
Stay tunned :D
Last edited by romulus; Apr 30, 2004 at 04:22 PM.

Thread
Thread Starter
Forum
Replies
Last Post
Brooklynite
NE For Sale/Wanted
4
Nov 10, 2015 06:42 PM
cschoeps
RX-8's For Sale/Wanted
0
Aug 6, 2015 12:44 PM