
DIY: Test Solenoid


Thread Starter
Grasshopper
iTrader: (1)
Joined: Dec 2006
Posts: 6,779
Likes: 50
From: Streetsboro, OH
DIY: Test Solenoid
This DIY explains how to test the solenoids for the VFAD, AIR, SSV, and VDI.
The Mazda Service Manual explains this procedure clearly, but I still get asked how to perform this.
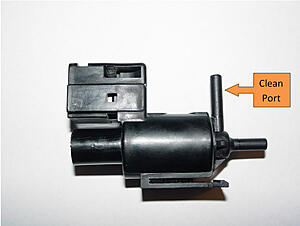
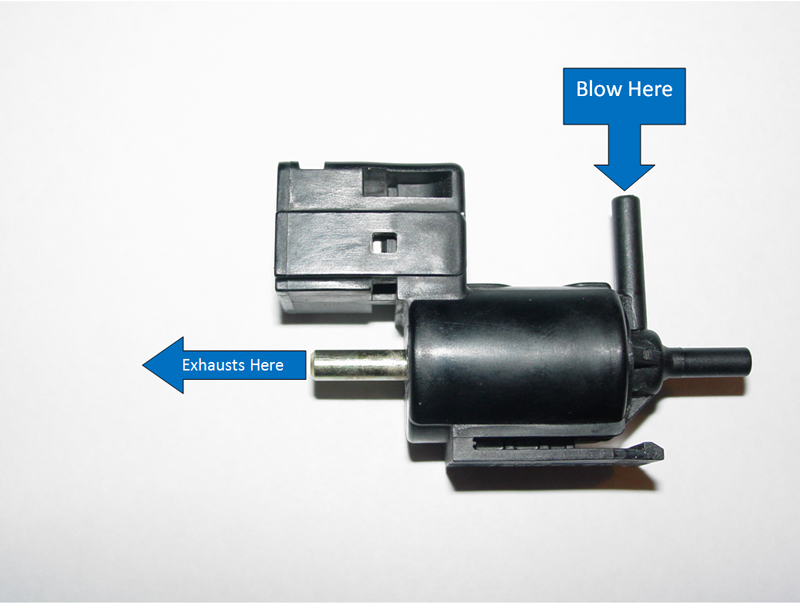
1) Once you get the solenoid removed you should clean the top port with soap/water or isopropyl alcohol.
This is where you are going to blow into with your mouth to verify airflow.
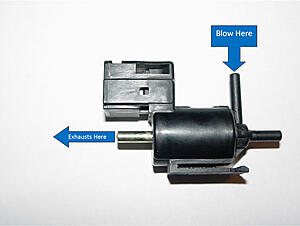
2) Remove the silencer for the solenoid by simply pulling it out.
This will expose another port.

3) Blow into the top port and verify the airflow is directed towards the "silencer side".
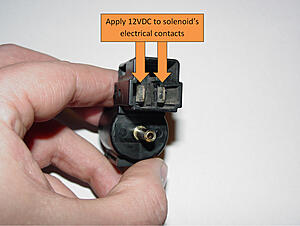
4) Apply 12VDC to the electrical contacts to energize the solenoid.
I used an old 12V transformer that I had laying around (could have been to a telephone) and cut/exposed the wires.
You can always get one from Radio Shack if you don't want to hack one up.
Its good for troubleshooting other devices like small motors.
I attached quick-disconnect terminals to the wires so I could plug them onto the contacts (better than having to hold the wires and blow into the port).
5) With 12VDC applied, blow into the top port and verify the airflow got redirected towards the other port.
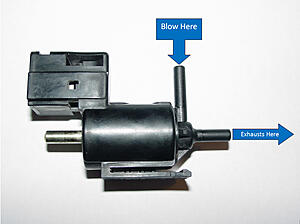
6) If the airflow did not match as instructed or if it came out the same port with it energized and not energized, replace the solenoid.
If it tested OK, simply reinstall.
The Mazda Service Manual explains this procedure clearly, but I still get asked how to perform this.
1) Once you get the solenoid removed you should clean the top port with soap/water or isopropyl alcohol.
This is where you are going to blow into with your mouth to verify airflow.

2) Remove the silencer for the solenoid by simply pulling it out.
This will expose another port.

3) Blow into the top port and verify the airflow is directed towards the "silencer side".
4) Apply 12VDC to the electrical contacts to energize the solenoid.
I used an old 12V transformer that I had laying around (could have been to a telephone) and cut/exposed the wires.
You can always get one from Radio Shack if you don't want to hack one up.
Its good for troubleshooting other devices like small motors.
I attached quick-disconnect terminals to the wires so I could plug them onto the contacts (better than having to hold the wires and blow into the port).

5) With 12VDC applied, blow into the top port and verify the airflow got redirected towards the other port.

6) If the airflow did not match as instructed or if it came out the same port with it energized and not energized, replace the solenoid.
If it tested OK, simply reinstall.
Last edited by Jon316G; Jun 18, 2011 at 07:53 AM.


New Member
Joined: May 2013
Posts: 1
Likes: 0
I hate to awaken such an old thread, I apologize.. I'm finding an easier smoother air flow in the middle solenoid than the top and bottom solenoids, is that ok? I unplugged and tested all three and seem to Work fine according to the steps suggested but as soon as I clip them in and test them again, I find the top and bottom solenoid having a hard time passing through when I blow into the top part...
I'm going to test the valves with a hand pump tomorrow..
Again sorry for waking the dead
I'm going to test the valves with a hand pump tomorrow..
Again sorry for waking the dead

The item in question are the three solenoids, if you are asking about coils, you are in the wrong thread. I just replaced mine when the air valve solenoid failed even after the tests. Which CEL(s) triggered that lead you to check the solenoids?

New Member
Joined: May 2013
Posts: 3
Likes: 0
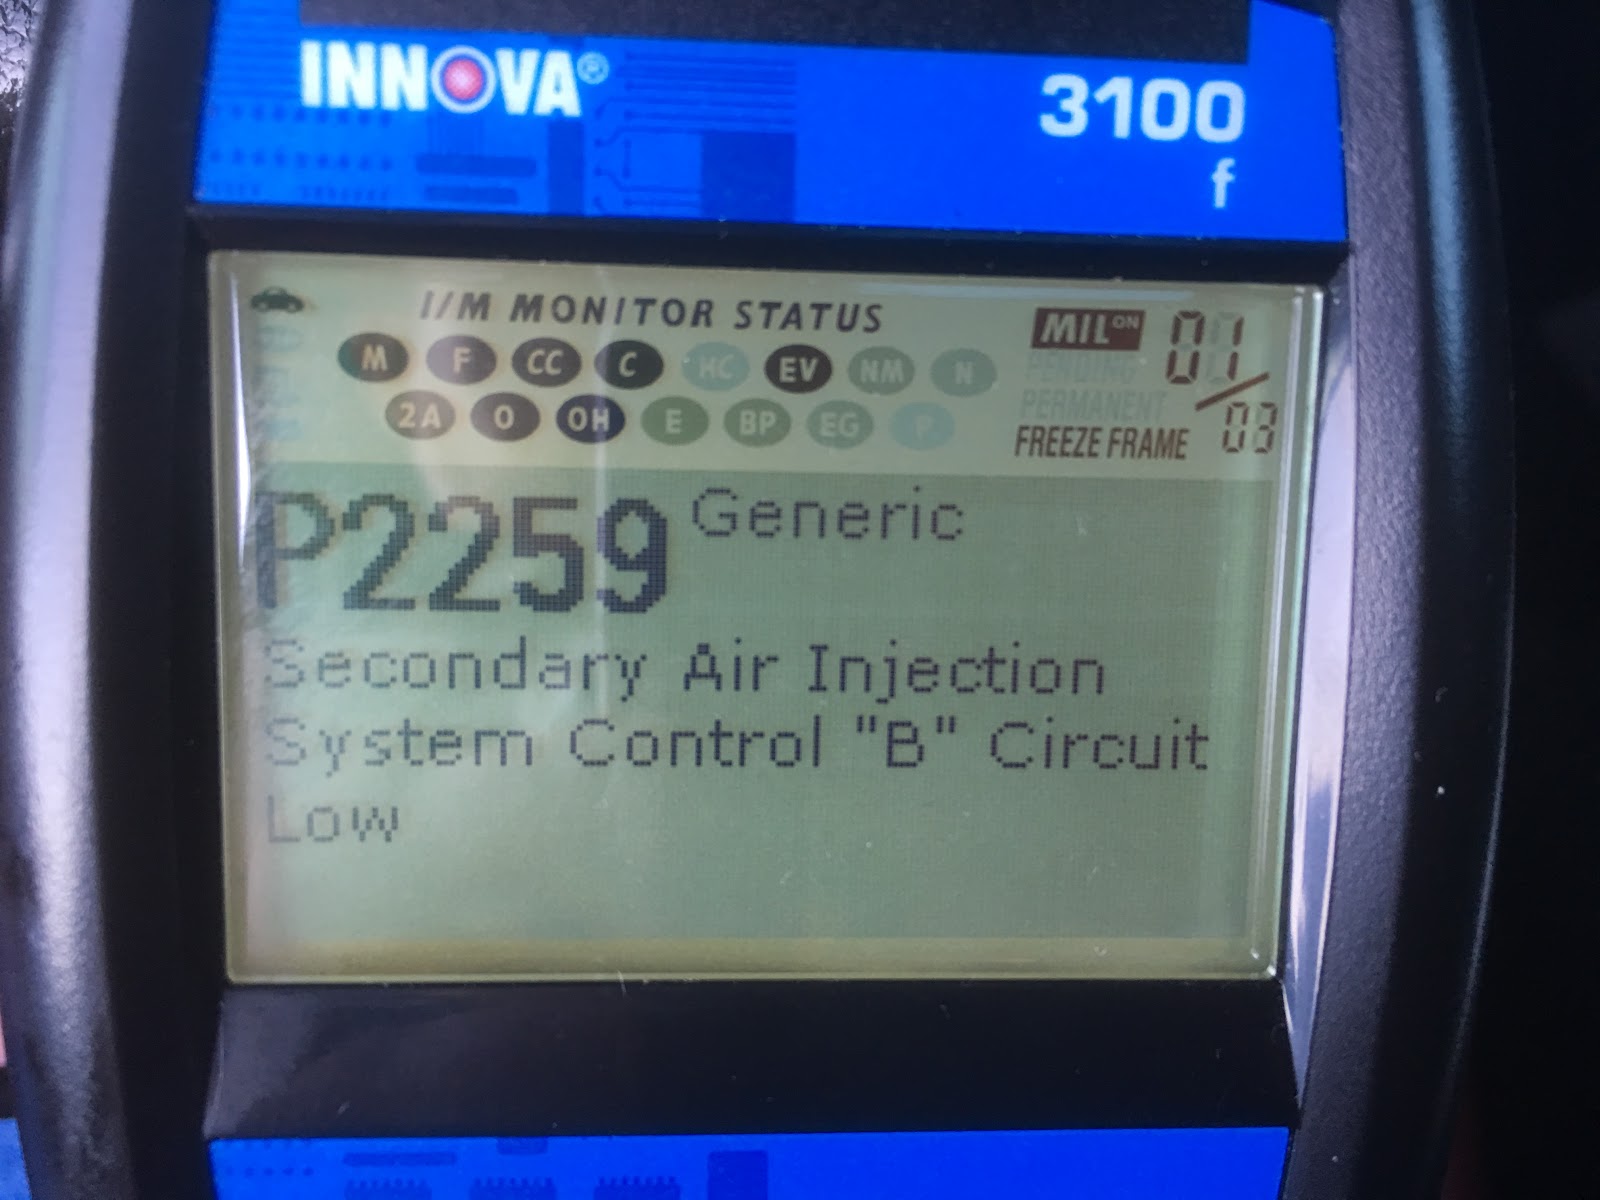
My bad. All 3 solenoids work with 12v applied. I have 12v at the connectors with key on. I still get p2259 code coming up.
New Member
Joined: May 2013
Posts: 3
Likes: 0
The switch has been done with mixing all 3 soleniods. At what point I'm I to get vacuum to the air check valve, ssv, and vdi. The only time I get vacuum is when I turn my car off. Is this right? My thought was with 12v power at the connector for each solenoid I would have vacuum all the time.

Registered
Joined: Apr 2012
Posts: 48
Likes: 0
From: Central NJ
I got one for ya's.. I was Tinkering around the X today.. I found what looks to be a Vacuum Solenoid Located on the Housing for the Air Pump.. Its between the Air Pump and Fuse Box on the Passenger side.. it has a Stubby piece of Vacuum line on it that's been Cut.. Anyone know what this is for and if it belongs somewhere other then bein Cut? Thanks

Registered
Joined: May 2003
Posts: 1,382
Likes: 11
I got one for ya's.. I was Tinkering around the X today.. I found what looks to be a Vacuum Solenoid Located on the Housing for the Air Pump.. Its between the Air Pump and Fuse Box on the Passenger side.. it has a Stubby piece of Vacuum line on it that's been Cut.. Anyone know what this is for and if it belongs somewhere other then bein Cut? Thanks


should add a few words
these solenoid often tests fine when cold, but fails when its HOT, which is the most common operating conditions these solenoid sees everyday.
so I usually heat it up with a hair dryer first before I test them.
these solenoid often tests fine when cold, but fails when its HOT, which is the most common operating conditions these solenoid sees everyday.
so I usually heat it up with a hair dryer first before I test them.

Registered
Joined: Jun 2013
Posts: 15
Likes: 0
Ah, okay. So P0661 and P2259 are entirely related to the solenoids, correct? So even though they tested out just fine, they might be faulty still as they were cool?

New Member
Joined: Apr 2018
Posts: 7
Likes: 0
From: Vancouver
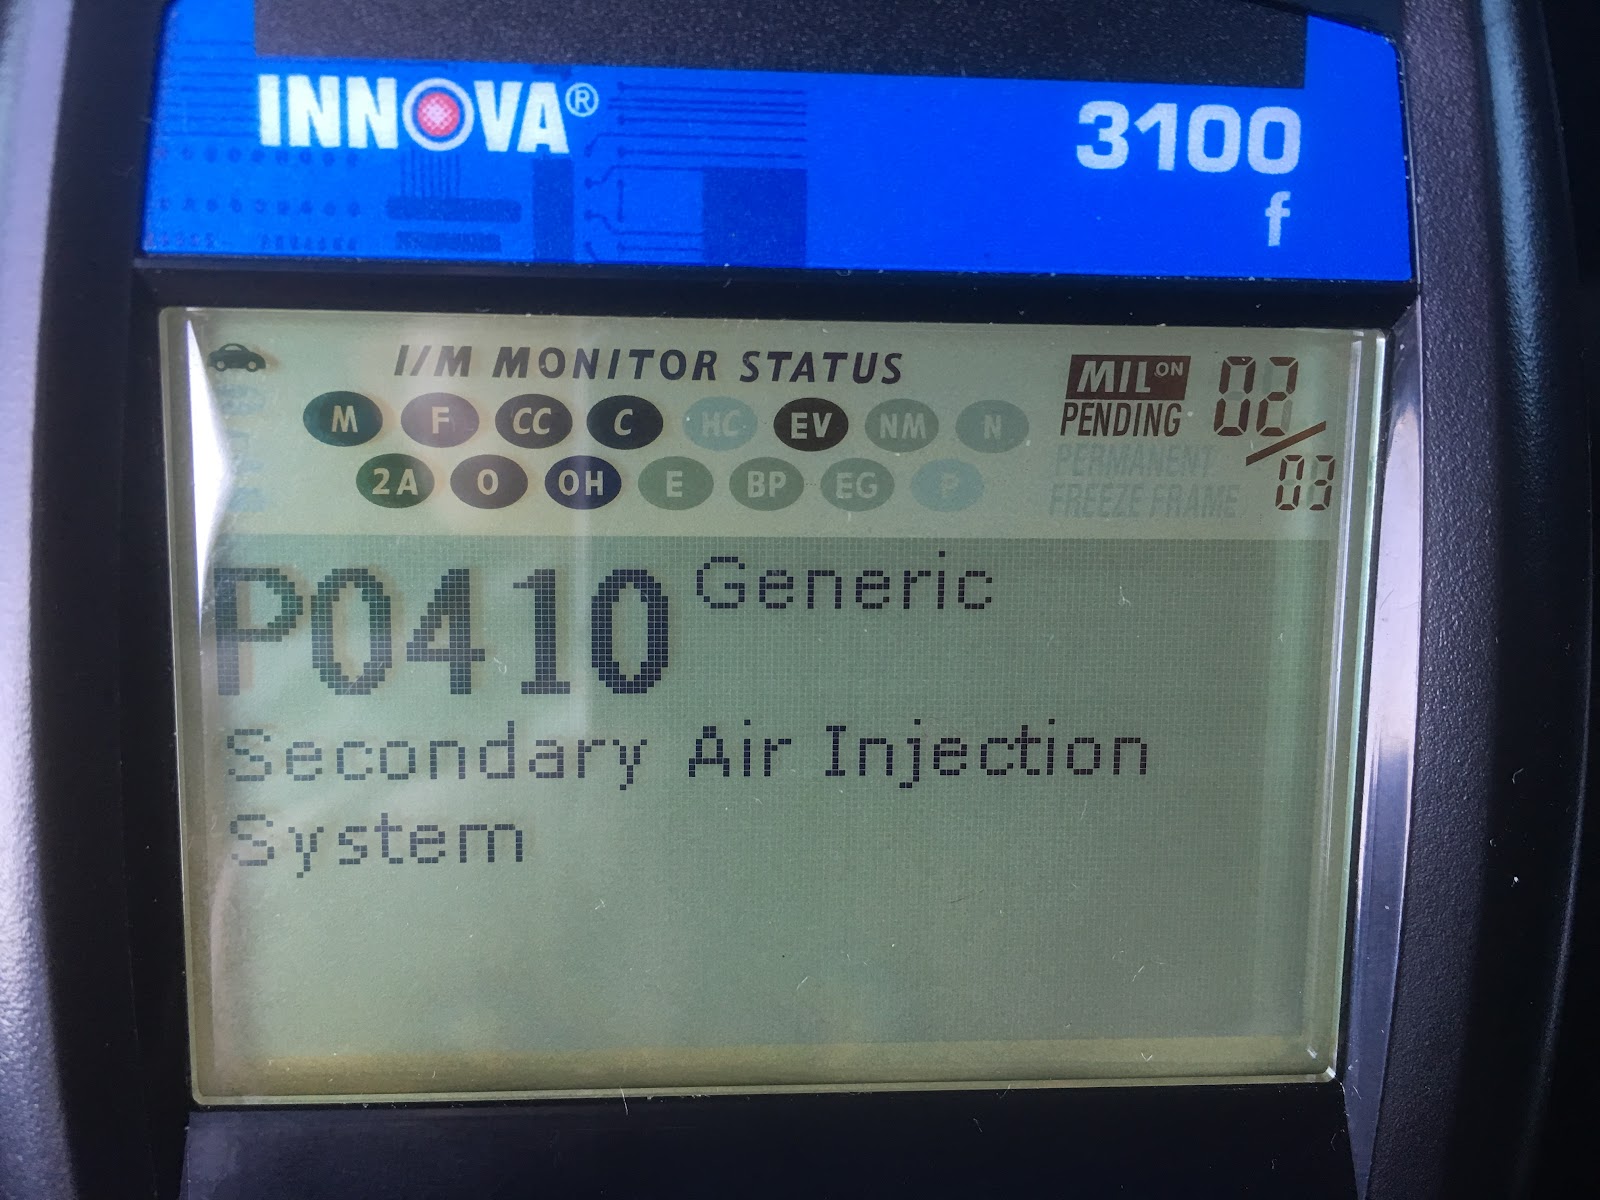
Urgent: P2259 & P0410
My 2004 RX8 has two P2259 code and one P0410 code. Contacted NAPA, LOrdco , I was told it's not something can be easily replaced, need take apart the whole engine .... If that's true, it would be a disaster for my poor RX8 ....
Anyone know how to fix it and where can I get the parts ,btw, I'm in Vancouver BC. --- -I hate going to the dealer ... much appreciated !

Anyone know how to fix it and where can I get the parts ,btw, I'm in Vancouver BC. --- -I hate going to the dealer ... much appreciated !

What am I doing here?
Joined: Mar 2006
Posts: 3,606
Likes: 652
From: 2017 Miata RF Launch Edition
P2259 is easily fixed with a new solenoid (rarely the contact just need to be cleaned).
http://a.co/fjef1oz
This may also fix P0410.
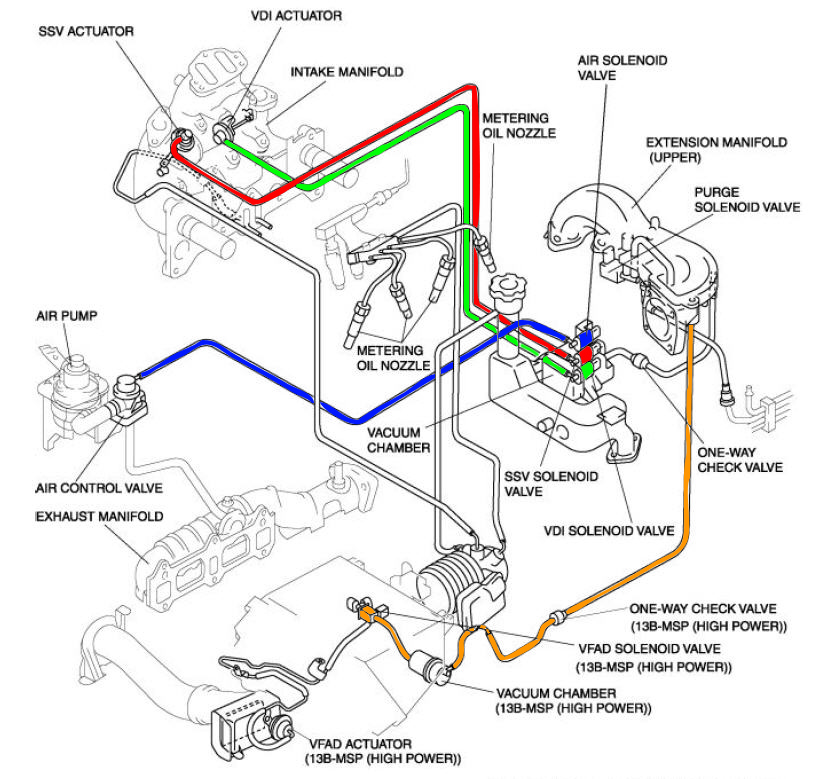
Getting to the solenoid is simple enough. It's mounted to a vacuum reservoir on the back side of the upper intake manifold. There are three solenoids back there so finding the right one may be tough. Follow the vacuum hose from the air pump, under the UIM, to the solenoid.
It's theoretically possible to remove the solenoid without removing the UIM but it's a royal pain in the ***. It will be faster to remove the airbox, throttle body, and UIM to get to it.
http://a.co/fjef1oz
This may also fix P0410.
Getting to the solenoid is simple enough. It's mounted to a vacuum reservoir on the back side of the upper intake manifold. There are three solenoids back there so finding the right one may be tough. Follow the vacuum hose from the air pump, under the UIM, to the solenoid.
It's theoretically possible to remove the solenoid without removing the UIM but it's a royal pain in the ***. It will be faster to remove the airbox, throttle body, and UIM to get to it.
New Member
Joined: Apr 2018
Posts: 7
Likes: 0
From: Vancouver
Much appreciated!
Much appreciated for your kind reply! Sorry I'm very new to rotary engine... How many of them? Do I need replace them all? Is there any way just cleaning it? Btw. If someone could provide a diagram of picture of the selinoid ofmy RX8, that would be wonderful and highly appreciated!
What am I doing here?
Joined: Mar 2006
Posts: 3,606
Likes: 652
From: 2017 Miata RF Launch Edition
P2259 is an electrical code. It's possible that cleaning the electrical connector may fix it but odds are the solenoid needs to be replaced. There are three mounted to the back of the UIM. You only need to repair/replace the one that connects to the air pump vacuum actuator. Just trace the vacuum hose from that actuator to the correct solenoid.

Is KL01-18-741 the correct part number for all three of the solenoids in that area underneath the rear of the upper intake manifold? As I've never had to take the upper intake manifold off, I'm thinking it might be prudent to replace all three while in there. I'm the original owner of a 2004 and the solenoids are all original.
New Member
Joined: Apr 2018
Posts: 7
Likes: 0
From: Vancouver
P2259 is easily fixed with a new solenoid (rarely the contact just need to be cleaned).
http://a.co/fjef1oz
This may also fix P0410.
Getting to the solenoid is simple enough. It's mounted to a vacuum reservoir on the back side of the upper intake manifold. There are three solenoids back there so finding the right one may be tough. Follow the vacuum hose from the air pump, under the UIM, to the solenoid.
It's theoretically possible to remove the solenoid without removing the UIM but it's a royal pain in the ***. It will be faster to remove the airbox, throttle body, and UIM to get to it.

Thread
Thread Starter
Forum
Replies
Last Post
Shankapotamus3
Series I Trouble Shooting
28
Mar 14, 2021 03:53 PM