
DIY: Sun Visor Fix


DIY: Sun Visor Fix
Ok so my DS visor is broken and decided to find out where the weak point is. Obviously it is made of cheap plastic, but there is more. When the visor reaches a certain temp., the lubrication on the metal bar used to rotate the clamp softens. When the metal part cools back down, so does the lube (hardens). That is why when the next time you go to use your visor, you hear the POP. That is the metal piece not being able to swivel like it used to, and thus the 2 pieces of visor are split apart. All I did is remove part of the metal and loosen it.
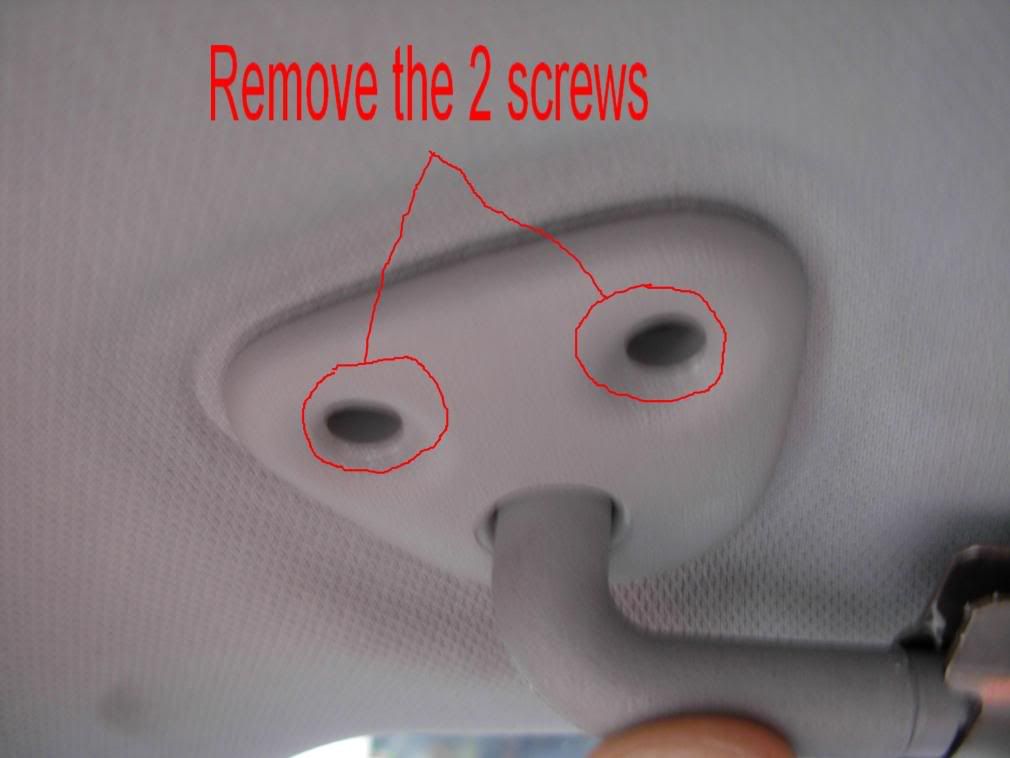
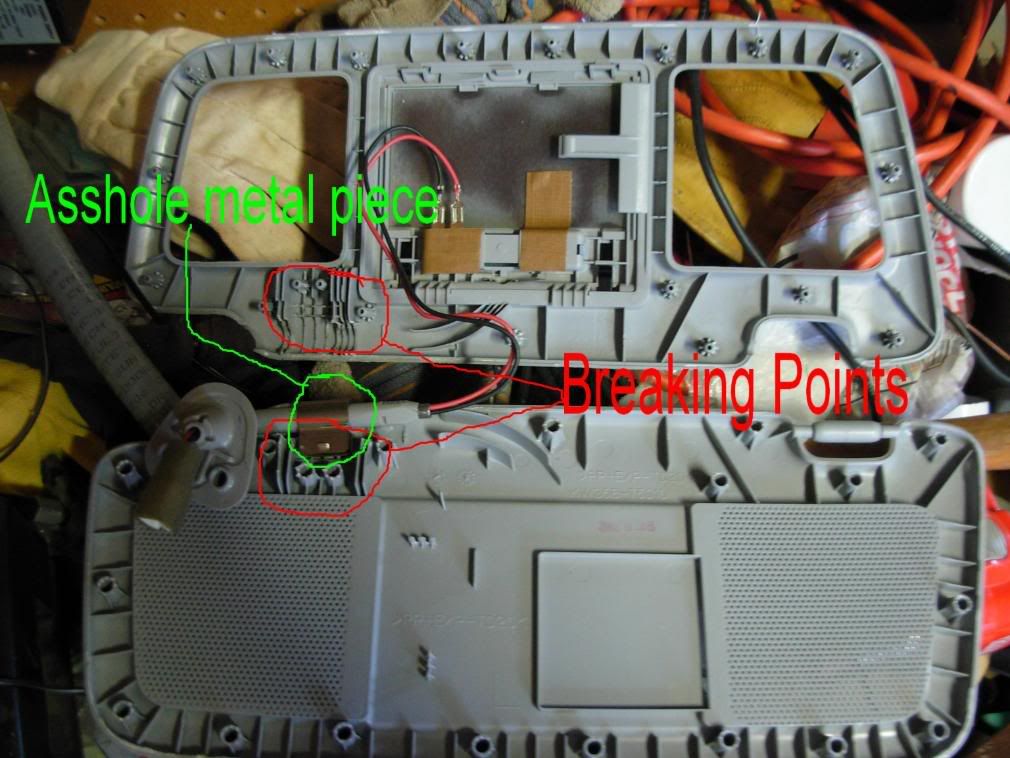
1.) Unscrew the two screws holding the visor into the roof.
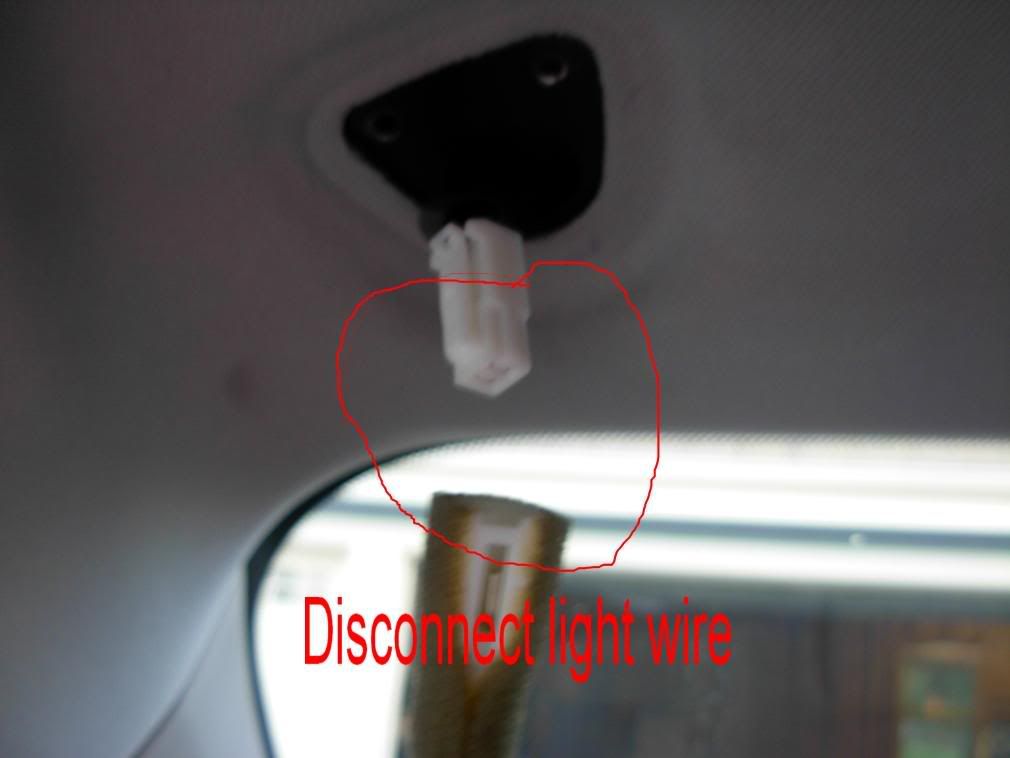
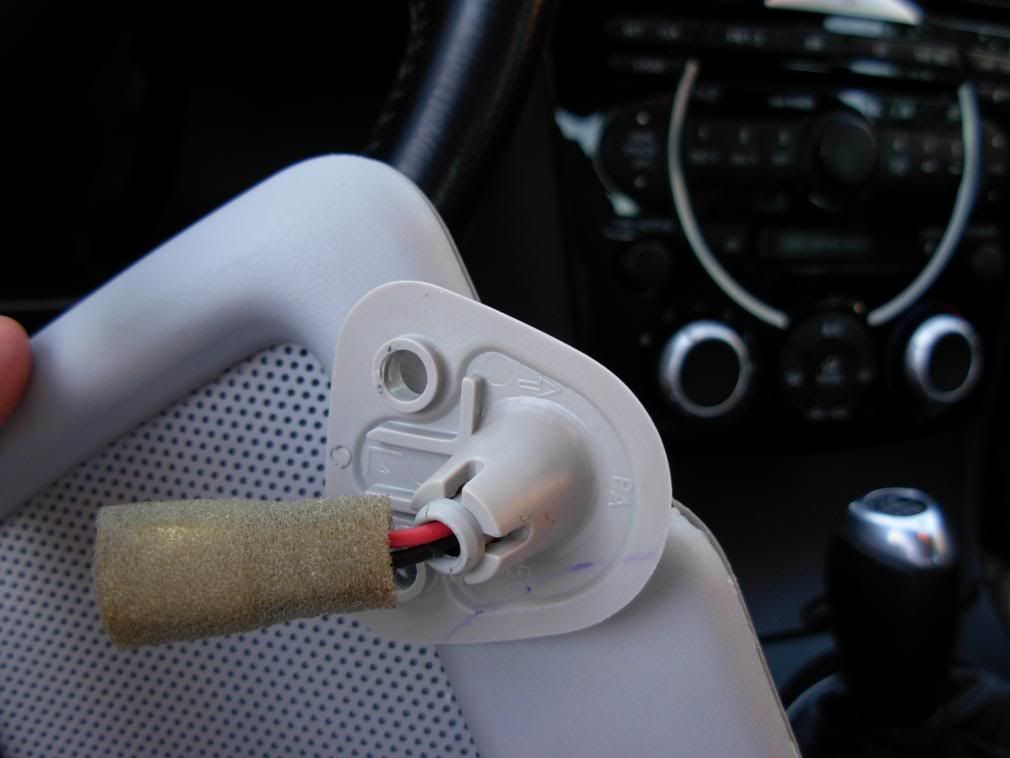
2.) Disconnect the power source for the vanity lights
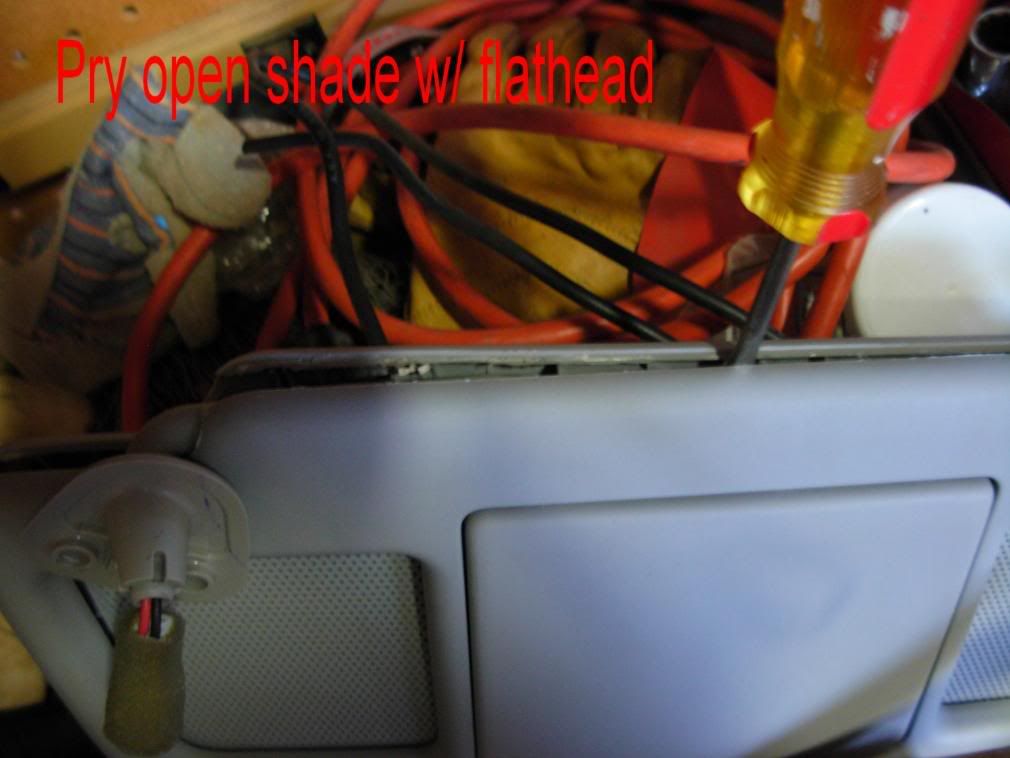
3.) Pry open the visor, like I said it is made of cheap plastic and comes right apart.
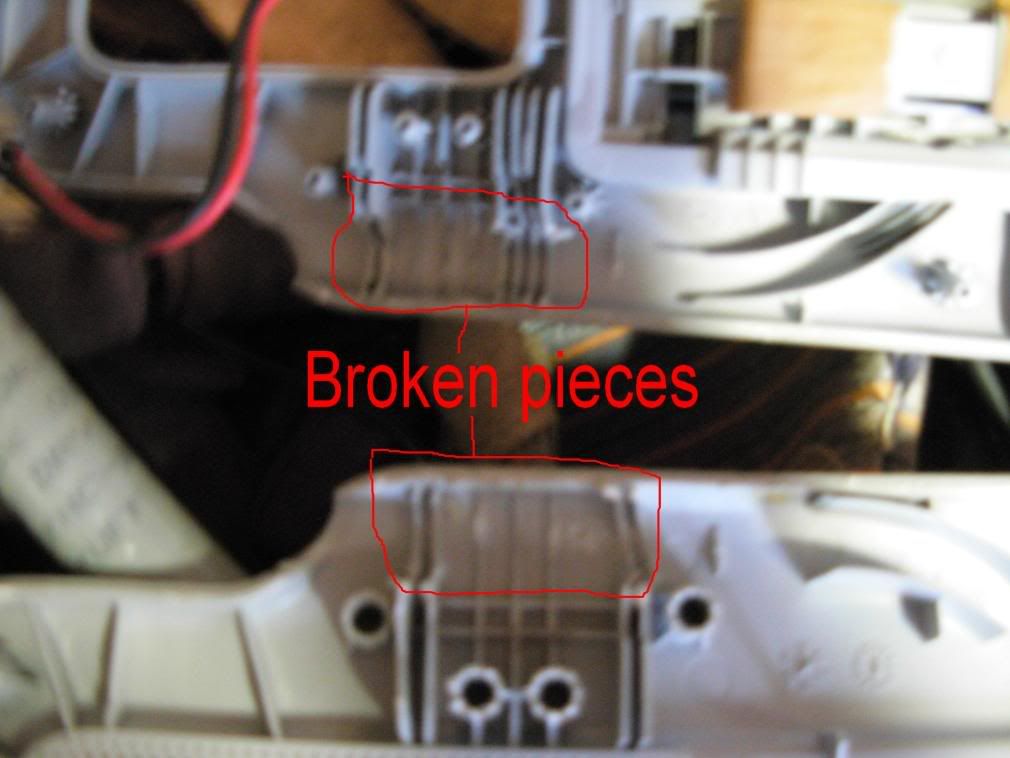
4.) Identify where the weak spot occurred (the thin pieces of plastic all mangled up everywhere). Also, the metal piece which froze up.
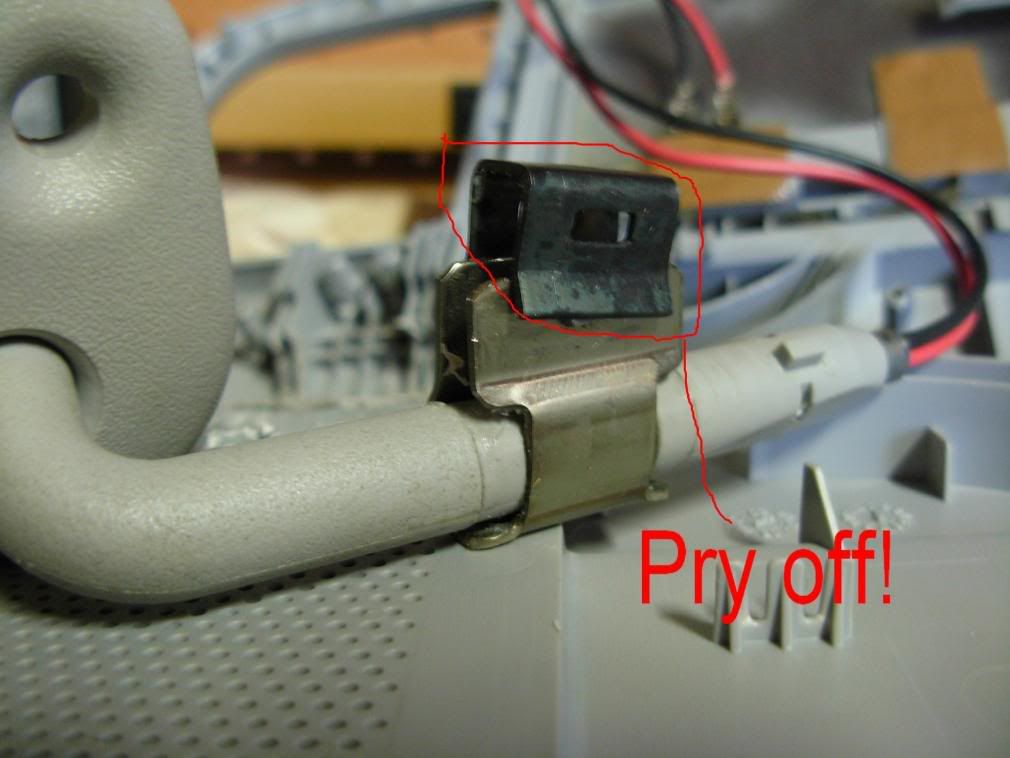
5.) Use a flathead screwdriver to pry off the black metal piece on the big metal part. This is what is clamping the swivel to the visor, not allowing it to move which ripped open the visor.
6.) After:
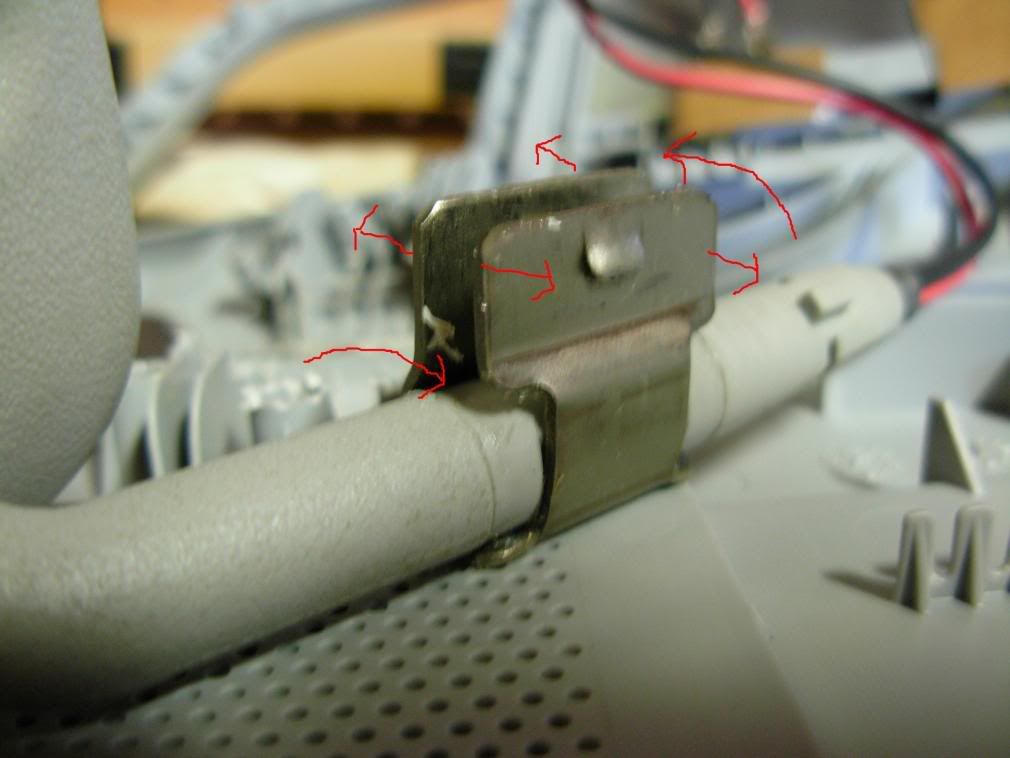
7.) Wiggle the final metal part for awhile, using a flathead to loosen the grasp on the visor. You can feel at first it doesn't move. But after some forceful twisting it will start to move again. Lube it up and DO NOT put that black metal piece back on.
8.) Put visor back together and use Gorilla Glue to seal the edges as Mazda decided to make the mirrors a one-time use product.
EDIT: Because Gorilla Glue expands when drying (and its an ugly orange), use super glue to glue the visible parts of the visor. ie: the warning label front and sides.
9.) Re-install in the reverse order but make sure it will swivel easily before screwing it back in. If it doesn't work for you, just shell out the $70 for a new one.
Suggestions?
1.) Unscrew the two screws holding the visor into the roof.
2.) Disconnect the power source for the vanity lights
3.) Pry open the visor, like I said it is made of cheap plastic and comes right apart.
4.) Identify where the weak spot occurred (the thin pieces of plastic all mangled up everywhere). Also, the metal piece which froze up.
5.) Use a flathead screwdriver to pry off the black metal piece on the big metal part. This is what is clamping the swivel to the visor, not allowing it to move which ripped open the visor.
6.) After:
7.) Wiggle the final metal part for awhile, using a flathead to loosen the grasp on the visor. You can feel at first it doesn't move. But after some forceful twisting it will start to move again. Lube it up and DO NOT put that black metal piece back on.
8.) Put visor back together and use Gorilla Glue to seal the edges as Mazda decided to make the mirrors a one-time use product.
EDIT: Because Gorilla Glue expands when drying (and its an ugly orange), use super glue to glue the visible parts of the visor. ie: the warning label front and sides.
9.) Re-install in the reverse order but make sure it will swivel easily before screwing it back in. If it doesn't work for you, just shell out the $70 for a new one.
Suggestions?
Last edited by Ross_Dawg; Aug 7, 2008 at 10:45 PM.

Great write-up! I just had both of mine replaced under warranty last week. Luckily I got it done just as the warranty had ended (47,900k). Next time this happens to me, I'll be sure to use this!

ZOOM-ZOOM
Joined: May 2008
Posts: 28
Likes: 1
From: oklahoma
My driver side sunvisor is split and my passenger side one is split all the way in half, it falls down on every rock on the road, Ill be doing my passenger side one within the next few days......ill let you know how it goes, Thanks
 8 bux is better than 70
Registered User
Joined: Jul 2004
Posts: 124
Likes: 0
From: Philadelphia, PA
Great DIY, one comment only: My visor was only split near the left corner, so I didn't have to take it apart, just kind of pulled out the hinge and the metal part came out, still connected via the vanity light wire. I removed the black metal part, loosened it up as per your instructions, and slid it back in. Ended up not having to glue the whole thing together, just the corner. Thanks!
Yeah one problem I noticed was that one time I jerked down the visor because I was momentarily blinded by the sun, and the POP happened. You have to be really really careful when bringing down your shade. Unless there's a way to clamp the rear part permanently... I still haven't nailed this DIY down yet... comments appreciated


Registered
Joined: Aug 2005
Posts: 461
Likes: 0
From: GAH!
Guys, without that black metal clip there is nothing to keep the tension on the swivel. The more you use your visors, the more loose it will get, and eventually it won't stay up anymore.
Instead of removing the black clip altogether, you might want to try bending it so it doesn't clamp so tightly.
Instead of removing the black clip altogether, you might want to try bending it so it doesn't clamp so tightly.

Registered User
Joined: Oct 2006
Posts: 2
Likes: 0
Your step by step instructions for repairing the sun visor were terrific! I didn't have to split the entire visor open. I was able to just pull out the metal piece from the corner and then reassemble.
A few drops of Krazy glue and a tight gripping clamp finished off the job nicely. The visor moves more smoothly now than when it was new!
And to block those blasted little holes, I cut two pieces of plastic from a cheap report cover to fit in each of the two sections. The plastic still allows some visibility, but acts like an added pair of sunglasses.
Thanks again!
Now today I noticed condensation inside my tail light! And this car, though now 4 years old has only 23,000 miles and is always garage kept! I love my RX-8, but this cheap stuff really stinks!


Registered User
Joined: Aug 2004
Posts: 346
Likes: 0
Just repaired my driver's side using this DIY. I also only had to pry up the corner. That black spring piece was a b!tch. When I finally pryed it off, it shot across the room like a bullet and could have easily "put an eye out". My driver side visor lasted 5-1/2 years (84,000 miles). Passenger side is still in good shape from what I can tell.


Registered User
Joined: Aug 2004
Posts: 346
Likes: 0
Guys, without that black metal clip there is nothing to keep the tension on the swivel. The more you use your visors, the more loose it will get, and eventually it won't stay up anymore.
Instead of removing the black clip altogether, you might want to try bending it so it doesn't clamp so tightly.
Instead of removing the black clip altogether, you might want to try bending it so it doesn't clamp so tightly.

Yeah I knew it would happen eventually... like I said the DIY is open to suggestions lol

04 Yellow
Joined: Apr 2008
Posts: 60
Likes: 0
From: North Richland Hills,TX
I just fixed mine! My passenger side sunvisor kept falling down-EVERY time I hit a bump. It really aggravated my friend that had it falling in her face! I just got done messing with it. I had a hard time sealing it completely at the area of the original break. I put it on and now it stays! It doesn't seem to be "snapping" into place like the driver's side, (hugging the headliner), but it's staying up and not falling! Well worth the effort!
Thanks!!!
Thanks!!!

Registered User
Joined: Jun 2009
Posts: 5
Likes: 0
From: S Cali
temp fix
Hey all, just wanted to give you a quick fix when you dont have current time to fix this using the above visor repair trick. I used a xl binder clip (the one that looks like a black triangle tube and you open with the 2 silver handles.)
Remove the visor as indicated in the first post.
Realign the joint and the visor to the "closed position"
Place the xl binder clip right over the swivel joint and it should keep the bad boy in place and the visor remains functional.
i know its ugly, but it beats having to keep putting it back up after hitting the smallest bump in the road till you can get a chance to perm fix it.
Also as an additional tip, i kept the binder clip after using the repair trick above as a clamp to keep everything nice a tight while the glue hardened. To date i haven't removed the binder clip because it offers additional strength.
Last edited by fearonline; Sep 14, 2009 at 02:14 PM.