


DIY: Stock Air Filter (Box)


Thread Starter
One Shot One Kill
Joined: Jan 2008
Posts: 1,369
Likes: 2
From: Houston
DIY: Stock Air Filter (Box)
since vital information was spread between multiple post, i decided to post them into one and add my own video.
courtesy of cesaralaniz (PICS)
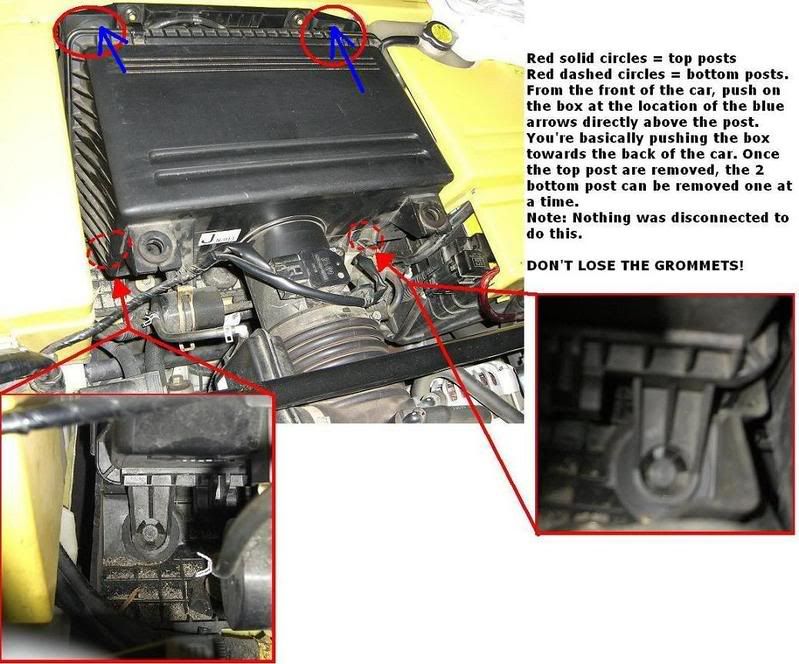
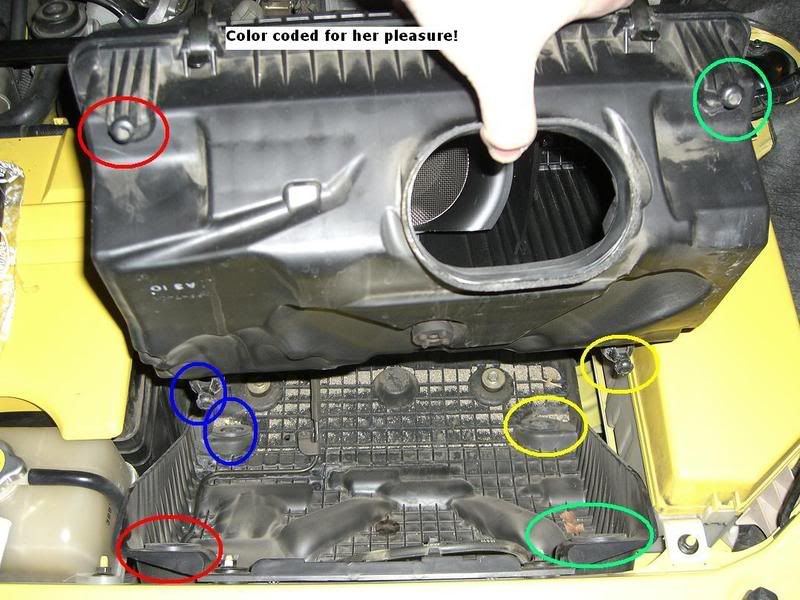
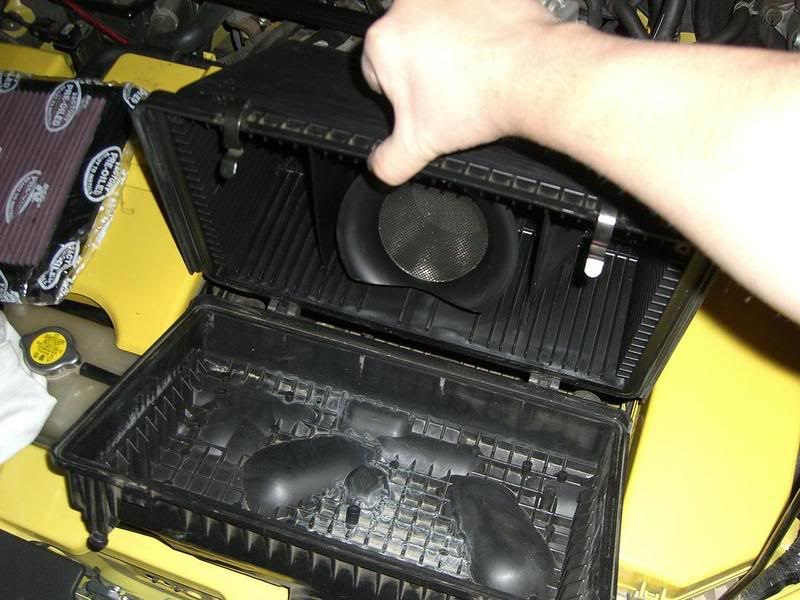
finally my videos:
http://www.youtube.com/watch?v=6I6_UnQELcw
http://www.youtube.com/watch?v=nK38j9IC7L4
Okay, I have seen some posts stating that there are some difficulties getting into the air filter housing to replace the filter. I was having problems myself, but I just figured it out. Here is what I did (and be aware that I am no mechanic, so I may use fictional names for some of the parts involved):
1. Remove the engine cover (obviously).
2. There are two small plastic posts at the front of the filter housing that snap into the engine compartment. With one hand on each side I pushed the housing back and the posts out of their connections.
3. There are also two posts at the bottom of the filter housing that are difficult to see, and are virtually impossible to dislodge by pushing back. But there is a trick. At the top rear of the filter housing, there are two small platforms where the posts on the engine cover snap into place. Place a couple of fingers under each one, and pull straight up. The bottom posts will pop right out. The only thing left to do is push the housing back so that the filter housing's front intake opening separates from the engine compartment and.....voila. You can now tinker with the filter at your leisure. And no need to disconnect anything from the filter housing.
If anyone would like photos if any of this is unclear, I can try to get some. Or if someone else with better access to a digital camera and who understood my instructions can do it, even better. Hope that helps.
1. Remove the engine cover (obviously).
2. There are two small plastic posts at the front of the filter housing that snap into the engine compartment. With one hand on each side I pushed the housing back and the posts out of their connections.
3. There are also two posts at the bottom of the filter housing that are difficult to see, and are virtually impossible to dislodge by pushing back. But there is a trick. At the top rear of the filter housing, there are two small platforms where the posts on the engine cover snap into place. Place a couple of fingers under each one, and pull straight up. The bottom posts will pop right out. The only thing left to do is push the housing back so that the filter housing's front intake opening separates from the engine compartment and.....voila. You can now tinker with the filter at your leisure. And no need to disconnect anything from the filter housing.
If anyone would like photos if any of this is unclear, I can try to get some. Or if someone else with better access to a digital camera and who understood my instructions can do it, even better. Hope that helps.
Too late for you, but this might help someone else. VIDEO
It's about 5 1/2 megs and you will need Quicktime 7
Here it is in DivX (.avi)
It's kind of hard to explain, you just have to get it right once.
It's about 5 1/2 megs and you will need Quicktime 7
Here it is in DivX (.avi)
It's kind of hard to explain, you just have to get it right once.
finally my videos:
http://www.youtube.com/watch?v=6I6_UnQELcw
http://www.youtube.com/watch?v=nK38j9IC7L4
Originally Posted by Socket7;
Might want to make a note to be careful not to push the rubber grommets for the bottom posts through their own holes when reinstalling the air box. I lost both of mine and had to replace them with the grommets from the engine cover (which incidentally work a lot better because they are much stiffer and don't easily push through the hole)
Last edited by xsnipersgox; May 3, 2008 at 11:12 PM.


ಠ_ಠ
Joined: Aug 2007
Posts: 2,228
Likes: 6
From: Under the Dumbarton Bridge
Might want to make a note to be careful not to push the rubber grommets for the bottom posts through their own holes when reinstalling the air box. I lost both of mine and had to replace them with the grommets from the engine cover (which incidentally work a lot better because they are much stiffer and don't easily push through the hole)

Registered User
Joined: Feb 2008
Posts: 10
Likes: 0
From: Chandler, AZ
Might want to make a note to be careful not to push the rubber grommets for the bottom posts through their own holes when reinstalling the air box. I lost both of mine and had to replace them with the grommets from the engine cover (which incidentally work a lot better because they are much stiffer and don't easily push through the hole)
Also, if you do happen to lose the grommets, you better check for them. They have a tendency to fall directly in to the radiator fans!

I was able to fish mine out but you have to remove the whole box, its platform, etc. You definitely don't want to leave them in the fans.





Yup, I just lost one of the lower air box grommets this weekend and similarly replaced with one of the engine cover rubber grommets. The cover didn't really need that one anyway. 
Might want to make a note to be careful not to push the rubber grommets for the bottom posts through their own holes when reinstalling the air box. I lost both of mine and had to replace them with the grommets from the engine cover (which incidentally work a lot better because they are much stiffer and don't easily push through the hole)

Registered User
Joined: Aug 2009
Posts: 4
Likes: 0
From: Miami, Florida
The images and youtube links were invaluable. Thanks much!
It definitely took more strength than I imagined to pop the box out. I found it to be a lot easier once I removed the battery cover and negative lead wire from the left side.
Besides a minor cut I'm feeling pretty good about the whole experience.
It definitely took more strength than I imagined to pop the box out. I found it to be a lot easier once I removed the battery cover and negative lead wire from the left side.
Besides a minor cut I'm feeling pretty good about the whole experience.
Finally!!!
I found the sticking point. That tube that is clipped on to the front there makes it impossible to get off. I might need a new air filter.
I took off those fins inside the box as well. It certainly sounds different.
I think I lost one of the rubber grommets also... is it retrievable without having to take the front bumper off?
I found the sticking point. That tube that is clipped on to the front there makes it impossible to get off. I might need a new air filter.
I took off those fins inside the box as well. It certainly sounds different.
I think I lost one of the rubber grommets also... is it retrievable without having to take the front bumper off?
Last edited by Bigbacon; Sep 28, 2009 at 06:50 AM.

Registered
Joined: Jan 2010
Posts: 3,487
Likes: 3
From: Omaha, NE
Finally!!!
I found the sticking point. That tube that is clipped on to the front there makes it impossible to get off. I might need a new air filter.
I took off those fins inside the box as well. It certainly sounds different.
I think I lost one of the rubber grommets also... is it retrievable without having to take the front bumper off?
I found the sticking point. That tube that is clipped on to the front there makes it impossible to get off. I might need a new air filter.
I took off those fins inside the box as well. It certainly sounds different.
I think I lost one of the rubber grommets also... is it retrievable without having to take the front bumper off?

Guest
Posts: n/a
The images and youtube links were invaluable. Thanks much!
It definitely took more strength than I imagined to pop the box out. I found it to be a lot easier once I removed the battery cover and negative lead wire from the left side.
Besides a minor cut I'm feeling pretty good about the whole experience.
It definitely took more strength than I imagined to pop the box out. I found it to be a lot easier once I removed the battery cover and negative lead wire from the left side.
Besides a minor cut I'm feeling pretty good about the whole experience.
its not your car until it has your blood, sweat, and/or tears on it


Registered
Joined: Jun 2006
Posts: 181
Likes: 0
Ok, I followed all those steps and I believe the bottom posts were released as well. I see that the flex duct is fully compressed but there is this small plastic clip that holds a thin hose and it is impossible to pass through that point. The lower part of the filter box hits on that point and although I put all my weight pushing the box, it is already to its maximum. Maybe the lower posts haven't released and I just think that they did? I don't know but I see that he only way to get it out is to break that plastic.
Last edited by andreasy; Nov 28, 2010 at 02:42 AM.

Only thought is that all the rearward pushing is going directly into the throttle body, which is held in place by the intake manifold, which is plastic, which runs across the top of the motor and is bolted to the lower intake. There is a heck of a lever arm on that plastic and those bolts.
I work the plastic flex duct out first, then do this. It takes a little longer, but you get the same result without all the pushing.
I work the plastic flex duct out first, then do this. It takes a little longer, but you get the same result without all the pushing.

Registered
Joined: Nov 2008
Posts: 603
Likes: 2
From: Long Beach, CA
Registered
Joined: Jun 2006
Posts: 181
Likes: 0
So, you untight the ring that holds the flex duct and then you pull the duct rearwards. And doesn't this require a lot of pulling to get the duct out? I thought to do this but then I thought that it will require the same amount of strength but instead of push it will be pull. Does it come out easily or does it need a lot of pulling effort?
Last edited by andreasy; Nov 29, 2010 at 10:47 AM.

40th AE #815
Joined: Feb 2011
Posts: 91
Likes: 0
From: Atlanta,GA
Only thought is that all the rearward pushing is going directly into the throttle body, which is held in place by the intake manifold, which is plastic, which runs across the top of the motor and is bolted to the lower intake. There is a heck of a lever arm on that plastic and those bolts.
I work the plastic flex duct out first, then do this. It takes a little longer, but you get the same result without all the pushing.
I work the plastic flex duct out first, then do this. It takes a little longer, but you get the same result without all the pushing.