
DIY: Side-marker "Clear Corner Lights" Installation


Registered
Joined: Feb 2005
Posts: 164
Likes: 0
From: South Florida
Florida Law
For those in Florida:
Taken From http://www.flsenate.gov/
Taken From http://www.flsenate.gov/
316.224 Color of clearance lamps, identification lamps, side marker lamps, backup lamps, reflectors, and deceleration lights.--
(1) Front clearance lamps, identification lamps, and those marker lamps and reflectors mounted on the front or on the side near the front of a vehicle shall display or reflect an amber color.
(2) Rear clearance lamps, identification lamps, and those marker lamps and reflectors mounted on the rear or on the sides near the rear of a vehicle shall display or reflect a red color.
(3) All lighting devices and reflectors mounted on the rear of any vehicle shall display or reflect a red color, except the stop light or other signal device, which may be red, amber, or yellow, and except that the light illuminating the license plate shall be white and the light emitted by a backup lamp shall be white or amber. Deceleration lights as authorized by s. 316.235(5) shall display an amber color.
(4) A violation of this section is a noncriminal traffic infraction, punishable as a nonmoving violation as provided in chapter 318.
History.--s. 1, ch. 71-135; s. 2, ch. 86-23; s. 176, ch. 99-248.
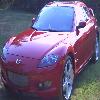
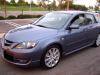
I finally posted pics of the Clear Corners and Lights...
https://www.rx8club.com/showthread.p...685#post746685
https://www.rx8club.com/showthread.p...685#post746685


In Exile
Joined: Jul 2004
Posts: 461
Likes: 0
From: North of Orlando
How about I spent 45 mins yesterday trying to do the install (but FAILED of course). I just read this and installed it in 5 mins, FU^%! I feel like such a dumb A$$. Great DIY! Next time I'll check here first.

Registered User
Joined: Sep 2004
Posts: 85
Likes: 0
From: Marlboro, NY
Originally Posted by BigOLundh
I hate all of you.
I have been trying to get one reflector out for over an hour now.
AWWWWWWWW!!!!
I have been trying to get one reflector out for over an hour now.
AWWWWWWWW!!!!


Thread Starter
Hubble has been saved!
Joined: Aug 2003
Posts: 1,221
Likes: 0
From: Richmond, VA
Originally Posted by salituro64
I will be getting the clear corners soon, but I canno't understand why everyone wants to break off this foil. Is there such a great improvement in doing this?
As this is a personal preference, you may not agree.
Registered User
Joined: Nov 2004
Posts: 13
Likes: 0
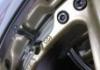
i just got this done today, took about 15 mins total. i removed the reflector, the first one yeah was kinda scary to remove. just use a very long an thin flat head screw driver and use a kind of 'opening the door method', twist the screw driver left, then right. do this about 10-15 times, then use a larger flathead and keep using that one till the reflector pops out. then i used some very long and thin needle nose to bend the reflector till it comes out. this took longer than popping it out. i did scratch other reflector the metal part but you cant notice it. its easy to do. i also used some temporary 194A leds from autozone until the hyper whites come in.
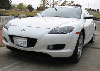
i have a pearl white 8 and it makes it look sooooo much cleaner.
i have a pearl white 8 and it makes it look sooooo much cleaner.

Purple PiXiE
Joined: Jun 2005
Posts: 125
Likes: 0
From: Vegas Babi
tnx so much for the instructions. The reflector took awhile to get out, but it looks amazing. I had my laptop outside and was reading the instructions while I was doin it. Looks awesome. Tnx tons. 

Just call me Circle
Joined: Jan 2005
Posts: 298
Likes: 0
From: San Diego
IMO, you shouldn't be too worried about scratching up the insides of the clear corner.
After I pulled my relectors out, I looked inside and it looked REALLY bad. However, from the outside it looks like nothing ever happened, unless you look EXTREMELY closely.
If you're willing to take this risk, it's tons easier ^^
After I pulled my relectors out, I looked inside and it looked REALLY bad. However, from the outside it looks like nothing ever happened, unless you look EXTREMELY closely.
If you're willing to take this risk, it's tons easier ^^

Attracts tree branches
Joined: Jun 2004
Posts: 5,940
Likes: 3
Originally Posted by xpixieshadowx
tnx so much for the instructions. The reflector took awhile to get out, but it looks amazing. I had my laptop outside and was reading the instructions while I was doin it. Looks awesome. Tnx tons.
>> Motion
Joined: Feb 2005
Posts: 301
Likes: 0
From: Long Island
I finally got my corners in today ... but it was a b!tch to get those damn pins to pop out... I guess maybe the person before me had clear corners and replaced his back with the amber before he sold it to me cuz the screws were stripped...

Registered User
Joined: Sep 2005
Posts: 77
Likes: 0
From: Washington DC
Yea one of mine was stripped too so i had to wedge my finger in ti and push REALLY hard to just get the thing to pop out on its own... not to much fun but whatcha gonna doo... u know?
got mine in today : ) With no reflectors and Stealh bulbs...
got mine in today : ) With no reflectors and Stealh bulbs...


350Z Killer
Joined: Sep 2005
Posts: 418
Likes: 0
From: Greenville, SC
Whew, just finished. I dunno about yall but for me it seemed like gettin the rear tab of the yellow side markers to pop out was the hardest part. I've still got dents in both my thumbs. The finished product looks good though, glad I went ahead and took the reflectors out.

Club Marbles Member
Joined: Jul 2005
Posts: 3,252
Likes: 0
From: DFW, TX
Did you get the clear corners with the stealth bulbs, Mike?
I need to look up on this thread...what are the reflectors about?
Edit: Ok, do the reflectors still come in the clear corners with stealth bulbs (via mazdaparts)? If they do, would it make a difference to remove them?
I need to look up on this thread...what are the reflectors about?
Edit: Ok, do the reflectors still come in the clear corners with stealth bulbs (via mazdaparts)? If they do, would it make a difference to remove them?
Thread Starter
Hubble has been saved!
Joined: Aug 2003
Posts: 1,221
Likes: 0
From: Richmond, VA
Originally Posted by Raptor2k
Ok, do the reflectors still come in the clear corners with stealth bulbs (via mazdaparts)? If they do, would it make a difference to remove them?
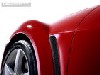
The type of buld makes no difference. The difference is in the look when the bolb is illuminated. The reflector blocks the light to the back half of the light fixture. Check out the picture in the following post.
https://www.rx8club.com/showpost.php...98&postcount=4
350Z Killer
Joined: Sep 2005
Posts: 418
Likes: 0
From: Greenville, SC
I didnt get the stealth bulbs, I got mine off Ebay through ICB Motorsports and they came with white bulbs. Just be careful when taking out the reflectors Raptor, if they touch the inside of the lenses, they will scratch really easy. Saw em at night for the first time and they look great, thanks for the detailed instruction Msrecant.