
DIY: Painting the Engine Cover & Related Items


Rotary eXperimental-8
Joined: Nov 2003
Posts: 1,830
Likes: 0
From: Gander, Newfoundland, Canada
That looks very cool. Good job. How did you put in those vents?
oops, nevermind. I didn't know they were always there :p
oops, nevermind. I didn't know they were always there :p
Last edited by moRotorMotor; Jan 1, 2004 at 05:24 PM.


uhhhhh....hello?
Joined: Dec 2002
Posts: 1,024
Likes: 0
Last edited by P00Man; Apr 16, 2011 at 08:54 PM.


Registered User
Joined: Oct 2003
Posts: 277
Likes: 0
From: Spotsylvania, VA
To CARDINAL35 I used automotive blue masking tape to get the curves right and to get a good bond to the plastic. For the vents i used a clear package tape over the vent so i could see the proper line and used an axacto blade to trim. Around the lettering i used 1/8 inch masking tape and placed it against the edge of the lettering to get a good striaght line.
The big thing is don't rush and take your time. And use paper to mask the sides and the back of the cover for overspray.
Hope this helps.
The big thing is don't rush and take your time. And use paper to mask the sides and the back of the cover for overspray.
Hope this helps.
Registered User
Joined: Oct 2003
Posts: 277
Likes: 0
From: Spotsylvania, VA
To TAKAHASHI,
They have it in black also. The gloss finish in the black would look great against the flat black of the plastic. It would look like two pieces put together.
They have it in black also. The gloss finish in the black would look great against the flat black of the plastic. It would look like two pieces put together.
Last edited by mmmdowning; Jan 2, 2004 at 08:53 AM.

Love it! Keepin' it!
Joined: Feb 2003
Posts: 567
Likes: 0
From: Orlando FL
Originally posted by mmmdowning
To TAKAHASHI,
They have it in black also. The gloss finish in the black would look great against the flat black of the plastic. It would look like two pieces put together.
To TAKAHASHI,
They have it in black also. The gloss finish in the black would look great against the flat black of the plastic. It would look like two pieces put together.


Registered
Joined: Oct 2001
Posts: 7,966
Likes: 4
From: Boulder County, Colorado
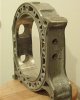
Well, I took the plunge today and painted my engine, ECU, and fuse box cover today. I used a metalflake black for the ECU and fuse box covers and part of the engine cover, and a georgeous metalflake dark blue on the central part of the engine cover. Paint is Rustoleum "Metallic," available at Home Depot.
In the picture, the blue looks lighter/brighter than it actually is... sorry, lighting was bad when I took the pic. Also note that the ECU and fuse box covers look the same as the outer part of the engine cover in good light - they didn't reflect well in the poor light.
Masking the engine cover was the hardest part, especially since I decided to do my own twist on what's been done before, and paint the engine cover in 2 stages: outer part and inner part. On the inner, I just had to get all **** retentive and after masking off the lettering and Mazda "flying M" logo, I carefully cut the mask around each and every letter. Came out great IMHO, but taking the tape off the letters was as big a pain as putting it on!
Anyway, I also painted the battery cover silver, to match my Rotary Extreme intake after it goes back on my car (I have it out now as my car's going in for service on Monday to get an oil cooler hose replaced, see this thread for more info). I also think I am going to redo my ECU and fuse box covers in the blue, as it looks SO nice in person.
Nice mod, and I appreciate all who have contributed to this idea. mmmdowning and WHealy especially come to mind.
BTW, that's dog fuzz in the pic below on the left side of the blue part, not a scratch.

Mr. Blue Man
Joined: Dec 2003
Posts: 887
Likes: 0
From: Carmel, IN
Paul (Omicron),
Looks good man. I gotta know. What did you use to mask the letters? I finally just gave up as every type of tape I tried on them mearly slipped off. And by the way, the emblem comes off and retails for $20. Not that you need it, but I did!
Looks good man. I gotta know. What did you use to mask the letters? I finally just gave up as every type of tape I tried on them mearly slipped off. And by the way, the emblem comes off and retails for $20. Not that you need it, but I did!