
DIY: The "I got nothing better to do, so I am going to stitch my shift boot" DIY


DIY: The "I got nothing better to do, so I am going to stitch my shift boot" DIY
Edit: THIS IS GOING TO TAKE OVER AN HOUR. Just noticed that the pictures wont show and you have to click on them  .
.
We were snowed in over night and I had nothing to do. I wanted to tinker with the cars but the snow obviously didn't allow me to. Thought of messing with the boring factory vinyl shiftboot. I have some red silk bead thread also. So out I went to tear the console apart and grab my shiftboot.
I want a black shiftboot with red stitching to match my interior. I like tinkering with things, so I decided against buying a premade shiftboot even though they are available for under 30 dollars. Now lets cut to the chase.
I thought about tearing apart the shiftboot stitching and starting it over with a whole new threads (my red silk bead). That wouldn't be overly hard, but very intricate and more than I want to do for a factory vinyl boot. So I came up with an idea to thread the new red bead around the stitching.
Start with your factory boot. Follow the instructions from Redline shiftboots in order to remove your shiftboot.

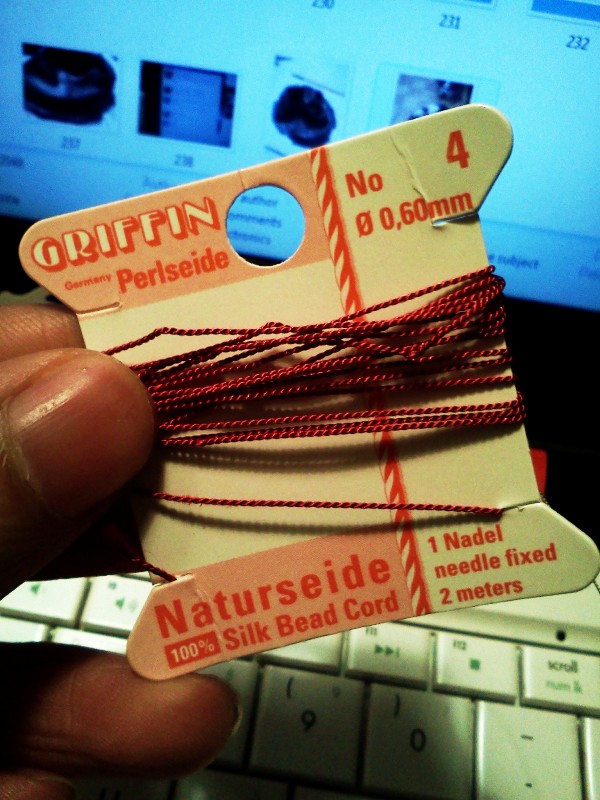
This is the silk bead I used. Take note of the diameter, which is also defined by the # (4). Each thread should be enough for one whole shiftboot, but if you want to be safe, get two. You will need four separate and equal threads because there are clearly four separate stitchings on the boot. I already had four 2ft long precut threads lying around with the needle. Each package comes with one need, but you can also use a regular needle. Just not too thick in diameter or too long (nothing over 2 inches).
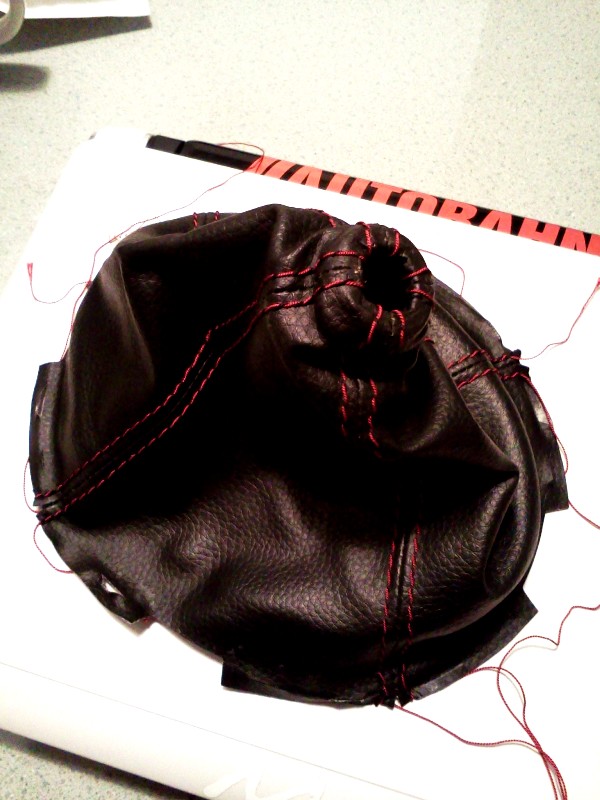
Start from the bottom of the boot. I actually started from the underside lip and worked my way around to the top side. Leave about 4 inches dangling at the end for the end knot. You an see how I went in and out of the original stitching with the new thread in this picture. Depending on which side of the double stitch youre working on, it may be in from the left side of the stitch or in front the right side. For the right side of the original stitch, you have to go in from the left, and vice versa for the other side of the stitch (or at least thats how it was for my boot).


.We were snowed in over night and I had nothing to do. I wanted to tinker with the cars but the snow obviously didn't allow me to. Thought of messing with the boring factory vinyl shiftboot. I have some red silk bead thread also. So out I went to tear the console apart and grab my shiftboot.
I want a black shiftboot with red stitching to match my interior. I like tinkering with things, so I decided against buying a premade shiftboot even though they are available for under 30 dollars. Now lets cut to the chase.
I thought about tearing apart the shiftboot stitching and starting it over with a whole new threads (my red silk bead). That wouldn't be overly hard, but very intricate and more than I want to do for a factory vinyl boot. So I came up with an idea to thread the new red bead around the stitching.
Start with your factory boot. Follow the instructions from Redline shiftboots in order to remove your shiftboot.
This is the silk bead I used. Take note of the diameter, which is also defined by the # (4). Each thread should be enough for one whole shiftboot, but if you want to be safe, get two. You will need four separate and equal threads because there are clearly four separate stitchings on the boot. I already had four 2ft long precut threads lying around with the needle. Each package comes with one need, but you can also use a regular needle. Just not too thick in diameter or too long (nothing over 2 inches).
Start from the bottom of the boot. I actually started from the underside lip and worked my way around to the top side. Leave about 4 inches dangling at the end for the end knot. You an see how I went in and out of the original stitching with the new thread in this picture. Depending on which side of the double stitch youre working on, it may be in from the left side of the stitch or in front the right side. For the right side of the original stitch, you have to go in from the left, and vice versa for the other side of the stitch (or at least thats how it was for my boot).
Last edited by SayNoToPistons; Jan 15, 2011 at 02:09 AM.
Slightly yank on the thread after a few stitches. You can see that the thread will be stitched at a slight angle if you dont yank it to tighten up the stitches..
When you get to the top collar. Go inside and loop around an original stitch INSIDE the boot and continue on with the other side of the stitch. Make sure the thread is not in the way of the collar opening or it might get caught by the shifter thread. You can see that I messed up on the stitching for the bottom. It works but it is not the same as the rest. Oh well.
https://www.rx8club.com/attachment.p...1&d=1294898204
Once you get to the bottom, complete it like how you started. Make an end knot of any kind. Now repeat on the other stitches until you are done.
https://www.rx8club.com/attachment.p...1&d=1294898204
If done correctly, the threads should be straight and uniformed. The slight angle of the new thread should not be noticeable unless you shift with your face.
https://www.rx8club.com/attachment.p...1&d=1294898204
Whether this DIY is worth it or not is up to you. I plan on picking some suede and nubuck leather and stitching up a shiftboot when I get the time to. Maybe Ill even stitch the stock shift **** with a thicker thread.
If anyone need the silk beads with the needles attached, let me know. I can let you guys have a few, but I would like to save some for my future projects.
Last edited by SayNoToPistons; Jan 13, 2011 at 12:05 AM.

 , i may give that a try when i got nothing better to do


Thanks, Easy. I was actually contemplating about that, but with so much competition from vendors with leather goods and how time consuming the process is, I am wondering if I can even make actual profits doing this by hand (especially being a full time college kid  ). I haven't completely ruled it out though.
Since I got some time on my hands now, im going to the fabric store tomorrow to see if I can find some leather. I want to make some shift boots and perhaps something for the handbrake. Ill keep you guys updated.
). I haven't completely ruled it out though. Since I got some time on my hands now, im going to the fabric store tomorrow to see if I can find some leather. I want to make some shift boots and perhaps something for the handbrake. Ill keep you guys updated.
Last edited by SayNoToPistons; Jan 13, 2011 at 03:40 AM.


Thread
Thread Starter
Forum
Replies
Last Post
jasonrxeight
RX-8's For Sale/Wanted
2
Sep 30, 2015 01:53 PM