
DIY: Hand made side strakes

Moderator with a mycocardium
Joined: Jan 2004
Posts: 1,599
Likes: 2
From: Springfield, IL
Yeah, I got the molding and casting material coming tomorrow from Tap's online order place since we have absolutely NOTHING like that here in the middle of BFU. :D I think with shipping it came to around just that. I bought my acrylic for other projcects from a glass supply company. Once again, no place to buy that stuff anywhere around here from a store that specializes in these types of materials. Although I only paid a little over $25 for a 4' X 4' piece of acrylic. Yes, that is 4 ft. by 4 ft.
I am hoping that there will be interest in these after I get some made. At least these should be affordable, I know I hated buying them for the $195 I got them for. That is almost highway robery. :D
I am hoping that there will be interest in these after I get some made. At least these should be affordable, I know I hated buying them for the $195 I got them for. That is almost highway robery. :D

So many roads to ride...
Joined: Sep 2003
Posts: 787
Likes: 1
From: Phoenix, AZ
a buddy of mine used to have to order custom pieces to make "water pipes." I think the front accent look will be fantastic and you will retire by the end of August. I think Polak just did (retire)...and he's only around 8-teen years old!!!

Registered User
Joined: Jul 2004
Posts: 14
Likes: 0
From: San Mateo, California
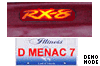
Attached are the images of the ones I just finished making. I tried many different ways of making them chrome/polished aluminum colored, but none worked out. There is good chrome spray paint, but when you try to seal it, the chrome turns to a dull grey.
So, I decided to use some "color changing paint" I purchased in the local auto-parts store (Mirage Ice color). I think the strakes look great as a dark grey on my Sunlight Silver RX8, and they sparkle in the light as well...see attached pics...
So, I decided to use some "color changing paint" I purchased in the local auto-parts store (Mirage Ice color). I think the strakes look great as a dark grey on my Sunlight Silver RX8, and they sparkle in the light as well...see attached pics...

Thread Starter
Registered User
Joined: Jan 2004
Posts: 184
Likes: 0
rendyr,
Wow, looks really sharp!. I want to see how it looks in your 8.... Anyway, I was just wondering if you bought the sander just for this project. I know...., you will use it for other projects.....
Anyway, I am glad that you were able to follow my DYI. It was not that hard to do it, right??
Wow, looks really sharp!. I want to see how it looks in your 8.... Anyway, I was just wondering if you bought the sander just for this project. I know...., you will use it for other projects.....
Anyway, I am glad that you were able to follow my DYI. It was not that hard to do it, right??
Moderator with a mycocardium
Joined: Jan 2004
Posts: 1,599
Likes: 2
From: Springfield, IL
I like that color! Looks pretty sharp. Great job of doing those. Great job of this DIY by romulus, kudos to the both of you.
Question? How are you going to mount them? Have you drilled the holes in the back of them and are you mounting them the way that the stock strakes are mounted? Will you also use the 3M tape to help support the sides that attach to the car? Make sure that if you do drill a hole in them, the hole is at the right angle for the grille and that if you plan to use a screw, use a brass screw to keep from cracking the plastic. The brass screw is soft metal and lessens the chances of cracking it. This is what they use to build the clear sided computer cases.
Just curious. I have thought of couple of ways for mounting home made ones and am checking on other methods. I was thinking aboutr using one of those plastic plugs that you use in drywall and wood but cutting off the small top ring part that keeps it from slipping down in the pilot hole and using a stainless screw to attach it with along with the 3M trim tape.
Last edited by D MENAC 7; Jul 21, 2004 at 10:07 AM.
Thread Starter
Registered User
Joined: Jan 2004
Posts: 184
Likes: 0
Yep, that gray shade looks like gun-metal, I like the color in the third picture. I am not a really fan of color changing, perhaps I have to see it personally in order to appreciate it. Anyway, I really like the shape of the hand made strakes compared with the OEM…nice curves! :D
I attached my strakes using the stock position, I think. I used two opening above the solid part of the opening. I also drilled the pilot holes perpendicular of the strakes. Since I used #8 screws (zinc plated, screwed just tight enough), their diameter is small enough to allow any drilling error. Before I drilled the pilot hole I put the vent back and put my strake against to mark where to drill by selecting the appropriate vent opening (not too far forward or back).
I also used double side black tape. I didn’t use 3M…just a generic one since I didn’t wanted to stick permanently in case I need to remove the vent. The way I did it, is to attach the strakes in to the vent first, aligning it with the vent’s horizontal lines. Then I removed the tape’s backing. Once the vent is positioned close to the fender about quarter inch away I pushed in by holding the strakes. That way the strakes will be secured in the right position. So far my strakes are holding, even during car wash.
Last edited by romulus; Jul 21, 2004 at 11:34 AM.
Registered User
Joined: Jul 2004
Posts: 14
Likes: 0
From: San Mateo, California
Yeah I bought the sander just for this....but I am sure that it will come in handy in other places as well!
I drilled the holes by" putting them up against the grills, and marking where the holes should go, based on the procedures in the install guide for the real strakes....basically, the second hole up in the middle, above the inner crossbar on the back side of the plastic piece.
My power drill has a little levelling bubble inside, so I know that I am drilling level to the ground, then I just eyeballed the 90 degree angle tot he strake itself.
When the strakes are not int he light, they look gunmetal incolor, with some "roughness" to the pattern, just like the sunlight silver on my rx8. When in the sun, the sparkle effect is not too pronounced...just enough to make them look just as sparkly as the paint, but in a more colorful way...
attached are pictures of the install.....
Thread Starter
Registered User
Joined: Jan 2004
Posts: 184
Likes: 0
Two thumbs Up! :D Since you got them installed, know I like the paint with or without direct sun shining on them
Yep, I had couple of small "roughtness" as well but not a big deal. By the way, did you used my patterns? they look simmilar as mine... not that I mind since I posted them....jub curious.... kudos...!
Yep, I had couple of small "roughtness" as well but not a big deal. By the way, did you used my patterns? they look simmilar as mine... not that I mind since I posted them....jub curious.... kudos...!
Registered User
Joined: Jul 2004
Posts: 14
Likes: 0
From: San Mateo, California
Absolutely used the pattern you posted! It was the picture with the rulers that really helped me out. I could not find anyone I knew at the time that had the strakes for me to measure, so your post was a great help!
I actually used some stuff I got at Office Depot to help attach them to the car, instead of using tape. I got some "Sticky Wax" which is basically just what it says...it is this waxy stuff that has tack to it, and worked well with attaching the strakes to the body of the car. Since it does not use adhesive, I thought that would be better than tape, which might hurt the paint. This stuff is just like getting some sap or, well, wax on your car...it removes with either some alcohol, or a little lighter fluid..
As I said before, the color is rather muted...it is just enough to catch the attention of someone for a moment...right before they see my tail-lights diminishing into the distance while they stay motionless, dumbfounded at my coolness!
I WAS BEES
Joined: Jun 2004
Posts: 279
Likes: 0
From: San Diego
Those look prety sharp.
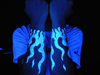
I was thinking. I'm not sure how good it would look, or how well it would go over with others. What if you were able to take the clear strakes and bore a little hole in them for a bulb and wire it to your blinkers? Or hook them up to the door sensor? I've read about several people who wanted those bulbs under their side mirrors like the aussies, this could be an alternative.
I was thinking. I'm not sure how good it would look, or how well it would go over with others. What if you were able to take the clear strakes and bore a little hole in them for a bulb and wire it to your blinkers? Or hook them up to the door sensor? I've read about several people who wanted those bulbs under their side mirrors like the aussies, this could be an alternative.
Registered User
Joined: Jul 2004
Posts: 14
Likes: 0
From: San Mateo, California
I was actually thinking of that as well....I have some fiber optic cables I got off of a $5 kids toy...holes could easily be drilled, and the cables inserted intothem leading to something attahced to the turn signals, etc...
YJou could even get fancy, and put whatever color you wanted into those...or keep them in an unfinished state, but sanded, so you get a nice frosted-glass effect when they light up....
YJou could even get fancy, and put whatever color you wanted into those...or keep them in an unfinished state, but sanded, so you get a nice frosted-glass effect when they light up....
Thread Starter
Registered User
Joined: Jan 2004
Posts: 184
Likes: 0
That sounds interesting….Strakes that function as a blinkers or as a courtesy light when you unlock and open you door. ..hmm…right now I can picture an 8 making a turn with those strakes blinking… and at night when you unlock your car in a low light area your strakes starting to glow… Yes indeed, it will look good… however, I am not sure too much about the blinkers… it might look a bit ricer (too many ricers have those aftermarket ones) but again it might look really unique. Ok back to reality, from what I can think, it is really possible in making them by using the same acrylic material like rendyr and D MENAC 7 (fog light strakes) are using. The only catch that I can think off is that after the sanding process the strakes has to be really polished (see rendyr unpainted strakes) otherwise will look grayish. My guess is that it has to be something in between. Smooth enough to get rid of the rough marks, but not so polished that the light won’t reflect around the strakes. As for source of light… I think some LED will do the job (note: LED in the turn signals may cause your signals to blink fast = ricer).
Anyway, hopefully I am making sense… If I am wrong, please correct me..
Anyway, hopefully I am making sense… If I am wrong, please correct me..
Moderator with a mycocardium
Joined: Jan 2004
Posts: 1,599
Likes: 2
From: Springfield, IL
Yes, they would have to be very polished to do this. Also, to reflect enough light, they have to have 90 degree walls somewhere, this is where the light is bounced back and reflected throughout the piece. I am trying to remember what the inside of the holes look like on some computer fan screens that have leds embeded in them that I have. I just checked and found both variations which means that if they work with unsanded non smooth indentations, then why bother sanding? :D
I was planning on experimenting with the front strakes like this. I was thinking about putting two LEDs per side and seeing what clear ones look like lit up at night. I presently use amber LEDs in my clear side markers. I also have LEDs in my rear tail light / brake light lamps. Of course, they do not blink except when the brake light comes on and they just get brighter. So, I cannot say whether they would effect the turnsignals blinking speed or not. Perhaps if all the turn signal lamps were changed out to LED replacements, that would correct it if it did.
I checked my tracking info on my TAP mold delivery and it doesn't come in until tomorrow. So, hopefully by this weekend...fist set of resin cast strakes. :D
I was planning on experimenting with the front strakes like this. I was thinking about putting two LEDs per side and seeing what clear ones look like lit up at night. I presently use amber LEDs in my clear side markers. I also have LEDs in my rear tail light / brake light lamps. Of course, they do not blink except when the brake light comes on and they just get brighter. So, I cannot say whether they would effect the turnsignals blinking speed or not. Perhaps if all the turn signal lamps were changed out to LED replacements, that would correct it if it did.
I checked my tracking info on my TAP mold delivery and it doesn't come in until tomorrow.
So, hopefully by this weekend...fist set of resin cast strakes. :D

noob
Joined: Nov 2007
Posts: 42
Likes: 0
oh im so making myself a set of strakes... ive been wanting some since i got my car... but im sure as he** not paying $200 for a set... bump that...
unfortunately im going to have to wait till i get home from Iraq in june to do it... ohrah
unfortunately im going to have to wait till i get home from Iraq in june to do it... ohrah


Thread
Thread Starter
Forum
Replies
Last Post
9krpmrx8
Series I Trouble Shooting
23
Nov 5, 2015 11:45 PM
M RX 8
RX-8 Parts For Sale/Wanted
3
Aug 5, 2015 06:45 PM