
DIY: The CORRECT way to remove the maplight / sunroof switch unit


Thread Starter
RX-8 Enthusiast
Joined: Jul 2006
Posts: 277
Likes: 2
From: Boston Area, MA
Here's a how-to on removing the map light / sunroof switch / sunglasses holder unit CORRECTLY. In all the DIYs I've seen, people just pry and yank it out by the front. Doing this could damage your trim, the unit itself, or more importantly, the metal clips holding the unit up that everyone seems to ignore. Follow these directions for a way to remove the unit properly without damage to anything.
Also, if using a screwdriver, it's a good idea to wrap it in electrical or some other sort of tape to prevent any possible damage to your trim. I personally never wrapped mine and never had a problem but don't be a fool - wrap your tool.
Well, hopefully that wasn't too complicated. Once you get the hang of it, youll be able to pry both clips out in under 10 seconds without much effort. Good luck and have fun!
Also, if using a screwdriver, it's a good idea to wrap it in electrical or some other sort of tape to prevent any possible damage to your trim. I personally never wrapped mine and never had a problem but don't be a fool - wrap your tool.
- Open the sunglasses holder and remove the two cross-head screws (image credit goes to Attack)

- Insert a flat head screw driver between the trim and the unit at a horizontal angle at once of the two boxed locations in the picture below.
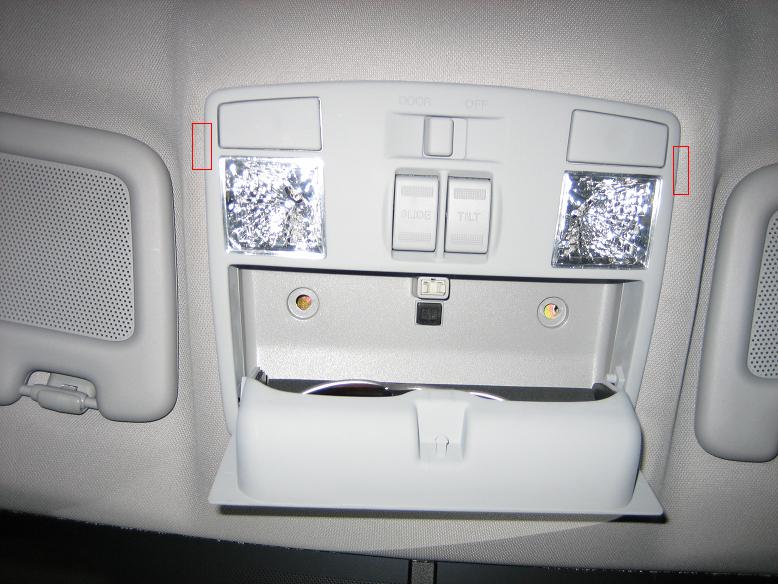

- Carefully drop the handle of the screwdriver until it is basically vertical. This will pry the trim to the side a little, but dont worry about it.

- Push up on the screwdriver until the tip makes contact with the metal clip. Then, pry the clip in towards the center of the car. While you pry the clip away from the trim, make sure to exert a constant force towards to clip with the head of the screwdriver so that it doesnt pop off the clip. If at any point you feel the screwdriver pop off and you hear a metal "boing" then you know you're doing the right thing. Try again and apply more pressure to keep the screwdriver on the clip. Once you've pried the clip away from the trim, push up on the maplight unit to release it from the trim just in case it got caught, and then pull down to remove the unit. The picture below shows the clip and how the screwdriver is prying it away.
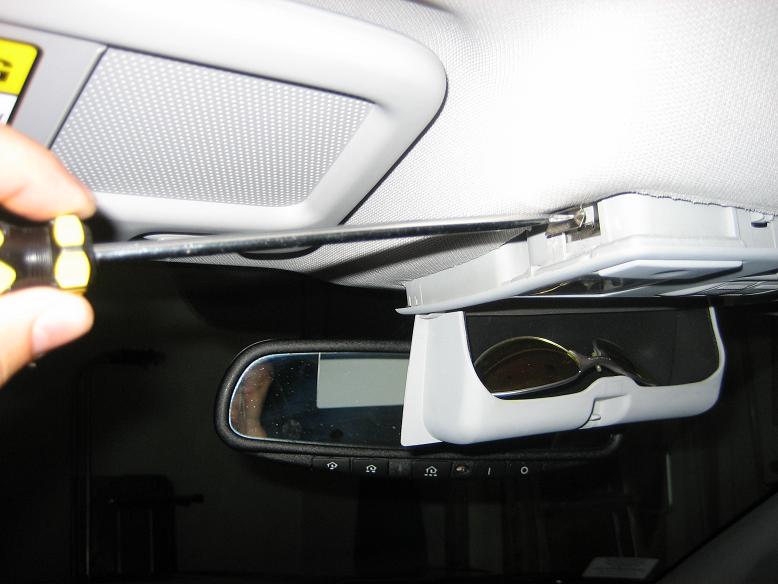
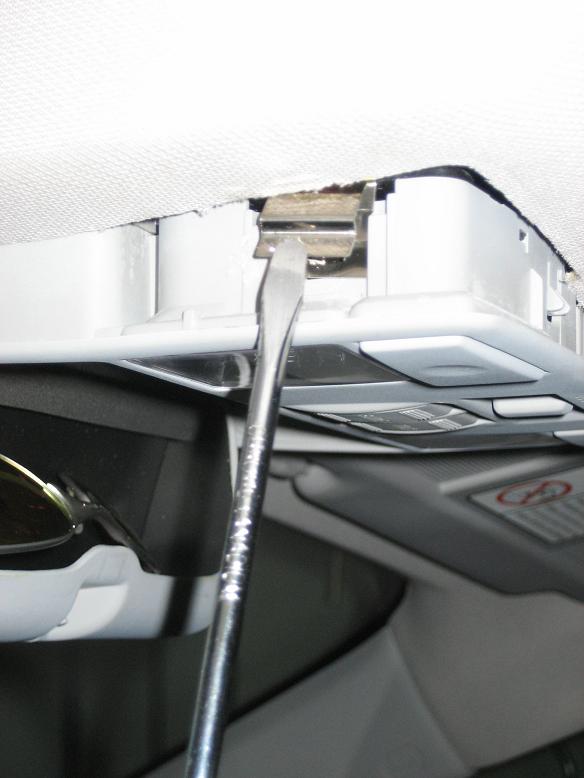
- Repeat on the other side. Once both clips are undone, just pull down the maplight unit and it should come out easily. Here's another picture of the metal clip with the screwdriver where it would be as you start to pry it away.
- The removed map light / glasses holder / sunroof switch unit. If you're looking to replace the maplights, just twist and pull the little black pieces circled in red. You may disconnect the electrical connectors if you want.

Well, hopefully that wasn't too complicated. Once you get the hang of it, youll be able to pry both clips out in under 10 seconds without much effort. Good luck and have fun!
Last edited by 1145climber; Aug 18, 2007 at 03:19 PM.

Skeet skeet skeet
Joined: Jun 2006
Posts: 393
Likes: 0
From: making my way to the ATL
great DIY with awesome pictures. was worried about this after all the comments i read, but following these instructions was a piece of cake. of course, my T13 bulbs didnt fit! so i'll have to do it again


Surf Hard, Drive Hard
Joined: Feb 2007
Posts: 7,840
Likes: 13
From: Indialantic, Florida
One small issue with your DIY................I will admit I didn't read it as I already knew how to do all this, but if you didn't say so................make sure you wrap that screw driver with some cloth or tape or you will have the possibility of jacking up your headliner.
Thread Starter
RX-8 Enthusiast
Joined: Jul 2006
Posts: 277
Likes: 2
From: Boston Area, MA
One small issue with your DIY................I will admit I didn't read it as I already knew how to do all this, but if you didn't say so................make sure you wrap that screw driver with some cloth or tape or you will have the possibility of jacking up your headliner.

This DIY cleared up all my confusion on how to remove the maplight. The tiny picture in the owner's manual doesn't do the clips enough justice IMO. I had no clue they were so far up. Super easy with some real pictures.
Surf Hard, Drive Hard
Joined: Feb 2007
Posts: 7,840
Likes: 13
From: Indialantic, Florida
Hope you got to them and got it out without screwing up the headliner?
Registered
Joined: Jul 2007
Posts: 53
Likes: 0
I did. It was not so much the headliner as it was the loud *PING* as I popped the first one out accidentally WAY too hard. I thought I broke it for sure. It was fine. Boo to having to remove the freakin' ceiling to change the map lights. .


Surf Hard, Drive Hard
Joined: Feb 2007
Posts: 7,840
Likes: 13
From: Indialantic, Florida
Simple search would have brought up.
https://www.rx8club.com/showthread.p...ight=bulb+list
I'm not going to tell you what it is, so you will have to go and look and then have the list for the future.
This info can also be found in the manual for your car.
https://www.rx8club.com/showthread.p...ight=bulb+list
I'm not going to tell you what it is, so you will have to go and look and then have the list for the future.
This info can also be found in the manual for your car.

Surf Hard, Drive Hard
Joined: Feb 2007
Posts: 7,840
Likes: 13
From: Indialantic, Florida
Not much to that one at all.
There's a picture in the manual on page 8-37(the 05 manual anyway), and it shows that on one of the longer sides of the plastic lens in the middle, there is a small indentation that you should be able to spot. Wrap a small screwdriver in a towel or something and pry it on that side.
The side to pry is opposite the side where the switch is located.
This assumes you are after just the bulb, if you want the whole assembly out, then it will be sort of like the map lights and you will have to sort of find out where to pry to get to the so-called clips to release.
Last edited by Mazurfer; May 4, 2011 at 09:41 PM.


 I'll try.

"I wanna go fast!"
Joined: Jul 2008
Posts: 330
Likes: 1
From: East Fishkill NY