
DIY: 3rd brake light RX-8 logo mod


The Jazz Man - Registered
Joined: Oct 2004
Posts: 8
Likes: 0
From: Texas!
Originally Posted by D MENAC 7
I thought I would do a DIY for the 3rd brake light RX-8 logo and show a step by step instruction.
First, I needed a way to produce the RX-8 graphic to be used as a mask so that I didn't have to take the lengthy time to cut a mask with an Xacto knife. Because I work in education and multi media, I went with what I have on hand which is a transparency film which is printed on by a laser printer and is normaly used for graphics on an over head projector. After some trial and error as to what is the ideal size to be produced through the lens of tht third brake light I came up with an acceptable design.
I found two ways to mount the graphic masking.
One is behind the red lens which I like to refer to as a stealth mount. WIth this method you do not see the logo until the brakes are applied.
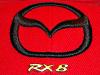
The second is the mounting of the graphic on the front side of the red lens and by this method, you see the red outline of the RX-8 logo even with the brake light not lit. I found this method to work best, imo.
Here is the finished look with the brake light applied using the second mehtod.
First, I needed a way to produce the RX-8 graphic to be used as a mask so that I didn't have to take the lengthy time to cut a mask with an Xacto knife. Because I work in education and multi media, I went with what I have on hand which is a transparency film which is printed on by a laser printer and is normaly used for graphics on an over head projector. After some trial and error as to what is the ideal size to be produced through the lens of tht third brake light I came up with an acceptable design.
I found two ways to mount the graphic masking.
One is behind the red lens which I like to refer to as a stealth mount. WIth this method you do not see the logo until the brakes are applied.
The second is the mounting of the graphic on the front side of the red lens and by this method, you see the red outline of the RX-8 logo even with the brake light not lit. I found this method to work best, imo.
Here is the finished look with the brake light applied using the second mehtod.
That was the quickest mod ever (mostly becuase you supplied the graphic!) It looks cool too! Here is a photo of my go at it! Thanks a million!
Jazper!
Thread Starter
Moderator with a mycocardium
Joined: Jan 2004
Posts: 1,599
Likes: 2
From: Springfield, IL
Thanks!
There are litteraly 100s of these out there world wide.
Be they from the Do It Yourselfer, from sales on Ebay and now my DLS CUSTOMS vendor forum @ https://www.rx8club.com/dls-customs-closed-89/rx8fun-products-pricing-37845/.
If you do not want to Do It Yourself I am selling them there for a mere $8 which includes postage. Also, the graphic has changed just slightly in size and this product is laminated between 5 mil plastic lamination pouch which makes it easy to install.
In addition, I now do custom graphics to order. The price starts at $10 for those, depending on artwork involved. Most are priced at the base price. For estimates on a custom brake light mask, contact me via DLS CUSTOMS email link.
Thanks! :D
Last edited by D MENAC 7; Jan 20, 2005 at 07:27 AM.

FX8TED on my RX-8
Joined: Jul 2002
Posts: 815
Likes: 0
From: San Antonio
Well, I had good intentions of doing it according to D MENAC 7's directions, but I made a mistake when I went from Microsoft Paint to printing the transparencies. I didn't catch it until after I'd already stuck three together and made a cutout of the 4th. Anyway, I wanted to see how it looked, so I attached it temporarily (stealth mode). I actually like the smaller logo a little better, and having the light around the edges would be kinda cool too. I think I'll play with a couple more sizes, maybe make the exterior light ring a uniform thickness. Anyway, here's my first effort. Comments (negative or positive) are welcome. Thanks for giving us this great mod, D MENAC 7!
Thread Starter
Moderator with a mycocardium
Joined: Jan 2004
Posts: 1,599
Likes: 2
From: Springfield, IL
Looks nice!
Actually this is on my list of things to do this week at work, as I find some time. I was planning on making a slight redesign of the ones I sell by maknig the logo slightly smaller and leaving a clear even area around the edge.
Because I now laminate those that I sell, this allows the purchaser who wants to put it in the stealth position, to trim closer without the trouble of having the laminated film from coming apart because they cut into the area between the two films which lay atop of each other. The big difference would more so show on the non-stealth mounted version in which it would have a small light emitting edge which would be even and not have the broad boarders on the ends.
I have also started to enclose some Very High Bond doble sided mounting tape with every brake light mask.
FX8TED on my RX-8
Joined: Jul 2002
Posts: 815
Likes: 0
From: San Antonio
OK, here's the one I went with, and there's no going back. I used some very strong 3M 2mil tapeto adhere the different layers and to adhere to the light. There's a slight edge around the logo. I made a larger one with no border, but after trying this one I just went for it. Thanks again D MENAC 7 for the great mod. I've already gotten some stares with my first one. I'm sure I'll get more. OI just hope the people behind me remember to brake 
Thread Starter
Moderator with a mycocardium
Joined: Jan 2004
Posts: 1,599
Likes: 2
From: Springfield, IL
Originally Posted by khoney
OK, here's the one I went with, and there's no going back. I used some very strong 3M 2mil tapeto adhere the different layers and to adhere to the light. There's a slight edge around the logo. I made a larger one with no border, but after trying this one I just went for it. Thanks again D MENAC 7 for the great mod. I've already gotten some stares with my first one. I'm sure I'll get more. OI just hope the people behind me remember to brake
No one yet has reported anyone hitting them in the rear with this on...or at least not by accident caused by staring at the light...:D
This was my first brain storm for the RX-8 to make these and they still are popular and are still the best method of doing this effect to the 3rd brake light. Thanks for the compliments.


Modena
Joined: Oct 2004
Posts: 308
Likes: 0
From: Wentzville, MO
I have a laser cutter at work and played with 3 mil thick magnetic stick and peel
Material, the stuff refrigerator door magnets are made of....
Works great, and no bleed on the rear break light neither.
Cool, now I can make any logo or text I want!
Material, the stuff refrigerator door magnets are made of....
Works great, and no bleed on the rear break light neither.
Cool, now I can make any logo or text I want!
Last edited by modena; Feb 3, 2005 at 08:29 PM.
'04 MT RX8/71 351C Mach1
Joined: Mar 2005
Posts: 462
Likes: 11
From: Waukesha, WI
Just did this mod this evening. Love it! And so easy to do. D MENAC 7 thank you! Now Im thinking about something else as the message. How about
Back Off!
I've often thought I would like to have a rearward pointing spot light to activate just about the time that tailgater is so close at 65mph that I can't even see her front bumper in my rear view mirror because she is so close! (Why the female reference? - because at least 4 ot of 5 times is see a tailgater in my rear view miror, it is a teen or 20 something female! Who taught them to drive!!! - Oh, I know I'll get flamed for that one - but think about it! Guys do stupid things too, but tailgaiting seems to be a "girl thing".)
Here's the current mod.
Last edited by glassetcher; Jun 24, 2005 at 09:36 PM.


Camel Lover Extrodinaire!
Joined: Sep 2005
Posts: 94
Likes: 0
From: Downtown Fullerton, CA
Nice DIY! Just done mine this afternoon....
Little Hint... Dont try it with ultra thin sign vinyl, the damn stuff took me hours and numerous attempts to get right, the RX-8 logo is so fiddly (but so damn good).
Little Hint... Dont try it with ultra thin sign vinyl, the damn stuff took me hours and numerous attempts to get right, the RX-8 logo is so fiddly (but so damn good).

Camel Lover Extrodinaire!
Joined: Sep 2005
Posts: 94
Likes: 0
From: Downtown Fullerton, CA
Originally Posted by J!E!T!S-8
Hey what and where do you get the material for this I keep reading vinal but what kind exactly lil help please?????
I cut the vinyl using a plotter, i suppose you could do it by hand, but thats gonna take some skill!


Vance Refrigeration
Joined: Dec 2004
Posts: 151
Likes: 0
From: Utah
I finally got pictures up of my installation, which is pretty standard. I made a pretty precise vector image of the logo and printed that out, so it matches the logo on the trunk lid pretty well. I also ended up with a slight border because the stencil I made was a bit small than the actual brake light. Anyway, here are the pictures:
Last edited by Nick; Jun 5, 2006 at 01:43 AM.


DonkeySlayer
Joined: Oct 2006
Posts: 2
Likes: 0
From: Gainessville FL
[COLOR=Blue]Awesome DIY...i just printed out Dmenac7's actual size picture and took it to kinkos and had them print me out 4 transparencies for 3.19 and 20 min to install. i did mine in stealth mode and it looks great....thanks
Just did this mod. Looks great and love it. I went to staples and bought clear window cling decal sheets for like 10 bucks, they work in your inkjet printer. I also went with black background instead of purple. Worked better for the look i wanted. I went with the non stealth placement. Because i did this, i think i'm going to remove the mazda, and rx8 badges and put Renesis. I saw someone else do it and it looks sharp.
Thanks for DYI
Thanks for DYI

ruthless8
Joined: Dec 2006
Posts: 91
Likes: 0
From: San Diego
Originally Posted by D MENAC 7
I hope this works, here is a copy of the graphic. It measures 6.513" wide by 1.556" tall. If you open it up in PS or another graphic program, you can size it to these dimensions and that should take care of it if it is not the exact size after saving the file.

Surf Hard, Drive Hard
Joined: Feb 2007
Posts: 7,840
Likes: 13
From: Indialantic, Florida
My first post!
I did this simple mod tonight in twenty minutes. Great site and great info!
Now if I can just get this acount setup how I want it!
Hey..........just a thought............has anybody tried a Stealth bulb here to somewhat act as a small difuser in order to more even spread out the lighting?
I did this simple mod tonight in twenty minutes. Great site and great info!
Now if I can just get this acount setup how I want it!
Hey..........just a thought............has anybody tried a Stealth bulb here to somewhat act as a small difuser in order to more even spread out the lighting?
Last edited by Mazurfer; Feb 24, 2007 at 06:33 AM. Reason: After thought


RX-8s Official Cool Guy
Joined: Mar 2004
Posts: 2,150
Likes: 1
From: Vancouver BC
An hour?!?!?!?!? What part took you that long?
Dude it is 2 bolts and a few clips
Great mod I have had it for years but it should take you 20 minutes TOPS from start to finish
Dude it is 2 bolts and a few clips
Great mod I have had it for years but it should take you 20 minutes TOPS from start to finish
Last edited by HiTMaNN; Feb 6, 2008 at 02:01 AM.

