Blue Carbon Fiber install


Thread Starter
Mr. Blue Man
Joined: Dec 2003
Posts: 887
Likes: 0
From: Carmel, IN
Blue Carbon Fiber install
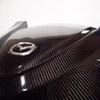
Well I got my Blue CF kit last night and managed to get all the parts installed that I wanted to use except for the steering wheel. I took some pictures this evening, but still want to take some sunlight pics in the next few days. However, I thought I would post what I got.
The process went smooth. The only issue I had with the installation was warming the parts and CF pieces. The instructions said warm them to 100 F. It was around 20 F last night. So that was a bit of a challenge. Fortunately all the interior pieces were applied to parts that I had previously removed from my car. So I stuck a space heater in a walk-in closet and managed to get the temp up to 80. Then I used a 500 watt �work lamp� and measured temps in the 95 F � 110 F range. All I know is the CF pieces conformed to the interior pieces without issue.
I had a few spots that didn�t quite come out the way I wanted. But that was my application and learning as I went. Never done this before. I did have one strange thing that when I was prepping the stereo unit for application, BOTH defrost buttons broke. You can see them in the pics. I did see a thread on a handful of people already experiencing this. Hopefully I won�t have any issue getting this repaired under warrantee.
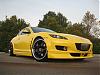
I like the look of the blue on black. The interior looks good. But I must admit that I like the exterior door pillar the best! For that piece I warmed the door trim with a heat gun (shsh, the instructions say not to do that) and warmed the CF pieces in the closet pulling them when both were at temp. I thought my wife might freak out if I pulled the door and put it in the closet!
Anyway, here�s some pics with a the car a little dirty inside and out. Hopefully I�ll get some outdoor sunlit pics soon with the �8� properly detailed. Thanks to IPT (located in the vendor forum) for all their help.
The process went smooth. The only issue I had with the installation was warming the parts and CF pieces. The instructions said warm them to 100 F. It was around 20 F last night. So that was a bit of a challenge. Fortunately all the interior pieces were applied to parts that I had previously removed from my car. So I stuck a space heater in a walk-in closet and managed to get the temp up to 80. Then I used a 500 watt �work lamp� and measured temps in the 95 F � 110 F range. All I know is the CF pieces conformed to the interior pieces without issue.
I had a few spots that didn�t quite come out the way I wanted. But that was my application and learning as I went. Never done this before. I did have one strange thing that when I was prepping the stereo unit for application, BOTH defrost buttons broke. You can see them in the pics. I did see a thread on a handful of people already experiencing this. Hopefully I won�t have any issue getting this repaired under warrantee.
I like the look of the blue on black. The interior looks good. But I must admit that I like the exterior door pillar the best! For that piece I warmed the door trim with a heat gun (shsh, the instructions say not to do that) and warmed the CF pieces in the closet pulling them when both were at temp. I thought my wife might freak out if I pulled the door and put it in the closet!
Anyway, here�s some pics with a the car a little dirty inside and out. Hopefully I�ll get some outdoor sunlit pics soon with the �8� properly detailed. Thanks to IPT (located in the vendor forum) for all their help.
Last edited by WHealy; Jan 21, 2004 at 09:36 PM.

Registered User
Joined: Dec 2003
Posts: 56
Likes: 0
From: Cary, NC
I love the blue you installed in your doors and the blue center piece. Those look great! Thanks for sharing the pics.
The funny thing about the carbon fiber application is it always reminds me of my super nintendo. When I got the nintendo power magazine that would have the stickers in the center you could peal off and put onto you controllers. It's not that it looks bad just can't help but think back to that when I see it.
The funny thing about the carbon fiber application is it always reminds me of my super nintendo. When I got the nintendo power magazine that would have the stickers in the center you could peal off and put onto you controllers. It's not that it looks bad just can't help but think back to that when I see it.

Forum Vendor
Joined: Jan 2004
Posts: 109
Likes: 0
From: iptmotorsports.com


Thread Starter
Mr. Blue Man
Joined: Dec 2003
Posts: 887
Likes: 0
From: Carmel, IN
Thanks for the compliments.
XDEEDUBBX,
Dyed. But the edge around where I masked to not get the cover has been a little week. I did this scratch while removing the **** for this installation. I'll be reapplying the dye at some point in the near future.
Originally posted by XDEEDUBBX
looks good..is your leather wrapped shift **** painted with blue paint? or was it dyed? cause i see a small chip in it....
looks good..is your leather wrapped shift **** painted with blue paint? or was it dyed? cause i see a small chip in it....
Dyed. But the edge around where I masked to not get the cover has been a little week. I did this scratch while removing the **** for this installation. I'll be reapplying the dye at some point in the near future.


I'm Kind of a Big Deal
Joined: Aug 2003
Posts: 918
Likes: 0
From: Columbus, Ohio
Don't let that stop you Mikeb - Order it up! I can't believe for one second that a: you're going to let a mod like this pass you by and b: that you weren't the first one to sign up. This is right up your alley. :D


Thread Starter
Mr. Blue Man
Joined: Dec 2003
Posts: 887
Likes: 0
From: Carmel, IN
Originally posted by Zoom2X
Looks great WHealy !!
Did you ever get your rear console cover off and dyed?
Looks great WHealy !!
Did you ever get your rear console cover off and dyed?
Thanks.
Nope not yet. The CF effort took priority. I wanted to see how it was going to look and how i coudl leverage it in the rear. From what I can tell, I'll have to dye the piece that the front arm rest slides on as well as the console trim around it. There just isn't enought room to put CF on it even though that would be my preference. But I'll still probably do the rear arm rest too. Just going to be a lot of blue. But that's OK! I like blue. Besides I decided to leave the seats as is. But I think CF on the rear trunk pass though cover would look cool too!
I've got the instructions tucked away for the next time i do some dying!
Forum Vendor
Joined: Jan 2004
Posts: 109
Likes: 0
From: iptmotorsports.com


Rotary eXperimental-8
Joined: Nov 2003
Posts: 1,830
Likes: 0
From: Gander, Newfoundland, Canada
Hey WHealy, Excellent job man. Looks very tempting. I just have one question; why does it seem like the circles cut out for the temp **** a bit off? It looks like it is covering up some of the 'cool' section of the dial

WHealy,
While I must say you've done an excellent qualtiy job and took the time to do it right!
But IMO the CF on the doors and interior makes the car look "cheap", and don't care for the way it looks.
While I must say you've done an excellent qualtiy job and took the time to do it right!
But IMO the CF on the doors and interior makes the car look "cheap", and don't care for the way it looks.