

Is there no DIY for alternator replacement?


Thread Starter
Registered
Joined: Jul 2004
Posts: 2,196
Likes: 0
From: Northern California
This is what I found. Am I reading this wrong? Drain coolant remove front bumper remove fresh air duct.
go engine..... charging...generator...removal....
http://foxed.ca/rx7manual/2003mazdarx8/
Last edited by Old Rotor; Mar 6, 2010 at 08:23 PM.
Thread Starter
Registered
Joined: Jul 2004
Posts: 2,196
Likes: 0
From: Northern California
Thread Starter
Registered
Joined: Jul 2004
Posts: 2,196
Likes: 0
From: Northern California

kevin@rotaryresurrection
iTrader: (3)
Joined: Feb 2005
Posts: 1,415
Likes: 61
From: east of Knoxville, TN
Thread Starter
Registered
Joined: Jul 2004
Posts: 2,196
Likes: 0
From: Northern California
disconnect battery
Remove belt from pully
remove wires
Unbolt alternator
reverse installation
Here are some of the steps that are in the manual.
1. Drain the engine coolant. (See ENGINE COOLANT REPLACEMENT.)
2. Remove in the order indicated in the table.
3. Install in the reverse order of removal.
1 Air hose
(See Air Hose Installation Note.)
2 Air cleaner cover
3 VFAD solenoid valve (13B-MSP (High power))
4 Vacuum chamber (13B-MSP (High power))
5 Air cleaner element
6 Air cleaner case
7 Throttle body
8 Extension manifold (upper)
9 Extension manifold (lower) (13B-MSP (High power))
10 Oil filler pipe
11 AIR solenoid valve
12 SSV solenoid valve
13 VDI solenoid valve
14 Air cleaner insulator
(See Air Cleaner Insulator Installation Note.)
15 Bracket (13B-MSP (High power))
16 APV motor (13B-MSP (High power))
17 Fresh-air duct
(See Fresh-air Duct Removal Note.)
(See Fresh-air Duct Installation Note.)
Fresh-air Duct Removal Note
1. Remove the front bumper. (See FRONT BUMPER REMOVAL/INSTALLATION.)
Fresh-air Duct Installation Note
1. Install the clips.
2. Tighten the bolt to the specified torque.
Tightening torque
7.8-10.8 N�m {79-111 kgf�cm, 69.0-95.6 in�lbf}
Air Cleaner Insulator Installation Note
1. Temporarily tighten nuts.
2. Temporarily tighten bolts.
3. Tighten the nuts to the specified torque.
4. Tighten the bolts to the specified torque.
Tightening torque
7.8-10.8 N�m {79-111 kgf�cm, 69.0-95.6 in�lbf}
Air Hose Installation Note
1. Align the alignment marks with the air hose notches.
Last edited by Old Rotor; Mar 6, 2010 at 11:12 PM.
kevin@rotaryresurrection
iTrader: (3)
Joined: Feb 2005
Posts: 1,415
Likes: 61
From: east of Knoxville, TN
I dont understand your point of view here. You have 2 basic choices.
1) do what the manual tells you.
2) do what we tell you.
You decide. Use common sense. No offense, but if you're having this much trouble figuring this one out, you probably dont need to be doing the job to begin with.
1) do what the manual tells you.
2) do what we tell you.
You decide. Use common sense. No offense, but if you're having this much trouble figuring this one out, you probably dont need to be doing the job to begin with.


One Shot One Kill
Joined: Jan 2008
Posts: 1,369
Likes: 2
From: Houston
i think ur looking at wrong thing, i just took a look at manual and it says this
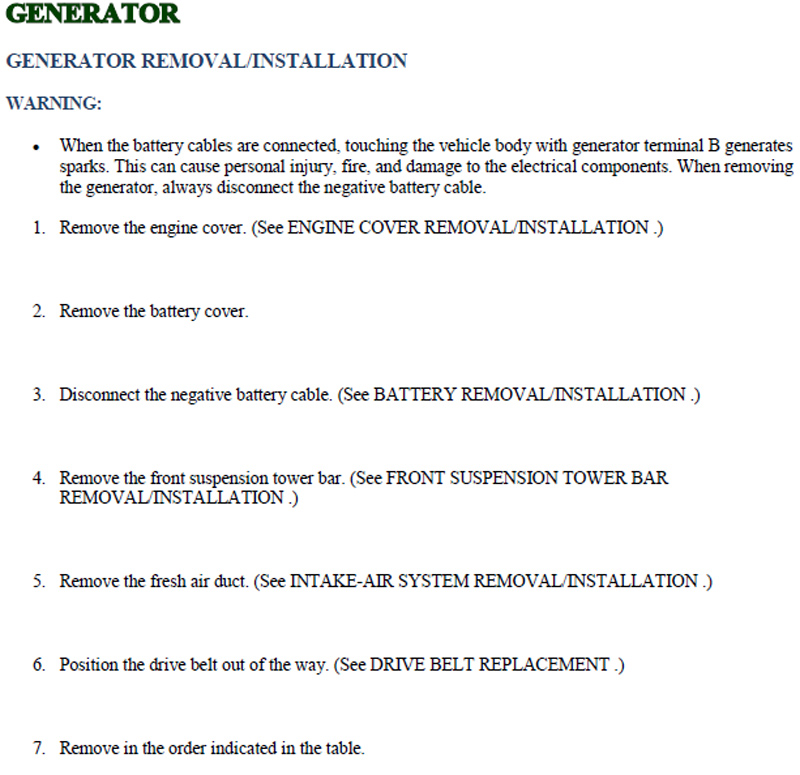
1. Remove the engine cover. (See ENGINE COVER REMOVAL/INSTALLATION.)
2. Remove the battery cover.
3. Disconnect the negative battery cable. (See BATTERY REMOVAL/INSTALLATION.)
4. Remove the front suspension tower bar. (See FRONT SUSPENSION TOWER BAR REMOVAL/INSTALLATION.)
5. Remove the fresh air duct. (See INTAKE-AIR SYSTEM REMOVAL/INSTALLATION.)
6. Position the drive belt out of the way. (See DRIVE BELT REPLACEMENT.)
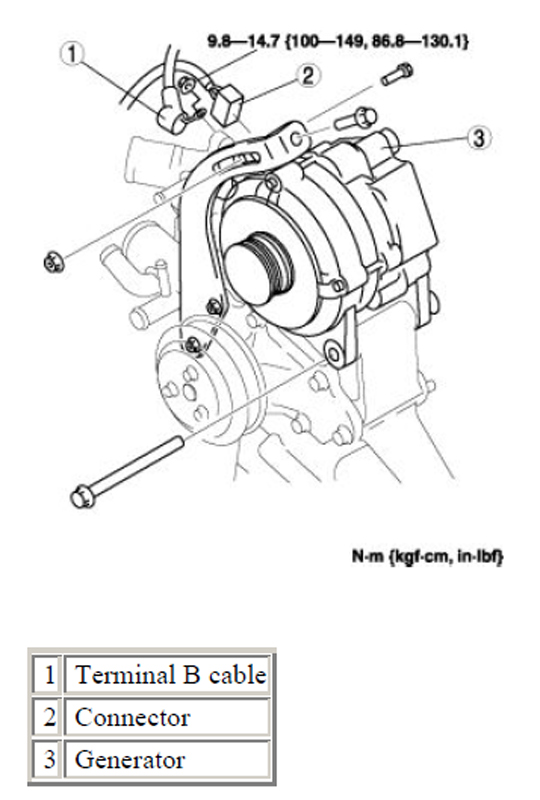
7. Remove in the order indicated in the table.
http://foxed.ca/rx7manual/2003mazdar...718300W01.html
it is correct.
i just figure out you were looking at, you are looking too deep into the thing, when it says remove airduct, just unbolt the throttle body and take it out.. simple. no draining.
http://www.youtube.com/watch?v=nK38j9IC7L4
1. Remove the engine cover. (See ENGINE COVER REMOVAL/INSTALLATION.)
2. Remove the battery cover.
3. Disconnect the negative battery cable. (See BATTERY REMOVAL/INSTALLATION.)
4. Remove the front suspension tower bar. (See FRONT SUSPENSION TOWER BAR REMOVAL/INSTALLATION.)
5. Remove the fresh air duct. (See INTAKE-AIR SYSTEM REMOVAL/INSTALLATION.)
6. Position the drive belt out of the way. (See DRIVE BELT REPLACEMENT.)
7. Remove in the order indicated in the table.
http://foxed.ca/rx7manual/2003mazdar...718300W01.html
it is correct.
i just figure out you were looking at, you are looking too deep into the thing, when it says remove airduct, just unbolt the throttle body and take it out.. simple. no draining.
http://www.youtube.com/watch?v=nK38j9IC7L4
Last edited by xsnipersgox; Mar 7, 2010 at 01:02 PM.
Thread Starter
Registered
Joined: Jul 2004
Posts: 2,196
Likes: 0
From: Northern California
The other steps tell you what part to remove but in this step where it says "remove fresh air duct" which is part number "17". You feel just doing all the steps that get the throttle body out is really what they meant? OK so there are some more steps then...
disconnect battery
Remove belt from pulley
remove wires
Unbolt alternator
reverse installation
I thought so because before I started this thread I was already competed with the last step "unbolted alternator". I've done many alternators and a few generators too but now I'm sixty two and disable so I need shortcuts. Then I looked for a DIY. I know someone on here has done this before. There has to be some shortcuts that a mechanic will find after he learns his away around the engine compartment.
Last edited by Old Rotor; Mar 8, 2010 at 10:58 AM.
One Shot One Kill
Joined: Jan 2008
Posts: 1,369
Likes: 2
From: Houston
removal of airduct and the suspension cross member thingy is just to give you room to work (which i recommend since room to work = good for your hands and sanity)

I removed the alternator this past weekend and the steps mentioned here are extactly what you have to do to have enough room.
remove engine cover
disconnect battery
take off the strut brace
take out the air box
loosen the tensioner bolt and slide the belt off
remove all clips and plugs from the alternator
Remove the bolts holding the alternator on and take it out.
go in reverse.
remove engine cover
disconnect battery
take off the strut brace
take out the air box
loosen the tensioner bolt and slide the belt off
remove all clips and plugs from the alternator
Remove the bolts holding the alternator on and take it out.
go in reverse.
Thread Starter
Registered
Joined: Jul 2004
Posts: 2,196
Likes: 0
From: Northern California
I removed the alternator this past weekend and the steps mentioned here are extactly what you have to do to have enough room.
remove engine cover
disconnect battery
take off the strut brace
take out the air box
loosen the tensioner bolt and slide the belt off
remove all clips and plugs from the alternator
Remove the bolts holding the alternator on and take it out.
go in reverse.
remove engine cover
disconnect battery
take off the strut brace
take out the air box
loosen the tensioner bolt and slide the belt off
remove all clips and plugs from the alternator
Remove the bolts holding the alternator on and take it out.
go in reverse.
Moderators please add to DIY list.
Thanks now we have all the steps for a DIY for the alternator replacement! The wife and I got it out! Where's my new 16X Mazda............ This was my last minor repair......I hope.
Last edited by Old Rotor; Mar 8, 2010 at 04:34 PM.

Thread Starter
Registered
Joined: Jul 2004
Posts: 2,196
Likes: 0
From: Northern California
Thats too bad I was't aware of that. I hope someone can find it easy with search like the DIY for....
DIY: brake squeal fix
--------------------------------------------------------------------------------
i have almost 9K on my 8 and the brakes squeal like crazy. i know there is a TSB out for this, but instead of going to the dealership, explain my problem, maybe/maybe not argue with the service writer that i should have the TSB, drop off or sit there and wait...i decided to just do it myself for a quick 15-30 mins.
- all i basically did was remove the front wheels
- remove the 14mm bolt from the bottom of the brake caliper
- swing the caliper upward
- remove the brake pads
- clap all the dust out of the little groove in the center of the pads (this is what makes the squeal)
- sanded the pads with either sand paper or brillo pad
- applied anti-seize to the back and sides of the brake pads
drove about 50 miles today around town and haven't heard a squeal yet!!
another few step DIY with no pics....

Registered User
Joined: Sep 2010
Posts: 9
Likes: 0
From: Pensacola, Florida
Yo, have any of you talking about "Oh it's easy!" even tried to take this piece of crap off? Old Rotor was unfortunately reading the wrong thing but the service manual instructions are absolute **** useless. This just took me like 2 and a half hours. (Including taking breaks because I was getting pissed and throwing tools.) Here are REAL instructions:
1. Remove Anti-Roll Bar(Or whatever you wanna call it.) Otherwise it WILL be in the way and you WILL be pissed off.
2. Disconnect Battery Ground.
3. Loosen the alternator tension from the belt and move belt out of the way.
4. REMOVE WATER PUMP PULLEY! This crap is ridiculous, you may be able to break the bolts loose while there is still tension on the pulley, but I had already removed mine so this is what I had to do. Stand IN the engine compartment while wedging a pipewrench (don't have a pry-bar) between the block and the pulley to keep the pulley from moving. I had to put my foot on the pipewrench because I couldn't get enough leverage with just my hand. Then break each of the pulley bolts loose with a 10mm wrench.
5. Remove the alternator bracket. It's that big black piece of steel mounting the alternator to the block. It will be annoying.
6. Finally remove the main bolt that the alternator hinges on, muster up all your strength and pull on that sucker as hard as you can. It should come off.
The End...
Thread Starter
Registered
Joined: Jul 2004
Posts: 2,196
Likes: 0
From: Northern California
Yo, have any of you talking about "Oh it's easy!" even tried to take this piece of crap off? Old Rotor was unfortunately reading the wrong thing but the service manual instructions are absolute **** useless. This just took me like 2 and a half hours. (Including taking breaks because I was getting pissed and throwing tools.) Here are REAL instructions:
1. Remove Anti-Roll Bar(Or whatever you wanna call it.) Otherwise it WILL be in the way and you WILL be pissed off.
2. Disconnect Battery Ground.
3. Loosen the alternator tension from the belt and move belt out of the way.
4. REMOVE WATER PUMP PULLEY! This crap is ridiculous, you may be able to break the bolts loose while there is still tension on the pulley, but I had already removed mine so this is what I had to do. Stand IN the engine compartment while wedging a pipewrench (don't have a pry-bar) between the block and the pulley to keep the pulley from moving. I had to put my foot on the pipewrench because I couldn't get enough leverage with just my hand. Then break each of the pulley bolts loose with a 10mm wrench.
5. Remove the alternator bracket. It's that big black piece of steel mounting the alternator to the block. It will be annoying.
6. Finally remove the main bolt that the alternator hinges on, muster up all your strength and pull on that sucker as hard as you can. It should come off.
The End...
1. Remove Anti-Roll Bar(Or whatever you wanna call it.) Otherwise it WILL be in the way and you WILL be pissed off.
2. Disconnect Battery Ground.
3. Loosen the alternator tension from the belt and move belt out of the way.
4. REMOVE WATER PUMP PULLEY! This crap is ridiculous, you may be able to break the bolts loose while there is still tension on the pulley, but I had already removed mine so this is what I had to do. Stand IN the engine compartment while wedging a pipewrench (don't have a pry-bar) between the block and the pulley to keep the pulley from moving. I had to put my foot on the pipewrench because I couldn't get enough leverage with just my hand. Then break each of the pulley bolts loose with a 10mm wrench.
5. Remove the alternator bracket. It's that big black piece of steel mounting the alternator to the block. It will be annoying.
6. Finally remove the main bolt that the alternator hinges on, muster up all your strength and pull on that sucker as hard as you can. It should come off.
The End...
Last edited by Old Rotor; Jun 16, 2011 at 12:51 PM. Reason: add

Registered
Joined: Dec 2009
Posts: 2,100
Likes: 7
From: Aurora, CO
Anyone who changes this cars alternator should be pretty happy with how easy it is compared to some other cars. My last car called for about 3 hours shop labor for the alt change, so you can imagine how fun that would be to do in your garage.
Last edited by xexok; Jun 17, 2011 at 12:09 AM.


Registered User
Joined: Mar 2011
Posts: 27
Likes: 0
All I did was disconnect battery. Loosen belt tensioner. I did unplug a vacuum line that ran over it. Unscrew the
alternator bolts. The tricky part was removing it from the bracket area. I had to almost fully rotate it and pull it out on an angle. After getting it tested I dropped it right back in and twisted it to make the holes for the bolts line back up. I didn't remove any pulleys, fluids or anything.
alternator bolts. The tricky part was removing it from the bracket area. I had to almost fully rotate it and pull it out on an angle. After getting it tested I dropped it right back in and twisted it to make the holes for the bolts line back up. I didn't remove any pulleys, fluids or anything.