
TECH INSTALL: Zero2E/E-Con


Hi guys,
We brought in a batch of Zero2E with E-con for the RX8 and managed to do a local install. I have another one next week so will actually modify this post and add a few more photos.
So I was having a difficult time determining the logic in which I'd recommend doing the install so you guys can decide if you want to do it this way or another way.
ONE WAY: ELECTRICAL, quick hardware to check function of servos. Then install coils.
SECOND WAY: R&R of suspension, then do Electrical. Either way you can use the suspension without the controller, so worst case if it doesn't work just don't use them.
I prefer to do electrical first and just know what i'm getting into. That way the rest is very standard.
Here's my staging:
1. Electrical splicing to ensure functionality of servos and controller
2. R&R of Front suspension, install servos, install F STB
3. R&R of Rear Suspension, MOUNT SERVOS BEFORE installing coils
4. FISH Wire, finish mounting position for controller
I'm sure there's a coilover install thread on here, but this electrical will be the biggest help if you don't have a test light or multimeter.
Contents: Compliments of Spin9k

You'll notice the orange, red spool of wires on the right side. This is your Illumination, Ground, and "Switched" Power.

We're lucky in that you can tap Switched Power and Illumination both from the cigarette lighter, and ground from right behind the shifter.
TO REMOVE THE ASH TRAY YOU NEED TO DO THIS.
Compliments of l008com
https://www.rx8club.com/showthread.p...stereo+removal
1. UNSCREW SHIFT ****
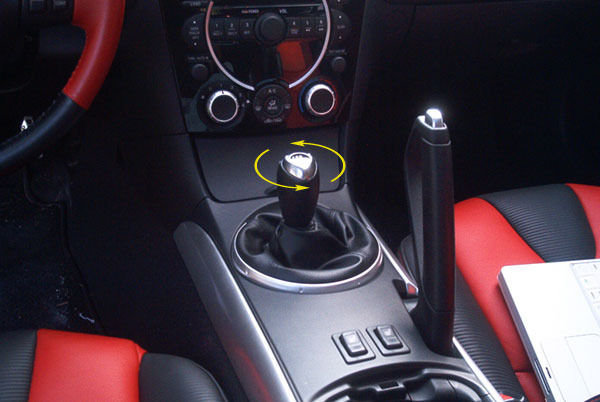
2. PULL UP ON THE SHIFTER PANEL AS SEEN ON THE LEFT IN THIS PICTURE
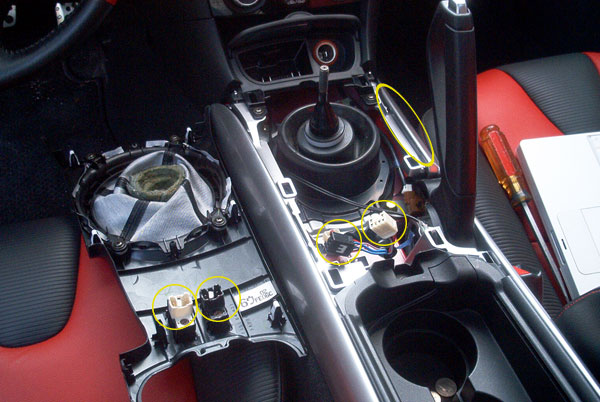
3. REMOVE THESE 2 SCREWS
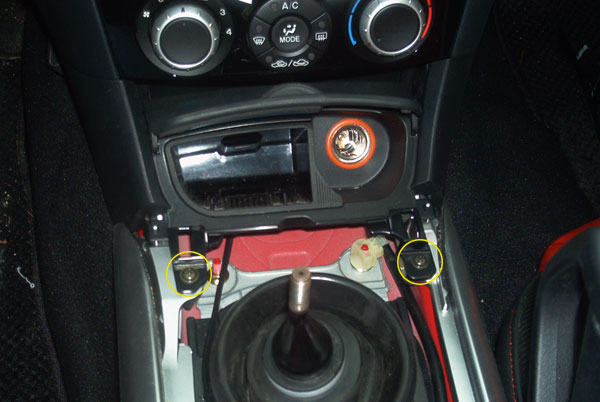
4. UNPLUG THE CIGARETTE LIGHTER

5. NOW YOU WILL FIND THESE COLOR WIRES FROM THOSE PLUGS.
6. CUSCO YELLOW= RX8 RED, that's your ILLUMINATION

7. CUSCO RED = RX8 YELLOW, that's your switched power

8. GROUND IS CONNECTED TO THIS BOLT BEHIND THE SHIFTER, PLUG AND PLAY

9. Now just plug in all your servos and controller into the ECON "BRAIN MODULE" and turn on the car. The servos should all move in a fashion to check for continuity.
10. ONCE YOU'VE CHECKED THIS YOU CAN UNPLUG THAT STUFF AND JUST LEAVE THOSE WIRES THERE FOR NOW.
We brought in a batch of Zero2E with E-con for the RX8 and managed to do a local install. I have another one next week so will actually modify this post and add a few more photos.
So I was having a difficult time determining the logic in which I'd recommend doing the install so you guys can decide if you want to do it this way or another way.
ONE WAY: ELECTRICAL, quick hardware to check function of servos. Then install coils.
SECOND WAY: R&R of suspension, then do Electrical. Either way you can use the suspension without the controller, so worst case if it doesn't work just don't use them.
I prefer to do electrical first and just know what i'm getting into. That way the rest is very standard.
Here's my staging:
1. Electrical splicing to ensure functionality of servos and controller
2. R&R of Front suspension, install servos, install F STB
3. R&R of Rear Suspension, MOUNT SERVOS BEFORE installing coils
4. FISH Wire, finish mounting position for controller
I'm sure there's a coilover install thread on here, but this electrical will be the biggest help if you don't have a test light or multimeter.
ELECTRICAL
Contents: Compliments of Spin9k
You'll notice the orange, red spool of wires on the right side. This is your Illumination, Ground, and "Switched" Power.
We're lucky in that you can tap Switched Power and Illumination both from the cigarette lighter, and ground from right behind the shifter.
TO REMOVE THE ASH TRAY YOU NEED TO DO THIS.
Compliments of l008com
https://www.rx8club.com/showthread.p...stereo+removal
1. UNSCREW SHIFT ****
2. PULL UP ON THE SHIFTER PANEL AS SEEN ON THE LEFT IN THIS PICTURE
3. REMOVE THESE 2 SCREWS
4. UNPLUG THE CIGARETTE LIGHTER
5. NOW YOU WILL FIND THESE COLOR WIRES FROM THOSE PLUGS.
6. CUSCO YELLOW= RX8 RED, that's your ILLUMINATION
7. CUSCO RED = RX8 YELLOW, that's your switched power
8. GROUND IS CONNECTED TO THIS BOLT BEHIND THE SHIFTER, PLUG AND PLAY
9. Now just plug in all your servos and controller into the ECON "BRAIN MODULE" and turn on the car. The servos should all move in a fashion to check for continuity.
10. ONCE YOU'VE CHECKED THIS YOU CAN UNPLUG THAT STUFF AND JUST LEAVE THOSE WIRES THERE FOR NOW.
THE REAL BEGINNING.
1. MAKE SURE ALL DAMPERS ARE SET TO 1, SOFTEST SETTING ON ALL FOUR CORNERS.
2. GET READY TO REMOVE OEM SUSPENSION
UPPER CONTROL ARM - 2 BOLTS
LOWER FORK - 1 BOLT (NOT SHOWN)
BOLTS ON UPPERMOUNT AND STB (NOT SHOWN)
I'm not gonna go into detail about holding the damper and pulling it down. It's extremely logical. You guys just need to know what parts, upper control arm, to remove so you can do this swiftly.
PIC BELOW:

NOW JUST PUT THE CUSCO COILOVERS IN AND BOLT UP ALL THE LOWER END, HAND TIGHTEN THE COILOVER UPPERMOUNT NUTS. INSTALL THE SERVO AS SHOWN BELOW. THEN INSTALL THE FRONT STB.
INSTALL THE SERVOS ONTO THE FRONT STRUTS AS ILLUSTRATED IN THE PHOTOS BELOW.
CONTENTS:

MAKE SURE THE DAMPERS ARE SET TO "1" PRIOR TO MOUNTING THE SERVO.

PROGRESSION:


AFTER YOU GOT THE SERVO AND FRONT STB INSTALLED YOU CAN GET EVERYTHING NICE AND HAND TIGHTENED. DO NOT INSTALL THE BRAKE MASTER STOPPER UNTIL THE CAR IS ON THE GROUND AND SETTLED.


1. MAKE SURE ALL DAMPERS ARE SET TO 1, SOFTEST SETTING ON ALL FOUR CORNERS.
2. GET READY TO REMOVE OEM SUSPENSION
UPPER CONTROL ARM - 2 BOLTS
LOWER FORK - 1 BOLT (NOT SHOWN)
BOLTS ON UPPERMOUNT AND STB (NOT SHOWN)
I'm not gonna go into detail about holding the damper and pulling it down. It's extremely logical. You guys just need to know what parts, upper control arm, to remove so you can do this swiftly.
PIC BELOW:
NOW JUST PUT THE CUSCO COILOVERS IN AND BOLT UP ALL THE LOWER END, HAND TIGHTEN THE COILOVER UPPERMOUNT NUTS. INSTALL THE SERVO AS SHOWN BELOW. THEN INSTALL THE FRONT STB.
INSTALL THE SERVOS ONTO THE FRONT STRUTS AS ILLUSTRATED IN THE PHOTOS BELOW.
CONTENTS:
MAKE SURE THE DAMPERS ARE SET TO "1" PRIOR TO MOUNTING THE SERVO.
PROGRESSION:
AFTER YOU GOT THE SERVO AND FRONT STB INSTALLED YOU CAN GET EVERYTHING NICE AND HAND TIGHTENED. DO NOT INSTALL THE BRAKE MASTER STOPPER UNTIL THE CAR IS ON THE GROUND AND SETTLED.
NOW FOR THE REAR:
YOU SHOULD INSTALL THE SERVO ONTO THE UNIT PRIOR TO PUTTING IT INTO THE CAR.

SERVO PLACEMENT: I DID IT FACING THE INSIDE OF THE CAR

REMOVAL OF STOCK: LOOK AT THIS PIC. THE ARROWS POINT TO WHAT YOU WANT TO UNBOLT. THERE'S A FEW BOLTS UP TOP, SELF EXPLANATORY. ON THE BOTTOM YOU WANT TO REMOVE THESE BOLTS.
1. UPPER LINK
2. SWAY BAR END LINK
3. BOTTOM BOLT OF SHOCK


WHEN BOLTING IN THE CUSCOS FOR THE REAR REMEMBER TO LOOK AT THIS PIC.

YOU SHOULD INSTALL THE SERVO ONTO THE UNIT PRIOR TO PUTTING IT INTO THE CAR.
SERVO PLACEMENT: I DID IT FACING THE INSIDE OF THE CAR
REMOVAL OF STOCK: LOOK AT THIS PIC. THE ARROWS POINT TO WHAT YOU WANT TO UNBOLT. THERE'S A FEW BOLTS UP TOP, SELF EXPLANATORY. ON THE BOTTOM YOU WANT TO REMOVE THESE BOLTS.
1. UPPER LINK
2. SWAY BAR END LINK
3. BOTTOM BOLT OF SHOCK
WHEN BOLTING IN THE CUSCOS FOR THE REAR REMEMBER TO LOOK AT THIS PIC.
NOW FOR WIRE FISHING:
JUST TAKE A LOOK AT THE PICS HOPEFULLY IT'S EASY TO FIGURE OUT. I RAN THE WIRES FROM THE FRONT THROUGH THE FACTORY HARNESS GROMMET ON THE DRIVER SIDE TOWARDS THE BOTTOM CORNER OF THE BRAKE MASTER CYLINDER.
TO START WITH I WANTED EVERYTHING NICE AND CINCHED WITH SLACK TOWARDS THE INSIDE OF THE CAR. SO I STARTED AT THE SERVOS AND STARTED TO FIGURE OUT MY ROUTING. HERE'S HOW IT WENT.
STARTING FROM PASSENGER TO DRIVER SIDE:


WENT UNDER THE BRAKE MASTER AS SHOWN HERE AND LEADS INTO THE CABIN.

JUST TAKE A LOOK AT THE PICS HOPEFULLY IT'S EASY TO FIGURE OUT. I RAN THE WIRES FROM THE FRONT THROUGH THE FACTORY HARNESS GROMMET ON THE DRIVER SIDE TOWARDS THE BOTTOM CORNER OF THE BRAKE MASTER CYLINDER.
TO START WITH I WANTED EVERYTHING NICE AND CINCHED WITH SLACK TOWARDS THE INSIDE OF THE CAR. SO I STARTED AT THE SERVOS AND STARTED TO FIGURE OUT MY ROUTING. HERE'S HOW IT WENT.
STARTING FROM PASSENGER TO DRIVER SIDE:
WENT UNDER THE BRAKE MASTER AS SHOWN HERE AND LEADS INTO THE CABIN.


PULL UNDER THIS HARNESS SO YOU CAN PULL IT THROUGH THE FUSE PANEL.


PASSENGER SIDE, SAME DEAL BUT YOU HAVE THE GLOVE BOX NOW.


CLEANING UP:


FISHING FROM DRIVER SIDE TO PASSENGER SIDE, LEADS TO CONTROL MODULE


PASSENGER SIDE, SAME DEAL BUT YOU HAVE THE GLOVE BOX NOW.
CLEANING UP:
FISHING FROM DRIVER SIDE TO PASSENGER SIDE, LEADS TO CONTROL MODULE
MY FISHING LINE WAS A RESOURCEFUL HANGER, HEHE.


THEN YOU CAN START WITH THE REAR STB IF YOU GOT ONE: EASIER ON GROUND.

1. REMOVE BAR FROM BRACKETS
2. MOUNT BRACKETS TO VEHICLE, HAND TIGHTEN
3. PUT CAR ON GROUND TIGHTEN UP SUSPENSION, TORQUE IT ALL
4. GRAB INTERIOR PIECES AND SLICE THEM SO THE BRACKETS STICK THROUGH, MOUNT THE BAR, TIGHTEN IT ALL DOWN.

GIVE IT A GOOD SHAKE TEST. I�M SURE I�VE FORGOTTEN SOMETHING. THIS WAS THE LONGEST POST I�VE EVER DONE IN MY LIFE. I CAN AMMEND THIS AT ANY TIME.
THANKS GUYS, RISHIE
THEN YOU CAN START WITH THE REAR STB IF YOU GOT ONE: EASIER ON GROUND.
1. REMOVE BAR FROM BRACKETS
2. MOUNT BRACKETS TO VEHICLE, HAND TIGHTEN
3. PUT CAR ON GROUND TIGHTEN UP SUSPENSION, TORQUE IT ALL
4. GRAB INTERIOR PIECES AND SLICE THEM SO THE BRACKETS STICK THROUGH, MOUNT THE BAR, TIGHTEN IT ALL DOWN.
GIVE IT A GOOD SHAKE TEST. I�M SURE I�VE FORGOTTEN SOMETHING. THIS WAS THE LONGEST POST I�VE EVER DONE IN MY LIFE. I CAN AMMEND THIS AT ANY TIME.
THANKS GUYS, RISHIE
i'm doing another one tomorrow morning and
AM HAPPY TO DO COILOVER INSTALLS, TEIN, CUSCO, JIC, WHATEVERS FOR THE RX8 FOR LOCAL CUSTOMERS.
I DO THIS ON THE SIDE, NOT THROUGH THE COMPANY. JUST PM ME AND I CAN SCHEDULE IT OUT FOR A SATURDAY.
ALIGNMENT AND ALL.
WHEN YOU PUT THE CAR ON THE GROUND YOU CAN DETERMINE HOW LOW YOU WANT IT TO BE AND THEN MOVE THE LOWER BRACKETS ACCORDINGLY.


Thx for the compliments guys. There are a couple little things missing here and there but hopefully everyone's intuition will make up for those gaps in my instructions.
Always a pleasure D. Your car cut me a couple times but ehhh it's collateral damage to me. hehehe.
I'm trying to find that other radio so we can do our super secret dealio. haha. I just need to dig through some boxes in storage. I got your vm though.
Peace, Rishie
Always a pleasure D. Your car cut me a couple times but ehhh it's collateral damage to me. hehehe.
I'm trying to find that other radio so we can do our super secret dealio. haha. I just need to dig through some boxes in storage. I got your vm though.
Peace, Rishie


Momentum Keeps Me Going
Joined: Sep 2002
Posts: 5,036
Likes: 5
From: Colorado
Must be the most complete and detailed DIY I've seen!! Good job done (and lots of pics) Rishie 
I did mine before you'd put all this up so there are a couple things I did differently that may be of interest to someone...
1) Rather than take the side sills up to run the two rear controller wires from the back, I ran them out under the rear seats and then both come together towards the center tunnel. They easily slip up & under the silver side lip on either side of the tunnel without ever removing any of the console. When they get to the front just take out the ashtray/shift boot cover and they easily flow thru to the underdash area to the driver or passenger side, depending on where you put the electronics box.
2) Putting the control box and display in the glove compartment does two things I think are counterproductive. One, the control box, wires, and display pretty much destroy the usefulness of the glove compartment. Bad. Second, the display being there hides it coolness (whatever there is) and makes it very inconvenient to use, esp. if you're the driver, and esp while driving. Not good.
There's a perfect spot (a control box similar in size to the Cusco box) over the gas pedal up under the dash where the control box can be easily velcroed (I used industrial strength velcro) - keeping all the many associated wires (4 from the EDFCs plus, power, ground, and ribbon cable to display box) neatly tied up and out of the way and out of sight. There's a bunch of extra cable length to hide as well. The EDFC display being small is less of a clutter issue, I brought the ribbon cable out thru the hole (remove plug) in the dash by the glove compartment and stickied it there on the side dash area. Easily read and changed from the driver's vantage point there.
Thank you very much sir. this was our first REAL DIY so I hope i met the standard.
There are definitely many ways to run the wiring. I am not sure if my way is "conventional" or not, but back in the audio days i was just used to pulling door sills all day long. hehe...
So i got another treat for you guys. The second local client I put these on works at a machine shop and he fabbed up his controller into the SPOT WE ALL WANT.
I am SOOO SAD for the edfc guys because he indicated that the controller is likely to large to fit in this place, PLUS IT DOESN'T HAVE MATCHING AMBER LIGHTS. MMMMMMMM MAJOR BROWNIE POINTS FOR CUSCO WITH THE RX8'S.

Like i said i have one more set. I'll let this go until the end of this month at the orignal GB price. Let me know ASAP.
Rishie
There are definitely many ways to run the wiring. I am not sure if my way is "conventional" or not, but back in the audio days i was just used to pulling door sills all day long. hehe...
So i got another treat for you guys. The second local client I put these on works at a machine shop and he fabbed up his controller into the SPOT WE ALL WANT.
I am SOOO SAD for the edfc guys because he indicated that the controller is likely to large to fit in this place, PLUS IT DOESN'T HAVE MATCHING AMBER LIGHTS. MMMMMMMM MAJOR BROWNIE POINTS FOR CUSCO WITH THE RX8'S.
Like i said i have one more set. I'll let this go until the end of this month at the orignal GB price. Let me know ASAP.
Rishie
Last edited by Endless Rotaries; May 24, 2007 at 03:00 AM.
 Attack of the giant pictures!
Ok so default of those MODE settings is
Basically same setting front and rear.
So say you're CUSTOM set at 2 front and 4 rear. If you push the mode button it should bring you to an even 1 and 1, 2 and 2 etc....
Mode on the RIGHT will count upwards but retain the same # for the front and rear. Mode LEFT will do the opposite. If memory serves.
I noticed if you push the mode button it just makes the settings symmetrical. I need to email cusco and ask if there is a way to make them custom settings like on a radio.
Rishie


Momentum Keeps Me Going
Joined: Sep 2002
Posts: 5,036
Likes: 5
From: Colorado
 . pm me.

Thread
Thread Starter
Forum
Replies
Last Post
gwailo
New Member Forum
38
May 14, 2024 06:57 AM
OnebaddRx8
RX-8 Parts For Sale/Wanted
5
Oct 17, 2015 10:05 PM
Solidtrance
Series I Wheels, Tires, Brakes & Suspension
22
Sep 4, 2015 12:47 PM
arm, brake, con, cusco, cylinder, econ, install, installation, instruction, long, mw, show, stopper, suspension, test