DIY: 3rd brake light RX-8 logo mod

 02-17-2004, 08:20 PM
#1
Moderator with a mycocardium
Thread Starter
DIY 3rd brake light RX-8 logo mod
I thought I would do a DIY for the 3rd brake light RX-8 logo and show a step by step instruction.
First, I needed a way to produce the RX-8 graphic to be used as a mask so that I didn't have to take the lengthy time to cut a mask with an Xacto knife. Because I work in education and multi media, I went with what I have on hand which is a transparency film which is printed on by a laser printer and is normaly used for graphics on an over head projector. After some trial and error as to what is the ideal size to be produced through the lens of tht third brake light I came up with an acceptable design.
I found two ways to mount the graphic masking.
One is behind the red lens which I like to refer to as a stealth mount. WIth this method you do not see the logo until the brakes are applied.
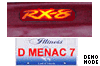
The second is the mounting of the graphic on the front side of the red lens and by this method, you see the red outline of the RX-8 logo even with the brake light not lit. I found this method to work best, imo.
Here is the finished look with the brake light applied using the second mehtod.
First, I needed a way to produce the RX-8 graphic to be used as a mask so that I didn't have to take the lengthy time to cut a mask with an Xacto knife. Because I work in education and multi media, I went with what I have on hand which is a transparency film which is printed on by a laser printer and is normaly used for graphics on an over head projector. After some trial and error as to what is the ideal size to be produced through the lens of tht third brake light I came up with an acceptable design.
I found two ways to mount the graphic masking.
One is behind the red lens which I like to refer to as a stealth mount. WIth this method you do not see the logo until the brakes are applied.
The second is the mounting of the graphic on the front side of the red lens and by this method, you see the red outline of the RX-8 logo even with the brake light not lit. I found this method to work best, imo.
Here is the finished look with the brake light applied using the second mehtod.
 02-17-2004, 08:28 PM
#4
Moderator with a mycocardium
Thread Starter
Here is how to disassemble the third brake light.
First, you need to remove all of the nylon screws holding up the trunk lid liner and then remove this liner from the lid.
Next you need to remove both mounting 10mm nuts and unplug the lamp socket and remove the entire third light assembly.
First, you need to remove all of the nylon screws holding up the trunk lid liner and then remove this liner from the lid.
Next you need to remove both mounting 10mm nuts and unplug the lamp socket and remove the entire third light assembly.
Last edited by D MENAC 7; 08-02-2004 at 05:09 PM.
02-17-2004, 08:31 PM
#5
Moderator with a mycocardium
Thread Starter
After you remove the third light assembly, you need to start disassembling the housing. First take out the two screws mounting the lamp housing.
02-17-2004, 08:37 PM
#6
Moderator with a mycocardium
Thread Starter
Next there is a clamp that holds the rear red assembly in place. I also found on the other side two hinge type parts that hold this part onto the center red lens. After taking this all out, I eventually seperated the rear red assembly from the center red lens. To get to that point, it may be easier to remove the two red parts together by pusing in on the slot on both sides and sliding these out of the clear lens part of the assembly.
 02-17-2004, 08:43 PM
#9
Moderator with a mycocardium
Thread Starter
Next you have to decide which placement to use to mount the RX-8 logo.
For the "stealth" method, you want to mount the graphic on the inside of the center red lens. To do this I used the same clear tape to afix this inside the lens.
For the "stealth" method, you want to mount the graphic on the inside of the center red lens. To do this I used the same clear tape to afix this inside the lens.
02-17-2004, 08:46 PM
#10
Moderator with a mycocardium
Thread Starter
Next you need to reassemble the third brake light. This is a shot with the graphic in place behind the center red lens and the unit reassembled. Note, this was shot using flash photography and normally you would not see anything because it is dark in the area behind the red lens.
02-17-2004, 08:55 PM
#15
Moderator with a mycocardium
Thread Starter
Finally, here is a shot of it at night. Rememberr, it's very difficult to take photos of light in the dark. It's hard not to over expose so, this photo cannot do it the best justice as the first in the light at the beginning of this thread.
02-17-2004, 08:59 PM
#17
Moderator with a mycocardium
Thread Starter
I will be glad to provide more information if anyone cares to ask. If you PM me, I can let you know the availability of these logo maskings if you would not wish to go through the work of producing them. If you would like, I can send you a file with the logo graphic if you have the materials at hand and wish to do it yourself.
 02-17-2004, 09:42 PM
#19
Moderator with a mycocardium
Thread Starter
logo file
I hope this works, here is a copy of the graphic. It measures 6.513" wide by 1.556" tall. If you open it up in PS or another graphic program, you can size it to these dimensions and that should take care of it if it is not the exact size after saving the file.
02-17-2004, 09:50 PM
#20
Moderator with a mycocardium
Thread Starter
I am still developing one that will fit in the clear lens part of the third brake light and am thinking about doing it in the color of the car, that is still on the drawing board becasue it really has to be opaque from the back otherwise the masked area would be purple on a Winning Blue, orange on a Lightening Yellow, Black on a Black....that might just work on there....brown on a Nordic Green, dark red on a Silver and Gray and may not show up on the best of colors, Red on a Velocity Red.
There would have to be some printing method to print on clear film that would have a first layer of some dark opaque color and then a color on top of that to fully mask out all lighting where you wouldn't want it.
There would have to be some printing method to print on clear film that would have a first layer of some dark opaque color and then a color on top of that to fully mask out all lighting where you wouldn't want it.
02-17-2004, 11:15 PM
#22
The Stickinator

Join Date: Nov 2003
Location: Portland, OR.
Posts: 1,328
Likes: 0
Received 0 Likes
on
0 Posts
Very funny... I may have an idea... uh no not about the sticky. If you could get two to line up you could just do one in black and then put the color of your choosing in front of it. If they lined up perfectly it would solve the transparent issue with the different colors.
02-18-2004, 12:38 AM
#23
Moderator with a mycocardium
Thread Starter
Duh...why didn't I think of that??? Thanks! it's off to bed then off to the drawing board I go tomorrow.
Last edited by D MENAC 7; 02-18-2004 at 07:09 AM.
02-22-2004, 07:04 AM
#24
Not so Super right now

Join Date: May 2003
Location: Beyond that there swamp.
Posts: 1,493
Likes: 0
Received 0 Likes
on
0 Posts
Just a tip, most vynil printing shops will do that quite easy. I cheked locally and to do 2 layers of it in that shape and size was all of 10 bucks tops.
