
DIY: AxialFlow Shifter Install


DIY: AxialFlow Shifter Install
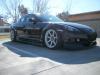
At the moment I have no pictures of the car, I'll add them when recieved.
The shifter is delivered with a kit having two plates, 4 screws, 2 dowels and a plastic rod.
The small plate and plastic rod are installation tools only.
Remove the console top as the S1, refer to the S1 if need be, but it is self explanitory. There are two new things to add. To remove the shiftboot just yank on the boot to remove. We've been doing it this way for years now and have better results at not breaking the tab than the old way. Removing the wire clips has been the hardest part of getting things apart. Now we've started just using a 90 degree bent needlenose under the clip and prying it up and off. Works fine, you can put it back on or not.
Remove the stock gate by taking the three bolts out, and lifting the shifter. Be sure it is in nutral with the brake on. Next remove the 4 12mm bolts that hold the shift tower to the trans. You might want to let it cool down before this.
You will not be able to remove the casting without a puller. This s due to the dowel pins. Here is where the little plate and plastic rod come in. Drop the rod into the place where the shifter was, then bolt the little plate where the shifter lockdown used to go. This will snap the casting off. It doesn't take nuch pressure here. Remove the plastic rod from the trans.
Turning the casting over on a bench you will remove the existing dowel pins. You can do this with a vice grip pliers by holding the pin and twisting. A screwdriver under the pliers sometimes helps. Install the new pins provided by tapping them in. Be sure they are tight, if not centerpunch on each side of the pin.
Clean the surfaces with some sort of thinner or acitone. Use a small (1/8 inch) bead of high temp RTV on both the trans and the tower. Place the spacer plate on the trans and then the tower. Using the dowel pins to align things up it only goes one way.
Use the 4 new bolts (13mm) to hold the casting down. You will find that a 13mm wigely socket helpfull here. 1/4 or 3/8 drive.
Put some greese on the sphere pivot of the stick. Don't worry about the lower bearing as it will sit in oil. If you are not in gear the lower bushing should be level and you can drop the shifter right in. Be sure the upper bearing sleeve has the two notches over the pins. It will not seat otherwise. Everything should drop in without force.
Now bolt the stock gate back on using the old bolts. Test that you can get all gears. Then you can replace all the stock parts on top.
If you have any problems Email me direct with your feedback. rap@axialflow.com
I would like comments from the first few users to find any problems that may exist.
Last edited by Richard Paul; Apr 19, 2012 at 12:42 PM.


Use longer bolts or shorten it. Not a CNC part, I just cut them by eye on the band saw. You can grind it on a bench grinder. Or you can use a socket with short extension, just play with parts till you find the right size.

Or getting some longer bolts 
All you are using that for is to pull the top part of the transmission case off....so either the rod or the bolts...in the end it doesn't matter much
All you are using that for is to pull the top part of the transmission case off....so either the rod or the bolts
...in the end it doesn't matter much

DIY: Axial Flow S2 Short Shifter Install
Hope Richard doesn't mind me posting this since he already started one, if so I am sure the mods can merge the threads. Anyway, here is my experience with installing the AFE SS on a 2010 Sport.
Package Contents
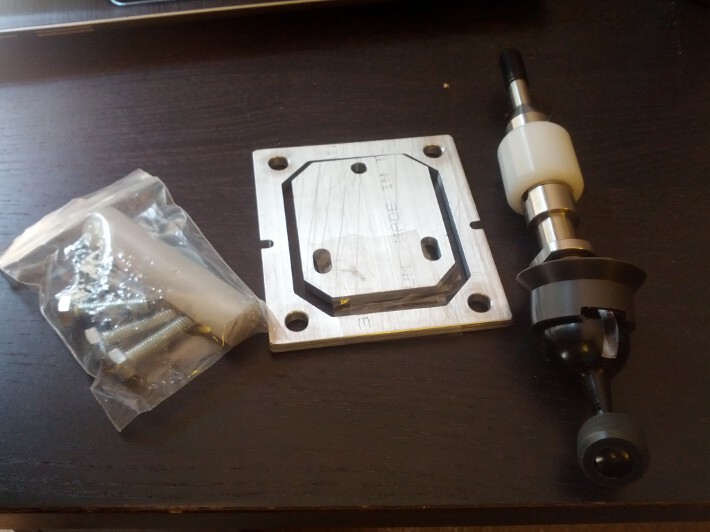
Shifter, 4 13mm Bolts, 2 Pins, 1 Dowel, 1 Spacer, 1 Puller
The Patient

Examine the patient ... she is about to undergo some cosmetic surgery ... but dont worry...she wants this ... she is sedated, she wont feel a thing
Remove The Console Tab
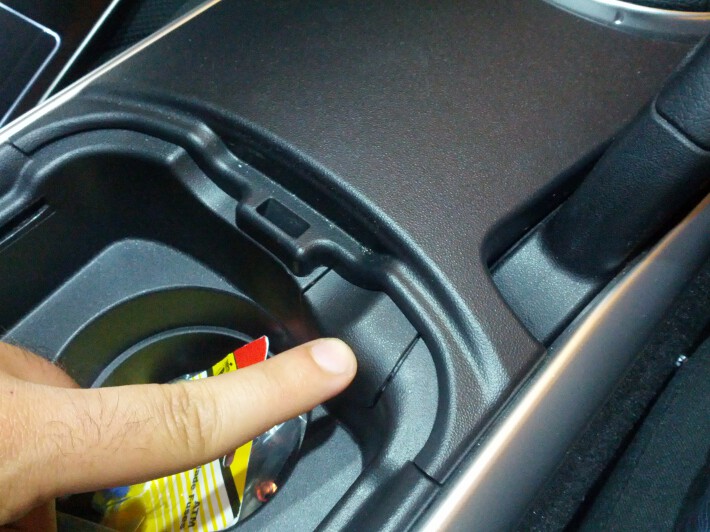
Start by removing the tab from the center console. This is very easy if you have the Parking Brake engaged. I simply stick my finger in through where the Parking Brake is, and pop out the tab.
Remove Console
With the tab removed, you can now pull off the console. The console is held on by tabs so be careful that you dont break them when pulling. The easiest way to do this is to stick your finger into the hole created by the tab that you removed. You should be able to feel one of the clips. Simply push up and you will see the console start to pop out.
Remove Ash Tray
To make life easier, remove the ashtray by unscrewing the two screws that are holding it in place. The ash tray is also clipped in so gently pull forward and it should pop right out. Be aware that there are a few wires to hold the ligher and lights on the ash tray, simply put the ash tray to the side without stressing the wires.
Package Contents
Shifter, 4 13mm Bolts, 2 Pins, 1 Dowel, 1 Spacer, 1 Puller
The Patient
Examine the patient ... she is about to undergo some cosmetic surgery ... but dont worry...she wants this ... she is sedated, she wont feel a thing
Remove The Console Tab
Start by removing the tab from the center console. This is very easy if you have the Parking Brake engaged. I simply stick my finger in through where the Parking Brake is, and pop out the tab.
Remove Console
With the tab removed, you can now pull off the console. The console is held on by tabs so be careful that you dont break them when pulling. The easiest way to do this is to stick your finger into the hole created by the tab that you removed. You should be able to feel one of the clips. Simply push up and you will see the console start to pop out.
Remove Ash Tray
To make life easier, remove the ashtray by unscrewing the two screws that are holding it in place. The ash tray is also clipped in so gently pull forward and it should pop right out. Be aware that there are a few wires to hold the ligher and lights on the ash tray, simply put the ash tray to the side without stressing the wires.
Last edited by paimon.soror; Apr 21, 2012 at 01:07 PM.
Start Removing The Plate That Holds The Shifter Down
There are 4 nuts that need to be removed. Be aware that the parking brake wire and the seat heater wires are clipped onto two of the 4 studs. I had removed these in a previous modification I did so I do not have a picture showing this. You can remove the clips that hold the wires on the studs with a small screwdriver and a pair of pliers.
Remove The Shifter Plate

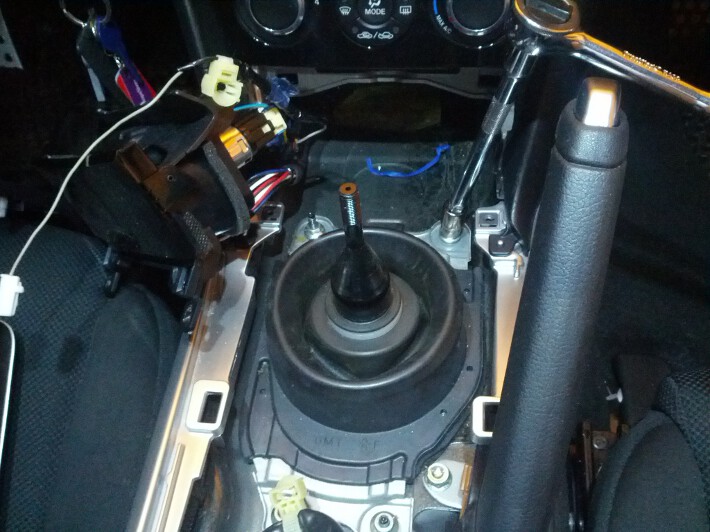
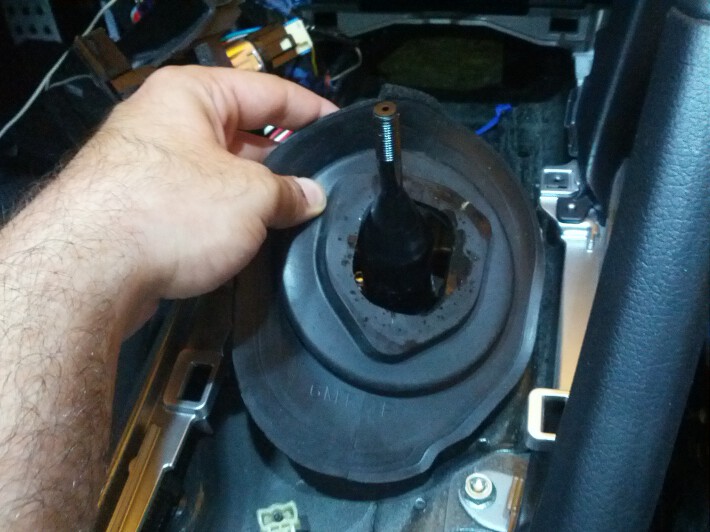
With the nuts removed, you can now remove the shifter plate. Simply start pulling up. You will notice that the rubber around the shifter is held on by a plastic ring. I found that the easiest way to remove this is to start pulling the rubber up, stick your fingers below the ring, and gently slide the ring up. Both the ring and the plate should come off at the same time.
Remove Transmission Gromet
Once you remove the shifter plate, you will see a rubber grommet that is covering the hole in the trasmission tunnel. This is simply removed by pulling it off, there is nothing really holding it on
Remove The Shift Gate

Start removing the stock shift gate using a 10mm socket. There should be 3 bolts in all.
Remove the OEM Shifter
With the shift gate unbolted, the oem shifter should simply pull up. Remove the shifter and put it aside as you will need to remove the gate in a future step.
There are 4 nuts that need to be removed. Be aware that the parking brake wire and the seat heater wires are clipped onto two of the 4 studs. I had removed these in a previous modification I did so I do not have a picture showing this. You can remove the clips that hold the wires on the studs with a small screwdriver and a pair of pliers.
Remove The Shifter Plate
With the nuts removed, you can now remove the shifter plate. Simply start pulling up. You will notice that the rubber around the shifter is held on by a plastic ring. I found that the easiest way to remove this is to start pulling the rubber up, stick your fingers below the ring, and gently slide the ring up. Both the ring and the plate should come off at the same time.
Remove Transmission Gromet
Once you remove the shifter plate, you will see a rubber grommet that is covering the hole in the trasmission tunnel. This is simply removed by pulling it off, there is nothing really holding it on
Remove The Shift Gate
Start removing the stock shift gate using a 10mm socket. There should be 3 bolts in all.
Remove the OEM Shifter
With the shift gate unbolted, the oem shifter should simply pull up. Remove the shifter and put it aside as you will need to remove the gate in a future step.
Last edited by paimon.soror; Apr 21, 2012 at 01:14 PM.
Start Unbolting The Transmission Tower

Using a 12mm socket, start removing the transmission tower. This part gets a bit tricky due to clearance, but take your time, and if available, use one of the 'wiggly' sockets. Remove these bolts and put them aside, you will not need them.
Insert Dowel
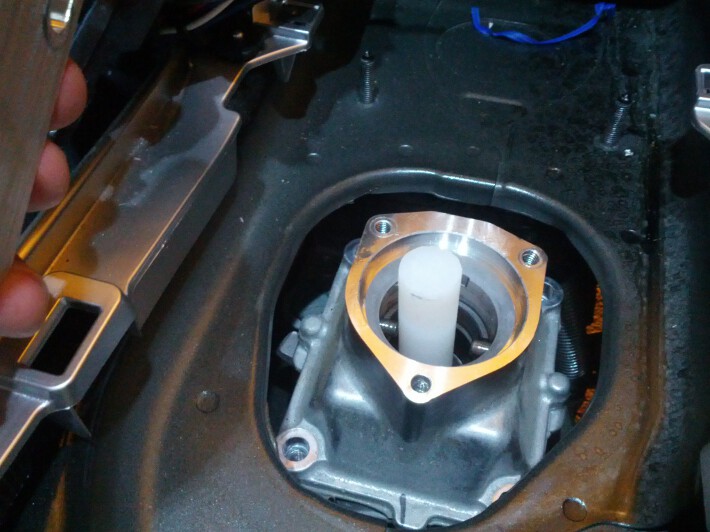
Next, insert the plastic dowel into the shifter hole.
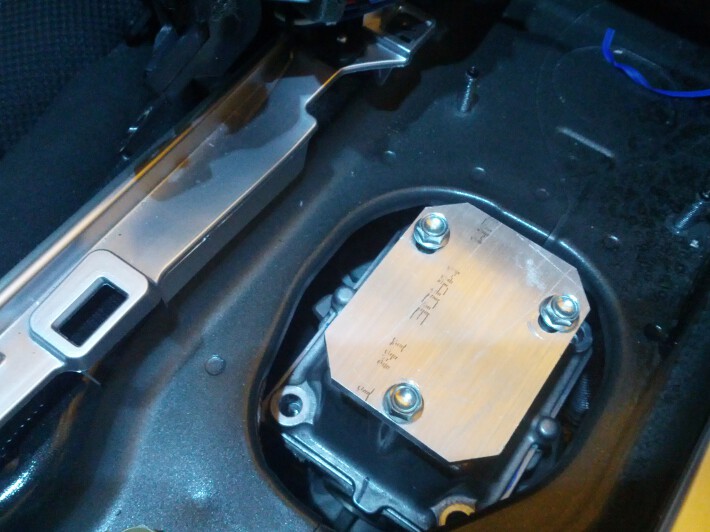
Install Puller Plate
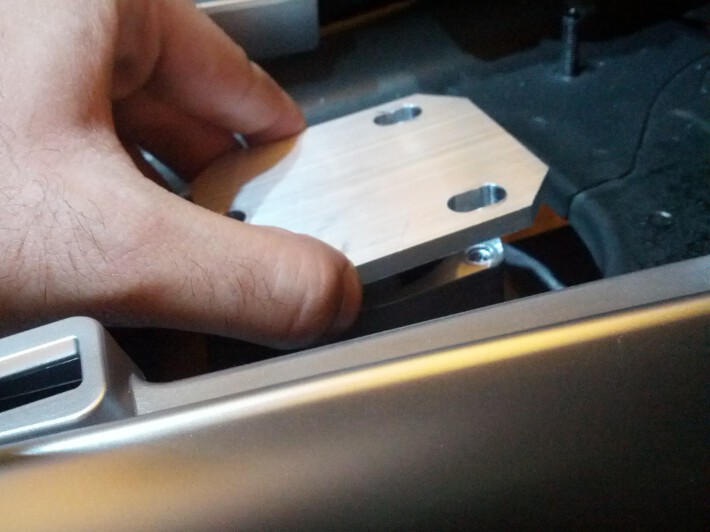
With the dowel installed, you can now mount the puller plate. Take note that the puller plate should sit with enough clearance that the shift gate bolts can thread in with a few turns.
Note: In my case the dowel was too long for the bolts to reach the shift gate holes, if that is the case, use either longer bolts, trim the dowel, or what I did was take an impact wrench socket as it was the perfect size for me
Like installing wheels, start threading in the bolts in a "star" pattern. The tower should simply pop off.
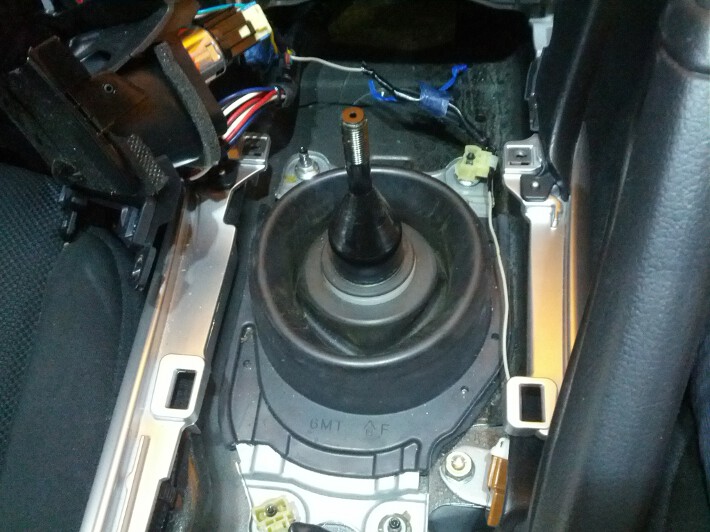
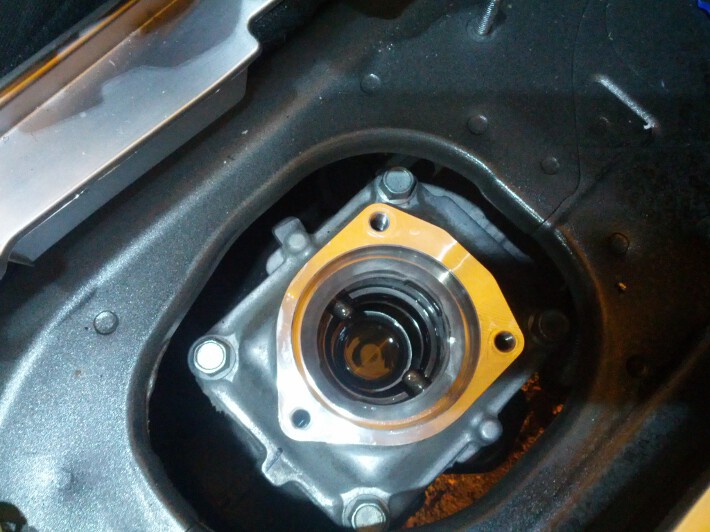
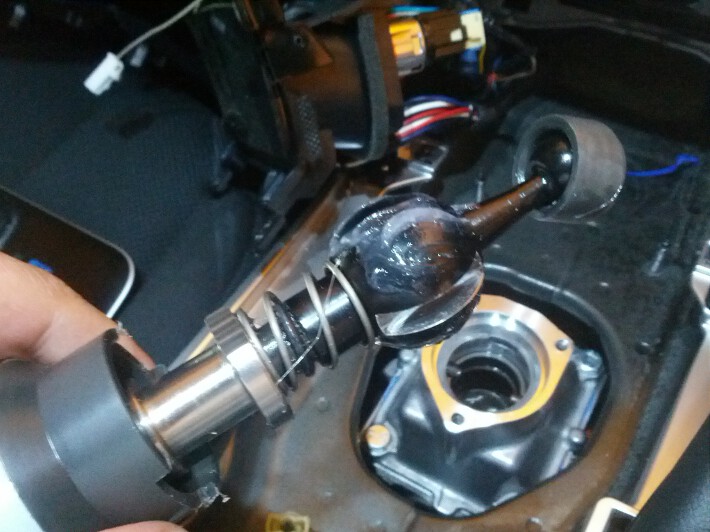
Trans Tower Removed
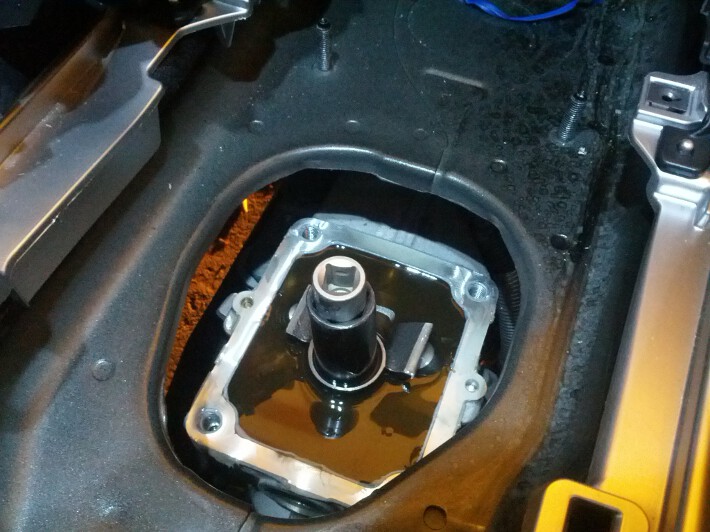
This is what you will be left with. Ignore the obscene amounts of tranny fluid here, this was from a previous test where I tried to fill the tranny fluid from the shifter hole .... it doesn't work hehe.
Examine The Tower
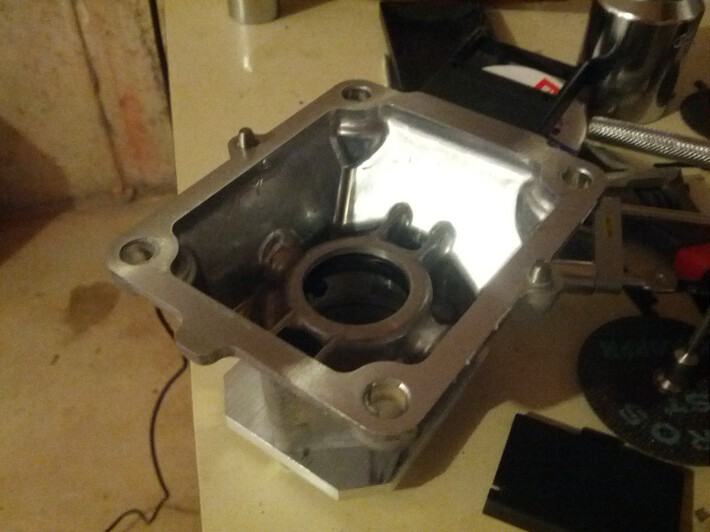
With the tower removed, take it to a workbench and turn it over. Take note of the pins. We will be removing these.
Using a 12mm socket, start removing the transmission tower. This part gets a bit tricky due to clearance, but take your time, and if available, use one of the 'wiggly' sockets. Remove these bolts and put them aside, you will not need them.
Insert Dowel
Next, insert the plastic dowel into the shifter hole.
Install Puller Plate
With the dowel installed, you can now mount the puller plate. Take note that the puller plate should sit with enough clearance that the shift gate bolts can thread in with a few turns.
Note: In my case the dowel was too long for the bolts to reach the shift gate holes, if that is the case, use either longer bolts, trim the dowel, or what I did was take an impact wrench socket as it was the perfect size for me
Like installing wheels, start threading in the bolts in a "star" pattern. The tower should simply pop off.
Trans Tower Removed
This is what you will be left with. Ignore the obscene amounts of tranny fluid here, this was from a previous test where I tried to fill the tranny fluid from the shifter hole .... it doesn't work hehe.
Examine The Tower
With the tower removed, take it to a workbench and turn it over. Take note of the pins. We will be removing these.
Last edited by paimon.soror; Apr 21, 2012 at 01:23 PM.
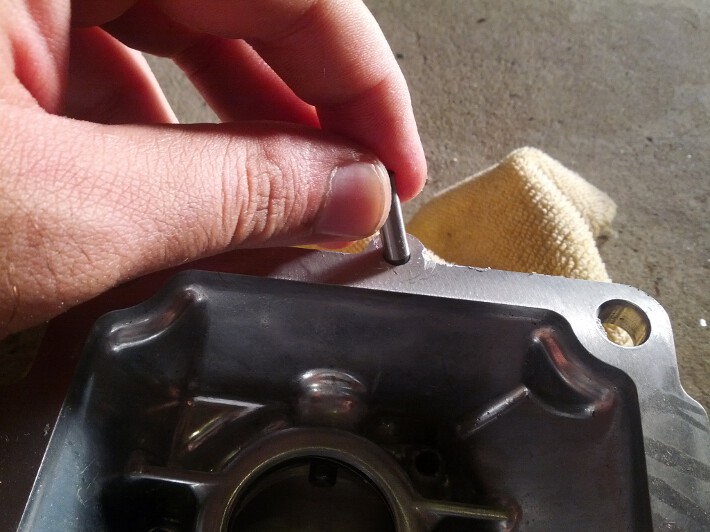
Remove OEM Pins

Using a pair of pliers or vice grips, remove the pins from the transmission tower. Don't judge my use of an ikea plier...they are some of the most comfortable pair of pliers I have ever come across
Install New Pins
Install the new pins by simply placing them back in the OEM hole and tapping them in. They should fit snug, if not, center punch them so that they don't fall out when you turn over the tower.
Apply some RTV to the top of the transmission

Just a small bead will do, I took a bead here and spread it because I didn't want to risk some goop falling into the tranny. Use your own discretion here
Install the Spacer

Now place the spacer on top. Make sure you have oriented it properly as it will only fit one way due to the cutouts for the pins.
Replace the Tranny Tower
Apply just a bit of RTV on the tranny tower like we did on the base, and place the tower on the transmission. Just like the spacer, the tower goes one way, be aware of the pins.
Using a pair of pliers or vice grips, remove the pins from the transmission tower. Don't judge my use of an ikea plier...they are some of the most comfortable pair of pliers I have ever come across
Install New Pins
Install the new pins by simply placing them back in the OEM hole and tapping them in. They should fit snug, if not, center punch them so that they don't fall out when you turn over the tower.
Apply some RTV to the top of the transmission
Just a small bead will do, I took a bead here and spread it because I didn't want to risk some goop falling into the tranny. Use your own discretion here
Install the Spacer
Now place the spacer on top. Make sure you have oriented it properly as it will only fit one way due to the cutouts for the pins.
Replace the Tranny Tower
Apply just a bit of RTV on the tranny tower like we did on the base, and place the tower on the transmission. Just like the spacer, the tower goes one way, be aware of the pins.
Last edited by paimon.soror; Apr 21, 2012 at 01:35 PM.
Grease Pivot Ball On Shifter
Apply a small amount of grease to the pivot ball of the new shifter. Do not worry about the lower pivot point as that sits in some grease inside the transmission.
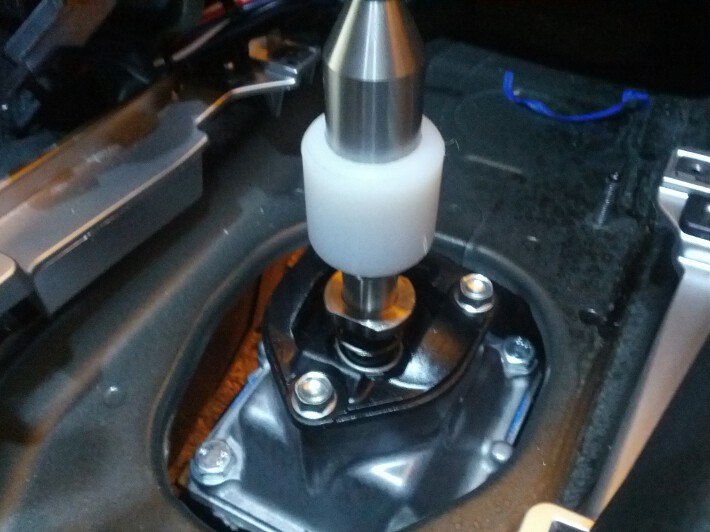
Install the Shifter
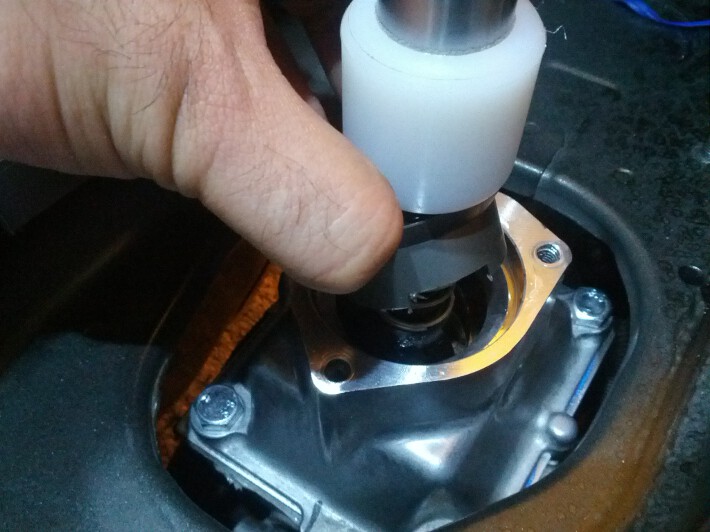
Now you can install the new shifter. Take note that the shifter only goes in one way so do not try to force the shifter in, it should gently fall into place. Take note of the cutouts on the plastic shifter plate, for this to go in properly, the tabs must align with the pins on the transmission, again, do not force this piece in.
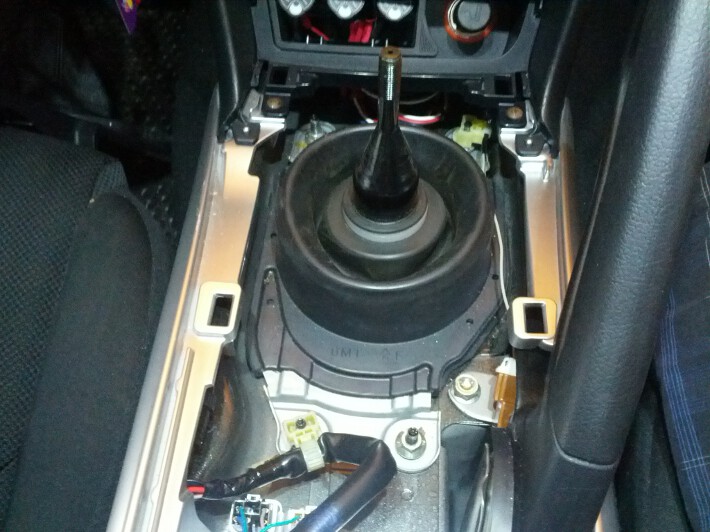
Shifter Installed
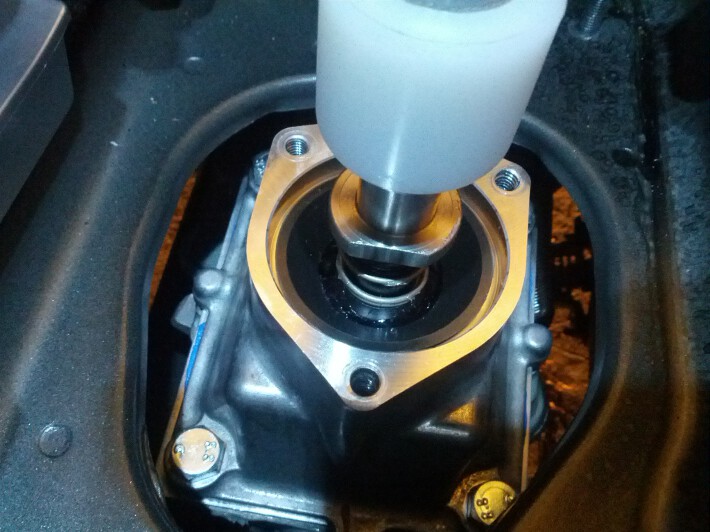
Here is what the shifter looks like when it is in place.
Replace OEM Shift Gate
Remove the shift gate from the OEM shifter. This is held in by clips so gently pull so that it unclips from the stock shifter. Bolt down the gate using the OEM bolts you removed before.
Contrats! Test and Reinstall The Console
With the shifter now bolted down, try to shift through each gear. Make sure you can get into each gear as well as reverse. Once you have confirmed this, start reinstalling everything in reverse order. Replace the transmission tunnel gromet, and then the plate that covers the transmission grommet. Make sure that the plastic ring is snug around the white base of the shifter. Replace the console, and screw your shifter back on.
Apply a small amount of grease to the pivot ball of the new shifter. Do not worry about the lower pivot point as that sits in some grease inside the transmission.
Install the Shifter
Now you can install the new shifter. Take note that the shifter only goes in one way so do not try to force the shifter in, it should gently fall into place. Take note of the cutouts on the plastic shifter plate, for this to go in properly, the tabs must align with the pins on the transmission, again, do not force this piece in.
Shifter Installed
Here is what the shifter looks like when it is in place.
Replace OEM Shift Gate
Remove the shift gate from the OEM shifter. This is held in by clips so gently pull so that it unclips from the stock shifter. Bolt down the gate using the OEM bolts you removed before.
Contrats! Test and Reinstall The Console
With the shifter now bolted down, try to shift through each gear. Make sure you can get into each gear as well as reverse. Once you have confirmed this, start reinstalling everything in reverse order. Replace the transmission tunnel gromet, and then the plate that covers the transmission grommet. Make sure that the plastic ring is snug around the white base of the shifter. Replace the console, and screw your shifter back on.
Last edited by paimon.soror; Apr 21, 2012 at 02:30 PM.


Thanks guys, and thank you Richard for all of the time and hard work you put into this. Just took a quick drive to give it a test and I am loving the feel! Some bullets:
- Installation was as simple as it could be given the design of the S2 transmission.
- Hardest part of install was getting the tower off, and that is only because my dowel was a bit long. And by "hardest" i mean on a scale from 1 - 10 with 10 being the easiest, it was a 9 lol.
- Shifting feels SOLID. Something that was stated multiple times by the S1 guys with their shifters. Regardless of the shortened throw, the OEM shifter feels lacking in quality.
- Throw is most certainly shortened. I dont know what the rated reduction is (RP?), but the shift throw feels significantly shorter, at least 25% shorter (possibly more)
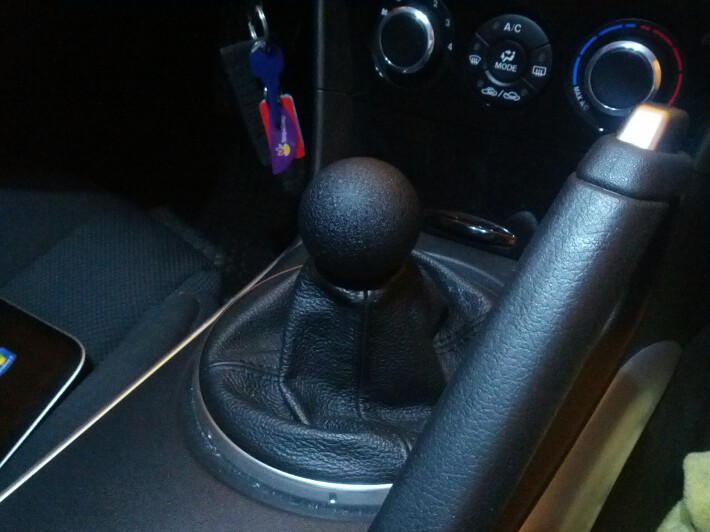
- Buyers should understand the difference between short shifter and short throw shifter, correct me if I am wrong but this is a short throw shifter. What I mean by that is that when installed the shifter sits a tad higher than the oem shifter. I know some people will order this and think that their shifter will sit lower, that isn't the case. The purpose of this shifter (as i have come to understand) is a reduction in throw (aka, function over cosmetic)
- Shifter is a bit louder, but I like that. What i mean is that each gear "clicks" into place, again this is due to the materials used in the shifter (which we can assume is why the oem shifter has softer material, noise reduction)
I will continue to post some more details over time. Feel free to correct me on any of my comments!
Thanks again Richard! This is a must have mod for S2 owners...probably one of the first legitimate mods made just for the S2!
- Installation was as simple as it could be given the design of the S2 transmission.
- Hardest part of install was getting the tower off, and that is only because my dowel was a bit long. And by "hardest" i mean on a scale from 1 - 10 with 10 being the easiest, it was a 9 lol.
- Shifting feels SOLID. Something that was stated multiple times by the S1 guys with their shifters. Regardless of the shortened throw, the OEM shifter feels lacking in quality.
- Throw is most certainly shortened. I dont know what the rated reduction is (RP?), but the shift throw feels significantly shorter, at least 25% shorter (possibly more)
- Buyers should understand the difference between short shifter and short throw shifter, correct me if I am wrong but this is a short throw shifter. What I mean by that is that when installed the shifter sits a tad higher than the oem shifter. I know some people will order this and think that their shifter will sit lower, that isn't the case. The purpose of this shifter (as i have come to understand) is a reduction in throw (aka, function over cosmetic)
- Shifter is a bit louder, but I like that. What i mean is that each gear "clicks" into place, again this is due to the materials used in the shifter (which we can assume is why the oem shifter has softer material, noise reduction)
I will continue to post some more details over time. Feel free to correct me on any of my comments!
Thanks again Richard! This is a must have mod for S2 owners...probably one of the first legitimate mods made just for the S2!

Registered
Joined: Oct 2009
Posts: 49
Likes: 1
I was installing mine this morning as well. I had to shorten my plastic rod down quite a bit, and then I was able to put 2 of the bolts in the plate on the tower and it came off. Those metal pins were not easy to take off...mine were almost fused into place!
It would have been nice to read this DIY as I was doing my install. Aw well, I got mine in in the same fashion Paimon did. I have pictures as well, but his are better.
When you guys said grease the sphere, I just used automotive all purpose grease. Should be good right?
Things I noticed:
1) Solid shifting for sure. Somewhat of a click when it goes into gear.
2) Lots of noise coming up into the shifter? Almost like whining, and only really happens when I am holding the shifter, or pushing a little hard into gear (holding it into gear). Is this normal? It sounds odd, almost abnormal. Is this due to something I may have done wrong?
3) The up/down motion for it to go into reverse doesn't seem to be broken in maybe? Sometimes will stay down, but it's getting slightly better I guess.
Overall, I am really liking the feel, but the noise I mentioned in #2 is bringing it down for me, only a bit. It sounds like something is not right? Any thoughts?
Registered
Joined: Oct 2009
Posts: 49
Likes: 1
Also quick question on the High Temp RTV...
I noticed when I took off the tower, there was silicone all around it, so I did the same with the tranny to spacer, and spacer to tower. All the way around (thinly applied). Is this not good?
Looks like Paimon only did a small section?
I noticed when I took off the tower, there was silicone all around it, so I did the same with the tranny to spacer, and spacer to tower. All the way around (thinly applied). Is this not good?
Looks like Paimon only did a small section?
I was installing mine this morning as well. I had to shorten my plastic rod down quite a bit, and then I was able to put 2 of the bolts in the plate on the tower and it came off. Those metal pins were not easy to take off...mine were almost fused into place!
It would have been nice to read this DIY as I was doing my install. Aw well, I got mine in in the same fashion Paimon did. I have pictures as well, but his are better.
When you guys said grease the sphere, I just used automotive all purpose grease. Should be good right?
Things I noticed:
1) Solid shifting for sure. Somewhat of a click when it goes into gear.
2) Lots of noise coming up into the shifter? Almost like whining, and only really happens when I am holding the shifter, or pushing a little hard into gear (holding it into gear). Is this normal? It sounds odd, almost abnormal. Is this due to something I may have done wrong?
3) The up/down motion for it to go into reverse doesn't seem to be broken in maybe? Sometimes will stay down, but it's getting slightly better I guess.
Overall, I am really liking the feel, but the noise I mentioned in #2 is bringing it down for me, only a bit. It sounds like something is not right? Any thoughts?
It would have been nice to read this DIY as I was doing my install. Aw well, I got mine in in the same fashion Paimon did. I have pictures as well, but his are better.
When you guys said grease the sphere, I just used automotive all purpose grease. Should be good right?
Things I noticed:
1) Solid shifting for sure. Somewhat of a click when it goes into gear.
2) Lots of noise coming up into the shifter? Almost like whining, and only really happens when I am holding the shifter, or pushing a little hard into gear (holding it into gear). Is this normal? It sounds odd, almost abnormal. Is this due to something I may have done wrong?
3) The up/down motion for it to go into reverse doesn't seem to be broken in maybe? Sometimes will stay down, but it's getting slightly better I guess.
Overall, I am really liking the feel, but the noise I mentioned in #2 is bringing it down for me, only a bit. It sounds like something is not right? Any thoughts?
#3 sounds suspect. Mine is working just fine. That part of the shifter is spring loaded, maybe it needs to be greased up?
Also quick question on the High Temp RTV...
I noticed when I took off the tower, there was silicone all around it, so I did the same with the tranny to spacer, and spacer to tower. All the way around (thinly applied). Is this not good?
Looks like Paimon only did a small section?
I noticed when I took off the tower, there was silicone all around it, so I did the same with the tranny to spacer, and spacer to tower. All the way around (thinly applied). Is this not good?
Looks like Paimon only did a small section?