DIY: Remove Front Bumper
 03-18-2011, 09:33 AM
#1
Living is best Modified.
Thread Starter

Welcome ladies and Gentlemen!
This is a dedicated post to removing the front bumper. This is foundation tutorial. Meaning this is not showing you how to install a specific part, or item. I will share with you my experience with getting the front bumper off. I bought the car used, any many of the screws and fasteners are missing. (It makes me wonder why they're missing) so some numbers may be off. I have tried to include everything possible in this DIY.
I wasn't planning on doing this DIY before doing another DIY. I didn't want to link off-site to a vendor. Also, I have tried searching using "Remove bumper" and "Remove front." I was unable to find a dedicated thread about this topic so here we go.
As is usual: Im not responsible for any damages to you, car, house, other things, stuff in general. Do at your own risk.
For more information about removing the front bumper see: https://www.rx8club.com/showthread.p...bumper+removal by kainis2k
0. Materials and Tools Needed
I. Safty *Suggested Reading*
II. Disassembly/Reassembly: Summary
III. Disassembly/Reassembly: Full Monte
IV. Bumper Pictures
///////////////////////
Materials:
1. Scissor Jack (Should be in the car's trunk)
1-a. Trolley Jack
1-b. Ramps
2. Jack Stands. (Safty First)
2-a. Ramps
3. 7mm Socket. (Underbelly)
4. 10mm Socket. (Top)
5. Philips Screw driver.
6. Flathead Screw driver
///////////////////////
Safty First
Safty Note: Scissor Jacks (Sucide Jacks)
Do not use a scissor jack (Sucide Jack) and use it to hold the car up. These are used to LIFT the car. Please use a Jack Stand to hold the car up. You do not want scissor jack failure while you're working with the car. The scissor jack that's included with your vehical is for emergency use only and should not be considered as a stable, reliable jack stand. Scissor jacks have been known to buckle and fail without any warning.
Safty Note: Lifting a car.
Before you raise the car on a Floor or Scissor jack, be sure to know where to place the jack. Read the user's manual to find the safest spot.
Safty Notice:
Be sure to place blocks to hold the car from falling forward, or backwards while lifting or while being lifted on 2 wheels.
Safty Notice:
Please consult your vehical's usermanual and jack manual before lifting any vehical.
Note:
You may need to use a combination of jacks, jackstands, or ramps. This is going to depend if you want/don't care if your wheels are on or you do care and you want the wheels off.
While you can turn your front wheels while on the ramps. I would not recommend it.
///////////////////////
Directions (Summary): Disassembly
1. Turn the car on, engine off.
2. Turn the wheel Right. Like you're trying to make a right-hand turn.
2-a. Undo the Driver's side (Left Side) fasteners.
3. Turn the wheel Left. Like you're trying to make a left-hand turn.
3-a. Undo the Passenger's side (Right side) fasteners
4. Disconnect the fog lights.
5. Turn off the car
6. Raise the car.
7. Undo the 10 screws underneath the car. Use a 7mm (metric) socket.
8. Pop the hood.
9. Remove the radiator Shroud
9-a. Undo the 6 fasteners from the radiator shroud with a flat head screw driver.
9-b. Lift the radiator shroud 90 degrees so it's facing up- flat up and down. Wiggle around the hood latch.
10. Remove the 4 screws from the front fender with a 10mm socket.
11. At the left or right side towards the front.
11-a. Pull out from the other side, towards the front.
12. Grab the front fender at the top, next to the top screw holes and pull towards you.
Directions (Summary): Assembly
1. Line up the bottom of the fender ontop of the bottom of the car.
2. Line up the top screw holes.
3. Pull the fender ontop of the screw holes.
4. Push the sides of the fender up and back into the orginal place.
5. Place the top screws back into their holes.
6. Place the fasteners on the sides into their holes.
////////////////////////
Directions: Disassembly
1. Turn the car on, engine off.
2. Turn the wheel Right. Like you're trying to make a right-hand turn.
2-a. Undo the Driver's side (Left Side) fasteners.
3. Turn the wheel Left. Like you're trying to make a left-hand turn.
3-a. Undo the Passenger's side (Right side) fasteners
Note: See above picture.
4. Disconnect the fog lights. (May not apply to your car)
4-a. Remove the black plastic shroud by pulling on the inside towards the front. Next, pull forward the plastic shroud on the outside.
4-b. Remove the 3 silver screws holding in the fog lamp.
4-c. Pull down the fog lamp. Pull the bottom of the fog lamp towards you, sliding the top of the fog lamp past the rest of the front.
4-d. Grasp the middle of the red-clip. Pull away from the fog lamp.
Note: Cars that have OilCooler Screens may need to hold the oil screen in, and push it back - while simultaneously pull the fog lamp out of the bumper.
5. Turn off the car
6. Raise the car.
7. Undo the 10 screws underneath the rx-8. Use a 7mm (metric) socket.
Note: There are 10. I only show half in this picture so I could show the positions with better accuracy.
8. Pop the hood.
9. Remove the radiator shroud.
9-a. Remove the 6 fasteners with a flat head screw driver.
9-b. Place the flat head screw driver. Twist around to pop the head/lock up.
9-c. Place the flathead under the fastener. Twist the screw driver to pop the rest of the body up.
10. Ontop, remove the 4 screws with a 10mm socket.
Note: I have them grouped up in two. You'll see a black and a silver screw at each side.
11. Pull out the sides towards the front.
12. Grab the bumper at the top, holding the both sides of the top-section. This will let you handle it with ease.
Directions: Reassembly
1. Line up the bottom of the fender ontop of the bottom of the car.
2. Line up the top screw holes.
3. Pull the fender ontop of the screw holes.
4. Push the sides of the fender up and back into the orginal place.
Note: You will need to pull up and slide the side into place.
5. Place the top screws back into their holes.
6. Place the fasteners on the sides into their holes.
7. Screw in the 10 screws at the bottom.
Note: Im running my car at Highway speeds (65) without the bottom screws. I don't recommend this unless you know the roads really well and you won't scrape.
////////////////////////
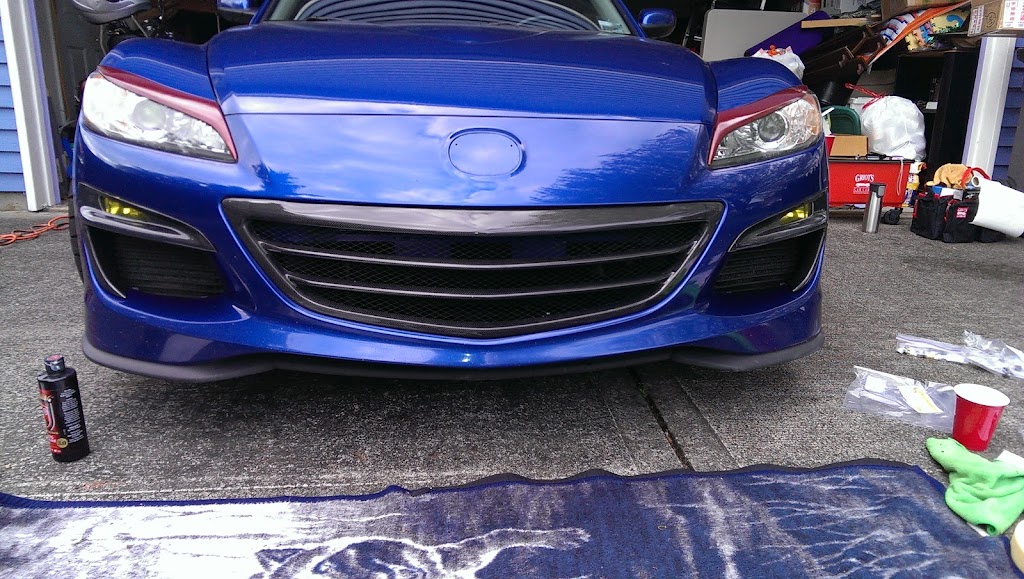
Front Bumper pictures
Front:
Side:
Back:
Closeup on the back-side of the Front Grill:
Even closer, on the Right-side of the back of the front grill
This is a dedicated post to removing the front bumper. This is foundation tutorial. Meaning this is not showing you how to install a specific part, or item. I will share with you my experience with getting the front bumper off. I bought the car used, any many of the screws and fasteners are missing. (It makes me wonder why they're missing) so some numbers may be off. I have tried to include everything possible in this DIY.
I wasn't planning on doing this DIY before doing another DIY. I didn't want to link off-site to a vendor. Also, I have tried searching using "Remove bumper" and "Remove front." I was unable to find a dedicated thread about this topic so here we go.
As is usual: Im not responsible for any damages to you, car, house, other things, stuff in general. Do at your own risk.
For more information about removing the front bumper see: https://www.rx8club.com/showthread.p...bumper+removal by kainis2k
0. Materials and Tools Needed
I. Safty *Suggested Reading*
II. Disassembly/Reassembly: Summary
III. Disassembly/Reassembly: Full Monte
IV. Bumper Pictures
///////////////////////
Materials:
1. Scissor Jack (Should be in the car's trunk)
1-a. Trolley Jack
1-b. Ramps
2. Jack Stands. (Safty First)
2-a. Ramps
3. 7mm Socket. (Underbelly)
4. 10mm Socket. (Top)
5. Philips Screw driver.
6. Flathead Screw driver
///////////////////////
Safty First
Safty Note: Scissor Jacks (Sucide Jacks)
Do not use a scissor jack (Sucide Jack) and use it to hold the car up. These are used to LIFT the car. Please use a Jack Stand to hold the car up. You do not want scissor jack failure while you're working with the car. The scissor jack that's included with your vehical is for emergency use only and should not be considered as a stable, reliable jack stand. Scissor jacks have been known to buckle and fail without any warning.
Safty Note: Lifting a car.
Before you raise the car on a Floor or Scissor jack, be sure to know where to place the jack. Read the user's manual to find the safest spot.
Safty Notice:
Be sure to place blocks to hold the car from falling forward, or backwards while lifting or while being lifted on 2 wheels.
Safty Notice:
Please consult your vehical's usermanual and jack manual before lifting any vehical.
Note:
You may need to use a combination of jacks, jackstands, or ramps. This is going to depend if you want/don't care if your wheels are on or you do care and you want the wheels off.
While you can turn your front wheels while on the ramps. I would not recommend it.
///////////////////////
Directions (Summary): Disassembly
1. Turn the car on, engine off.
2. Turn the wheel Right. Like you're trying to make a right-hand turn.
2-a. Undo the Driver's side (Left Side) fasteners.
3. Turn the wheel Left. Like you're trying to make a left-hand turn.
3-a. Undo the Passenger's side (Right side) fasteners
4. Disconnect the fog lights.
5. Turn off the car
6. Raise the car.
7. Undo the 10 screws underneath the car. Use a 7mm (metric) socket.
8. Pop the hood.
9. Remove the radiator Shroud
9-a. Undo the 6 fasteners from the radiator shroud with a flat head screw driver.
9-b. Lift the radiator shroud 90 degrees so it's facing up- flat up and down. Wiggle around the hood latch.
10. Remove the 4 screws from the front fender with a 10mm socket.
11. At the left or right side towards the front.
11-a. Pull out from the other side, towards the front.
12. Grab the front fender at the top, next to the top screw holes and pull towards you.
Directions (Summary): Assembly
1. Line up the bottom of the fender ontop of the bottom of the car.
2. Line up the top screw holes.
3. Pull the fender ontop of the screw holes.
4. Push the sides of the fender up and back into the orginal place.
5. Place the top screws back into their holes.
6. Place the fasteners on the sides into their holes.
////////////////////////
Directions: Disassembly
1. Turn the car on, engine off.
2. Turn the wheel Right. Like you're trying to make a right-hand turn.
2-a. Undo the Driver's side (Left Side) fasteners.
3. Turn the wheel Left. Like you're trying to make a left-hand turn.
3-a. Undo the Passenger's side (Right side) fasteners
Note: See above picture.
4. Disconnect the fog lights. (May not apply to your car)
4-a. Remove the black plastic shroud by pulling on the inside towards the front. Next, pull forward the plastic shroud on the outside.
4-b. Remove the 3 silver screws holding in the fog lamp.
4-c. Pull down the fog lamp. Pull the bottom of the fog lamp towards you, sliding the top of the fog lamp past the rest of the front.
4-d. Grasp the middle of the red-clip. Pull away from the fog lamp.
Note: Cars that have OilCooler Screens may need to hold the oil screen in, and push it back - while simultaneously pull the fog lamp out of the bumper.
5. Turn off the car
6. Raise the car.
7. Undo the 10 screws underneath the rx-8. Use a 7mm (metric) socket.
Note: There are 10. I only show half in this picture so I could show the positions with better accuracy.
8. Pop the hood.
9. Remove the radiator shroud.
9-a. Remove the 6 fasteners with a flat head screw driver.
9-b. Place the flat head screw driver. Twist around to pop the head/lock up.
9-c. Place the flathead under the fastener. Twist the screw driver to pop the rest of the body up.
10. Ontop, remove the 4 screws with a 10mm socket.
Note: I have them grouped up in two. You'll see a black and a silver screw at each side.
11. Pull out the sides towards the front.
12. Grab the bumper at the top, holding the both sides of the top-section. This will let you handle it with ease.
Directions: Reassembly
1. Line up the bottom of the fender ontop of the bottom of the car.
2. Line up the top screw holes.
3. Pull the fender ontop of the screw holes.
4. Push the sides of the fender up and back into the orginal place.
Note: You will need to pull up and slide the side into place.
5. Place the top screws back into their holes.
6. Place the fasteners on the sides into their holes.
7. Screw in the 10 screws at the bottom.
Note: Im running my car at Highway speeds (65) without the bottom screws. I don't recommend this unless you know the roads really well and you won't scrape.
////////////////////////
Front Bumper pictures
Front:
Side:
Back:
Closeup on the back-side of the Front Grill:
Even closer, on the Right-side of the back of the front grill
Last edited by RogueTadhg; 03-18-2011 at 08:04 PM. Reason: Pictures Broken. Still.
 03-18-2011, 09:38 AM
#2

Nice work man, wish I had this the first time i tried taking off my front. For some stupid reason I forgot to remove the bolts at the very top right and left. Must have blacked out because it was a terrible noob mistake. Took me forever to realize my mistake too lol.
 03-18-2011, 07:13 PM
#5
Surf Hard, Drive Hard

Join Date: Feb 2007
Location: Indialantic, Florida
Posts: 7,840
Likes: 0
Received 11 Likes
on
9 Posts
Not to rain on your parade and while I certainly applaud the effort and the clarity of the pics........the below is a decent one as well.
This one covers the headlights as well.
He goes a little overboard, but for noobs........it can't be beat.
Caution......this is a little long, but this along with your write-up and pics is all even the least experienced could do it.
He's got a few of these vids!
Here's the thread link incase I can't get it to run here.
https://www.rx8club.com/showthread.p...bumper+removal
http://video.google.com/videoplay?do...26768096045127
Last edited by Mazurfer; 03-18-2011 at 07:46 PM.
03-18-2011, 08:03 PM
#6
Living is best Modified.
Thread Starter
No worries. I'll add the thread link to the top, Mazurfer.
I couldn't find that thread when I was searching the forum for it :P
Ill view it when I get home on the netbook as I can't view youtube videos at work. Unfortantly this is where I do all the writing and such.
I couldn't find that thread when I was searching the forum for it :P
Ill view it when I get home on the netbook as I can't view youtube videos at work. Unfortantly this is where I do all the writing and such.
02-23-2012, 02:55 AM
#7
Registered

I ran into some trouble doing this. Here is your pic, with a red mark showing the part that will NOT budge at all. There must be some trick I am missing.

I can get the part with your hand touching it off easy but that is all. The other part no matter what I try to do will not come off of there. I don't want to use a lot of force and break the thing. From what I have read on here it shouldn't require much force anyway. I double and triple checked that I have taken off everything you mention.
Also the screws on the bottom of my bumper are not 7mm, they may be 8mm I didn't bother to check once two 7mm sockets didn't fit it. I just went with a screwdriver at that point so that doesn't really matter..
02-25-2012, 06:24 AM
#9
Voids warranties

There are to clips there. The one closest to his hand in the picture is already un-done. The other one that you have circled is the same style as the first. Reach in behind the the bumper with your hand flat against the inside. Use your other hand on the outside to keep the bumper level with the lines on the fender. Apply pressure gently straight out with the tips of your fingers reaching all the way in and it should pop out. If you try to pull it off at an angle like in the photo it may get bound up and ruin the clip.
Try maybe squirting some soapy water in the crease for lubrication if it is still being persistent.
Try maybe squirting some soapy water in the crease for lubrication if it is still being persistent.
02-25-2012, 11:12 PM
#10
Registered
Turns out there was nothing holding it in, took some force to make it move. At least, nothing broken came out when I removed it so I dunno about a second clip. I was pulling it in every direction before pretty hard, but this time I just figured **** it and really went at it. It was probably the first and only time that bumper came off in almost 40k miles that may be why.
Also I do not have fog lights, but I still had some type of wire hooked up to both fog light areas. I guess for if I decide I want them down the road?
Also I do not have fog lights, but I still had some type of wire hooked up to both fog light areas. I guess for if I decide I want them down the road?
Last edited by xexok; 02-26-2012 at 03:22 AM.


Thread
Thread Starter
Forum
Replies
Last Post
Touge
Canada Forum
3
09-10-2015 08:07 AM
LMURailsplitter02
New Member Forum
1
09-06-2015 10:56 PM
Touge
Canada Forum
0
09-01-2015 10:47 PM
Jazzmeson
RX-8 Parts For Sale/Wanted
0
08-30-2015 02:42 AM