DIY: No Heat? Repair the Heater Control

 01-26-2015, 04:51 AM
#551

Just wanted to say a few things as I too successfully completed the no heat DIY. Thanks to wingnut first of all! The dealership wanted close to $1K to fix this issue. I even suggested that they just do this DIY themselves...I had to take it in for something else and figured they wouldn't charge much to do it but they wanted to replace the whole thing and charge me a grand so I just did it myself.
Anyways, disconnecting the connectors was the biggest PITA like others posted. Another issue I ran into was that I didn't replace the radio face plate tight enough so it didn't power on when I put the radio back in but after reading some other posts I figured that was the issue and it was.
Now everything including the heat is working but my radio isn't tuning in stations so I'll need to make sure the antenna is plugged in properly but I don't think it's too much to worry about. Shouldn't be too hard to fix I'm hoping.
 02-06-2015, 11:10 AM
#552
Registered

Join Date: Jan 2015
Location: WV
Posts: 24
Likes: 0
Received 0 Likes
on
0 Posts
Incredible DIY. Just bought my RX8 and spent much time on here before buying it. Heat was intermittent when I bought it and this week it went out all the way. Took 2 hours and I took my time as it was about 14 degrees outside so I kept coming in to get warm. Worked flawlessly.
Chad
'04 RX8
Chad
'04 RX8
02-17-2015, 01:34 PM
#553
Registered

Join Date: Jun 2013
Posts: 15
Likes: 0
Received 0 Likes
on
0 Posts
I finally managed to pull the thing apart and found the issue.
One of those plastic tabs had broken. A little glue fixed that. Now I just need to figure out why it's cold on the driver's side and hot on the passenger's side (heater core lines plugged, maybe)?
One of those plastic tabs had broken. A little glue fixed that. Now I just need to figure out why it's cold on the driver's side and hot on the passenger's side (heater core lines plugged, maybe)?
02-22-2015, 10:53 PM
#554
Registered

Join Date: Aug 2007
Posts: 44
Likes: 0
Received 0 Likes
on
0 Posts
Just bought an 05 shinka and applied this fix. Awesome! I have heat in the sub zero tundra of MN! I was able to talk the seller down several thousand dollars on the car partially because of the no heat. Thanks to the OP
03-08-2015, 04:06 PM
#555
New Member

Join Date: Mar 2015
Posts: 1
Likes: 0
Received 0 Likes
on
0 Posts
Just got a 04 mazda rx8. Completely in love. Having heat and air problems. Thinking I need to try the soldering tip to get a better connection. But also not blowing air at all. Not hold not cold. Nothing. Kinda disappointed bt def worth a fix. Maybe need to flush it? Confused as to what I need to do. But going to try the tips.
03-09-2015, 05:17 AM
#556
You gonna eat that?
iTrader: (1)

Welcome.
Start by checking your fuses if you haven't already.
One fuse box is under the hood, and one on the kick panel under the dash.
Start by checking your fuses if you haven't already.
One fuse box is under the hood, and one on the kick panel under the dash.
 03-16-2015, 01:04 AM
#557
New Member

Join Date: Mar 2015
Posts: 2
Likes: 0
Received 0 Likes
on
0 Posts
Process Temperatutre Controllers
As the name implies, a temperature controller is an instrument used to control temperature. The temperature controller takes an input from a temperature sensor and has an output that is connected to a control element such as a heater or fan.
To accurately control process temperature without extensive operator involvement, a temperature control system relies upon a controller, which accepts a temperature sensor such as a thermocouple or RTD as input.
To accurately control process temperature without extensive operator involvement, a temperature control system relies upon a controller, which accepts a temperature sensor such as a thermocouple or RTD as input.
04-07-2015, 08:29 PM
#558
Registered

Join Date: Nov 2011
Location: Toronto, ON
Posts: 20
Likes: 0
Received 0 Likes
on
0 Posts
Thanks for the write up and all the help.
Currently have a dime jammed between the **** and the housing as another user suggested. Heat works until I complete this permanent fix.
Currently have a dime jammed between the **** and the housing as another user suggested. Heat works until I complete this permanent fix.
04-28-2015, 03:46 PM
#559
New Member

Join Date: Apr 2015
Posts: 4
Likes: 0
Received 0 Likes
on
0 Posts
I went through everything as instructed but couldn't get radio out far enough to get it unplugged.....worried i might not be able to get it back together i stopped there.I can move my control setting from 0 to 16 by pushing a certain way on ****.There should be a recall you would think?
04-28-2015, 09:06 PM
#560
You gonna eat that?
iTrader: (1)
You must have missed something, I haven't done it but need to, and most people say it's pretty easy to pull the radio out.
04-28-2015, 09:15 PM
#561
New Member
Join Date: Apr 2015
Posts: 4
Likes: 0
Received 0 Likes
on
0 Posts
Let me know how it turns out....I didn't know about removing vents when I did it but my radio would only slide out a few inches and it was a tussle to get it out at first.
04-28-2015, 10:45 PM
#562
New Member
Join Date: Apr 2015
Posts: 4
Likes: 0
Received 0 Likes
on
0 Posts
Call NATSA To Complain
No heat and only cooling, or only heat and no cooling, or erratic temperature control?
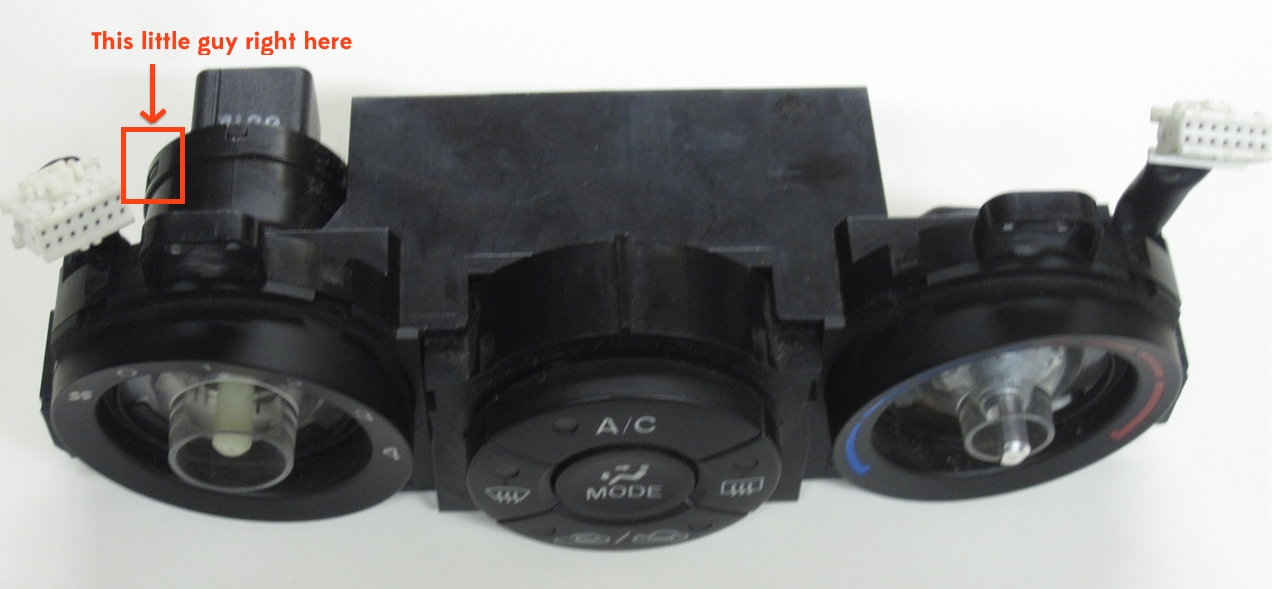
The temperature control **** seems to have quite a bit of issues for early RX8 owners where the system will cool only, and not provide heat despite the position of the control ****. This can also work in the opposite way, only heating and no cooling. After living with it for a season, I finally pulled the heater control unit out and repaired the circuit board. It was simple to repair and because I was going to have to pull the unit out anyway to replace it, it was not much extra work. The replacement unit (part FE01-61-190) retails for $350, some vendors on this site sell it for $240ish, and I hear there are some that sell used parts for $125ish. It is definitely covered under warranty for those lucky enough to be under warranty.
If you do not have heat, or only have heat, IMHO it is most likey the AC/heater control unit. This is the part which has the AC/heat control buttons and *****.
Easy Diagnosis:
The easiest way to verify this is to turn on the radio, press and hold the power on/off button and press and hold the scan-up button for a second (full second). The word "A/C TEMP" should appear on the left of the display and a number from 0 to 16 on the right. I suspect yours will have the number 0 (or 16 if heating only problem) displayed no matter where you turn the temperature control ****. If this is the case you could turn the temp. **** to full heat and see if it goes to 16 after pushing down or to the right on the ****.
In a working system, the number moves evenly in increments of 1, from 0 to 16 as you turn the temperature ****.
Easy Fix:
I was able to take mine out and solder 3 loose connections to fix it.
The beginning steps are the same as for any radio removal procedure. Instead of reinventing the wheel I would like to direct anyone to John Masone�s excellent DIY for radio removal at this DIY:
DIY: Radio Removal / Add an AUX Input - RX8Club.com
or directly linked here:
What's My IP Address? - Obsolete Browser Page
The procedure is basically the same until page 7, second frame. Here is the modified step at that phase:

Removal of Heater Control Unit
I did not take pictures of the next step which is basically removing the cover on the temperature **** side of the control which requires a small screwdriver to three plastic clips on the perimeter of the cover. This will be evident when you get it in front of you. I stripped the circuit board down further than you may need to because I was also repairing cracked defrost (windshield and rear) buttons with superglue.
Then re-solder the 3 joints indicated in the next photos. A little bit of heat and just a little extra solder and they should be good to go.

Front of Heater Control Circuit Board

Front of Temperature Control **** (3 connections noted)
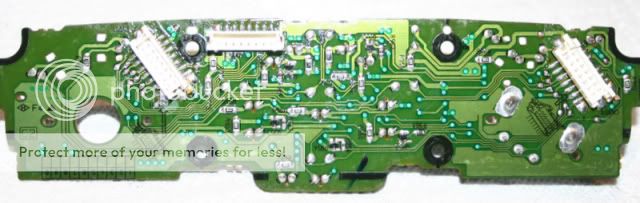
Back of Heater Control Circuit Board

Back of Heater Control ****

3 Bad Solder Joints (Note cracks) Prior to Re-soldering
I did the power-button/up scan combination to get the head unit to display the dial position and it now travels even increments from 0 to 16, instead of jumping from 0 to 16 when pushed like before. And the temperature control works perfectly.
Good luck.
The temperature control **** seems to have quite a bit of issues for early RX8 owners where the system will cool only, and not provide heat despite the position of the control ****. This can also work in the opposite way, only heating and no cooling. After living with it for a season, I finally pulled the heater control unit out and repaired the circuit board. It was simple to repair and because I was going to have to pull the unit out anyway to replace it, it was not much extra work. The replacement unit (part FE01-61-190) retails for $350, some vendors on this site sell it for $240ish, and I hear there are some that sell used parts for $125ish. It is definitely covered under warranty for those lucky enough to be under warranty.
If you do not have heat, or only have heat, IMHO it is most likey the AC/heater control unit. This is the part which has the AC/heat control buttons and *****.
Easy Diagnosis:
The easiest way to verify this is to turn on the radio, press and hold the power on/off button and press and hold the scan-up button for a second (full second). The word "A/C TEMP" should appear on the left of the display and a number from 0 to 16 on the right. I suspect yours will have the number 0 (or 16 if heating only problem) displayed no matter where you turn the temperature control ****. If this is the case you could turn the temp. **** to full heat and see if it goes to 16 after pushing down or to the right on the ****.
In a working system, the number moves evenly in increments of 1, from 0 to 16 as you turn the temperature ****.
Easy Fix:
I was able to take mine out and solder 3 loose connections to fix it.
The beginning steps are the same as for any radio removal procedure. Instead of reinventing the wheel I would like to direct anyone to John Masone�s excellent DIY for radio removal at this DIY:
DIY: Radio Removal / Add an AUX Input - RX8Club.com
or directly linked here:
What's My IP Address? - Obsolete Browser Page
The procedure is basically the same until page 7, second frame. Here is the modified step at that phase:
Removal of Heater Control Unit
I did not take pictures of the next step which is basically removing the cover on the temperature **** side of the control which requires a small screwdriver to three plastic clips on the perimeter of the cover. This will be evident when you get it in front of you. I stripped the circuit board down further than you may need to because I was also repairing cracked defrost (windshield and rear) buttons with superglue.
Then re-solder the 3 joints indicated in the next photos. A little bit of heat and just a little extra solder and they should be good to go.
Front of Heater Control Circuit Board
Front of Temperature Control **** (3 connections noted)
Back of Heater Control Circuit Board
Back of Heater Control ****
3 Bad Solder Joints (Note cracks) Prior to Re-soldering
I did the power-button/up scan combination to get the head unit to display the dial position and it now travels even increments from 0 to 16, instead of jumping from 0 to 16 when pushed like before. And the temperature control works perfectly.
Good luck.
05-14-2015, 06:27 PM
#563
New Member
Join Date: Apr 2015
Posts: 4
Likes: 0
Received 0 Likes
on
0 Posts
I just called Mazda Manufacturing 1-800-222-5500 to complain about this heater issue. Since they do look at all the complaints monthly i think if everybody does the same they might think about a recall.
05-14-2015, 07:02 PM
#564
 06-15-2015, 04:00 AM
#565
New Member

Join Date: Jun 2015
Posts: 1
Likes: 0
Received 0 Likes
on
0 Posts
Use the diy at the beginning of this thread. Just did this in my car, same exact issue as your explaining. Re-soldered the 3 connections and my a/c was golden!
 06-15-2015, 04:07 AM
#566
Driving my unreliable rx8

I just called NATSA @ 888-327-4236 to complain about this issue and it maybe being a safety Hazzard trying to drive with no heater in the winter.I think this should be a recall item since so many has it.Maybe if everybody complains they fix it so I don't have to worry about all the little issues some has had with the fix like just scratching the faceplate for example!
06-16-2015, 04:30 AM
#567
New Member
Join Date: Mar 2015
Posts: 2
Likes: 0
Received 0 Likes
on
0 Posts
Elitech URC-5 temperature data logger
Temperature data logger is mainly used for temperature recording during storage and ocean/air/highway transportation of foodstuff, medicine, chemicals and other products, especially widely used in all kinds of warehousing, logistics and cold chain, such as refrigerated containers, refrigerated trucks refrigerated package, cold storage, laboratory, etc. or in large-sized global supply chain businesses.
Elitech URC-5 temperature data logger more than twice as many asURC - 4 points
Elitech URC-5 temperature data logger
Feature:
Wide measuring range, high accuracy and large permanent data memory Data management software included for working with PC easily Data can be downloaded, analyzed, exported and printed conveniently Over Temperature Alarm & Upper/Lower Limits can be set MAX/MIN values available
Specifications:
1)Temperature measuring range: -30 �C~+70 �C; Resolution: 0.1 �C
2)Accuracy: �0.5 �C(-20℃~+40℃); others, +1 ℃
3)Temperature unit: ℃ or ℉ optional
4)Record capacity: 32000 points (MAX)
5)Record interval: 10s~24hour adjustable
6)Sensor: Internal NTC thermal resistor
7)Communication interface: USB interface
8)Waterproof grade: IP67
9)Power supply: CR2032 battery or power supply via USB interface, and it could upload data even if the battery is out of use
10)Battery life: in normal temperature, if the record interval sets as 15 minutes, it could be used above one year
11)Size: approx. 80 (L) x 34 (W) x 14 (H) mm
12)Item Weight: approx. 3oz (30 g)
06-16-2015, 04:55 PM
#568
Registered

Join Date: Jun 2015
Location: CANADA EAST COAST
Posts: 16
Likes: 0
Received 0 Likes
on
0 Posts
A big thank you...
I just bought a clean 05. Did the radio check. Stuck at 0...
Now I don't have to panic and can take the time to fix it.
Once done.....neeeed more powerrrr.
Now I don't have to panic and can take the time to fix it.
Once done.....neeeed more powerrrr.
07-26-2015, 02:23 PM
#570
Registered

Join Date: Mar 2011
Posts: 15
Likes: 0
Received 0 Likes
on
0 Posts
Thank you Wingnut!
After dealing with my '05 not having heat in the last couple of months before I store the car (Novemberish) for a couple winters - I finally got around to following this DIY. Total success, took me about three hours including finding the thread and cleaning up.
The tricky bolt next to the steering wheel was best handled as follows:
(Once you've found it...)
1) Stick a small flashlight up above the gas pedal area, aimed at the bolt
2) Loosen it with your socket, but don't back it out all the way
3) Use your fingers to finish removing it, so you can not lose the bolt and no have to put tape in your socket, etc. either
Do the same in reverse to put it back together again. I almost skipped putting it back, but it was pretty easy.
11-05-2015, 03:24 AM
#571
New Member

Join Date: Apr 2013
Posts: 5
Likes: 0
Received 0 Likes
on
0 Posts
WingNut going to work on it this weekend. Spent 6 months in South Dakota with not heater FML. Time to fix this issue. Moved back to cali but not having heat is just getting annoying. I'll let yall no of my success.

 11-15-2015, 04:56 PM
#573
Registered

Ok I did the whole DIY and followed the instructions to the T. Now after I have put my head unit back in and reconnected everything my radio dosent work, the lights on it dont work and neither does the heads up display on the dash. I have checked all the fuses and I have even pulled the whole thing back out to check for bent prongs and I havent found anything. does anyone have any ideas am I missing a fuse somewhere.
 11-15-2015, 06:05 PM
#575
Registered
That is what it was. I took everything back apart and put it all back together. I stop and started thinking about how i had a little bit of tention on the screws when I put it together the first time. But now everything is working good and she is blowing heat like a dragon.