
DIY: Removing "orange peel" from your factory clearcoat.


Thread Starter
Raging Fatcat
Joined: Apr 2004
Posts: 96
Likes: 0
From: Lewisville, TX
DIY: Removing "orange peel" from your factory clearcoat.
NEWEST REVISION AND DISCLAIMER.
**************************************************
I have discovered through some experimentation that the clear on the RX8's is a little softer than other cars. This greatly simplifies the procedure. This is the latest edit with the new simplified instructions.
DISCLAIMER!!! DISCLAIMER!!! DISCLAMER!!! DISCLAIMER!!!
**************************************************
I'm not tooting my own horn here so don't take it that way. If you are at all nervous about taking sandpaper to your new 8 that is for a reason. The results shown here are the product of years of experience and thousands of hours behind a rotary buffer before ever attempting this on a car. These results are also the product of a few, uuuuuh, "learning experiences" on previously owned vehicles.
If you don't feel confident in your ability to use a high speed rotary buffer on your paint then play it safe and do not attempt.
If you don't have a few hundred dollars comfortably in reserve for any potential "mistakes" do not attempt.
In a moment's inattention on my hood I managed to go through the clearcoat on a sharp edge. This will cost me about $300 to repaint the whole hood and start over but I was prepared mentally and financially to PROPERLY fix any boo-boo's.
However, with a moderate amount of practice and intestinal fortitude, there is no reason a good do it yourselfer can't do this.
I recommmend starting in the middle of your trunklid as it is nice and flat and will be the cheapest part to repaint if you booger it up.
REVISION!! REVISION!! REVISION!! REVISION!! REVISION!!
*************************************************
The list of supplies is long and distinguished. You will need the following at a minimum.
1. A good rotary buffer, I use a DeWalt with adjustable speeds. Milwaukee makes a good one too. Do not, under any circumstances, attempt to retrofit a buffing pad to an angle grinder. They spin way too fast.
2. Foam cutting pad. I prefer the burgundy Meguiars W-7000
3. A foam polishing pad, I prefer the yellow Meguiars W-8000
4. Wet sandpaper, 2500 grit. Nikken (Meguiars unigrit) has the best bite and lasts a long time. Get a sleeve of 25 sheets.
5. Spray bottle full of clean water.
6. About 1 Qt of Meguiars #83 Dual action cleaner/polish
7. About 1 Qt of 3M Perfect-it foam polishing pad glaze part #05996. This is the kind for dark cars, I have the best results with this on anything red or darker. There is a different glaze for light colors.
8. A rubber sanding block, get a thin flexible one not the rigid palm sized jobs.
9. About a week and a half to do a whole car (if you have a day job)
Trying to explain this without being there is like trying to explain the color orange to a blind person but I'll give it my best.
Mazda Maniac said the clear isn't thick enough to sand flat but I digress. Just don't push your luck. The clear on new cars is about 4 mils thick, the peel is about .5-1 mil deep so you have some room, but not much.
You need to start with a very clean car, at least the panel you are working. Soak the sandpaper in a bucket of water for at least an hour before you begin. Fold the paper in half along the long edge to make a square and wrap it around the block. Dip the block into a bucket of clean water, cross your fingers, say 3 hail mary's and get started.
Tuck in your nuts and start sanding, keeping the surface very wet and going in only one direction. You will start to feel the paper bite in after a few swipes, press down about as hard as you would press on a polishing cloth when taking a coat of wax off. Do this for a few seconds using even pressure on the block and scrape the water away from the area with your bare sanding block. Don't dig the paper in with the edge of the block, keep it flat. Look very closely at the mess you just made of your new paint job. You will notice that amid the scuffing there will be shiny parts. As you sand with the 2500, squeege off the water with a bare sanding block and look at the paint every few seconds. When you see the shiny parts of the paint become little dots that are completely surrounded by dull paint, you are getting close.
Continue working about a 1 sq foot area until all the shiny spots are gone. The paint is now as flat as you are going to get it. STOP NOW!! Scrape the water off again and let it dry. Look deep into the paint, you should only see scratches in the last direction you were sanding. resist the temptation to sand out any more wavy stuff. If there are no more shiny spots then STOP!!
If you have never used a rotary buffer before, you should acquaint yourself with it. Do this with the polishing (yellow)pad and the 3M glaze like on the hood or something. You'd be hard pressed to hurt the paint with this stuff, It's like a high speed wax job. This is solely to get a feel for how it will handle bacause it [the buffer] will want to wander and if you catch an edge somewhere it will kick hard! Around edges, always buff so that the pad rotates from the middle of the material out. Don't press down, let the buffer do the work. This is especially important with the #83.
Keep in mind that as the paint is applied it will pull away from edges and sharp corners making it thinner in these areas. Be careful (see disclaimer at top)!! Even I burned a spot and I know better.
When you feel like you've got it licked, put on the cutting pad and shake up the #83 Dual Action Cleaner Polish. If you have an adjustable buffer, set it to about 2000 rpm. Spray the cutting pad with your clean water spray bottle until it is lightly damp. Apply a decent amount of DACP to the sanded area and spread it around with the pad. Slowly work your way up to full speed, this will prevent the stuff from slinging everywhere. Keep the area moist with a spritz or two from your spray bottle and don't keep the buffer in one place for more than a second or two. Work it back and forth buffing ACROSS the sanding scratches. Treat it like it was a belt sander, that'll put things into perspective.
The DACP is a wonderful product which has a self depleting abrasive. That means that the grits get smaller and smaller as you work it in leaving the finish well polished and smooth. The product is somewhat oily like carnauba wax so don't confuse swirl marks with residual DACP. Even after working it in thoroughly it will look like there is dried wax on the paint.
Check your work by giving the panel a thorough wipe down with a CLEAN cloth to remove the DACP oilyness and give the area a good inspection. If there are no residual scratches proceed to the next step. If there are residual scratches in some spots, spray some water on the panel and work them out with the residue in the pad, again, buffing perpendicular to the scratches.
Switch to the polishing (yellow) pad and shake up the 3M really well. Repeat above keeping the surface wet with the 3M and a few spritzes of water. This will take you to a very high gloss and expose any remaining scratches you may not have seen before. You can work minor scratches out with the 3M but it will take a while. This is the safe way to go, always use the LEAST abrasive compound you can get away with.
If you have any larger scratches left you can work them out with the #83 and finish with the 3M. Just remember to wipe down the sheetmetal between compounds and use the appropriate pad. After all this work on one little area you will understand why good paint jobs cost thousands and thousands of dollars and why this will take you a week to finish
A few tips to consider.
1. The water in your sanding bucket should stay really clean, change it out often. Your standby paper should stay submerged. Keep about 5 sheets at a time ready to go. The Unigrit lasts a long time. I used 1 sheet for the hood, 1 for the roof, 1 total for both drivers side doors etc. etc.
2. Don't sand really fast, you will just be skimming across the water on the panel. Sanding slowly will give you faster results as it needs to bite into the paint.
3. The sanding water and compounds will end up everywhere and can be very difficult to clean up. As you gain some experience with this you may want to tape off gaps in body panels. Do this after sanding and before buffing as the tape won't adhere long after being soaked with sanding water.
4. The abrasives end up everywhere. At a minimum you should protect your headlight, tail light and corner lenses as they will scuff just like your paint. I'd also tape off the sunroof and the edges of the glass.
5. DO NOT, UNDER ANY CIRCUMSTANCES ATTEMPT THIS ON YOUR PAINTED PLASTIC. THIS INCLUDES THE BUMPERS AND ANY APPEARANCE PACKAGE ITEMS I.E. SIDE SKIRTS AND AERO FLARES. The paint doesn't stick as well to the plastic. I learned this the hard way on my honda and it wasn't pretty. For this reason you should mask off this stuff when you are buffing near it with the #83, the 3M won't hurt it at all.
6. The best way to get swirl marks out of older paint is to attack it just with the 3M and polishing pad. If you have an older car, try it, you'll see!!
Good luck, it's quite a project!
**************************************************
I have discovered through some experimentation that the clear on the RX8's is a little softer than other cars. This greatly simplifies the procedure. This is the latest edit with the new simplified instructions.
DISCLAIMER!!! DISCLAIMER!!! DISCLAMER!!! DISCLAIMER!!!
**************************************************
I'm not tooting my own horn here so don't take it that way. If you are at all nervous about taking sandpaper to your new 8 that is for a reason. The results shown here are the product of years of experience and thousands of hours behind a rotary buffer before ever attempting this on a car. These results are also the product of a few, uuuuuh, "learning experiences" on previously owned vehicles.
If you don't feel confident in your ability to use a high speed rotary buffer on your paint then play it safe and do not attempt.
If you don't have a few hundred dollars comfortably in reserve for any potential "mistakes" do not attempt.
In a moment's inattention on my hood I managed to go through the clearcoat on a sharp edge. This will cost me about $300 to repaint the whole hood and start over but I was prepared mentally and financially to PROPERLY fix any boo-boo's.
However, with a moderate amount of practice and intestinal fortitude, there is no reason a good do it yourselfer can't do this.
I recommmend starting in the middle of your trunklid as it is nice and flat and will be the cheapest part to repaint if you booger it up.
REVISION!! REVISION!! REVISION!! REVISION!! REVISION!!
*************************************************
The list of supplies is long and distinguished. You will need the following at a minimum.
1. A good rotary buffer, I use a DeWalt with adjustable speeds. Milwaukee makes a good one too. Do not, under any circumstances, attempt to retrofit a buffing pad to an angle grinder. They spin way too fast.
2. Foam cutting pad. I prefer the burgundy Meguiars W-7000
3. A foam polishing pad, I prefer the yellow Meguiars W-8000
4. Wet sandpaper, 2500 grit. Nikken (Meguiars unigrit) has the best bite and lasts a long time. Get a sleeve of 25 sheets.
5. Spray bottle full of clean water.
6. About 1 Qt of Meguiars #83 Dual action cleaner/polish
7. About 1 Qt of 3M Perfect-it foam polishing pad glaze part #05996. This is the kind for dark cars, I have the best results with this on anything red or darker. There is a different glaze for light colors.
8. A rubber sanding block, get a thin flexible one not the rigid palm sized jobs.
9. About a week and a half to do a whole car (if you have a day job)
Trying to explain this without being there is like trying to explain the color orange to a blind person but I'll give it my best.
Mazda Maniac said the clear isn't thick enough to sand flat but I digress. Just don't push your luck. The clear on new cars is about 4 mils thick, the peel is about .5-1 mil deep so you have some room, but not much.
You need to start with a very clean car, at least the panel you are working. Soak the sandpaper in a bucket of water for at least an hour before you begin. Fold the paper in half along the long edge to make a square and wrap it around the block. Dip the block into a bucket of clean water, cross your fingers, say 3 hail mary's and get started.
Tuck in your nuts and start sanding, keeping the surface very wet and going in only one direction. You will start to feel the paper bite in after a few swipes, press down about as hard as you would press on a polishing cloth when taking a coat of wax off. Do this for a few seconds using even pressure on the block and scrape the water away from the area with your bare sanding block. Don't dig the paper in with the edge of the block, keep it flat. Look very closely at the mess you just made of your new paint job. You will notice that amid the scuffing there will be shiny parts. As you sand with the 2500, squeege off the water with a bare sanding block and look at the paint every few seconds. When you see the shiny parts of the paint become little dots that are completely surrounded by dull paint, you are getting close.
Continue working about a 1 sq foot area until all the shiny spots are gone. The paint is now as flat as you are going to get it. STOP NOW!! Scrape the water off again and let it dry. Look deep into the paint, you should only see scratches in the last direction you were sanding. resist the temptation to sand out any more wavy stuff. If there are no more shiny spots then STOP!!
If you have never used a rotary buffer before, you should acquaint yourself with it. Do this with the polishing (yellow)pad and the 3M glaze like on the hood or something. You'd be hard pressed to hurt the paint with this stuff, It's like a high speed wax job. This is solely to get a feel for how it will handle bacause it [the buffer] will want to wander and if you catch an edge somewhere it will kick hard! Around edges, always buff so that the pad rotates from the middle of the material out. Don't press down, let the buffer do the work. This is especially important with the #83.
Keep in mind that as the paint is applied it will pull away from edges and sharp corners making it thinner in these areas. Be careful (see disclaimer at top)!! Even I burned a spot and I know better.
When you feel like you've got it licked, put on the cutting pad and shake up the #83 Dual Action Cleaner Polish. If you have an adjustable buffer, set it to about 2000 rpm. Spray the cutting pad with your clean water spray bottle until it is lightly damp. Apply a decent amount of DACP to the sanded area and spread it around with the pad. Slowly work your way up to full speed, this will prevent the stuff from slinging everywhere. Keep the area moist with a spritz or two from your spray bottle and don't keep the buffer in one place for more than a second or two. Work it back and forth buffing ACROSS the sanding scratches. Treat it like it was a belt sander, that'll put things into perspective.
The DACP is a wonderful product which has a self depleting abrasive. That means that the grits get smaller and smaller as you work it in leaving the finish well polished and smooth. The product is somewhat oily like carnauba wax so don't confuse swirl marks with residual DACP. Even after working it in thoroughly it will look like there is dried wax on the paint.
Check your work by giving the panel a thorough wipe down with a CLEAN cloth to remove the DACP oilyness and give the area a good inspection. If there are no residual scratches proceed to the next step. If there are residual scratches in some spots, spray some water on the panel and work them out with the residue in the pad, again, buffing perpendicular to the scratches.
Switch to the polishing (yellow) pad and shake up the 3M really well. Repeat above keeping the surface wet with the 3M and a few spritzes of water. This will take you to a very high gloss and expose any remaining scratches you may not have seen before. You can work minor scratches out with the 3M but it will take a while. This is the safe way to go, always use the LEAST abrasive compound you can get away with.
If you have any larger scratches left you can work them out with the #83 and finish with the 3M. Just remember to wipe down the sheetmetal between compounds and use the appropriate pad. After all this work on one little area you will understand why good paint jobs cost thousands and thousands of dollars and why this will take you a week to finish
A few tips to consider.
1. The water in your sanding bucket should stay really clean, change it out often. Your standby paper should stay submerged. Keep about 5 sheets at a time ready to go. The Unigrit lasts a long time. I used 1 sheet for the hood, 1 for the roof, 1 total for both drivers side doors etc. etc.
2. Don't sand really fast, you will just be skimming across the water on the panel. Sanding slowly will give you faster results as it needs to bite into the paint.
3. The sanding water and compounds will end up everywhere and can be very difficult to clean up. As you gain some experience with this you may want to tape off gaps in body panels. Do this after sanding and before buffing as the tape won't adhere long after being soaked with sanding water.
4. The abrasives end up everywhere. At a minimum you should protect your headlight, tail light and corner lenses as they will scuff just like your paint. I'd also tape off the sunroof and the edges of the glass.
5. DO NOT, UNDER ANY CIRCUMSTANCES ATTEMPT THIS ON YOUR PAINTED PLASTIC. THIS INCLUDES THE BUMPERS AND ANY APPEARANCE PACKAGE ITEMS I.E. SIDE SKIRTS AND AERO FLARES. The paint doesn't stick as well to the plastic. I learned this the hard way on my honda and it wasn't pretty. For this reason you should mask off this stuff when you are buffing near it with the #83, the 3M won't hurt it at all.
6. The best way to get swirl marks out of older paint is to attack it just with the 3M and polishing pad. If you have an older car, try it, you'll see!!
Good luck, it's quite a project!
Last edited by newtlicious; May 25, 2004 at 12:12 PM.
Thread Starter
Raging Fatcat
Joined: Apr 2004
Posts: 96
Likes: 0
From: Lewisville, TX
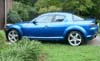
Getting started!! You need to soak your paper for at least an hour and keep it in a bucket full of water as you are using it. This is the left front fender.
Last edited by newtlicious; May 25, 2004 at 12:08 PM.
Thread Starter
Raging Fatcat
Joined: Apr 2004
Posts: 96
Likes: 0
From: Lewisville, TX
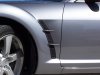
Now after the 2500....Notice all the shiny spots are gone and the surface is uniform. It is of the utmost importance to protect i.e. tape off your headlights, bumpers and any other plastic before you buff. Several layers of tape are necessary.
Last edited by newtlicious; May 22, 2004 at 10:30 PM.
Thread Starter
Raging Fatcat
Joined: Apr 2004
Posts: 96
Likes: 0
From: Lewisville, TX
Here's a good before and after. The part on the left is the fender which has been sanded and buffed. The part on the right is the drivers side door which is untouched. The difference is amazing when done correctly.

Thread Starter
Raging Fatcat
Joined: Apr 2004
Posts: 96
Likes: 0
From: Lewisville, TX
I would post them if I had them but I'm not done with the whole car yet. I just took these pictures today. I'll post up when I'm finished which may or may not be this weekend. This is very hard work and I still have all 4 doors, rear quarters and roof left.


Thread Starter
Raging Fatcat
Joined: Apr 2004
Posts: 96
Likes: 0
From: Lewisville, TX
Cortc, you sure are lucky, that paint looks sick for being factory! Nice exhaust.
Rxeightr, with a 3 stage paint the color coat is not particularly shiny. When you completely remove the clearcoat either deliberately or accidentally, it is painfully obvious as there will be a very dull discolored spot that won't go away no matter how much you buff it. This is called a burn. As you can see from the photo, there is nothing but shiny stuff. There is a pretty good amount of room to work with in the factory clear. They are designed to provide years of life with enough room left over for moderate polishing and scratch protection/removal, you just have to know what you're doing.
Thanks baba. I learned this trick polishing bathroom sinks!! I used to work in a factory where we made cultured marble. This marble was clearcoated and my job was to remove defects from the clearcoat and buff the sinks up for the customers. This company was known for their quality and I had good teachers. I got very proficient over a few years and applied the exact same principals and products to automobiles. Years of sanding countertops gave me tons of experience so for me it's easy, just time consuming.
Last edited by newtlicious; May 23, 2004 at 10:07 AM.

Thread Starter
Raging Fatcat
Joined: Apr 2004
Posts: 96
Likes: 0
From: Lewisville, TX
Originally posted by loco4rx8
Amazing, you've got some guts! How much would you charge to do mine? :D
Seriously, are there shops that do this for people and any idea how much they would charge?
Amazing, you've got some guts! How much would you charge to do mine? :D
Seriously, are there shops that do this for people and any idea how much they would charge?
It is still hotly debated as to whether or not this is safe. My car is Zaino'd regularly and garaged at home and at work so I'm not worried.
It's hard to venture a guess at a price. This is going to take me at least a week and a weekend to finish but i have a full time job. I would figure around $700 at a minimum. I would charge more since it would eat up at least 3 full days of my time to do it properly and return it clean. Go to www.autopia.org there may be a pro detailer in your area that can make you an offer.

Thread Starter
Raging Fatcat
Joined: Apr 2004
Posts: 96
Likes: 0
From: Lewisville, TX
I just finished the whole drivers side at about 9:00 pm. Here's some good pics. I hate posting these because it really does the car no justice and it is hard to see the difference in far away shots.

8 the HARD way.
Joined: Feb 2003
Posts: 1,001
Likes: 0
From: San Antonio
Yo Cort,
How's that MS exhaust? Any good? Did you change your intake?
I was just wondering if the MS exhaust is worth my $ and time to get my dealer to install.
How's that MS exhaust? Any good? Did you change your intake?
I was just wondering if the MS exhaust is worth my $ and time to get my dealer to install.
Originally posted by cortc
Nice results, luckily not all 8s have the orange peel; mine has none...
Nice results, luckily not all 8s have the orange peel; mine has none...

yes, I bite
Joined: Nov 2003
Posts: 796
Likes: 0
Newtlicious, that is one sweet job! I have a black as well, and it is orange-peely as can be, but I love it anyway. I wish I had the ***** to do your DIY, but I sure enjoyed looking at yours. The before and after pic says it all.
Well done, and thanks for the detailed write-up. Maybe someday....
Well done, and thanks for the detailed write-up. Maybe someday....
Thread Starter
Raging Fatcat
Joined: Apr 2004
Posts: 96
Likes: 0
From: Lewisville, TX
Thanks Doc! I need to post a revision to the DIY because I learned a few shortcuts. The Clearcoat on these 8's is softer than my Honda was so I can get away with much less agressive techniques. Knowing what I know now, I could probably accomplish an entire car in a weekend....hint, hint.