
DIY: Bose speakers in the doors not working? $1.67 relay fix.


Thread Starter
Registered
Joined: Jan 2007
Posts: 49
Likes: 3
DIY: Bose speakers in the doors not working? $1.67 relay fix.
Issue: If your Bose door speakers are semi-working, not working, turning on momentarily (aka: intermittent operation) or something similar then it may be your relays inside the door amps have failed.
Quick test: Carefully tap the door panel near the amp while the stereo is on. You may have to get a bit aggressive, but be careful not to damage the speaker. If you hear sound coming in and out from the side you're tapping, and it shuts off on its own soon after, it is likely the relay. If no sound comes out, you may have another issue like a fuse so I�d check the easy stuff first. Don't forget this could also be a loose connector or wire so check for this when you remove the door panel. I had to hit my panel with some force to get the sound to come on temporarily.
Tap location: Using a flashlight, look inside the front door lower speaker grill and identify where the amp is at. It's next to the speaker about 2 inches towards the back of the car. The speaker has a golden colored ring around it so it�s easy to see through the vent holes.
Part Sources: Newark in one - R46-5D3-12 ($5 range,) Digikey - JS1-12V-F ($1.67 and they offer USPS priority mail.) Others have verified the NTE part works too, so it's up to you. Both are larger than the original but the amp design was made to accommodate either one.
Step 1: Use the search function to find the shop manual and/ or instructions on how to properly remove the door panel and take it off. Also, KNOW your soldering skill level. If you don't have experience, stop at step 4 and have someone else replace the relay for you - it's not a good job to use to learn about soldering since it's a conformal coated 5 pin part and to boot the new part doesn't mount in the same holes - so you'll need to clean 10 holes thoroughly. That's 10 chances to accidentally break the delicate copper traces, rings and vias where the relay mounts.
Step 2: Remove the large speaker held on with 4 phillips screws. Pull out gently and observe the wire channel built into the speaker mounting location between the amp and speaker. Disconnect the speaker.
Step 3: Remove 3 phillips screws holding the amp to the inner door panel. Disconnect amp from the door by removing the smaller connector. DO NOT REMOVE THE LARGE RECTANGULAR CONNECTOR THAT was connected to the speaker. It�s a pain and you�ll probably break it if you try. Only remove the smaller square connector directly on top of the amp (note it is the one with less wires going to it.) Take the amp out � AGAIN LEAVE THE LARGE CONNECTOR OUTLINED IN GREEN ALONE!
Step 4: To gain access to the PCB, remove the smaller square connector from the black bracket. Next remove 4 phillips screws. Now you can remove the black bracket WITHOUT removing large connector. Inspect the metal cage the amp is enclosed in and pull up the small tab at the bottom of it to take it apart. It's snapped together in two pieces like a clam-shell. You should now have a bare PCB.
Step 5: You have a choice. Take it to a repair shop or replace the relay. If you decide to replace it yourself, you will need to use a solder wick braid or a solder sucker to clean out the relay's connection points properly. You can also re-coat covering relay and pins with conformal coat if desired see NOTE below.
Step 6: Put amp back together. Install amp, speaker and door panel and crank it UP!!!
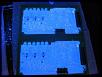
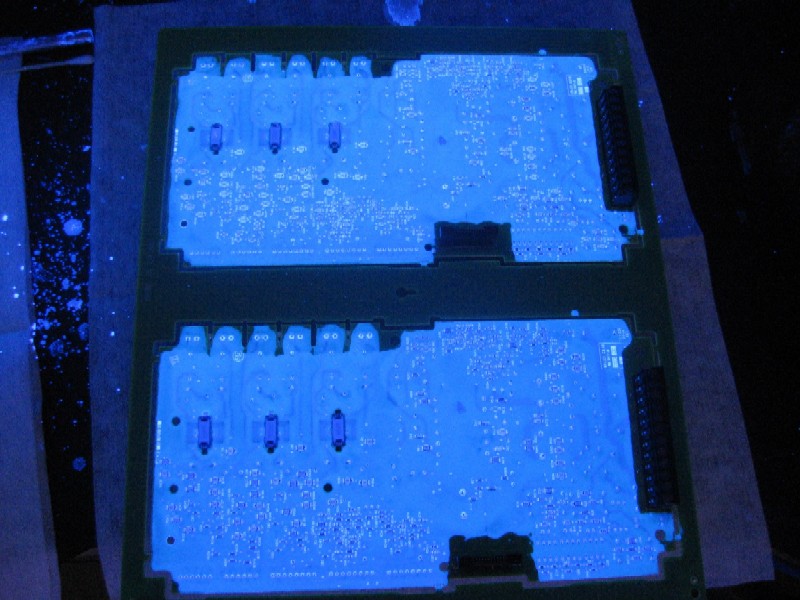
NOTE: Conformal coating has consistency and water proofing properties similar to rubber cement. If you want to re-coat the relay and pins, there are two options for applying it. A small brush works well as does a spray can. Once the soldering is complete, you should clean off the burnt coating areas as seen in the pic below from around the pins before re-coating. I've applied acetone in small amount to remove the coating before, but make sure you only get it on what you want to clean off. To verify that coating has covered the relay 100%, you can use a blacklight. For more application info, see posts #7 and #9. Thanks for the info Jon316G!!
Quick test: Carefully tap the door panel near the amp while the stereo is on. You may have to get a bit aggressive, but be careful not to damage the speaker. If you hear sound coming in and out from the side you're tapping, and it shuts off on its own soon after, it is likely the relay. If no sound comes out, you may have another issue like a fuse so I�d check the easy stuff first. Don't forget this could also be a loose connector or wire so check for this when you remove the door panel. I had to hit my panel with some force to get the sound to come on temporarily.
Tap location: Using a flashlight, look inside the front door lower speaker grill and identify where the amp is at. It's next to the speaker about 2 inches towards the back of the car. The speaker has a golden colored ring around it so it�s easy to see through the vent holes.
Part Sources: Newark in one - R46-5D3-12 ($5 range,) Digikey - JS1-12V-F ($1.67 and they offer USPS priority mail.) Others have verified the NTE part works too, so it's up to you. Both are larger than the original but the amp design was made to accommodate either one.
Step 1: Use the search function to find the shop manual and/ or instructions on how to properly remove the door panel and take it off. Also, KNOW your soldering skill level. If you don't have experience, stop at step 4 and have someone else replace the relay for you - it's not a good job to use to learn about soldering since it's a conformal coated 5 pin part and to boot the new part doesn't mount in the same holes - so you'll need to clean 10 holes thoroughly. That's 10 chances to accidentally break the delicate copper traces, rings and vias where the relay mounts.
Step 2: Remove the large speaker held on with 4 phillips screws. Pull out gently and observe the wire channel built into the speaker mounting location between the amp and speaker. Disconnect the speaker.
Step 3: Remove 3 phillips screws holding the amp to the inner door panel. Disconnect amp from the door by removing the smaller connector. DO NOT REMOVE THE LARGE RECTANGULAR CONNECTOR THAT was connected to the speaker. It�s a pain and you�ll probably break it if you try. Only remove the smaller square connector directly on top of the amp (note it is the one with less wires going to it.) Take the amp out � AGAIN LEAVE THE LARGE CONNECTOR OUTLINED IN GREEN ALONE!
Step 4: To gain access to the PCB, remove the smaller square connector from the black bracket. Next remove 4 phillips screws. Now you can remove the black bracket WITHOUT removing large connector. Inspect the metal cage the amp is enclosed in and pull up the small tab at the bottom of it to take it apart. It's snapped together in two pieces like a clam-shell. You should now have a bare PCB.
Step 5: You have a choice. Take it to a repair shop or replace the relay. If you decide to replace it yourself, you will need to use a solder wick braid or a solder sucker to clean out the relay's connection points properly. You can also re-coat covering relay and pins with conformal coat if desired see NOTE below.
Step 6: Put amp back together. Install amp, speaker and door panel and crank it UP!!!
NOTE: Conformal coating has consistency and water proofing properties similar to rubber cement. If you want to re-coat the relay and pins, there are two options for applying it. A small brush works well as does a spray can. Once the soldering is complete, you should clean off the burnt coating areas as seen in the pic below from around the pins before re-coating. I've applied acetone in small amount to remove the coating before, but make sure you only get it on what you want to clean off. To verify that coating has covered the relay 100%, you can use a blacklight. For more application info, see posts #7 and #9. Thanks for the info Jon316G!!
Last edited by gabrod72; Jul 1, 2011 at 10:24 AM.


Thread Starter
Registered
Joined: Jan 2007
Posts: 49
Likes: 3
No problem. Sorry I was too lazy to add the door removal info but all I did was search for the manual and I removed it without breaking anything. Figure if someone can't look that up then they should not attempt this complex fix - but if you know how to solder then just find either part number above and it's a cakewalk. Hope this fixes some problems out there with the Bose hecho en Mexico amps with stock Japanese relays. Take your pick at who you want to blame be it Mazda, Bose or the MFGs. It's fun knowing we can follow the chain and choose where we want to stop and who made the shitty part. I'd guess Mazda would sell you the entire Amp which technically defines the term part.

Great write-up!
Its good that you noted the conformal coating.
The coating will prevent a good solder joint when you attempt to solder the relay on, so its important that its removed.
We use black lights to inspect the conformal coating process, so you can always use a black light to verify all the coating is removed.
Just a suggestion...
Thread Starter
Registered
Joined: Jan 2007
Posts: 49
Likes: 3
Ah Grasshopper, nice one. I've seen this done during assembly, but never found out whether all conformal coatings trigger on it and is it just an ordinary black light in a dark surrounding of sorts? Would you comment on the setup it would be a great addition?
All conformal coating material I've seen, thus far, was inspected under ordinary black lights.
I've been out to Asymtek for training on our CC machine and they too were using regular black lights.
We use 1B73 and UV40 material from HumiSeal.
We do have some manual applications with a brush, and just dip the brushes in Xylene when done to keep the material from hardening on the brush.
1B73 is a real runny material, but UV40 is more difficult to remove (though better for environmental protection).
There are many kinds of coating material and each one has a specific method for removal.
Some can be removed with solvents alone while others require localized heat (like from a soldering iron).
Without knowing the material, its difficult to suggest the best method.


I HATE SPEEDBUMPS!
Joined: Nov 2007
Posts: 8,549
Likes: 8
From: Las Vegas, NV
Thread Starter
Registered
Joined: Jan 2007
Posts: 49
Likes: 3
Radio Shack may be able to cross reference the part number for you... I'd use the JS1-12V-F number though since this is a Panasonic part number. Digikey is pretty cheap though - unfortunately you have to pay for shipping but they make it as cheap as possible.

Registered
Joined: Feb 2011
Posts: 22
Likes: 0
I just picked two of them up through here for 15$. I'll have to wait and see how things go. Would have ordered from digikey but they had a "call us" backorder on the part.
http://www.weisd.com/store2/nterly/R46-5D3-12.php
http://www.weisd.com/store2/nterly/R46-5D3-12.php

2009 RX-8 Touring
Joined: Oct 2009
Posts: 574
Likes: 6
From: Manassas, VA USA
Wait. There are amplifiers INSIDE THE DOORS? Doors get slammed. Why would anyone put sensitive electronics in the doors?
EDIT: In other news, those are some goofy-*** looking speakers. Please tell me they can be replaced with something respectable, like some nice Infinity Kappas.
EDIT: In other news, those are some goofy-*** looking speakers. Please tell me they can be replaced with something respectable, like some nice Infinity Kappas.


Registered
Joined: Apr 2005
Posts: 44
Likes: 0
From: Calgary, Alberta
My door speaker works fine but has anybody else had issues with the speaker causing some rattling in the door frame? On mid-low notes I get this, and it's because the door doesn't close tight enough. If I pull in on the door handle, the rattling stops. Has anybody noticed this and is there an adjustment that could be done to the latch maybe?

Just completed this on my passenger door. Surprisingly I didnt even notice my passenger door cutting out due the the center speaking masking it. Very easy to do, i would say the only thing that bugged me was those damn white clips that hold the door breaking.
Total spent:
Panasonic Relay from Newark = $1.57
Cheap soldering iron = $5
Radioshack 63/37 Solder = $5
Radioshack desoldering bulb = $4
Youtube vids for soldering/desoldering = Free
Total spent without cost of shipping = about $16

Total spent:
Panasonic Relay from Newark = $1.57
Cheap soldering iron = $5
Radioshack 63/37 Solder = $5
Radioshack desoldering bulb = $4
Youtube vids for soldering/desoldering = Free
Total spent without cost of shipping = about $16


just saw this post, Nice DIY !
well, my speakers have been working fine, and I "close" my doors pretty hard *knock on wood*
"Relay is dead" is very common in OEM stuff cuz they usually use Standard duty(READ: CHEAP!) components. Like in the RX-7, windshield wiper relay burnout/dead is soooo common, replace it with Heavy Duty ones and it will last the life of the car (even you)
and Digikey can get you almost any of the "HD" version of the same relay.
just a note : if this is your first "attempt" to repair any of these stuff, go with an iron that's around 30w or 25w, too hot and it might kill your PCB (lift the connections and your game would be over)
no matter what people say, try to use LEAD solder whenever possible. It's my preference cuz lead-free stuff don't usually last as long(for me)
when you solder, try to breathe normally, a lot of "newbies" think that when they hold their breath(or just don't want breathe those smoke in) and it will give them a more steady hand, but it's actually the opposite. if you don't want to breathe the smoke into your lungs, just move your head away, or have a small fan around aim it at ur head.
and try to practice on some useless PCB before you try it on the actual repair. just grab some old computer sound cards or whatever u had in ur attic. mess around with it till u're comfortable with the process
well, my speakers have been working fine, and I "close" my doors pretty hard
*knock on wood*"Relay is dead" is very common in OEM stuff cuz they usually use Standard duty(READ: CHEAP!) components. Like in the RX-7, windshield wiper relay burnout/dead is soooo common, replace it with Heavy Duty ones and it will last the life of the car (even you)
and Digikey can get you almost any of the "HD" version of the same relay.
just a note : if this is your first "attempt" to repair any of these stuff, go with an iron that's around 30w or 25w, too hot and it might kill your PCB (lift the connections and your game would be over)
no matter what people say, try to use LEAD solder whenever possible. It's my preference cuz lead-free stuff don't usually last as long(for me)
when you solder, try to breathe normally, a lot of "newbies" think that when they hold their breath(or just don't want breathe those smoke in) and it will give them a more steady hand, but it's actually the opposite. if you don't want to breathe the smoke into your lungs, just move your head away, or have a small fan around aim it at ur head.
and try to practice on some useless PCB before you try it on the actual repair. just grab some old computer sound cards or whatever u had in ur attic. mess around with it till u're comfortable with the process
Last edited by nycgps; Sep 11, 2011 at 11:55 AM.
Thread Starter
Registered
Joined: Jan 2007
Posts: 49
Likes: 3
I'm very glad this is still helping people. Maybe a mod can link it to the main audio FAQ sticky??
One was asking where can you find someone to replace the relay for you. Try any local electronics repair place, maybe even ask some of the auto-sound installers in your area. Be sure to ask them if they solder or crimp their radio installs as the latter folk may not have experience soldering.
I noticed people commenting on aftermarket upgrades and I agree, there's much better sound to be had than Bose - but that's not what this thread is about. It's about repairing your Bose on the cheap. I must note that I love the way well amplified Infinity Kappa Components sound up front and it's usually my first choice ;-) IMO: It's the best bang for the buck.
The money I saved will contribute to a full system (kappas included) install in my Evo-x because the stock bare-bones system really blows. I've been driving the 8 more and more lately because of the better sound - well also because it's just more fun to drive. Yeah, I must mention the Evo is wicked quick friggin nasty though, but the RX8 just feels better - oh, and it has a sunroof!