DIY: LED Puddle Lights on the cheap! (read: $<15 bux!)


Thread Starter
I h8 boards, just msg me.
Joined: Dec 2006
Posts: 60
Likes: 0
From: Gloucester Point, VA
Things you'll need...
Derwankel install sheet to run wiring:
http://www.google.com/url?sa=t&sourc...q3XQVRfdR63n6w
The LED units to purchase:
http://www.superbrightleds.com/cgi-b...6.7864#LBM-xW4
Now, it says they come on a three inch strand, this isn't true if you buy 2, they are wired together with a 3" wire between each unit, and you need to leave a little on the end of each when you cut them. In short this means if you aren't comfortable working with 1.5-2" worth of wire, BUY 3 so you can have the full length wire for both.
Also mind you these units are SEALED and waterproof, thus excellent for this use, and at $3 each, how can you go wrong!
Some Heat Shrink tubing, and heat shrink butt connectors. I suggest Marine grade as they don't just shrink, they "liquefy" on the inside and re-harden when they cool to form a water-tight seal.
Toolage... you're all bright ones.. I won't make a list.
So essentially all you do is follow the Derwankel install instructions for the wiring, and at the very end you want to cut the secondary wire on the LED units, and use a bit of the heatshrink tubing to "cap" off the ends to keep water out.
Now, in this first picture, a shot of one of the LED units with heat shrink tubing, the left side of the unit is the amount of wire you'll have if you buy three units, on the right the amount if you buy two units.
http://www.suprvln.com/rx8/puddle/unit1.jpg
In this picture you'll see the unit prepped to be wired in, including the heatshrink "cap" like I said, I'm using marine grade so when I heated it, it became liquid inside and I used needle nose pliers to "crimp" the end.
http://www.suprvln.com/rx8/puddle/unit2.jpg
Now here is the awesome part, they are the PERFECT size, when you slide them in, they are pressure mounted between the mirror mechanism and the hole in the bottom of the mirrors, the 4 LEDS will actually rest inside the bottom hole to keep the LED from slipping. (they don't protrude past the bottom edge of the mirror when mounted) If you don't feel the fit is good enough, I suggest a wire coat hanger and a screw, and fab yourself a mounting bracket and use the factory attachment point for the puddles. I didn't feel this was necessary so I didn't do it.
http://www.suprvln.com/rx8/puddle/unit3.jpg
And here are some "action shots" of the power of these little units:
This first one, the garage lift light is on, as well as my running lights, you can see how bright they are! (sorry, hard to take a non-blurry, non-flash photo at night)
http://www.suprvln.com/rx8/puddle/lightson.jpg
Driver side from front:
http://www.suprvln.com/rx8/puddle/driver.jpg
Pass from back:
http://www.suprvln.com/rx8/puddle/pass.jpg
Close up of light in service:
http://www.suprvln.com/rx8/puddle/close.jpg
Now, as you can see the unit is WHITE, so if you're going to be looking up from under your car that often and you're AR, I suggest painting them black, remember to tape off the LEDs!
Happy hacking!
-nolz


Geek
Joined: Feb 2010
Posts: 17
Likes: 0
From: Greenville, SC
Just want to thank you for the DIY and of course Derwankel for the install sheet.
I installed my own puddle lights today. I did however use blue LEDs instead of white so it'd match my interior lights.
I installed my own puddle lights today. I did however use blue LEDs instead of white so it'd match my interior lights.


Registered User
Joined: Aug 2010
Posts: 42
Likes: 0
Thanks for all the info! I did (half of) this project tonight and it's awesome! I've wanted the big ***** lights from the moment I knew of their existence but $75 was way too steep.
BTW, a panel popper is a must-have for any project that requires taking the door apart, if those little white clips stay behind when you pull the door panel off it's really difficult to get them out without damaging them if you don't have the tool -- my $.02
BTW, a panel popper is a must-have for any project that requires taking the door apart, if those little white clips stay behind when you pull the door panel off it's really difficult to get them out without damaging them if you don't have the tool -- my $.02
Last edited by bkcberry; Sep 15, 2010 at 10:43 PM. Reason: corrections/added stuff

where am i supposed to get all the things that the derwankel instructions says you need like lamps and ties, can u explain what all those things are
i have 3 of the LED squares as you recommended, what else do i need
i have 3 of the LED squares as you recommended, what else do i need
Registered User
Joined: Aug 2010
Posts: 42
Likes: 0
Examples of what I used:
http://www.parts-express.com/pe/show...number=095-550 (for connecting LED wires to the wire that i bought to run into the door)
http://www.parts-express.com/pe/show...number=082-100 (for splicing into courtesy lights)
and some electrical tape and wire. I think i used 18 or 20 gauge.. LEDs don't require much current at all so it doesn't have to be very thick wire.
I got all that stuff from a local oreilly's, just used parts-express to show examples
Your 'lamps' are the lights you ordered, and there's no way to screw them in. The wire ties he's talking about are just zip ties.
I kindof wedged my LEDs between the bottom of the mirror adjustment motor thing and the housing of the mirror and then i just hot-glued it down. It probably wouldn't have moved otherwise, but I didn't want to have to deal with them moving around in my mirrors.
Tip- LEDs only work if you hook them up correctly, so make sure you match the + and - wires correctly before you make your splices. Multimeter, etc.

Sunlight Silver Bias
Joined: May 2010
Posts: 1,259
Likes: 0
From: Kirkland, WA
Alright, I just did this stuff so it's really easy. You need a solder, soldering iron, shrink tubing, and a bunch of primary wire (I used lighting wire because the hot and ground are attached but are in their own separate housing.) PM me if you have any questions

Looks like it may be my next mod. Thanks!
These are things that Derwankel originally provided in his kit. He produced a (more-or-less) replica of the OEM puddle lights used outside NorthAmerica. A little more OEM look perhaps.Looks like it may be my next mod. Thanks!
These are things that Derwankel originally provided in his kit. He produced a (more-or-less) replica of the OEM puddle lights used outside NorthAmerica. A little more OEM look perhaps.Looks like it may be my next mod. Thanks!
what kind of wires should i use?
i have some 16 guage electrical wire from home depot, will that work?
would i need two "strands" of wire to connect negative to negative and positive to positive? or would i need special wire that is connected with positive and negative sides?
and by neg. to neg and pos. to pos. i mean the neg and pos of the actual LED lights to the pos and neg in the courtesy lights
and is it illegal and or possible to wire them somewhere else so that they are always on? or turn on with the lights?


The LED's he listed doesnt have a blue option, but the LED's above them do AND they are the same size if you check out the dimensions. While the effective range of how much area the LEDs light up are smaller, it shouldnt matter it being in the mirror housing (having to go straight down).
I have a pearl white 8' with blue interior too, so I ordered those LED's under the blue option. I'll tell yea how it turns out mate.
I have a pearl white 8' with blue interior too, so I ordered those LED's under the blue option. I'll tell yea how it turns out mate.
Last edited by Imperium612; Dec 24, 2010 at 02:59 PM.
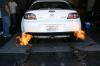
Ok, got the LEDS yesterday, wired them up and went through the install sheet for the wiring, the LED units fit PERFECTLY snug in there, and it wire tapped right into the door light. Went perfect. Sorry for the crappy pics, didnt have my camera at the station with me, just my cell phone.
http://i4.photobucket.com/albums/y13...ium612/2-4.jpg
http://i4.photobucket.com/albums/y13...um612/22-2.jpg
http://i4.photobucket.com/albums/y13...m612/222-1.jpg
http://i4.photobucket.com/albums/y13...ium612/2-4.jpg
http://i4.photobucket.com/albums/y13...um612/22-2.jpg
http://i4.photobucket.com/albums/y13...m612/222-1.jpg


Did this awhile ago... looks great. The one thing I'd do differently would be to make a quick connect on the inside of the mirrors just infront of the LED pod... one of mine just started shorting out.. woulda been easier to replace..

Registered
Joined: Mar 2010
Posts: 93
Likes: 0