
DIY: footlamp rewire Part 2 (with OEM kit)


Thread Starter
ShinkaMan #748 SV6P
Joined: May 2005
Posts: 536
Likes: 0
From: Lake Worth, FL
DIY: footlamp rewire Part 2 (with OEM kit)
The first DIY I did was for people without the footlamp lighting kit. I tried to make the instructions as elementary as possible and the installation as easy as it can be for amateurs like me :D .
This thread will now tackle rewiring the OEM footlamps (or for those who bought the footlamp kit who would like to wire it this way) so the lamp can be controlled via the parking light switch. No additional items need for this DIY except for electrical tape, scissors, flashlight and pliers but be prepared to butcher your wiring
1. You would need to remove the splices made behind the driverside plastic panel (picture #1) and cover the exposed wires with electrical tape. However, leave the negative(-) wiring attached to the bolt above the fusebox. Keep the plastic quick taps for use later.
2. Cut all the wires from the male plug that leads to the timer relay about 6inches from the plug. Throw away the black/blue wire, relay and plug you no longer need these. Keep the green LED wires, black neg(-) wire and the blue/red wire with the fuse.
3. expose from the black plastic covering of the 2 sets of green wires that leads to each LED lights. Strip the wires bare about about 1/2inch. Strip the black neg(-) wire, as well as the blue/red wire on one end.
4. attach one green wire from each LED and the black wire to make a 3-way splice by tying then together tightly and cover it with the electrical tape. Do the same for the other green wires and the exposed end of the blue/red wire. The finished wirings should look like picture #2.
5. Find the RED with YELLOW STRIPE wire from the pin connector (white plastic box with wires) located behind/underneath the steering column near the hood release mechanism. It is bigger than the other connector close to it. The R/Y wire is easy to find and looks orange in picture #3 front center of the bundle.
6. Splice the blue/red wire to the Red/yellow wire using the quick connect tap.
7. Test your handiwork by turning on the parking light. The LEDs should come on at this time.
You are now done with the wiring!
Thread Starter
ShinkaMan #748 SV6P
Joined: May 2005
Posts: 536
Likes: 0
From: Lake Worth, FL
If anybody has questions or would like additional photos let me know. Special thanks to Rotary Rasp for pointing out the correct wire to tap into.
Last edited by wedge357; Jul 17, 2005 at 01:37 AM.

Registered
Joined: Apr 2006
Posts: 9
Likes: 0
From: Peoria, IL
I have a set of LED lights that I want to install on the same circuit as the courtesy lights to light up the footwells when the door is opened. Can anyone tell me where to connect the wires if I want to have the lights come on with the courtesy lights?

doin' the bull dance
Joined: Mar 2006
Posts: 3,174
Likes: 2
From: Quahog, RI
Wedge: (or anyone else who knows) I am trying to install the footwell lamps, and need a little advise. Bought the OEM lamps, and following instructions, I pulled everything apart to get to the 54 pin connector.
My first question is this: Does the 54 pin connector detach from the side wall of the car, and if so, how. I tried twisting it, pulling it, turning it, tried to pop the 'tabs' from the gray harness that holds it; all to no avail.
Second Q: Does it matter if you splice to the wires on top or bottom of 54 pin connector?
Since I don't have the lamps installed, I believe I am able to skip step one - removing splices, and start with step 2 - cutting the wires going into the male plug. This seems obvious to me, but again, I don't want to cause any damage.
BTW: Your DIY on the rewire actually came w/the lights. I bought them off e-bay, ("new in box") and was quite amused when I opened it and found the factory instructions & a print out of your DIY, pics and all!!
doin' the bull dance
Joined: Mar 2006
Posts: 3,174
Likes: 2
From: Quahog, RI
Just reviewing this DIY (again)
Is the 3rd picture of the 54 pin connector in the driver side kick panel? I sounds like this pic is of a different white connector box under the steering column.
 duh, I'm not bright.
Is the 3rd picture of the 54 pin connector in the driver side kick panel? I sounds like this pic is of a different white connector box under the steering column.
duh, I'm not bright.
Registered
Joined: May 2005
Posts: 417
Likes: 2
Originally Posted by ixoye71
I have a set of LED lights that I want to install on the same circuit as the courtesy lights to light up the footwells when the door is opened. Can anyone tell me where to connect the wires if I want to have the lights come on with the courtesy lights?
doin' the bull dance
Joined: Mar 2006
Posts: 3,174
Likes: 2
From: Quahog, RI
brain wandering . . .
Thanks for the DIY - I did get these installed (long ago it seems) and am happy with the result. Looks nice w/the red on all the time at night.
Anyone who needs help can PM me. It was easier to do than I thought . . .
Thanks for the DIY - I did get these installed (long ago it seems) and am happy with the result. Looks nice w/the red on all the time at night.
Anyone who needs help can PM me. It was easier to do than I thought . . .

Utopia Taco Bell
Joined: May 2006
Posts: 902
Likes: 1
From: * Queens NY *
Does anyone know which wire it is to connect the foot lamps to the courtesy lights?
Am I right in assuming I can tap into both the parking light switch and the courtesy light lead at the same time to make my foot lamps come on with the open door as well as with the parking light switch?
Am I right in assuming I can tap into both the parking light switch and the courtesy light lead at the same time to make my foot lamps come on with the open door as well as with the parking light switch?
doin' the bull dance
Joined: Mar 2006
Posts: 3,174
Likes: 2
From: Quahog, RI
Not sure which line is courtesy lights. That should be in the instructions, if you got a set (I may still have instr. somewhere if you need a copy).
I do recall it was a much bigger hassle to try and do the OEM install, while the rewire to the parking lights was really simple.
I do recall it was a much bigger hassle to try and do the OEM install, while the rewire to the parking lights was really simple.
doin' the bull dance
Joined: Mar 2006
Posts: 3,174
Likes: 2
From: Quahog, RI
No. The lights are not bright at all. They look good & have no interference at all b/c they are subtle enough. The only thing I ever noticed was a slight reflection on the windows when looking at the side mirrors at night, but that's b/c I've got 20% tint - I doubt it would reflect at all w/o tint. Also, that "reflection" is basically gone. It was minor and I got used to it w/in a week, now I don't notice it at all and it never affected the actual visibility in the mirrors.
These two pics were taken by my buddy who does photography as a hobby & some professionally, so the camera is insane & really pics up the light.
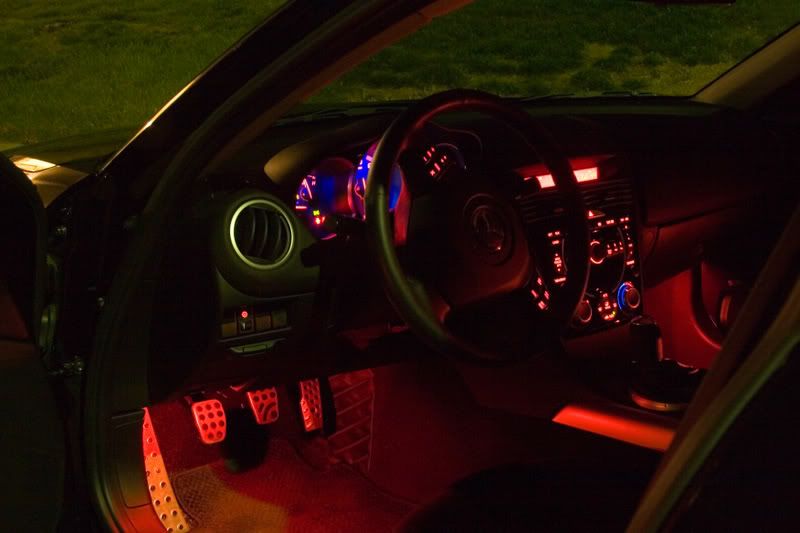
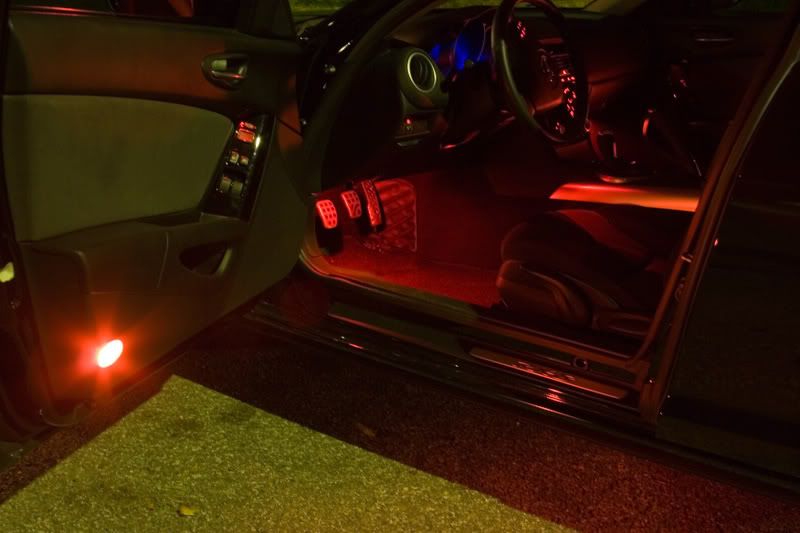
These two pics were taken by my buddy who does photography as a hobby & some professionally, so the camera is insane & really pics up the light.

doin' the bull dance
Joined: Mar 2006
Posts: 3,174
Likes: 2
From: Quahog, RI
haha, sorry. I managed to read your post without the TO in there . . . "how do I get the wires?" . . . . d'oh
I recall it being a bitch to get to everything, and re-reading my post reminded me just how bad it was. The white wire housing wouldn't come off. I had to contort myself under the dash to get at the wires. It sucked.
But you don't need to open that white box. You connect to the wire with a vampire clamp, so it can connect anywhere along the wire.
Is that what you were asking? I can try an get a peek in there to refresh my memory.
doin' the bull dance
Joined: Mar 2006
Posts: 3,174
Likes: 2
From: Quahog, RI
That sucks. I may not be much help with that. I bought the kit and installed it, so I didn't have to search around for the wires.
I can say the color descriptions in Wedge's DIY here were all accurate when I did mine.
You can't follow the wires from the light itself back to the fuse box?
I can say the color descriptions in Wedge's DIY here were all accurate when I did mine.
You can't follow the wires from the light itself back to the fuse box?
i cant even get to the wires. i dont know how to take the black plastic cover off...... never done anything with the wires before so i dontknow.
i could proably get the wiring right but its the step before that. lol
i could proably get the wiring right but its the step before that. lol
doin' the bull dance
Joined: Mar 2006
Posts: 3,174
Likes: 2
From: Quahog, RI
ahhhh!!! I may be able to help a little . . .
IIRC, the door sill has to come off (the part along the floor w/the rx8 emblem, then the kick panel that covers those wire clusters comes off.
That's a bit of a dilemma. I just went through a few threads quickly and don't see the full instructions on removing those panels. I'm not sure if I had instructions w/the kit, from the owners manual, or found them on the site. ??? Did you check in the manual for instructions on how to get at them?

ohh...
well I am pretty sure you can do this mod without doing that.. idk, I wired mine to headlights/parking lights, and put an additional switch.
But you have to remove the door panel thing, idk what you'd call it. the plastic piece that separates carpet from metal. You need to pry that bad boy up then you can remove the plastic piece to expose those wires.
This answer your questions?