
DIY: FRONT Fog Light RE-WIRE [S2 Vr/Compilation]


Thread Starter
Living is best Modified.
Joined: Jul 2007
Posts: 479
Likes: 1
From: South Carolina
DIY: FRONT Fog Light RE-WIRE [S2 Vr/Compilation]
Now for those that don't want to read 444 posts (at this moment). I'm going to sum all of that muss in a pretty package. Including my own pictures, I will be using other people's pictures to help explain this in greater detail. I've tried to make this as simple, straight forward, complete in one post. Enjoy. Original Thread
I performed this modification as my first step for doing a Fog Light projector retrofitment. Doing this modification fixed the problem with having HID bulbs, constantly turning on/off with the High beams.
Omicron's Method: (I did my Fog light re-wiring using Omicron's method. This way met all the prerequites I needed and I can confirm it works)
1. Useable at all times the car is running: No lights, Low Beams, High Beams.
2. Turns off when the car is not running: Will not run the battery dry if I forget to turn off the fog lights.
3. I can turn off the fog lights with my normal "Fog Light" switch.
Other Methods and variations to this modification include:
(Link) - Magnesium's Original Method. Fog lights will remain on when the car is not running. No warning sound that the lights are on. This method probably is best mated with Unser's, as his method incorporated a physical LED and switch.
(Link) - MazdaManiac's Daytime Running lights: Attached to the brake lights, these will come on whenever the "Parking" lights are turned on.
(Link) - bobclevenger's ignition circuit. The car does not need to have the accessory lights working.
(Link) - Unser's switch variation:
For Candian Cars (Credit: StealthTL): (I do not know if this works for S2 cars, but i'm sure someone might want to know.)
"NOTE FOR CANADIAN CARS.....
To bypass the DRL module (behind the glovebox) you need to disconnect the 'fog in'(light green&black) and 'fog out'(yellow&red) at the big DRL connector, and join them together ( best way is to use a tiny screwdriver to poke the terminals back out of the block - no cutting required.). They are side by side at the lower left of the connector.
Also, the 'brown' wire on US cars is 'brown&white' striped for DRL models, but it IS the same wire as in the Omicron instructions."
Websites:
http://koczarski.com/RX8/Mods/FogLight/ReWire.htm
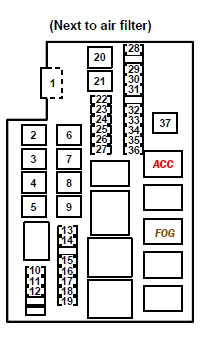
Fuse box picture: Accessory Is the red "Acc". Brown Fog for the fog light fuse.
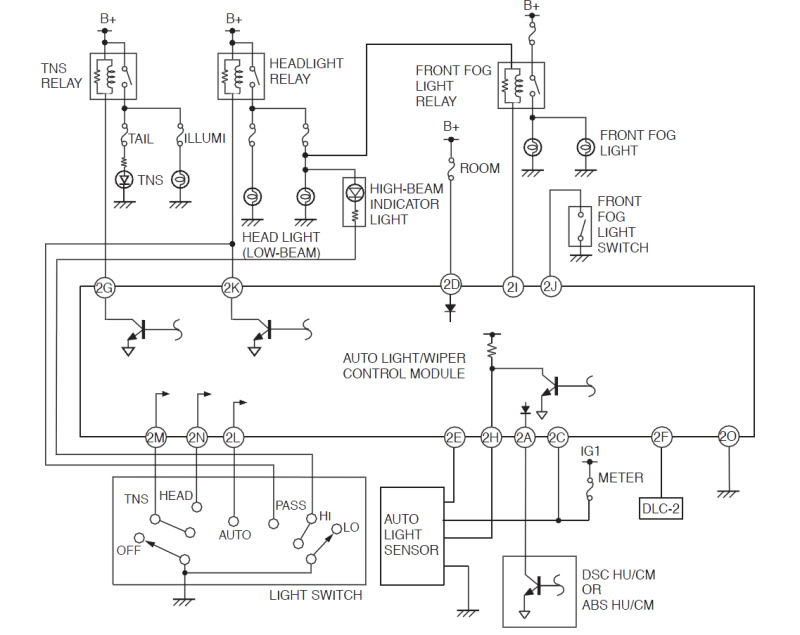
Schematic of the Fog lights without DRL (Daytime Running Lights)
__________________________________________________ ______________
Omicron's Method: (Short)
0. Disconnect the "-" battery terminal. Open the fuse box. take off the top connector the power cords at the top of the fuse box.
1. Find the Brown wire that's connected to the Fog Light fuse. Cut it.
2. Find the THIN Red and White wire. Splice the Brown wire (Leading to the fuse) to the THIN Red and White wire.
__________________________________________________ ______________
Omicron's Method: (Detailed)
0. Disconnect the Negative battery terminal. The black connector.
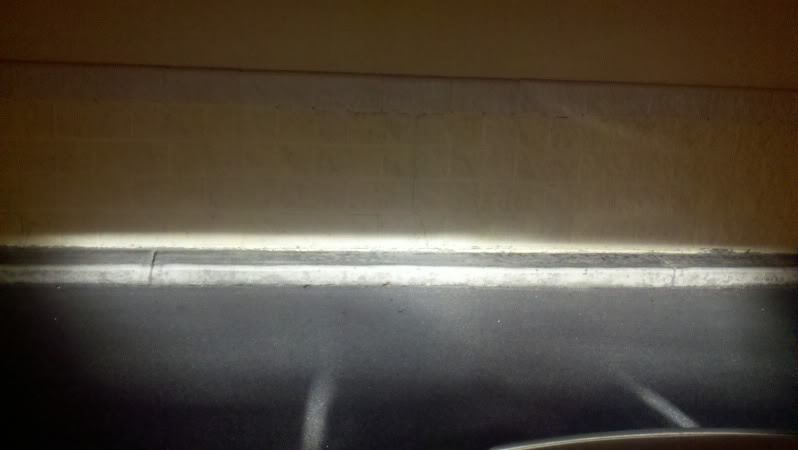
0a. Located the fuse box. This will be located at the driver's side, next to the air filter. This is what the fuse box looks like without a box cap.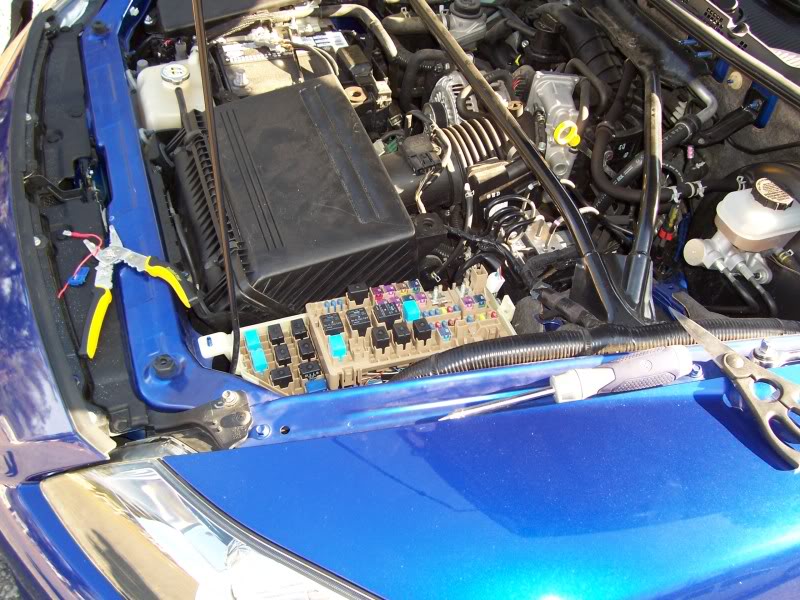
0b. Disconnect the power terminals and the connector, located at the top of the fuse box. Push these between the air filter, so you won't need to worry about them later. They don't easily fall down so you won't need to worry about that.

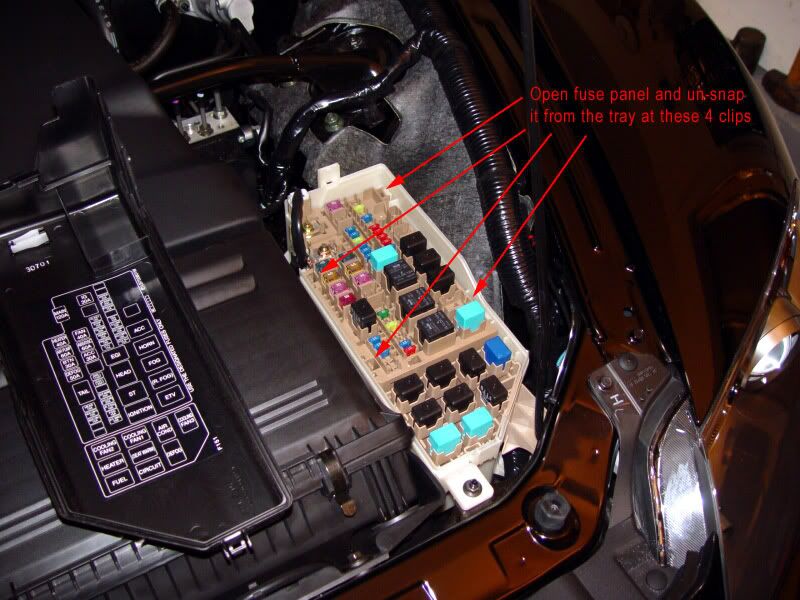
0c. Locate the four tabs holding the fuse box down. MazdaManiac's Picture
1. Lift the fuse box. It'll want to fall back down, so proping it up with something helps a lot. I didn't prop it up, and fighting with it is not a very fun chore. This is what you'll see when you first lift it:
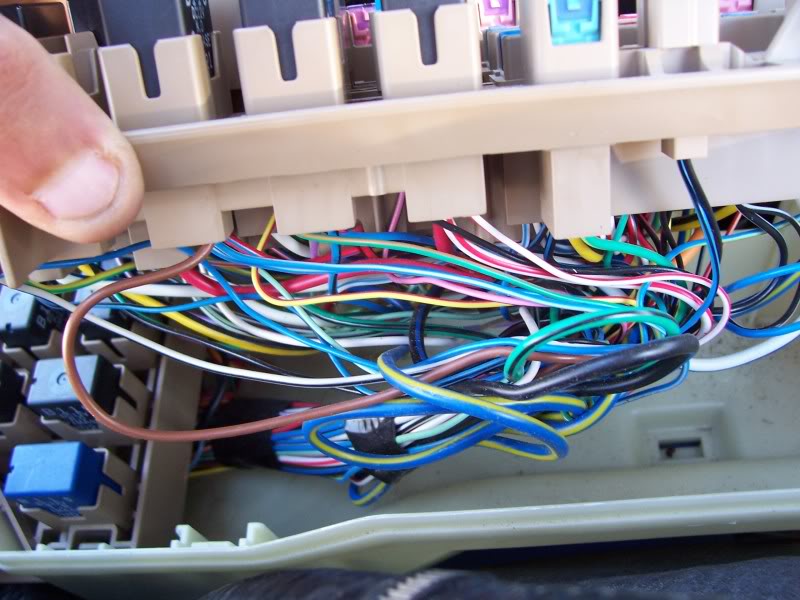
Intimidating, daunting a little? Using Focus-O-Vision, Let's focus on the wires you actually need to worry about. Notice the brown wire, and notice the two white/red stripped wires. Focusing on the two white wires you'll notice they differ in size. My rule of thumb "Ignore the fatty. Go with the skinny"
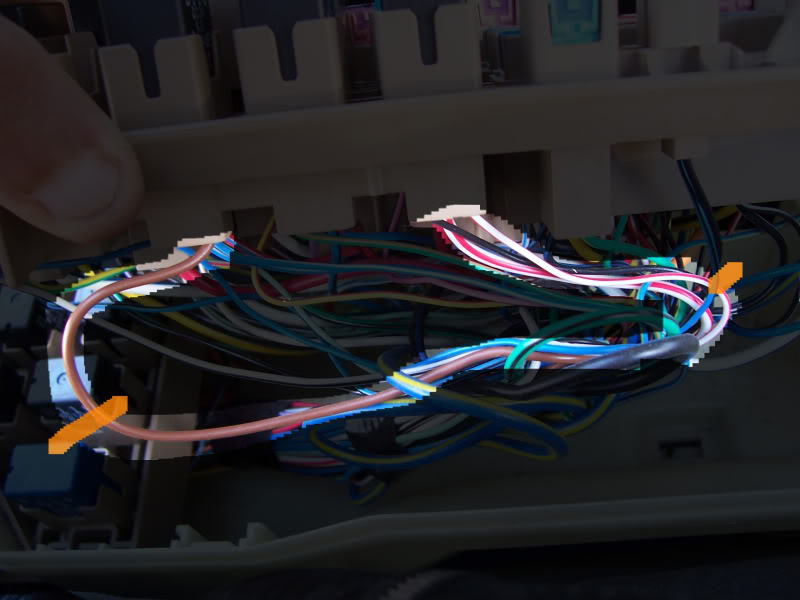
2. Do not cut the white wires! Using a splice connector, splice your home-made wire with the thin white wire. I added a female connector.
3. Cut the brown wire. And add connectors.
- The Fuse-side brown wire needs to be tapped with a Male connector.
- The NON Fuse-side brown wires needs to be tapped with a female connector.
Notice that if **** hits the fan, you can go back to stock and no one will be the wise
With Step 2 and 3 Done:
Focus-O-Vision:

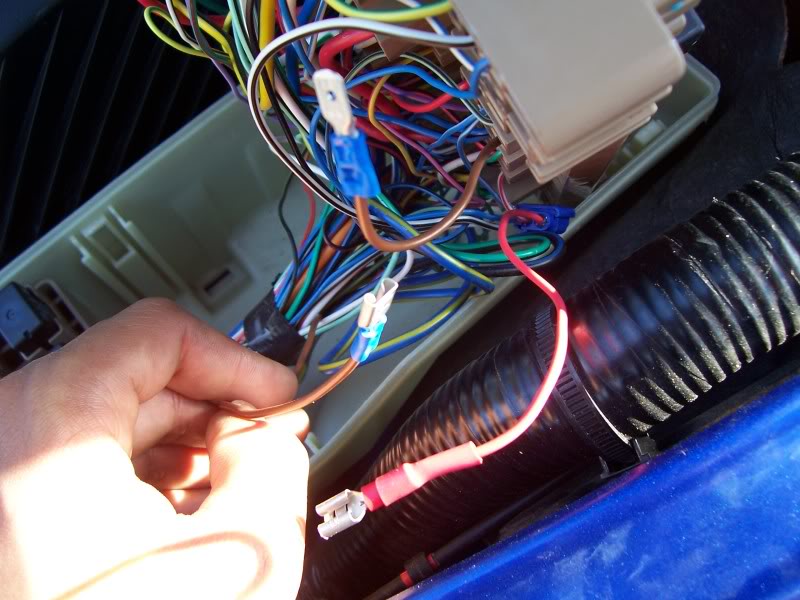
4. Connect the Male connector to the spliced new wire's female side. Wrap in electical tape. Wrap the unused female brown wire with electrical tape. Stuff the connectors back in the place.
5. Push the fuse box down.
6. Connect the main connector and power wires.
7. Connect the negative battery terminal.
8. Reset the DSC with the steering wheel.
9. Enjoy.
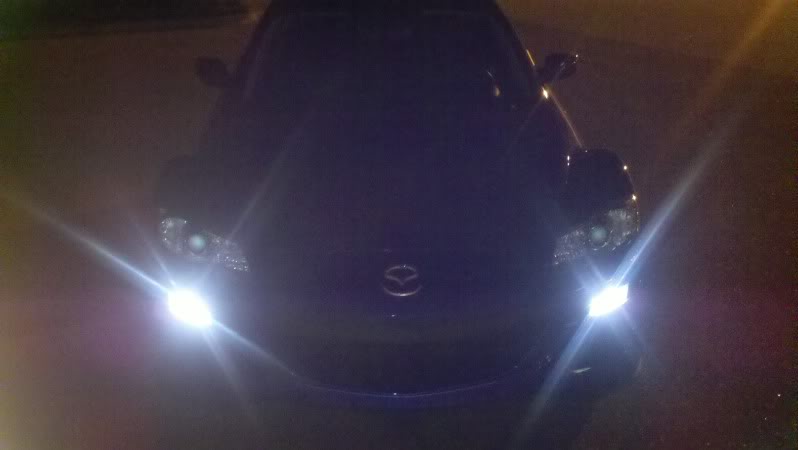
After pictures:
I performed this modification as my first step for doing a Fog Light projector retrofitment. Doing this modification fixed the problem with having HID bulbs, constantly turning on/off with the High beams.
Omicron's Method: (I did my Fog light re-wiring using Omicron's method. This way met all the prerequites I needed and I can confirm it works)
1. Useable at all times the car is running: No lights, Low Beams, High Beams.
2. Turns off when the car is not running: Will not run the battery dry if I forget to turn off the fog lights.
3. I can turn off the fog lights with my normal "Fog Light" switch.
Other Methods and variations to this modification include:
(Link) - Magnesium's Original Method. Fog lights will remain on when the car is not running. No warning sound that the lights are on. This method probably is best mated with Unser's, as his method incorporated a physical LED and switch.
(Link) - MazdaManiac's Daytime Running lights: Attached to the brake lights, these will come on whenever the "Parking" lights are turned on.
(Link) - bobclevenger's ignition circuit. The car does not need to have the accessory lights working.
(Link) - Unser's switch variation:
For Candian Cars (Credit: StealthTL): (I do not know if this works for S2 cars, but i'm sure someone might want to know.)
"NOTE FOR CANADIAN CARS.....
To bypass the DRL module (behind the glovebox) you need to disconnect the 'fog in'(light green&black) and 'fog out'(yellow&red) at the big DRL connector, and join them together ( best way is to use a tiny screwdriver to poke the terminals back out of the block - no cutting required.). They are side by side at the lower left of the connector.
Also, the 'brown' wire on US cars is 'brown&white' striped for DRL models, but it IS the same wire as in the Omicron instructions."
Websites:
http://koczarski.com/RX8/Mods/FogLight/ReWire.htm
Fuse box picture: Accessory Is the red "Acc". Brown Fog for the fog light fuse.
Schematic of the Fog lights without DRL (Daytime Running Lights)
__________________________________________________ ______________
Omicron's Method: (Short)
0. Disconnect the "-" battery terminal. Open the fuse box. take off the top connector the power cords at the top of the fuse box.
1. Find the Brown wire that's connected to the Fog Light fuse. Cut it.
2. Find the THIN Red and White wire. Splice the Brown wire (Leading to the fuse) to the THIN Red and White wire.
__________________________________________________ ______________
Omicron's Method: (Detailed)
0. Disconnect the Negative battery terminal. The black connector.
0a. Located the fuse box. This will be located at the driver's side, next to the air filter. This is what the fuse box looks like without a box cap.
0b. Disconnect the power terminals and the connector, located at the top of the fuse box. Push these between the air filter, so you won't need to worry about them later. They don't easily fall down so you won't need to worry about that.
0c. Locate the four tabs holding the fuse box down. MazdaManiac's Picture
1. Lift the fuse box. It'll want to fall back down, so proping it up with something helps a lot. I didn't prop it up, and fighting with it is not a very fun chore. This is what you'll see when you first lift it:
Intimidating, daunting a little? Using Focus-O-Vision, Let's focus on the wires you actually need to worry about. Notice the brown wire, and notice the two white/red stripped wires. Focusing on the two white wires you'll notice they differ in size. My rule of thumb "Ignore the fatty. Go with the skinny"
2. Do not cut the white wires! Using a splice connector, splice your home-made wire with the thin white wire. I added a female connector.
3. Cut the brown wire. And add connectors.
- The Fuse-side brown wire needs to be tapped with a Male connector.
- The NON Fuse-side brown wires needs to be tapped with a female connector.
Notice that if **** hits the fan, you can go back to stock and no one will be the wise
With Step 2 and 3 Done:
Focus-O-Vision:
4. Connect the Male connector to the spliced new wire's female side. Wrap in electical tape. Wrap the unused female brown wire with electrical tape. Stuff the connectors back in the place.
5. Push the fuse box down.
6. Connect the main connector and power wires.
7. Connect the negative battery terminal.
8. Reset the DSC with the steering wheel.
9. Enjoy.
After pictures:
Last edited by ASH8; Oct 3, 2011 at 04:37 AM.

Impressive, I might use the same instead of a HID kit. Less **** to wire up. Besides, you don't want overly bright fogs anyways unless you want to blind people.
Zoom Zoom
Joined: Jun 2011
Posts: 103
Likes: 0
From: Selma, TX
What happened?
I followed the instructions and it worked however my console didn't work after that. Like my clock, AC, radio, all that stuff had no power going to it and at first I thought I blew a fuse but I just put the wires back to the original configuration and it worked. Did anyone else have this issue?
The way I wired it was the brown wire from the fuse to the skinny red striped wire coming from the light, then the skinny red striped wire coming from the fuse to the brown wire coming from the light. I'm assuming they're coming from the light, I don't actually know where the wires are coming from lol.
Ok nvm I found out what I did wrong. I wasn't suppose to cut the striped wire only tap into it oops lol. I'll try it tonight and see if I can get it right this time.
Last edited by i3oots; Jun 27, 2011 at 07:56 AM. Reason: I found the answer

The way I wired it was the brown wire from the fuse to the skinny red striped wire coming from the light, then the skinny red striped wire coming from the fuse to the brown wire coming from the light. I'm assuming they're coming from the light, I don't actually know where the wires are coming from lol.
The only thing I see mentioned in the DIY is to connect the fuse side brown to the wire that you tapped onto the skinny white/red wire. sounds like you had that part down then you made another connection that wasn't mentioned here...

Registered
Joined: Sep 2003
Posts: 3,319
Likes: 58
From: NYC
I'm not even doing this, but just had to chime in and compliment you on the clearest, best written directions I've ever seen on this forum. I've always thought it's unfair to ask people to spend hours (or days) wading through endless pages of posts just to figure out how to do something that could be explained in 5 minutes. Cheers to you, sir. And on behalf of everyone who's wasted a day and a half trying to find only what they need to know to do a simple mod, thank you.

The darkness lies within
Joined: Jun 2011
Posts: 48
Likes: 0
From: Annapolis
I followed the instructions and it worked however my console didn't work after that. Like my clock, AC, radio, all that stuff had no power going to it and at first I thought I blew a fuse but I just put the wires back to the original configuration and it worked. Did anyone else have this issue?
The way I wired it was the brown wire from the fuse to the skinny red striped wire coming from the light, then the skinny red striped wire coming from the fuse to the brown wire coming from the light. I'm assuming they're coming from the light, I don't actually know where the wires are coming from lol.
Ok nvm I found out what I did wrong. I wasn't suppose to cut the striped wire only tap into it oops lol. I'll try it tonight and see if I can get it right this time.
The way I wired it was the brown wire from the fuse to the skinny red striped wire coming from the light, then the skinny red striped wire coming from the fuse to the brown wire coming from the light. I'm assuming they're coming from the light, I don't actually know where the wires are coming from lol.
Ok nvm I found out what I did wrong. I wasn't suppose to cut the striped wire only tap into it oops lol. I'll try it tonight and see if I can get it right this time.
 because I didn't read closely). And I couldn't start the car either. All my ACC stuff was out...

Hey, i know this is a diy written for S2's but ive checked the S1 diy and with a quick look they look really similar, can i follow this on my S1? your instructions are as clear as day compared to the others ive seen.


Voids warranties
Joined: Aug 2011
Posts: 1,632
Likes: 0
From: southern new england

4 DOORS FOR MORE WHORES
Joined: Feb 2012
Posts: 484
Likes: 0
From: San Clemente, California
A quick Google search on Fog light rewire yielded this awesome writeup!
I don't get how some people say they searched for hours and found nothing. Lol.
First search, 10 seconds later, BAM! This dope thread.
I don't get how some people say they searched for hours and found nothing. Lol.
First search, 10 seconds later, BAM! This dope thread.


New Member
Joined: Mar 2014
Posts: 4
Likes: 0
Sorry to revive an old thread, but i am new to this forum. I tried this tonight only to find the fog lights work the exact same (lights must be on to use fogs). I have an 09 rx8 and the only mods are megen lowering springs, bho ignition mod and goodridge ssbl. Anyone have a clue why it didn't work for me? I also posted in the series 1 thread as it is the exact same?
https://dl.dropboxusercontent.com/u/...502890_HDR.jpg
Edit: After many trials, and checking every relay and fuse, i switched methods and still no different than stock. They now only work when ignition/accessory (dependent upon wire location) and headlights on where as before they worked in any position as long as headlights were on.
https://dl.dropboxusercontent.com/u/...449161_HDR.jpg
Last edited by jamarctatum; Mar 25, 2014 at 03:09 AM.

On canadian cars the brown wire is white with a brown stripe
Removed the 15amp drl fuse so no more lights up there when parking brake is disengaged
Removed the 15amp drl fuse so no more lights up there when parking brake is disengaged
Last edited by MaD666MaX; May 16, 2014 at 04:03 PM.
New Member
Joined: Mar 2014
Posts: 4
Likes: 0
Canadian??
Thank you for the reply. My car isn't Canadian though. I don't have daytime running lights and I traced the wires to the right relays. I'm not sure what's wrong unless something is different on series 2'

New Member
Joined: May 2014
Posts: 2
Likes: 0
Anyone have experience with the electrical cutting out while the engine is running? The tripometer resets to zero, all radio presets go away, GPS stops working. Turn off the engine and next morning it's like nothing ever happened.

Registered
Joined: Aug 2005
Posts: 37
Likes: 0
From: Ohio
Did not work?
Just tried this on my 2010. It did not change anything? any ideas?? I purchased the car in Pittsburgh, so I don't think it is Canadian? any suggestion. I taped the brown wire and left as is until someone responds?
I did this on my 2005 when I had it and it worked????
I did this on my 2005 when I had it and it worked????