View Poll Results: what do think of new clear coners
Like it


33
50.00%
want it


15
22.73%
dont like it


18
27.27%
Voters: 66. You may not vote on this poll
new clear coners

 07-31-2009, 07:45 AM
#101
Call me ROTO BAGGINS
iTrader: (1)

Join Date: Apr 2008
Location: The big OH yeah! (Cincinnati, OH)
Posts: 462
Likes: 0
Received 0 Likes
on
0 Posts
That's actually a really good idea! I wonder how it would look to paint the housing, socket and bulb to match the body.
Be sure to post up some pictures once you get everything painted up!
Be sure to post up some pictures once you get everything painted up!
 07-31-2009, 09:50 AM
#102
whines all the way home
iTrader: (2)

Join Date: Oct 2004
Location: Towson/Baltimore, MD
Posts: 7,402
Likes: 0
Received 2 Likes
on
2 Posts
I ordereded these last night ,,,
Im hearing alot of whining about simple little things that could resolve the issues people have.
As of yet Mysql seems to be the only person trying to make these perfect....
IDEAS-
Now that I see the seals arent evenly distributed, and the bulb being exposed seems less than desireable(LED bulbs), someone might want to try and sand down the glass and put a semi gloss coat on the lense, it will cover the bad seal areas and distribute the light more evenenly at the same time covering the visible bulb(if you are using the LEDs, I think the oe looks fine)
Allso, someone may want to try creating a painted, or vinyl overlay border around the edges. Black will be fine, some oe headlights come like this like the S14 and S15s, this will cover the visible seals and creat a more finished look with a nice clean border,,,
Also painting the bulb connector black will help immensly...
I will have an assembled set in a few days and will decide what to do then, I will ost progress and pics,,,
Last edited by Rotr8; 07-31-2009 at 09:53 AM.
07-31-2009, 11:47 AM
#103
Registered User
iTrader: (1)

Join Date: Feb 2009
Location: Annapolis Maryland
Posts: 21
Likes: 0
Received 0 Likes
on
0 Posts
I just installed mine and they look fantastic. They almost perfectly match the headlights. I have no seal issues with mine (ordered them assembled). I am however going to paint the light socket black because it is the one thing that sticks out. I like the look much more than the reflector style clear corners.
07-31-2009, 11:49 AM
#104
Registered User
iTrader: (1)
Join Date: Feb 2009
Location: Annapolis Maryland
Posts: 21
Likes: 0
Received 0 Likes
on
0 Posts
Have you looked at your front and rear turn signal, and reverse lights? Those bulbs hang out for the world to see also...
Lilring, no offense intended, but this picture shows exactly what it is that I don't like about them. It just looks a little bit unnatural to me to have that bulb just hanging out behind that perfectly clear lens for all the world to see. If the housing were chromed or something, like a taillight or headlight housing, it would look so much more natural I think.
I am sure they look great at night, but for me personally, I'll stick to the original (white) clear corners.
I am sure they look great at night, but for me personally, I'll stick to the original (white) clear corners.
07-31-2009, 12:10 PM
#105
Call me ROTO BAGGINS
iTrader: (1)
Join Date: Apr 2008
Location: The big OH yeah! (Cincinnati, OH)
Posts: 462
Likes: 0
Received 0 Likes
on
0 Posts
It's all opinion, but my opinion is that it just doesn't look right the way it is. Those clear corners look extremely cheap to me.
 08-01-2009, 01:57 PM
#107
Drive the Revolution!

Join Date: Oct 2008
Location: TN
Posts: 40
Likes: 0
Received 0 Likes
on
0 Posts
They compliment the headlights and look really good at night. The suggestion of painting the edges and or bulb connector is interesting.
Last edited by RX-8.40; 08-01-2009 at 04:10 PM.
 08-01-2009, 03:06 PM
#109
whines all the way home
iTrader: (2)
Join Date: Oct 2004
Location: Towson/Baltimore, MD
Posts: 7,402
Likes: 0
Received 2 Likes
on
2 Posts
I just saw these on Olorin2's car, he had them already preassembled, besides the white bulb connector I dont see what the big fuss is about,,, They looked great to me,,,
08-02-2009, 12:04 PM
#110
Registered User

Join Date: Jul 2009
Posts: 1
Likes: 0
Received 0 Likes
on
0 Posts
i just git them
i got them last night and went to install them right away .. i have a 2005 black rx 8 ... i like the concept but i think they are too clear ..... you can see everything inside them... i think i am going to exchange them for the less trasnparent one ... i have some pics if anyone wants to see them ...
08-02-2009, 02:59 PM
#111
Dial P for Phantom
iTrader: (1)

Join Date: Jun 2007
Location: East Central Florida
Posts: 606
Likes: 0
Received 0 Likes
on
0 Posts
I have them. Have been having issues with condensation on the inside. I put them on in the morning, mid day, and night time. Some other point in the next day, there will be condensation. I immediately take them off when i get home, and with a piece of soft cotton cloth on a twistie tie, i get it all out, and have been repeating this for a few days, almost a week. I cant figure out what else to try.
08-02-2009, 03:16 PM
#112
whines all the way home
iTrader: (2)
Join Date: Oct 2004
Location: Towson/Baltimore, MD
Posts: 7,402
Likes: 0
Received 2 Likes
on
2 Posts
Try applying some RTV Silicon,,,
I know people dont like seeing the globs of silicon but at least you wont have to wipe the iniside down daily,
Also Ill see if I can find a rubber gasket for the bulb connnector that may be where much of the condesation is coming from with the tempeture difference of the air that is right next to the bulb...
08-02-2009, 03:18 PM
#113
whines all the way home
iTrader: (2)
Join Date: Oct 2004
Location: Towson/Baltimore, MD
Posts: 7,402
Likes: 0
Received 2 Likes
on
2 Posts
i got them last night and went to install them right away .. i have a 2005 black rx 8 ... i like the concept but i think they are too clear ..... you can see everything inside them... i think i am going to exchange them for the less trasnparent one ... i have some pics if anyone wants to see them ...
Last edited by Rotr8; 08-03-2009 at 10:51 AM.
08-04-2009, 03:12 PM
#115
Dial P for Phantom
iTrader: (1)
Join Date: Jun 2007
Location: East Central Florida
Posts: 606
Likes: 0
Received 0 Likes
on
0 Posts
Ok ive noticed that sometimes they have condensation, and sometimes they dont. No matter how many times i take them off and dry out the inside and put them back on. Will drilling a hole in the black plastic somewhere help the problem, or make it worse?
08-04-2009, 03:18 PM
#116
whines all the way home
iTrader: (2)
Join Date: Oct 2004
Location: Towson/Baltimore, MD
Posts: 7,402
Likes: 0
Received 2 Likes
on
2 Posts
probably make it better, the condensation has to do with temp differences inside vs. out,,, Drilling a hole will help to equalize, many people do this for thier fish-tank taillights....
08-04-2009, 03:29 PM
#117
Call me ROTO BAGGINS
iTrader: (1)
Join Date: Apr 2008
Location: The big OH yeah! (Cincinnati, OH)
Posts: 462
Likes: 0
Received 0 Likes
on
0 Posts
I still think your best bet is to dry them completely out and then seal them up well. If you get them dried out and completely sealed up, both between the lens and housing AND the socket, the condensation problem will go away. If you drill a hole, it will help them drain and probably reduce the problem, but it will of course continue to let moisture in.
 08-07-2009, 05:19 AM
#119
Registered

I ordereded these last night ,,,
Im hearing alot of whining about simple little things that could resolve the issues people have.
As of yet Mysql seems to be the only person trying to make these perfect....
IDEAS-
Now that I see the seals arent evenly distributed, and the bulb being exposed seems less than desireable(LED bulbs), someone might want to try and sand down the glass and put a semi gloss coat on the lense, it will cover the bad seal areas and distribute the light more evenenly at the same time covering the visible bulb(if you are using the LEDs, I think the oe looks fine)
Allso, someone may want to try creating a painted, or vinyl overlay border around the edges. Black will be fine, some oe headlights come like this like the S14 and S15s, this will cover the visible seals and creat a more finished look with a nice clean border,,,
Also painting the bulb connector black will help immensly...
I will have an assembled set in a few days and will decide what to do then, I will ost progress and pics,,,
Im hearing alot of whining about simple little things that could resolve the issues people have.
As of yet Mysql seems to be the only person trying to make these perfect....
IDEAS-
Now that I see the seals arent evenly distributed, and the bulb being exposed seems less than desireable(LED bulbs), someone might want to try and sand down the glass and put a semi gloss coat on the lense, it will cover the bad seal areas and distribute the light more evenenly at the same time covering the visible bulb(if you are using the LEDs, I think the oe looks fine)
Allso, someone may want to try creating a painted, or vinyl overlay border around the edges. Black will be fine, some oe headlights come like this like the S14 and S15s, this will cover the visible seals and creat a more finished look with a nice clean border,,,
Also painting the bulb connector black will help immensly...
I will have an assembled set in a few days and will decide what to do then, I will ost progress and pics,,,
08-07-2009, 06:18 AM
#120
08-07-2009, 09:19 PM
#121
whines all the way home
iTrader: (2)
Join Date: Oct 2004
Location: Towson/Baltimore, MD
Posts: 7,402
Likes: 0
Received 2 Likes
on
2 Posts
Put mine on tonite, Look Great,,,
Installed the LEDs also,, Painted the connector and led bulb stand,,,
Looked great untill I fitted the connector back into the housing,,,
I will take pics, its probably acceptable and you can only see it if you get really close and look for the smudged paint,,,,
But what Im going to do is remove and sand down the diameter of the connector to allow enough tolerance for the paint to clear, this shouldn't be a problem with condesation becasue the seal isnt on the diameter its on the cap,,,
Pics tomorrow,,,
08-08-2009, 11:40 AM
#122
whines all the way home
iTrader: (2)
Join Date: Oct 2004
Location: Towson/Baltimore, MD
Posts: 7,402
Likes: 0
Received 2 Likes
on
2 Posts
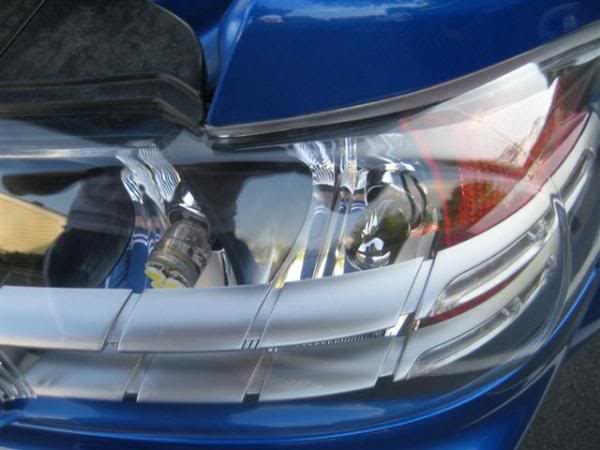
Pics,,,,


The chips in the paint due to the tight fitment are barely visible, so Im gonna leave them for now, if I experience any of the condensation issues that some are having I will sand down the connetors to allow for the thickness of the paint,,,
The chips in the paint due to the tight fitment are barely visible, so Im gonna leave them for now, if I experience any of the condensation issues that some are having I will sand down the connetors to allow for the thickness of the paint,,,
 08-08-2009, 01:44 PM
#124
whines all the way home
iTrader: (2)
Join Date: Oct 2004
Location: Towson/Baltimore, MD
Posts: 7,402
Likes: 0
Received 2 Likes
on
2 Posts
yeah thats gonna take some more time to get something that looks right,,,
Wrking on that later, for now Im satisfied...
IMO they ended up looking alot better in person than the pics where you can scrutinize every liitle imperfection,,,
Wrking on that later, for now Im satisfied...
IMO they ended up looking alot better in person than the pics where you can scrutinize every liitle imperfection,,,