
DIY: Sohn Adapter


Hey,
Version 2
About 6 months after the original install, the oil tank cracked under a bit of force while someone was changing the oil filter. To avoid this complication, I built a version 2 using an eBay catch can kit and some sheet aluminium. Crack that.
Find the Version 2 DIY here in attachment.
https://www.rx8club.com/attachment.p...1&d=1353641574
Overall I find this new setup much cleaner and more reliable.
Enjoy!
Version 1
I thought I'd write up my install of the Sohn adapter, since I didn't really find one before starting my project and the included instructions are ehn. So here goes, do this at your own risk, obviously. Know what you're getting into. Comments or criticisms are welcome, I don't say this is the best way to do it.
Tools:
- 10mm wrench or boxwrench
- 10mm socket with about a 10" extension
- zip ties
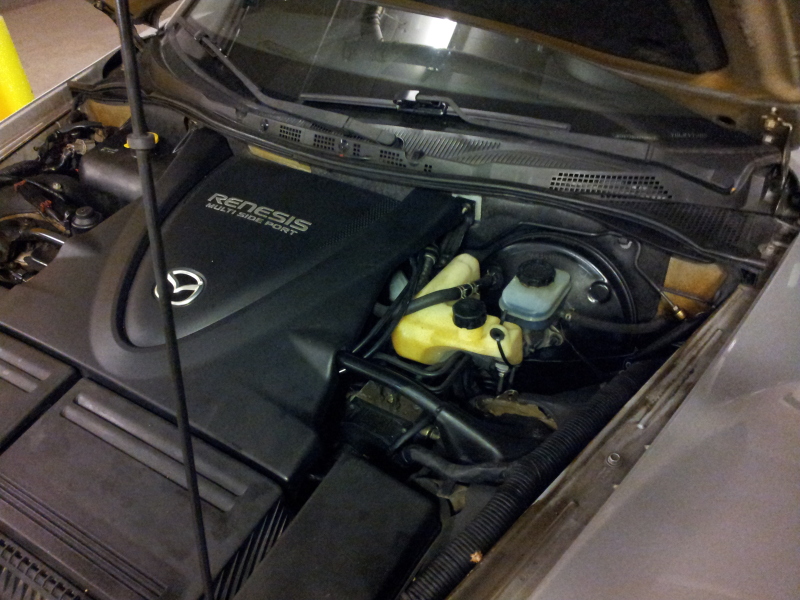
1) Reservoir
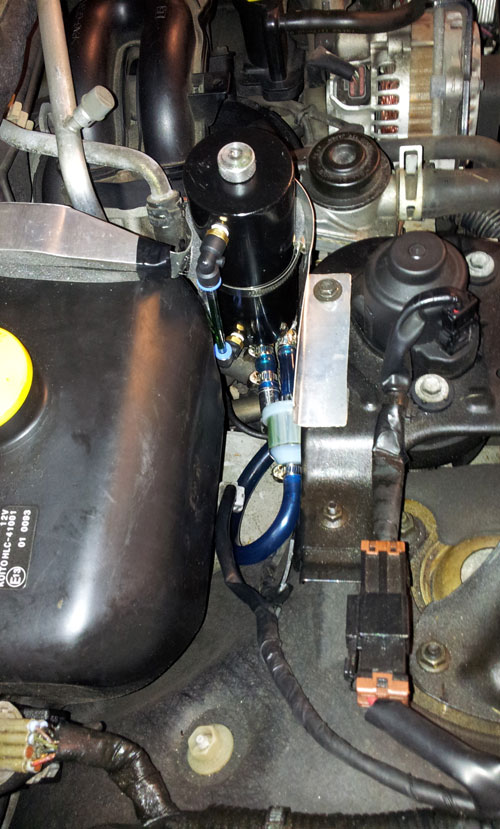
I wanted a stock-ish look and wanted to keep my windshield washer and engine cover. There are a few ways to do this, but what I had accessible (all over ebay at 20-30 bucks) is an oil tank off a Suzuki GT185.
It literally drops in like this:
2 things:[LIST][*]I used foam tape any parts that contacts the brake lines or the master cylinder. Metal will always wear through plastic, so needs protection. This padding may be a wear item as it probably degrades with heat and motion.[*]Make sure you slot the reservoir all the way in so the neck doesn't interfere with the hood.
There are 2 eyelets on the tank, top and bottom. The tank sits fairly snugly by itself, but zipties were used to prevent it running away. There is a convenient hole in the strut mount sheet metal near the bottom eyelet that I may use for more security in the future with a fabbed bracket. That said, the install as is passed the earthquake test.
2) Adapter install
It's really not that bad.
1) The air box is removed by disconnecting the rubber intake pipe from the back of the MAF housing, disconnecting the 2 electrical connections to the airbox and the 2 little vacuum lines on the left of the airbox and on the right of the MAF. Be freaking careful not to break the plastic nipples these attach to.
2) The battery is disconnected and removed. Negative first, positive second. The battery box is also removed. It is made in 2 parts: the top part unclips from the bottom, just flex it and you'll see; the bottom part is held in with 3 10mm bolts.
Note: you'll want a simple 10mm wrench for one of them, as it sits just under another piece that makes it hard to get a socket on it.
Things should now look roughly like this:
Say hello to your OMP.
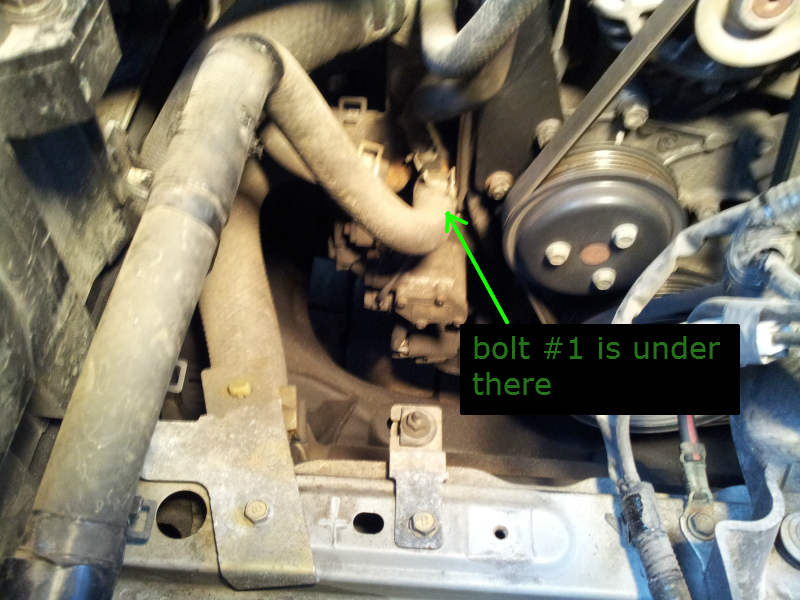
3) The passenger side wheel was removed and a drip pan placed under the OMP. This gives you a clear shot at the 2 back bolts on the OMP, indicated here:
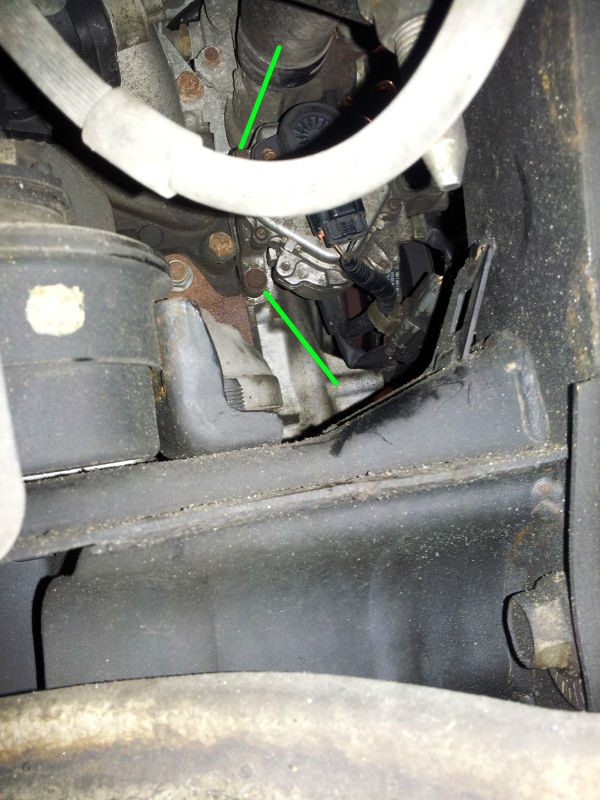
4) The 2 bolts above, as well as the 1 bolt on the front were loosened. You'll want a wrench or boxwrench on the front one as there is no space for a socket. Socket with extension on the back 2.
5) Congrats, you've disconnected your OMP. Unplug the 2 electrical connections to it and be careful around the little oil lines. Things should look like this (the OMP is resting on the crossmember with the engine-facing surface up).
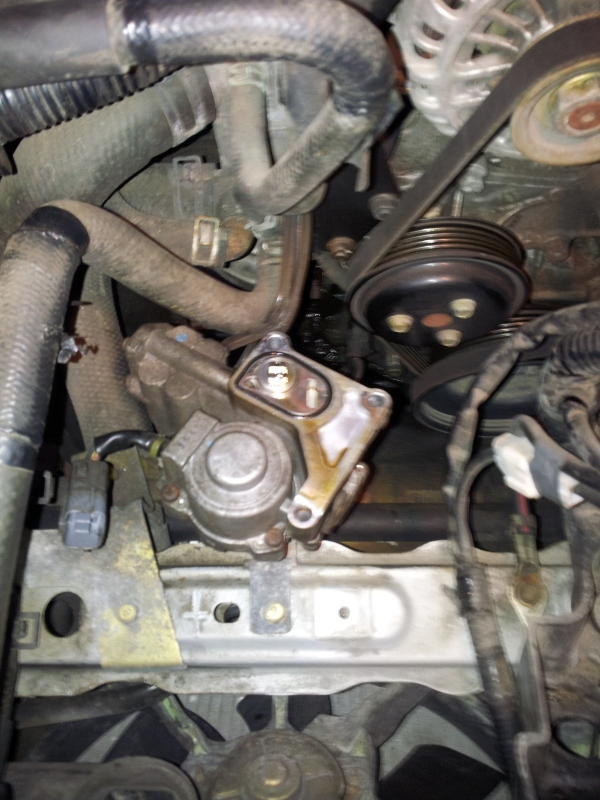
Note the black gasket on the OMP. You want to make sure it stays there.
6) Now, we'll want to channel our inner Indiana Jones and move the little oil lines from one side of the coolant line directly above the OMP to the other side. First, tape over the OMP's electrical connections and the things they plug into. We don't want coolant in there. To do this, remove the clip securing the coolant hose to the engine. Use gentle pliers to rotate the hose in place back and forth to unstick it. Now, in one swift motion, pull the hose off, pass the OMP and oil lines behind it and plug it back on.
If you're good, you spilled maybe a quarter of a cup of coolant, but if you hit a snag you've got a gusher.
The more intelligent way is to drain the coolant first.
7) Shiny new Sohn adapter is mated to the OMP. The rectangular tab on the OMP has to fit into the similarly shaped groove on the adapter, so spin the adapter around until it does, then turn the adapter until the bolt holes line up. Note that the rotating part of the adapter can me up and down, so make sure it's really seated on the OMP driver.
It's a good idea to keep both mating surfaces of the OMP spotless, to avoid oil leaks and having to ever do this again.
Things should look like this: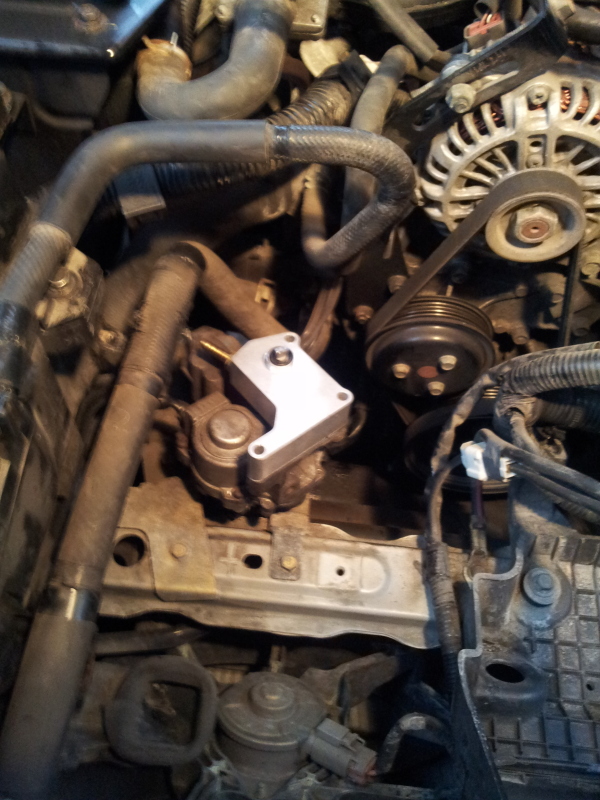
8) Now by far the funnest part of this: place the paper gasket on the Sohn so that it lines up with the various holes. Put a bolt through one of the holes to help keep everything lined up. I suggest the rear holes because they are easier to thread in by hand (through the wheel well)
Line the OMP and Sohn adapter and gasket up with their place in the engine, and rotate the adapter's tab to roughly fit the angle of the matching rotating thingy in the engine.
Gently press the OMP and adapter against the engine and wiggle gently. At some point everything will line up and it will snap in all the way. Thread in the bolt you had started to hold it in place. Verify through the wheel well that the gasket didn't go out of position. If it's sticking out anywhere except a sliver at thee top of the adapter, pull the adapter back off and adjust the gasket position and retry.
9) Thread in and tighten the remaining bolts, and replug the OMP's electrical connections. While I don't have exact torque spec (someone help?) you're threading into aluminium so be gentle.
10) Run your oil hose from the reservoir to the Sohn, and clamp it in place on both ends. I ziptied mine along the wiring harness that runs the same route to keep the line away from any metal contact.
Before you connect the line to the adapter, fill the reservoir with oil until it comes out at the other end of the line. If you have a small syringe, prime the adapter with some 2-stroke oil, just in case.
Connect and clamp the line to the adapter.
11) Put the wheel back on and close everything back up.
I pre-mixed about 100:1 on my first tank with the Sohn, just in case I had messed something up and it wasn't actually feeding oil. Go for a drive and verify for leaks.
Final look:
That's about it.
Happy rotoring!
edit: [ img ] tags off?
Version 2
About 6 months after the original install, the oil tank cracked under a bit of force while someone was changing the oil filter. To avoid this complication, I built a version 2 using an eBay catch can kit and some sheet aluminium. Crack that.
Find the Version 2 DIY here in attachment.
https://www.rx8club.com/attachment.p...1&d=1353641574
Overall I find this new setup much cleaner and more reliable.
Enjoy!
Version 1
I thought I'd write up my install of the Sohn adapter, since I didn't really find one before starting my project and the included instructions are ehn. So here goes, do this at your own risk, obviously. Know what you're getting into. Comments or criticisms are welcome, I don't say this is the best way to do it.
Tools:
- 10mm wrench or boxwrench
- 10mm socket with about a 10" extension
- zip ties
1) Reservoir
I wanted a stock-ish look and wanted to keep my windshield washer and engine cover. There are a few ways to do this, but what I had accessible (all over ebay at 20-30 bucks) is an oil tank off a Suzuki GT185.
It literally drops in like this:
2 things:[LIST][*]I used foam tape any parts that contacts the brake lines or the master cylinder. Metal will always wear through plastic, so needs protection. This padding may be a wear item as it probably degrades with heat and motion.[*]Make sure you slot the reservoir all the way in so the neck doesn't interfere with the hood.
There are 2 eyelets on the tank, top and bottom. The tank sits fairly snugly by itself, but zipties were used to prevent it running away. There is a convenient hole in the strut mount sheet metal near the bottom eyelet that I may use for more security in the future with a fabbed bracket. That said, the install as is passed the earthquake test.
2) Adapter install
It's really not that bad.
1) The air box is removed by disconnecting the rubber intake pipe from the back of the MAF housing, disconnecting the 2 electrical connections to the airbox and the 2 little vacuum lines on the left of the airbox and on the right of the MAF. Be freaking careful not to break the plastic nipples these attach to.
2) The battery is disconnected and removed. Negative first, positive second. The battery box is also removed. It is made in 2 parts: the top part unclips from the bottom, just flex it and you'll see; the bottom part is held in with 3 10mm bolts.
Note: you'll want a simple 10mm wrench for one of them, as it sits just under another piece that makes it hard to get a socket on it.
Things should now look roughly like this:
Say hello to your OMP.
3) The passenger side wheel was removed and a drip pan placed under the OMP. This gives you a clear shot at the 2 back bolts on the OMP, indicated here:
4) The 2 bolts above, as well as the 1 bolt on the front were loosened. You'll want a wrench or boxwrench on the front one as there is no space for a socket. Socket with extension on the back 2.
5) Congrats, you've disconnected your OMP. Unplug the 2 electrical connections to it and be careful around the little oil lines. Things should look like this (the OMP is resting on the crossmember with the engine-facing surface up).
Note the black gasket on the OMP. You want to make sure it stays there.
6) Now, we'll want to channel our inner Indiana Jones and move the little oil lines from one side of the coolant line directly above the OMP to the other side. First, tape over the OMP's electrical connections and the things they plug into. We don't want coolant in there. To do this, remove the clip securing the coolant hose to the engine. Use gentle pliers to rotate the hose in place back and forth to unstick it. Now, in one swift motion, pull the hose off, pass the OMP and oil lines behind it and plug it back on.
If you're good, you spilled maybe a quarter of a cup of coolant, but if you hit a snag you've got a gusher.
The more intelligent way is to drain the coolant first.
7) Shiny new Sohn adapter is mated to the OMP. The rectangular tab on the OMP has to fit into the similarly shaped groove on the adapter, so spin the adapter around until it does, then turn the adapter until the bolt holes line up. Note that the rotating part of the adapter can me up and down, so make sure it's really seated on the OMP driver.
It's a good idea to keep both mating surfaces of the OMP spotless, to avoid oil leaks and having to ever do this again.
Things should look like this:
8) Now by far the funnest part of this: place the paper gasket on the Sohn so that it lines up with the various holes. Put a bolt through one of the holes to help keep everything lined up. I suggest the rear holes because they are easier to thread in by hand (through the wheel well)
Line the OMP and Sohn adapter and gasket up with their place in the engine, and rotate the adapter's tab to roughly fit the angle of the matching rotating thingy in the engine.
Gently press the OMP and adapter against the engine and wiggle gently. At some point everything will line up and it will snap in all the way. Thread in the bolt you had started to hold it in place. Verify through the wheel well that the gasket didn't go out of position. If it's sticking out anywhere except a sliver at thee top of the adapter, pull the adapter back off and adjust the gasket position and retry.
9) Thread in and tighten the remaining bolts, and replug the OMP's electrical connections. While I don't have exact torque spec (someone help?) you're threading into aluminium so be gentle.
10) Run your oil hose from the reservoir to the Sohn, and clamp it in place on both ends. I ziptied mine along the wiring harness that runs the same route to keep the line away from any metal contact.
Before you connect the line to the adapter, fill the reservoir with oil until it comes out at the other end of the line. If you have a small syringe, prime the adapter with some 2-stroke oil, just in case.
Connect and clamp the line to the adapter.
11) Put the wheel back on and close everything back up.
I pre-mixed about 100:1 on my first tank with the Sohn, just in case I had messed something up and it wasn't actually feeding oil. Go for a drive and verify for leaks.
Final look:
That's about it.
Happy rotoring!
edit: [ img ] tags off?
Last edited by Loki; Nov 22, 2012 at 09:36 PM.


4 DOORS FOR MORE WHORES
Joined: Feb 2012
Posts: 484
Likes: 0
From: San Clemente, California

Nice write up but I could have sworn I read a DIY when I installed mine a couple of years ago.
Edit:
Yep, but it wasn't here I guess:
http://www.rotaryinsider.com/diy-tac...pter-gap28.htm
Edit:
Yep, but it wasn't here I guess:
http://www.rotaryinsider.com/diy-tac...pter-gap28.htm

Registered User
Joined: Sep 2011
Posts: 13
Likes: 0
From: Germany
I wrote a DIY in the german Forum. It may not help much, but maybe the pics could make it a little bit easier.
http://rx8forum.de/index.php?page=Thread&threadID=29677
http://rx8forum.de/index.php?page=Thread&threadID=29677
Last edited by Str!k3r; May 29, 2012 at 04:26 PM.

Thanks guys.
I think that's a combination of my phone adding a tinge and dried rustproofing. That would explain the rust on aluminium lol.
Yeah, that's going to be interesting. I'll update the thread when the time comes.
I think that's a combination of my phone adding a tinge and dried rustproofing. That would explain the rust on aluminium lol.
Yeah, that's going to be interesting. I'll update the thread when the time comes.
Last edited by Loki; May 29, 2012 at 05:53 PM.

Registered
Joined: Jan 2010
Posts: 95
Likes: 0
Hi, very nice write up and solution. And don't worry, you will have enough space for the oilfilterchange. 
BUT: I can see nowhere the hole on the cap of your tank. You must drill just a little (1 mm) hole on it.
BUT: I can see nowhere the hole on the cap of your tank. You must drill just a little (1 mm) hole on it.
Last edited by corres78; May 30, 2012 at 02:52 PM.
Registered
Joined: Apr 2009
Posts: 366
Likes: 4
From: Simi Valley-SoCal
I wrote a DIY in the german Forum. It may not help much, but maybe the pics could make it a little bit easier.
http://rx8forum.de/index.php?page=Thread&threadID=29677
http://rx8forum.de/index.php?page=Thread&threadID=29677
Will definitely use all info to do mine this summer.

Hmm that sounds like limp mode. Do you think all the OMP electrical connections are snug? Is the Check Engine light on?
I got it fixed lol I used the adjuster and removed the sensor...that made it go into limp mode found out through lots of searching how to fix it now runs fine thanks but thanks for trying to help out
Just keeping the oil clean. The cap is not dust-proof, plus who knows what metal or sealant flakes might detach from inside the can with time. Not super worried about the flow rate, the OMP doesn't draw that much. One 5 hour highway trip is what, 100mL? Even at the track it's let's say about half a liter per hour runtime?

Registered
Joined: Dec 2013
Posts: 75
Likes: 0
From: Ontario
I know this is an old thread, but I just wanna say thanks for posting this DIY. Just installed my Sohn adapter yesterday and this really helped. I was lucky enough not to have to do much in the way of wiggling to get all the shaft pieces to fit together, it all slid together no problem. I also left the electrical connections hooked up throughout the install.

RX8Club.com Sponsor
Joined: Dec 2013
Posts: 171
Likes: 28
From: Tulsa OK
Congrats on the sohn adapter install Buckshot. What are you using for your oil reservoir solution?
As you are likely aware, Epitroch sells a kit to accompany the sohn adapter.
Mazda RX 8 Oil Metering Pump Sohn Adapter Installation Support Kit | eBay
-Dan
As you are likely aware, Epitroch sells a kit to accompany the sohn adapter.
Mazda RX 8 Oil Metering Pump Sohn Adapter Installation Support Kit | eBay
-Dan
Registered
Joined: Dec 2013
Posts: 75
Likes: 0
From: Ontario
I used the the coolant overflow reservoir off my dirt bike (2001 Yamaha WR250F). I didn't take it off the bike just for this purpose, it's been off for a couple years since I installed an aluminum YZ sub-frame on it. It holds about 1 litre of fluid, and already had molded in hose barbs top and bottom. I left the top barb open for venting.
It's long, narrow, and meant to me mounted on an angle, so it fit perfectly stuffed in between the washer fluid bottle and strut tower. I'll try to get a picture or two up shortly.
It's long, narrow, and meant to me mounted on an angle, so it fit perfectly stuffed in between the washer fluid bottle and strut tower. I'll try to get a picture or two up shortly.
Registered
Joined: Dec 2013
Posts: 75
Likes: 0
From: Ontario
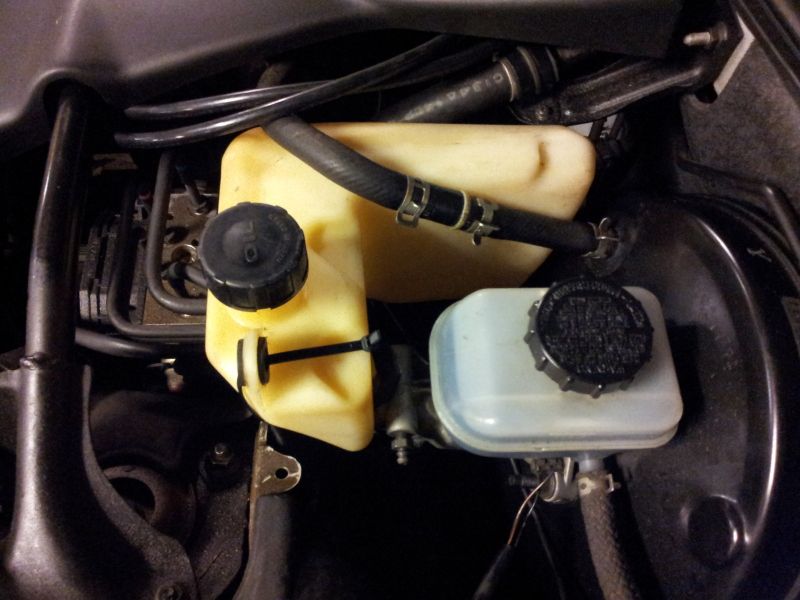
This is the tank.
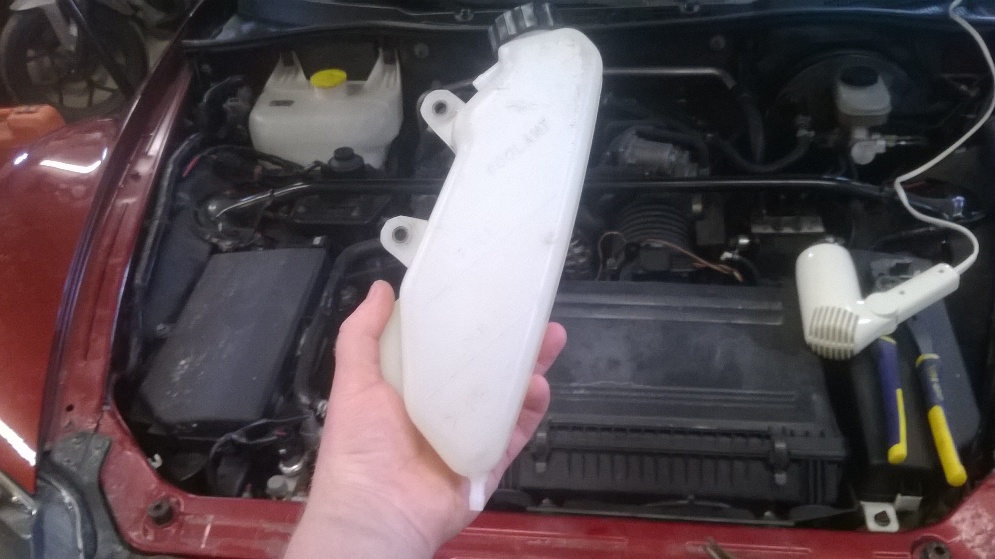
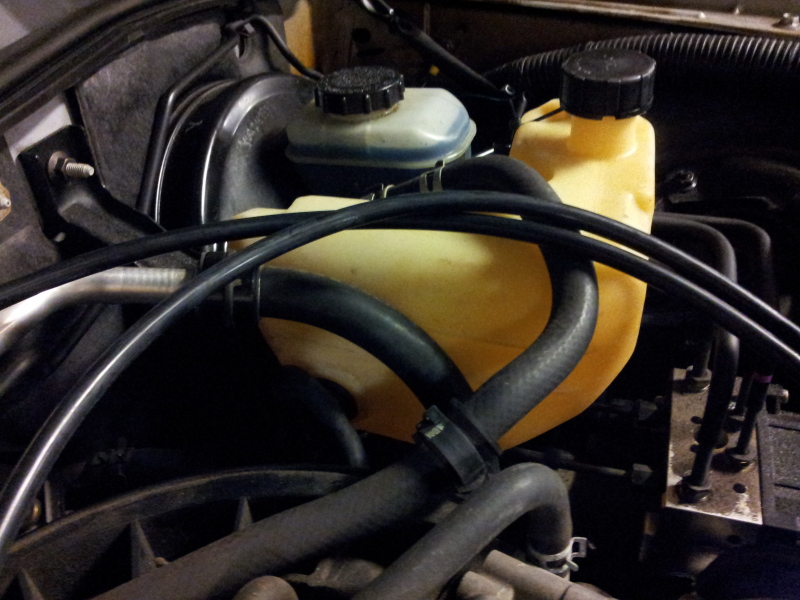
And this is where it went.

Granted, it's not as clean looking as your tank kit, and it does have the word coolant stamped all over it, but it was something I already had lying around. And my engine cover still fits, so it works for me.

And this is where it went.

Granted, it's not as clean looking as your tank kit, and it does have the word coolant stamped all over it, but it was something I already had lying around. And my engine cover still fits, so it works for me.


Registered
Joined: Jun 2013
Posts: 18
Likes: 0
From: Ogden Utah
I installed my Sohn Adapter today But I really can not tell if it is working! I have been looking at the oil lines on the OMP and see nothing in them, and my oil light has also turned on. any tips?