
DIY: Remove/Replace Rear Combination Light(Tail Light)


DIY: Remove/Replace Rear Combination Light(Tail Light)
Update : April 18, 2008
Im adding Q&A to all my DIY. Including this one.
1. What is this DIY all about ?
- This DIY is to show you how to take your rear combination light(s) out.
2. Why would I want to take it out?
- Well, this is one of the RX-8's *known* problem. Depends on how dusty your area is, dirt will build around the gasket area, eventually, the dirt will block the water flow completely, then your Rear combination light will collect all the water and turn itself into a fish tank. the only way to prevent this from happening is to *take it out, and clean it once in a while*. This is not really a RX-8 only problem, I've seen A LOT of cars out there with the same problem. meh. We're not alone!
3. What kind of tools do I need?
- 10 mm socket or wrench.
- working arms and hands.
- Some time, maybe an hour or so. should be less.
- Glove is NOT required, but if you are afraid of getting hurt in the process. You can always get a pair of those *working* gloves that has red paint on one side. For like what couple a buck or 2 a pair.
4. Do I need to watch out for anything ?
- Well, there is a chance that you might break some plastic in the process. You might cut yourself too, so just becareful.
Photos are based on the right side tail light, its the same as the left side, just follow the order.
This is what it looks like

then u'll need to take these plastic fasteners out, I circle them in red
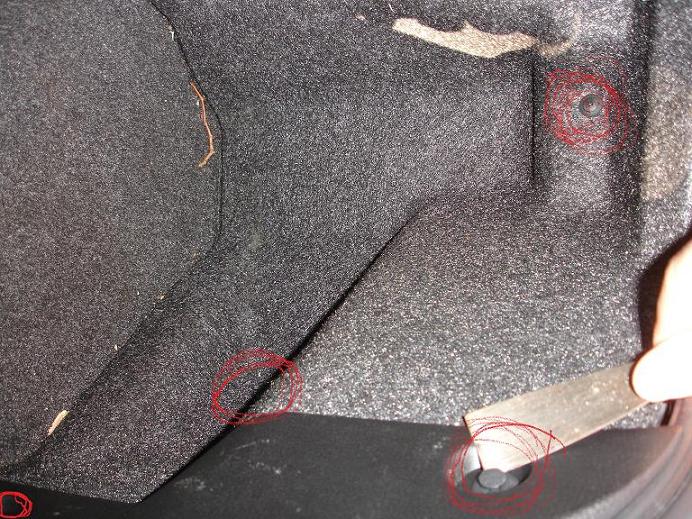
You'll need to take the center piece out before you have access to the light, so just do the same thing to the other side, take the top and bottom of the fasteners out.

then, pull this piece straight UP
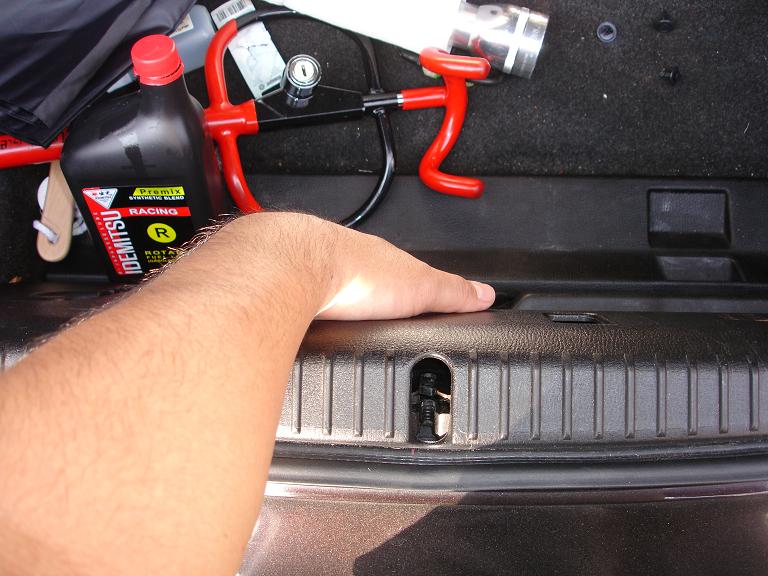
This is what it looks like
Im adding Q&A to all my DIY. Including this one.
1. What is this DIY all about ?
- This DIY is to show you how to take your rear combination light(s) out.
2. Why would I want to take it out?
- Well, this is one of the RX-8's *known* problem. Depends on how dusty your area is, dirt will build around the gasket area, eventually, the dirt will block the water flow completely, then your Rear combination light will collect all the water and turn itself into a fish tank. the only way to prevent this from happening is to *take it out, and clean it once in a while*. This is not really a RX-8 only problem, I've seen A LOT of cars out there with the same problem. meh. We're not alone!
3. What kind of tools do I need?
- 10 mm socket or wrench.
- working arms and hands.
- Some time, maybe an hour or so. should be less.
- Glove is NOT required, but if you are afraid of getting hurt in the process. You can always get a pair of those *working* gloves that has red paint on one side. For like what couple a buck or 2 a pair.
4. Do I need to watch out for anything ?
- Well, there is a chance that you might break some plastic in the process. You might cut yourself too, so just becareful.
Photos are based on the right side tail light, its the same as the left side, just follow the order.
This is what it looks like
then u'll need to take these plastic fasteners out, I circle them in red
You'll need to take the center piece out before you have access to the light, so just do the same thing to the other side, take the top and bottom of the fasteners out.
then, pull this piece straight UP
This is what it looks like
Last edited by nycgps; May 28, 2008 at 01:10 PM.
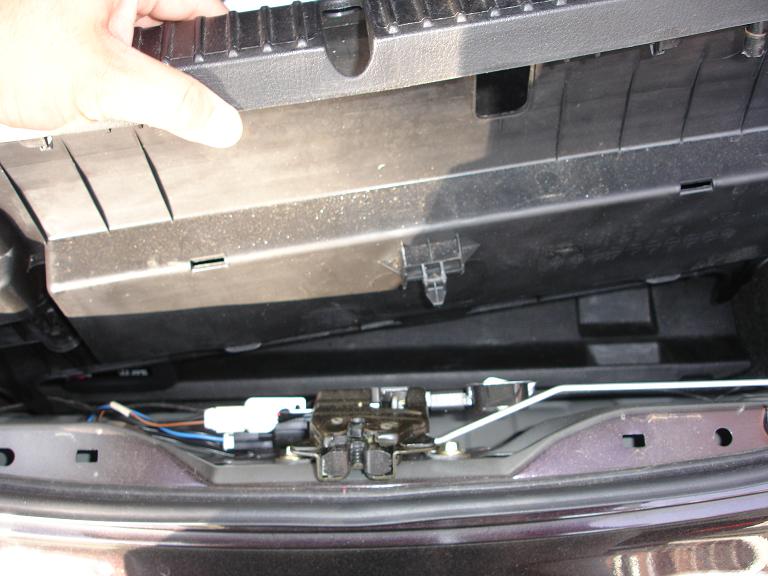
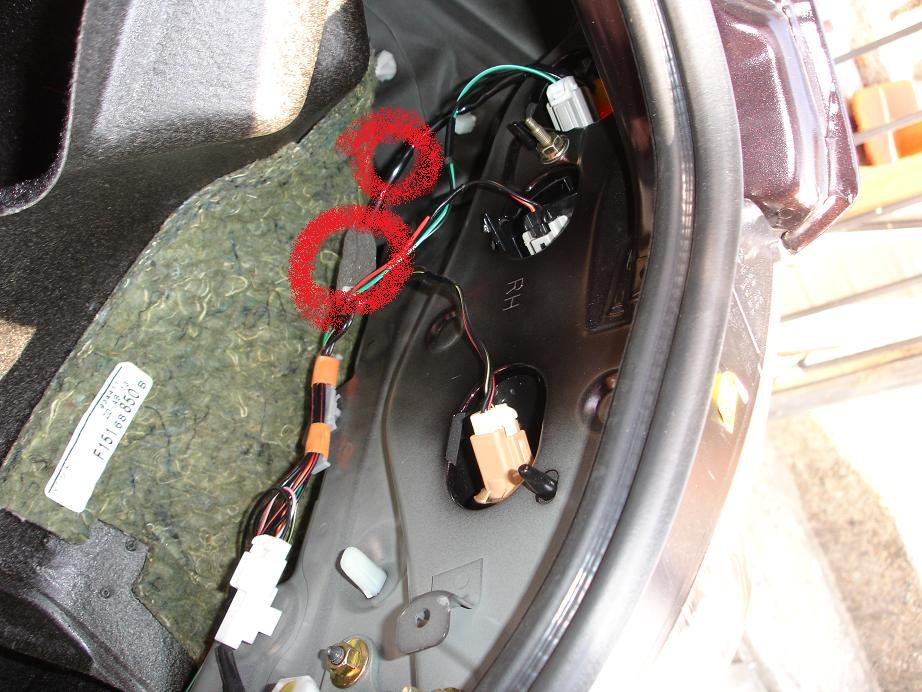
Now, this is the fun part, unplug the 4 plugs (circle in red), you dont really have to mark them cuz I think it only goes in one way, they have diff colors on them, so just remember which one goes to which. Then take 2 bolts (in Blue Circle) out, I think its 8mm or 10mm in size Im not 100% sure. After the above, remember there is a little plastic tab(hook, orange circle) right UNDER the middle light, when you try to pull the light out, remember to push this tab a bit, then the whole tail light should slid right out
Notice : The one that has been covered by foam, look closely to the connector u will see a little tab, just squeeze it hard and it will come out.

The bulbs still attached to it ? just turn it and it will come out.
After that you will see a piece of grey looking gasket. if you're out of warranty and want to save a few bucks, you can clean the gasket with soap and water, to dry it, you can blow dry it, but do NOT heat it, its going to melt, and it will not be funny.
or replace it with revised gasket from Mazda, but it will NOT FIX THIS PROBLEM !
After everything dries up, just put them back in reverse order.
Update:
- If you want it to dry FAST, you can either put it on a stack of old newspaper, news paper love moisture!
- Or you can put it on Air purifier like I did.
- Try to do this on a Sunny and Low Humility Day. It helps to dry it a lot faster.
- If you see Water spot in the lights, you can pour some *white* vinegar into the light, move it around. then just dry it with the method above.
- Remember, do NOT force anything. If its stuck somewhere, you probably forgot to take something out. Just be easy, and say good bye to condensation ! (for a while ...)
Notice : The one that has been covered by foam, look closely to the connector u will see a little tab, just squeeze it hard and it will come out.
The bulbs still attached to it ? just turn it and it will come out.
After that you will see a piece of grey looking gasket. if you're out of warranty and want to save a few bucks, you can clean the gasket with soap and water, to dry it, you can blow dry it, but do NOT heat it, its going to melt, and it will not be funny.
or replace it with revised gasket from Mazda, but it will NOT FIX THIS PROBLEM !
After everything dries up, just put them back in reverse order.
Update:
- If you want it to dry FAST, you can either put it on a stack of old newspaper, news paper love moisture!
- Or you can put it on Air purifier like I did.
- Try to do this on a Sunny and Low Humility Day. It helps to dry it a lot faster.
- If you see Water spot in the lights, you can pour some *white* vinegar into the light, move it around. then just dry it with the method above.
- Remember, do NOT force anything. If its stuck somewhere, you probably forgot to take something out. Just be easy, and say good bye to condensation ! (for a while ...)
Last edited by nycgps; Apr 16, 2008 at 11:28 PM.

Taylor not Tyler
Joined: Jul 2006
Posts: 188
Likes: 0
From: Bristol, Connecticut
Too add to this DIY I have some information of my own.
Like many 8 owners I've also run into the condensation issue on multiple occasions.
This time I got tired of going to Mazda to get it fixed. The closest Mazda service center is not very close to me at all and I work a lot, so it's not convenient for me.
I decided to follow nycgps's DIY. I got up to the point where I had the taillight completely out of the car. I looked over it, shook it, tilted it, and I noticed theres no easy way to get the water out of it.
So I kept tilting it on different angle to see how the water moves inside it and where it goes.
I was able to completely dry out my tailight by myself without having to go to Mazda again.
1: Follow nycgps's DIY.
2: While you have the taillight out of the car, remove all 3 bulbs, and place them in a safe spot. Like all bulbs they should be handled with care. Be sure to not get any grease prints on the glass. While they are not like headlights that run all the time, grease can still cause the bulbs to shatter.
3: Get a shop vac or borrow one from a friend.
4: Attach the smallest end connector to the end of the hose on the shop vac so that the suction from the vacuum is extremely concentrated.
5: Turn on the vac, and stick the hose into or over the hole for each bulb. The suction from the vac may not pull water out of the light directly, but it will get air circulating in there like crazy.
6: I let mine run on each bulb hole (or outlet) for 10 minutes a piece.
It helps to tilt the tailight while you have the hose sucking air out of it, it moves the water around and helps spread it out. See what technique works best for you.
I just did it myself this morning and it worked really well. We will see how long it lasts, but I appear to have gotten all the water and condensation out of the light.
If you have any doubt at all in your mind about trying this, then don't do it. It worked for me, and it may work for you, but I don't know right off the bat if this can cause any major issues or malfunctions.
Thanks,
Like many 8 owners I've also run into the condensation issue on multiple occasions.
This time I got tired of going to Mazda to get it fixed. The closest Mazda service center is not very close to me at all and I work a lot, so it's not convenient for me.
I decided to follow nycgps's DIY. I got up to the point where I had the taillight completely out of the car. I looked over it, shook it, tilted it, and I noticed theres no easy way to get the water out of it.
So I kept tilting it on different angle to see how the water moves inside it and where it goes.
I was able to completely dry out my tailight by myself without having to go to Mazda again.
1: Follow nycgps's DIY.
2: While you have the taillight out of the car, remove all 3 bulbs, and place them in a safe spot. Like all bulbs they should be handled with care. Be sure to not get any grease prints on the glass. While they are not like headlights that run all the time, grease can still cause the bulbs to shatter.
3: Get a shop vac
or borrow one from a friend. 4: Attach the smallest end connector to the end of the hose on the shop vac so that the suction from the vacuum is extremely concentrated.
5: Turn on the vac, and stick the hose into or over the hole for each bulb. The suction from the vac may not pull water out of the light directly, but it will get air circulating in there like crazy.
6: I let mine run on each bulb hole (or outlet) for 10 minutes a piece.
It helps to tilt the tailight while you have the hose sucking air out of it, it moves the water around and helps spread it out. See what technique works best for you.
I just did it myself this morning and it worked really well. We will see how long it lasts, but I appear to have gotten all the water and condensation out of the light.
If you have any doubt at all in your mind about trying this, then don't do it. It worked for me, and it may work for you, but I don't know right off the bat if this can cause any major issues or malfunctions.
Thanks,
I sent ya a PM, but I guess I will add some follow up here
How I dried my tail light ? I left it on top of my air purifier, turn it up high for 2-3 hours. completely dry.
I thought about the vacuum idea before, but I hate vacuum cleaner sound (loud as hell), so I just did the air purifier trick, it dried my light, and made my room's air cleaner
How I dried my tail light ? I left it on top of my air purifier, turn it up high for 2-3 hours. completely dry.
I thought about the vacuum idea before, but I hate vacuum cleaner sound (loud as hell), so I just did the air purifier trick, it dried my light, and made my room's air cleaner
BSG 75
Joined: Jul 2003
Posts: 869
Likes: 0
From: Virginia
I tried this, but there was one wire I never could figure out how to get loose from the tail light. It didn't appear to have any connector.
In nycgps's picture of the wiring, it's the wire closest to the connector you have circled in red at the top of the picture.
Can someone help? Thanks.
In nycgps's picture of the wiring, it's the wire closest to the connector you have circled in red at the top of the picture.
Can someone help? Thanks.
Originally Posted by loco4rx8
I tried this, but there was one wire I never could figure out how to get loose from the tail light. It didn't appear to have any connector.
In nycgps's picture of the wiring, it's the wire closest to the connector you have circled in red at the top of the picture.
Can someone help? Thanks.
In nycgps's picture of the wiring, it's the wire closest to the connector you have circled in red at the top of the picture.
Can someone help? Thanks.
You can take it out by squeezing the connector, its covered in foam.
Last edited by nycgps; Apr 28, 2007 at 11:13 PM.
Taylor not Tyler
Joined: Jul 2006
Posts: 188
Likes: 0
From: Bristol, Connecticut
Originally Posted by loco4rx8
I tried this, but there was one wire I never could figure out how to get loose from the tail light. It didn't appear to have any connector.
In nycgps's picture of the wiring, it's the wire closest to the connector you have circled in red at the top of the picture.
Can someone help? Thanks.
In nycgps's picture of the wiring, it's the wire closest to the connector you have circled in red at the top of the picture.
Can someone help? Thanks.
Read what nycgps said. The last connector is covered in foam. It looks like from his pic that you can see the white clip coming out from under the foam in his car. I'm willing to bed that the foam piece is completely covering the white clip on yours, so it wouldn't make it apparent that there's a clip under there at all.
Carefully slide the foam off to the side, and unclip it like all the other 3 clips. Then bam, you're done you can slide that puppy out.

My 8 is Sexy!
Joined: Dec 2006
Posts: 865
Likes: 0
it takes me some times to take out the tail light at first time without any DIY guide, but after that i only need like 5 mins to take out the light the next time. easy job. good guide.
Last edited by CoMBo8; Apr 29, 2007 at 09:28 AM.

Registered User
Joined: Jul 2006
Posts: 336
Likes: 0
From: Elverson, PA
This was a great DIY. My car is 2,000 miles out of warranty and the nearest dealer is 20 miles from my house, so it was ridiculously easy following the instructions to do it myself. Thanks guys!

Man, We Ain't Found Sh*t!
Joined: Oct 2007
Posts: 318
Likes: 2
From: Earth
just got finished.. was gonna take before and after pics but the dealership took it upon themselves to drill a small hole in my drivers side tail light to let the water out.. bastards stole my thunder! but regardless, thanks for the DIY..


Registered User
Joined: Nov 2007
Posts: 116
Likes: 0
I need to do this myself. I have a few questions though. I have never done this sort of thing, but would my gaskets on my 04 still be ok if I washed them? Also To get the condensation out of the light do you need to drain it, or I see people using blow dryers, but where do you aim the air to get it in there?

RX-8s Official Cool Guy
Joined: Mar 2004
Posts: 2,150
Likes: 1
From: Vancouver BC
YOU ARE A GENIUS NY!!! My warranty is over and I used to shutter at seeing my fish bowl. I did this DIY this morning and I am going to put back the lights. I ripped my knuckles while doing the DIY but thats because my hands are fat and I was getting impatient  But know that I know it is going to so easy to take it apart. I didn't have a Air Purifer so I just kept using my shop vac and after about 15 minutes were tail light the water was all gone.
But know that I know it is going to so easy to take it apart. I didn't have a Air Purifer so I just kept using my shop vac and after about 15 minutes were tail light the water was all gone.
I need to do this myself. I have a few questions though. I have never done this sort of thing, but would my gaskets on my 04 still be ok if I washed them? Also To get the condensation out of the light do you need to drain it, or I see people using blow dryers, but where do you aim the air to get it in there?
I have the new and so called *will fix the issue* gasket and it still fog up
You can use Blow dryers, but I found that it *often* takes too long to dry it completely. so I just left it on my air purifier then I go have lunch or whatever, when I come back it should be dry.
If you want to get rid of those water spot. when dried, give it some windex and shake it around, and dry it again.
RX-8s Official Cool Guy
Joined: Mar 2004
Posts: 2,150
Likes: 1
From: Vancouver BC
Your gasket will be fine. put some glue around the gasket after u're done.
I have the new and so called *will fix the issue* gasket and it still fog up
You can use Blow dryers, but I found that it *often* takes too long to dry it completely. so I just left it on my air purifier then I go have lunch or whatever, when I come back it should be dry.
If you want to get rid of those water spot. when dried, give it some windex and shake it around, and dry it again.
Just asking because I am about to put my tail lights back on.
Registered User
Joined: Nov 2007
Posts: 116
Likes: 0
Registered User
Joined: Nov 2007
Posts: 116
Likes: 0
Can anyone tell me what they use to put the gasket back on? Do I glue it or use some other adhesive. What did you guys who have done this already use? I just want to pick up the right stuff today so I can try this tonight.
Registered User
Joined: Nov 2007
Posts: 116
Likes: 0
Actually, will a 2008 taillight work on an 08? I figured it would but wanted to ask before I purchased, I was thinking about just getting some new ones off of ebay, and just installing them. Should they come with the gaskett to install?

Boost Junkie
Joined: Nov 2003
Posts: 683
Likes: 0
From: Orange County, CA
I just did mine with the new gasket... you don't need any sealant. The new one is so thick, nothing will get through. It comes with some double sided tape already attached. It takes like 30 seconds to attach.

5Picker
Joined: Nov 2004
Posts: 158
Likes: 0
From: Tennessee
I noticed that the light sockets do not have gaskets on them like some other cars I have had. Does anyone else have gaskets on theirs?
RX-8s Official Cool Guy
Joined: Mar 2004
Posts: 2,150
Likes: 1
From: Vancouver BC