DIY: No Heat? Repair the Heater Control


 07-17-2018, 04:29 PM
#602
Registered

So I finally got around to pulling my head unit out to do the resoldering. My AC will randomly bounce between 0 and 1 when it's on the coldest setting. I've occasionally seen it hit 2. Thinking this was my problem, I took the circuit board out but the pot solder points look fine. I get a linear reading on the pot with a multimeter for each setting on the pot. I reflowed the solder anyway and checked the rest of the board for any visible damage and found none. I checked the board behind the main face plate too and found nothing. When the weather gets cold, the top LCD display will flicker when there's excess vibration, so I'm guessing there might be a loose connector but I've pulled and reseated everything.
Does anyone have any ideas? I'm tempted to just buy the metra kit and put in an aftermarket unit. I just want to make sure it's the head unit that's failing before I spend that much money, and not something else in the system. If it was something other than the head unit, the diagnostic should still read 0 at coldest setting but I would feel warm air right?
Does anyone have any ideas? I'm tempted to just buy the metra kit and put in an aftermarket unit. I just want to make sure it's the head unit that's failing before I spend that much money, and not something else in the system. If it was something other than the head unit, the diagnostic should still read 0 at coldest setting but I would feel warm air right?
07-17-2018, 05:23 PM
#603
I had similar issues as you when I first got my rx8. The upper LCD would drop out, the heat and AC would act odd, but the radio would work fine. As it turns out, the bolts that hold the "face" of the radio, on one side, had broken out of the plastic and brass connectors on the "face" side of the radio. A bit of epoxy solved those issues.
The following users liked this post:
sappari (07-17-2018)
07-17-2018, 07:27 PM
#604
Registered
I had similar issues as you when I first got my rx8. The upper LCD would drop out, the heat and AC would act odd, but the radio would work fine. As it turns out, the bolts that hold the "face" of the radio, on one side, had broken out of the plastic and brass connectors on the "face" side of the radio. A bit of epoxy solved those issues.
Update Edit: Found my problem. It was the face plate after all. The last time I took out my head unit, I did not tighten down the 10mm bold holding the unit in so vibrations started causing it to fall farther into the dash. This caused just enough separation from the face to the main unit so that the connection was intermittent. Not sure if reflowing the solder helped too but problem is now fixed.
Last edited by sappari; 07-24-2018 at 12:29 AM. Reason: Update
 11-01-2018, 07:05 AM
#606
Registered

are there any solder joints on the board that might result in the A/C not working? Not only do i have the intermittent heat issue, my A/C also stopped working (compressor won't engage)
12-12-2018, 08:51 AM
#607

A big thank you to Wingnut. I''ve had this very issue with my 04 for at least 10 years. No heat sometimes no cooling sometimes but up until this week I could always get the temperature control to function just by turning it back and forth a few times. This week nothing helped get the heat going. My neighbor did the removal and re-installation and I did the soldering repair yesterday as described by Wingnut and now she works perfectly. Thank you.
 08-16-2019, 04:25 AM
#609
New Member

Join Date: Jan 2019
Posts: 2
Likes: 0
Received 0 Likes
on
0 Posts
08-16-2019, 11:09 AM
#610
You gonna eat that?
iTrader: (1)
 10-11-2019, 10:57 AM
#611

So i'm missing that big metal line that bridges the gap between the right side of the engine and the heater core, and i don't wanna run a hose if i don't have to. I don't need heat anyways, its just a summer car. Could I just connect the inlet and outlet that run to the heater core, to each other? just leaving the heater core out of the equation all together?
04-07-2021, 07:32 PM
#612
Registered

Great diagnosis and fix
Thanks Wingnut!
Old thread but great, easy diagnosis and fix!
I started out looking for a thread to show how to replace the HVAC damper motor but glad I found this cuz this fixed my problem.
I had a bit of difficulty finding the lone bolt holding the radio in from under the dash... because IT WASN�T THERE!!!
Apparently, whoever took it out before me felt it was such a pain to get to that they did �t bother to put it back.
Or it is lost forever behind the carpeting...
No heat and only cooling, or only heat and no cooling, or erratic temperature control?
The temperature control **** seems to have quite a bit of issues for early RX8 owners where the system will cool only, and not provide heat despite the position of the control ****. This can also work in the opposite way, only heating and no cooling. After living with it for a season, I finally pulled the heater control unit out and repaired the circuit board. It was simple to repair and because I was going to have to pull the unit out anyway to replace it, it was not much extra work. The replacement unit (part FE01-61-190) retails for $350, some vendors on this site sell it for $240ish, and I hear there are some that sell used parts for $125ish. It is definitely covered under warranty for those lucky enough to be under warranty.
If you do not have heat, or only have heat, IMHO it is most likey the AC/heater control unit. This is the part which has the AC/heat control buttons and *****.
Easy Diagnosis:
The easiest way to verify this is to turn on the radio, press and hold the power on/off button and press and hold the scan-up button for a second (full second). The word "A/C TEMP" should appear on the left of the display and a number from 0 to 16 on the right. I suspect yours will have the number 0 (or 16 if heating only problem) displayed no matter where you turn the temperature control ****. If this is the case you could turn the temp. **** to full heat and see if it goes to 16 after pushing down or to the right on the ****.
In a working system, the number moves evenly in increments of 1, from 0 to 16 as you turn the temperature ****.
Easy Fix:
I was able to take mine out and solder 3 loose connections to fix it.
The beginning steps are the same as for any radio removal procedure. Instead of reinventing the wheel I would like to direct anyone to John Masone�s excellent DIY for radio removal at this DIY:
https://www.rx8club.com/series-i-do-yourself-forum-73/diy-radio-removal-add-aux-input-36001/
or directly linked here:
http://www.whatsmyip.org/ipodrx8/
The procedure is basically the same until page 7, second frame. Here is the modified step at that phase:
Removal of Heater Control Unit
I did not take pictures of the next step which is basically removing the cover on the temperature **** side of the control which requires a small screwdriver to three plastic clips on the perimeter of the cover. This will be evident when you get it in front of you. I stripped the circuit board down further than you may need to because I was also repairing cracked defrost (windshield and rear) buttons with superglue.
Then re-solder the 3 joints indicated in the next photos. A little bit of heat and just a little extra solder and they should be good to go.
I did the power-button/up scan combination to get the head unit to display the dial position and it now travels even increments from 0 to 16, instead of jumping from 0 to 16 when pushed like before. And the temperature control works perfectly.
Good luck.
The following users liked this post:
StealthTL (04-07-2021)
08-18-2021, 01:32 PM
#613

No heat and only cooling, or only heat and no cooling, or erratic temperature control?
The temperature control **** seems to have quite a bit of issues for early RX8 owners where the system will cool only, and not provide heat despite the position of the control ****. This can also work in the opposite way, only heating and no cooling. After living with it for a season, I finally pulled the heater control unit out and repaired the circuit board. It was simple to repair and because I was going to have to pull the unit out anyway to replace it, it was not much extra work. The replacement unit (part FE01-61-190) retails for $350, some vendors on this site sell it for $240ish, and I hear there are some that sell used parts for $125ish. It is definitely covered under warranty for those lucky enough to be under warranty.
If you do not have heat, or only have heat, IMHO it is most likey the AC/heater control unit. This is the part which has the AC/heat control buttons and *****.
Easy Diagnosis:
The easiest way to verify this is to turn on the radio, press and hold the power on/off button and press and hold the scan-up button for a second (full second). The word "A/C TEMP" should appear on the left of the display and a number from 0 to 16 on the right. I suspect yours will have the number 0 (or 16 if heating only problem) displayed no matter where you turn the temperature control ****. If this is the case you could turn the temp. **** to full heat and see if it goes to 16 after pushing down or to the right on the ****.
In a working system, the number moves evenly in increments of 1, from 0 to 16 as you turn the temperature ****.
Easy Fix:
I was able to take mine out and solder 3 loose connections to fix it.
The beginning steps are the same as for any radio removal procedure. Instead of reinventing the wheel I would like to direct anyone to John Masone�s excellent DIY for radio removal at this DIY:
https://www.rx8club.com/showthread.php?t=36001
or directly linked here:
http://www.whatsmyip.org/ipodrx8/
The procedure is basically the same until page 7, second frame. Here is the modified step at that phase:

Removal of Heater Control Unit
I did not take pictures of the next step which is basically removing the cover on the temperature **** side of the control which requires a small screwdriver to three plastic clips on the perimeter of the cover. This will be evident when you get it in front of you. I stripped the circuit board down further than you may need to because I was also repairing cracked defrost (windshield and rear) buttons with superglue.
Then re-solder the 3 joints indicated in the next photos. A little bit of heat and just a little extra solder and they should be good to go.

Front of Heater Control Circuit Board

Front of Temperature Control **** (3 connections noted)
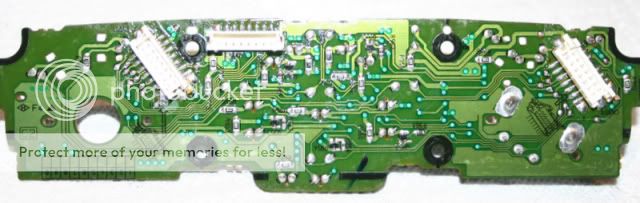
Back of Heater Control Circuit Board

Back of Heater Control ****

3 Bad Solder Joints (Note cracks) Prior to Re-soldering
I did the power-button/up scan combination to get the head unit to display the dial position and it now travels even increments from 0 to 16, instead of jumping from 0 to 16 when pushed like before. And the temperature control works perfectly.
Good luck.
The temperature control **** seems to have quite a bit of issues for early RX8 owners where the system will cool only, and not provide heat despite the position of the control ****. This can also work in the opposite way, only heating and no cooling. After living with it for a season, I finally pulled the heater control unit out and repaired the circuit board. It was simple to repair and because I was going to have to pull the unit out anyway to replace it, it was not much extra work. The replacement unit (part FE01-61-190) retails for $350, some vendors on this site sell it for $240ish, and I hear there are some that sell used parts for $125ish. It is definitely covered under warranty for those lucky enough to be under warranty.
If you do not have heat, or only have heat, IMHO it is most likey the AC/heater control unit. This is the part which has the AC/heat control buttons and *****.
Easy Diagnosis:
The easiest way to verify this is to turn on the radio, press and hold the power on/off button and press and hold the scan-up button for a second (full second). The word "A/C TEMP" should appear on the left of the display and a number from 0 to 16 on the right. I suspect yours will have the number 0 (or 16 if heating only problem) displayed no matter where you turn the temperature control ****. If this is the case you could turn the temp. **** to full heat and see if it goes to 16 after pushing down or to the right on the ****.
In a working system, the number moves evenly in increments of 1, from 0 to 16 as you turn the temperature ****.
Easy Fix:
I was able to take mine out and solder 3 loose connections to fix it.
The beginning steps are the same as for any radio removal procedure. Instead of reinventing the wheel I would like to direct anyone to John Masone�s excellent DIY for radio removal at this DIY:
https://www.rx8club.com/showthread.php?t=36001
or directly linked here:
http://www.whatsmyip.org/ipodrx8/
The procedure is basically the same until page 7, second frame. Here is the modified step at that phase:
Removal of Heater Control Unit
I did not take pictures of the next step which is basically removing the cover on the temperature **** side of the control which requires a small screwdriver to three plastic clips on the perimeter of the cover. This will be evident when you get it in front of you. I stripped the circuit board down further than you may need to because I was also repairing cracked defrost (windshield and rear) buttons with superglue.
Then re-solder the 3 joints indicated in the next photos. A little bit of heat and just a little extra solder and they should be good to go.
Front of Heater Control Circuit Board
Front of Temperature Control **** (3 connections noted)
Back of Heater Control Circuit Board
Back of Heater Control ****
3 Bad Solder Joints (Note cracks) Prior to Re-soldering
I did the power-button/up scan combination to get the head unit to display the dial position and it now travels even increments from 0 to 16, instead of jumping from 0 to 16 when pushed like before. And the temperature control works perfectly.
Good luck.
08-21-2021, 01:57 PM
#614
Registered
SM,
It’s been a few months now since I made my repair but if I remember correctly the two bigger solder joints are mechanical joints that only old the dial to the board.
The smaller 3 joints are the electrical connections where the failures occur.
If you are a novice solderer, I suggest watching a few YouTube videos on thru-hole solder joint repair.
A small diameter solder wire will work best.
You will need a helper or a vice to hold the board while you heat the pins.
Make sure you get good barrel fill and no bridging (top nor bottom side) between the three pins.
Best of luck!
02-15-2023, 12:06 PM
#615

For the easy diagnosis part, is there an alternative for those of us who've replaced the stock Bose radio with an aftermarket head unit + Metra kit? Would FORScan have that diagnosis?
Thanks!
Thanks!
02-15-2023, 01:52 PM
#616
Ha almost forgot about this! I did exactly that awhile back, soldered those three pins, watched some you tube vids, somehow came out great. Of course I broke the plastic pieces holding the unit to the front panel on reinstallation but managed to re glue and rescrew that. Came out perfect and still working 6 months later! Thanks Boss

 09-18-2023, 01:14 PM
#619
New Member

Join Date: Sep 2023
Posts: 1
Likes: 0
Received 0 Likes
on
0 Posts
Just did this over the weekend, my son and I worked during the rainstorm on the center removal. The radio and HVAC wires do have a small push in style clips on the BOTTOM on each connection. This was easy to do with an inspection mirror and small flat blade screw driver, once the center wiring is disconnected, removal is smooth sailing. Thanks again Wingnut

Thread
Thread Starter
Forum
Replies
Last Post