When you click on links to various merchants on this site and make a purchase, this can result in this site earning a commission. Affiliate programs and affiliations include, but are not limited to, the eBay Partner Network.
Mod Edit: Warning:
This DIY goes contrary to the proven instructions in the factory service manual. This IS a method of adjustment, but it is not a proper adjustment and could easily lead to premature clutch failure. Do this at your own risk!
See post #10 in this thread
I couldn't find this tutorial anywhere, hope this C/P helps someone
DIY Mazda Rx8 Clutch Pedal Adjustment
The Mazda Rx8 Clutch like all clutches are a wear and tear parts that are designed to be replaced periodically to keep the car functioning correctly. My Mazda Rx8 Clutch lasted about 55,000 miles but depending on driving style and the amount of town driving versus highway driving will vary how long you clutch lasts. As the Mazda Rx8 Clutch gets older it will start to wear down and become smaller this will mean that the bite point on the clutch will become higher. This Mazda Rx8 Clutch Pedal adjustment DIY will show you how you can quickly adjust your pedal in under 30 minutes including a test drive or two, to make sure your bite point is in the correct position.
Prepare for the Mazda Rx8 Clutch Adjustment
Before you start adjusting the clutch pedal you need to make sure that you have the right tools.
All you need for this is:
1. 4 inch adjustable wrench
2. flashlight
First image below shows Mazda Rx8 Clutch adjustment screw
The adjustment is done from the driver foot well so make sure you have enough room beside your Mazda Rx8 to have the door fully open.
The easiest way to get access is to move the seat all the way back and then just lay in the foot well as best you can it is not comfortable or graceful but it only takes a couple of minutes so you wont be there long.
Mazda Rx8 Clutch adjustment
Once you manage to get comfortable shine your flashlight and look at the top of the clutch pedal you should be able to see the adjustment screw that you can see in the photo on the left.
Loosen the locking nut using you adjustable spanner it might be a little stiff but should slacken off easily enough.
Them turn the adjustment screw, clockwise will raise the bite point of the clutch (if your adjusting for a new clutch) and anti-clockwise will lower the bite point of you clutch (if you are adjusting for a worn clutch).
Look at the thread indicated in thesecond image below, this will give you a good point of reference when adjusting the Mazda rx8 clutch. You only need to make small adjustments I recommend one full turn, then tighten the locking nut and take the car for a drive.
When you are driving make sure the bite point is between 1/4 to a 1/3 of the way to the floor. It may feel a little strange at first but you will get used to it.
After your drive readjust if necessary then drive again and repeat until you have the ideal clutch position. Once completed make sure the locking nut is fully tightened and you are good to go.
This is perfect! I will try this out in a couple minutes. Just installed a new clutch pedal as my old one fully broke off. Have to say very easy DIY.
I'll report back once I've adjusted the friction point.
Well that took no time at all. I used a 12mm wrench for the locking nut and twisted the adjustment one accordingly with my hand until I felt some resistance (in this case I was raising my point/ clockwise).
Test drove...and the point was too high, so I did counter-clockwise a couple turns, tightened it all back up and it's magically delicious!
Thanks again for this simple yet effective DIY!
Title should be revised with the addition of the word "Pedal" to not confuse with the actual clutch disc and plate. And you actually need two wrenches, a 10 mm and a 12 mm.
Title should be revised with the addition of the word "Pedal" to not confuse with the actual clutch disc and plate. And you actually need two wrenches, a 10 mm and a 12 mm.
Great DYI. After I adjusted it the pedal travel itself became too long before I could feel the clutch being engaged. There is another screw that adjust the pedal travel so it shortens the travel. But in the process to adjust this screw I accidentally broke off what appears to be a sensor switch for the clutch pedal . I don't know what it does and so far the car is running fine. Any ideas??
Great DYI. After I adjusted it the pedal travel itself became too long before I could feel the clutch being engaged. There is another screw that adjust the pedal travel so it shortens the travel. But in the process to adjust this screw I accidentally broke off what appears to be a sensor switch for the clutch pedal . I don't know what it does and so far the car is running fine. Any ideas??
Might be the sensor for your Cruise control, when i press on my clutch that disengages cruise control.
Might be the sensor for your Cruise control, when i press on my clutch that disengages cruise control.
Your right, I use the cruise control almost all the time and this morning on my way to work I immediately notice it wasn't working properly. Now I just found out how dependent I was on cruise control. I need to fix this ASAP.
Now, after adjusting the pedal "feel" I couldn't help but notice that after a while it felt just the same. just the pedal travel is a lot shorter. The bite feel is a lot sooner, just like I wanted, though.
Originally Posted by Charles R. Hill
The author of this "DIY" is incorrect; clutch pedal free-play is not adjusted using the clutch engagement point as measured from the floor as a reference. The amount of total system free-play, as detailed in the factory service manual, is .26"-.59". To make adjustments in the manner proscribed in the "DIY" may lead to release bearing failure.
So is there a proper adjustment? My clutch is nowhere near close to been worn out. Its just that the pedal feel is not like when new.
I recently had my clutch replaced. They didn't do a good job, because my PPF was basically resting on the frame crossmember when I got it back and it was driving like garbage. I adjusted the PPF within spec and the car drives way better now. I just want to check the clutch adjustment.
I can check/measure/adjust the free play, but not really sure about the pedal height. After looking at the service manual I can see that the pedal stroke should be 5.12'.
I've already "set" the height and free play, but it still seems a bit dodgy going into gear in mainly 1st and 2nd sometimes. My thoughts are that there isn't enough "stroke" on the pedal to completely disengage the clutch.
My way of setting it was to get a yard stick, mark the yard stick at the point where the pedal is down on the floor completely. Then I measured 5.125" from that mark and made another mark thinking that this should be the proper hieght given the stroke adjustment specs in the manual. Then I just spun the adjuster out till the pedal matched with the 2nd mark.
Is this a good way to go about setting the actual pedal height? I also read elsewhere that the pedal should be even with the brake pedal, which i tried, but didnt seem right.
Anyone have a definitive how-to on the pedal height adjustment would be class-act in my book. Thanks!
I was lurking around and find this topic here and a similar topic in Mazda 6 froum, interestingly they dive deeper
That's true that the clutch pedal spring position is not leaner and it is softer in the place where the engagement is just about to start
and suddenly becomes stronger where it should be, hence make clutching easier and elongate the life of the clutch.
I would share it here, there are some mistakes in photos and descriptions but mostly it is correct.
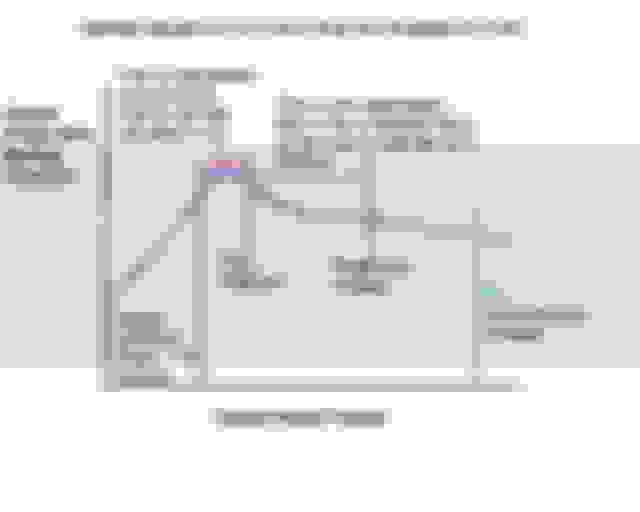
This diagrams show what it looks like after doing the adjustments described in the steps above. Note that by moving the pedal arm closer to the firewall it�s pushed the spring into the more linear region of it�s curve, and then readjusting the actuator rod to compensate moves the whole engagement range into the more linear part of the curve.
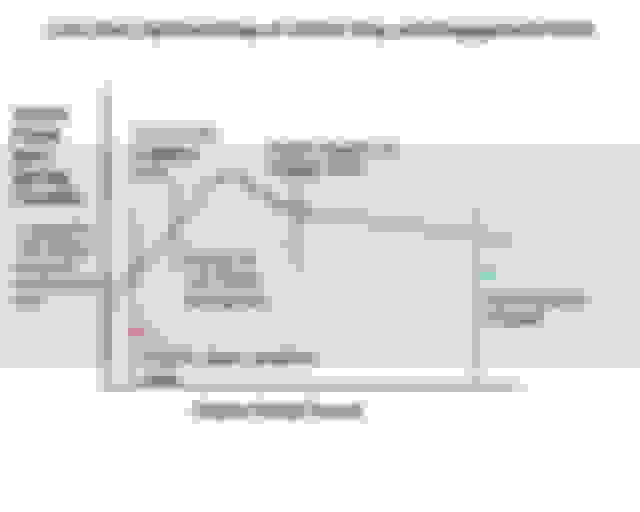
This diagram shows what the stock settings look like. Note that the clutch engagement range is smack dab in the non-linear region of the curve, just where it ramps up quickly and then tapers off just as quickly.
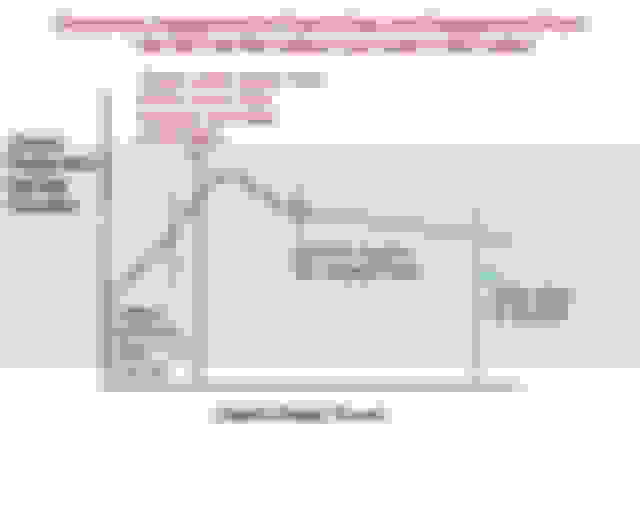
This diagram is the one you must AVOID doing, where the stop bolt is moved in but the actuator rod has not been backed off to compensate. You�ve effectively and permanently set the clutch up as if you were �riding� it, or in other words, resting your foot on the pedal so that it�s partially depressing the pedal resulting in reduced clamping force on the clutch disc. DO NOT DO THIS!!
Interesting, as I just dealt with this. I see the goal and it makes sense, but with my setup it does not seem possible. The distance between the two parallel purple lines seems greater on my car. Because of that I needed to increase the space between the red and green lines to keep the clutch from engaging off the floor and having sufficient throw after the clutch is fully engaged.
Ultimately I raised the pedal to the max OEM spec.
there are threads on here with the factory adjustment procedure diagrams, which provides specific measurement dimensions rather than the poor way it was explained in this thread. If you just follow the factory procedure everything will be fine, but leave it to some wannabe rocket scientist to add confusion where it’s completely unnecessary.
.
there are threads on here with the factory adjustment procedure diagrams, which provides specific measurement dimensions rather than the poor way it was explained in this thread. If you just follow the factory procedure everything will be fine, but leave it to some wannabe rocket scientist to add confusion where it�s completely unnecessary.
.
What? Mazda is very useless when goes to some details and settings, basically left them as a family car spec rather than a sport car.
They failed the whole idea. the failure rate of the pedals assembly speaks for itself !!!
I recently replaced my clutch and I didn't bother to properly adjust the clutch engagement. Now I've realized it doesn't fully disengage, so I thought I needed to bleed the lines a bit. Turns out all I need to do to adjust the clutch is an adjuster on the pedal? Makes life easier. I had my foot on he floor and the bite point was barely released, so that's not good.
Yep, I had a similar problem. The bite point too low. But for me there was not enough pedal throw to raise the bite point and leave the proper clearance. Ultimately found out the pedal was a little low, raised it up and re adjusted. All in spec now.
 05-07-2013, 07:56 PM


 . I don't know what it does and so far the car is running fine. Any ideas??