DIY: Aftermarket (ebay) H.I.D conversion install!
 09-09-2014, 08:36 PM
#1
Alright so since I couldn't find a DIY for this I figured I would write up my own. Figured I would tackle this really quick while I work on a few other projects waiting for materials to arrive in the mail. For reference, it is a 2007 base model (sport), but this install should apply for all series 1 (2004-2008) models with halogen headlights. So lets begin..
(note, pic below shows comparison looking towards the car during the day to show the difference in color and daytime brightness between the stock halogen and the aftermarket kit. my kit is a 35w 5000k kit)
(note, pic below shows comparison looking towards the car during the day to show the difference in color and daytime brightness between the stock halogen and the aftermarket kit. my kit is a 35w 5000k kit)
Last edited by Ricky SE3P; 09-09-2014 at 10:56 PM.
 09-09-2014, 08:37 PM
#2
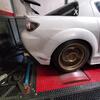
Step 1: Jack up your car and remove the wheel. If you cannot complete step 1, now would be a good time to sell your car. Lol
Step 2: If you have aluminum lug nuts, especially cheap aluminum lug nuts like seen in the second photo, now would be a good time to put steel lugs of your choice. "Mad weight savingz, yo!" is not worth the headache when one of these strip at the threads or get damaged to where you cant remove them.
Step 3: Using a #2 phillips screw driver, remove the plastic fasteners holding the fender liner behind the headlight in place, giving you access to the rear of the headlight.
Step 4: Identify the headlight bulb (rather difficult to miss)
Step 5: remove the connector on the headlight bulb. I took a picture of the connector so you could see there is a small area you press on one side that will allow you to remove the connector.
Last edited by Ricky SE3P; 09-09-2014 at 11:06 PM.
09-09-2014, 08:39 PM
#3
Step 6: Remove the rubber seal from the rear of the headlight housing to gain access to the bulb and retaining clip
Step 7: Release the headlight bulb by pushing down and aside, opening the metal retaining clip.
Step 8: Remove the halogen bulb. At this step I want you to take note of the bulb itself. It is not connected directly to the wiring harness, but rather to a type of "adapter/bulb spacer" that connects to the oem harness. YOU WILL NEED TO BUY AN ADAPTER FOR THE BULBS. The next two "steps/ photos" show the adapter required to install the HID conversion kit.
Step 9: Adapter slipped onto the harness from the bulb. I kept the foam on the bulb to protect it right until I went to install it into the headlight assembly. Advise everyone else to do the same.
Step 10: Just showing the two bulbs in comparison.
Last edited by Ricky SE3P; 09-09-2014 at 11:16 PM.
09-09-2014, 08:40 PM
#4
Step 11: Take off the protective foam from the bulb. Notice how there is a notch in the base of the bulb. You will see in the next step the relevance of the notch.
Step 12: Line up the notch on the bulb with the notch in the housing and very carefully install the bulb, pushing the adapter into place as well.
Step 13: It can be a little tricky, but get the retaining clip back in place. Now would be a good time to get the wires coming out of the bulb through the rubber housing seal removed in step 6 and reinstall that seal. Push the seal onto the bulb adapter to ensure a proper seal.
Step 14: Connect the ballast to the bulb and the plug on the harness. Make sure the connections are securely and completely seated.
Step 15: Just a photo showing the ballast connected.
Last edited by Ricky SE3P; 09-09-2014 at 11:25 PM.
09-09-2014, 08:40 PM
#5
Step 16: MAKE SURE THE BULB ILLUMINATES BEFORE PROCEEDING. If it doesn't, reverse the positive and negative wires coming from the ballast to the OEM harness/plug and check again.
Step 17: See the opening in the frame above the headlight? This is the location that I picked to secure the ballast. I reached up with a zip tie through the hole and wrapped it around the ballast going between the two plugs coming off of it.
Step 18: A picture showing the ballast was secured. I tightened it up and tucked the wires to the side inside the cavity behind the headlight towards the engine bay. I put the liner back in place with the plastic fasteners and put the wheel back on.
Step 19: Repeat steps 1-18 for the other side.
Step 20: Enjoy your now installed HID conversion kit!
Last edited by Ricky SE3P; 09-09-2014 at 11:36 PM.


Thread
Thread Starter
Forum
Replies
Last Post
cjun
Series I Do It Yourself Forum
43
10-08-2017 12:16 PM