BHR LongTube Header Install and Review
 01-03-2015, 12:38 PM
#1
BHR LongTube Header Install and Review
In July of last year I was reached out to by Charles (BHR) in regards to his then prototype designed long tube header. After some brief conversations about my car, setup and his views on the market and desired outputs it was agreed upon that I would be given the chance to get my hands on one of his products before it went to market. Ultimately 3 people including myself where chosen to field test a pre-market edition of this header, I have been in direct contact with the other two field testers (who at this time I will not divulge names, but if they feel to comment below that is their choice). So far to my knowledge this is the second header to be fit onto a S1 chassis, the first being the one Charles dyno tested some months back. Ultimately as my schedule shifts wildly depending on m business requirements I was only able to be home for a quick 4 weeks this December and have been avidly working on this since the start of the month.
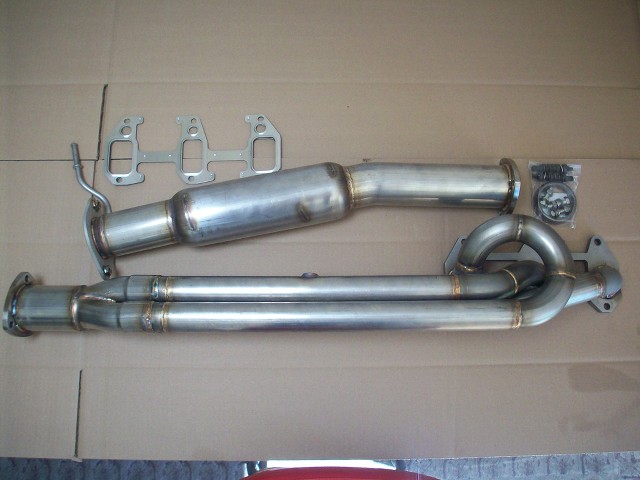
Black Halo Long Tube Header, whats in the box?
Install
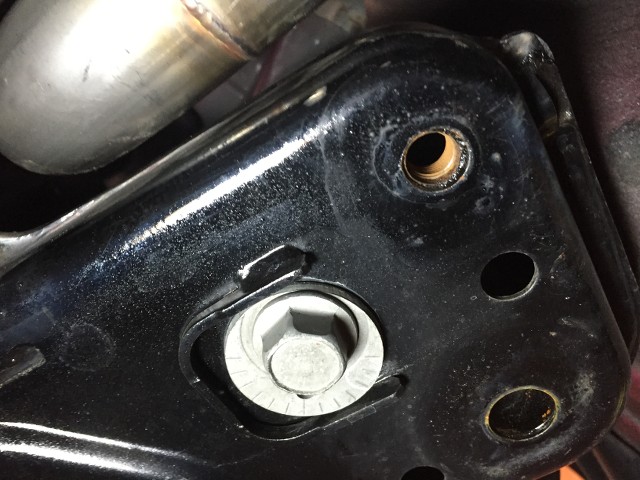
My initial perception of the install was like most headers we have, drop the passenger motor mount remove the old install the new. Unfortunately this was not the case. In order to install the header I had to remove both motor mounts and push the engine to the drive side of the engine bay and it was a very tight fit, I did notice that if you remove the header stud from the bottom of the rear iron exhaust port that it frees up a lot of room on the install. Just be sure you install the stud again and sink it into the iron before you try to bolt the header to thee engine. Depending on individual skill level I would give this header a 2-4 hour install time depending if you have a lift or jackstands
Fitment
The header was originally designed on the chassis of a stock S1, then (and I may be wrong) transferred over to a jig to make the 3 pre-market products. As my car is no where near a stock S1 I did run into 2 installation fitment issues which did require some modifications in order to overcome.
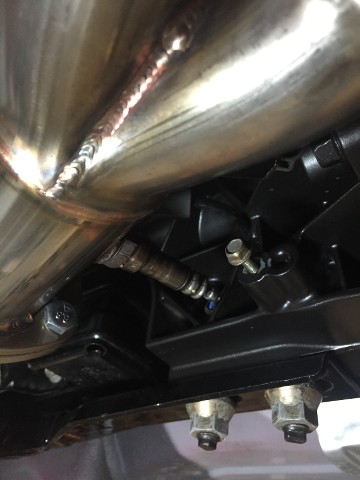
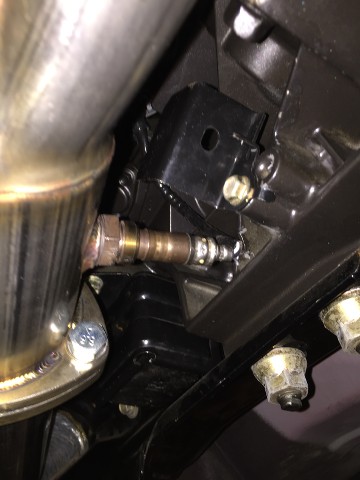
The first fitment issue was the downstream O2 sensor would hit the tail of the S2 trans, as this was never tested with the bigger S2 trans, which has much more reinforced ribbing at the tail then the S1 trans this issue is due to this. A simple 15 degree rotation of the bung location can correct this issue, but as I did not have that option I decided to notch the trans ribbing enough to clear the end of the sensor loom.

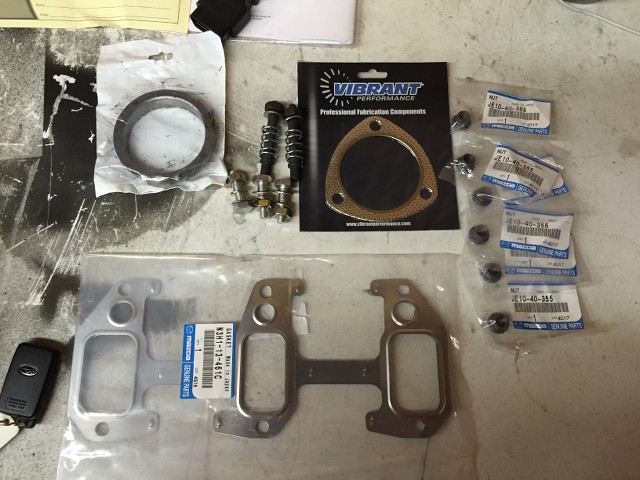
Black Halo Long Tube Header, whats in the box?
- BHR Long Tube Header
- BHR Midpipe
- Engine-Header OR Gasket
- Engine-Header Nuts
- Header-Midpipe 2ply gasket
- Header-Midpipe Bolts
- Midpipe-Catback Donut Gasket
- Midpipe-Catback Spring Bolts
Product Review
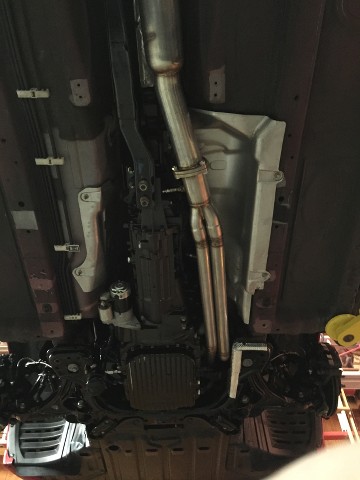
A quick side by side comparison between my existing header and midpipe (Exoticspeed header and OBX midpipe). The quality of this product is as to be expected from Charles (BHR) with a very well put together piece, clean and welds and top notch materials.

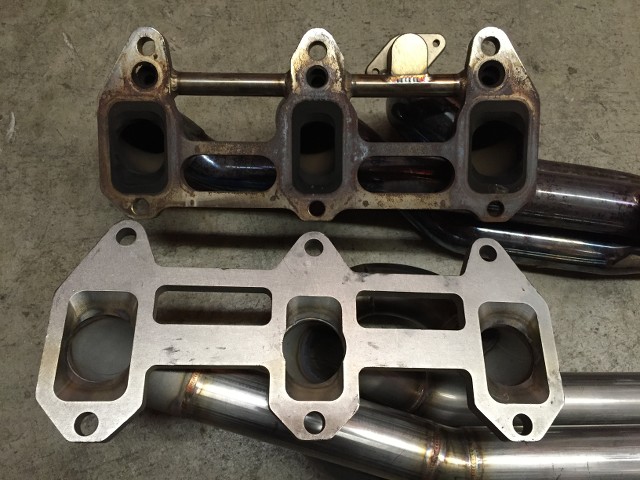
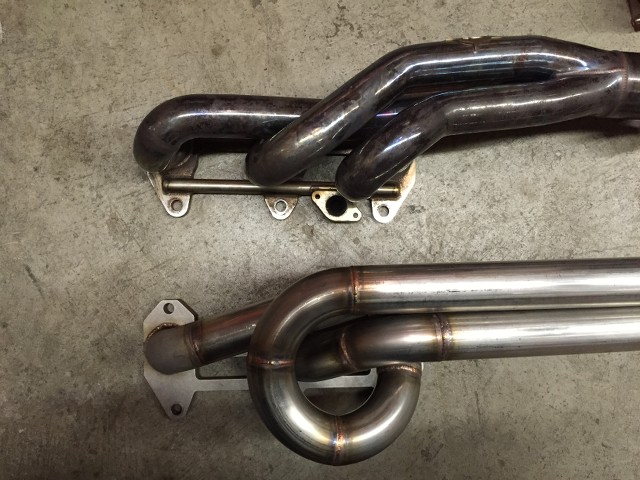
A quick side by side comparison between my existing header and midpipe (Exoticspeed header and OBX midpipe). The quality of this product is as to be expected from Charles (BHR) with a very well put together piece, clean and welds and top notch materials.
My initial perception of the install was like most headers we have, drop the passenger motor mount remove the old install the new. Unfortunately this was not the case. In order to install the header I had to remove both motor mounts and push the engine to the drive side of the engine bay and it was a very tight fit, I did notice that if you remove the header stud from the bottom of the rear iron exhaust port that it frees up a lot of room on the install. Just be sure you install the stud again and sink it into the iron before you try to bolt the header to thee engine. Depending on individual skill level I would give this header a 2-4 hour install time depending if you have a lift or jackstands
Fitment
The header was originally designed on the chassis of a stock S1, then (and I may be wrong) transferred over to a jig to make the 3 pre-market products. As my car is no where near a stock S1 I did run into 2 installation fitment issues which did require some modifications in order to overcome.
The first fitment issue was the downstream O2 sensor would hit the tail of the S2 trans, as this was never tested with the bigger S2 trans, which has much more reinforced ribbing at the tail then the S1 trans this issue is due to this. A simple 15 degree rotation of the bung location can correct this issue, but as I did not have that option I decided to notch the trans ribbing enough to clear the end of the sensor loom.
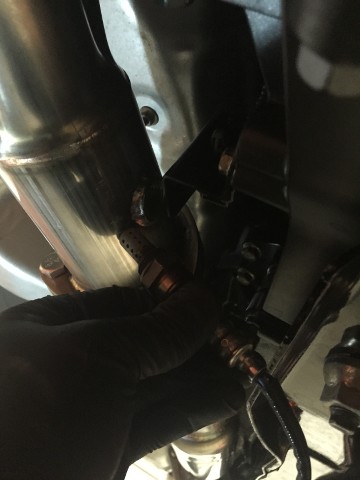
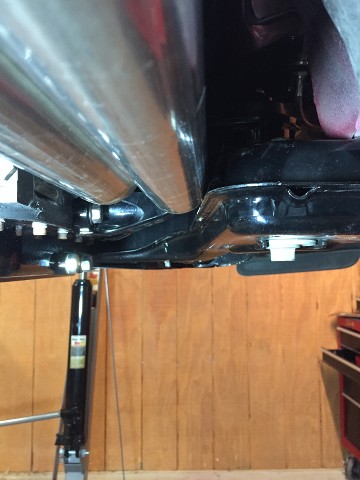
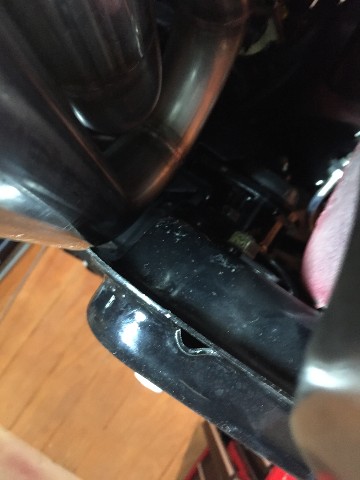
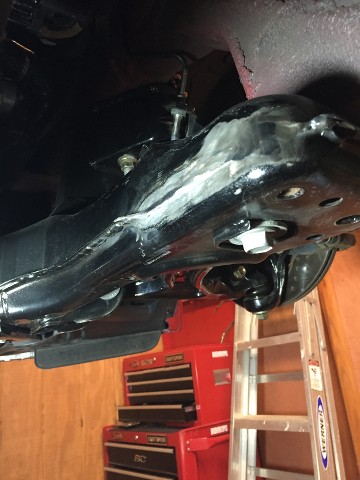
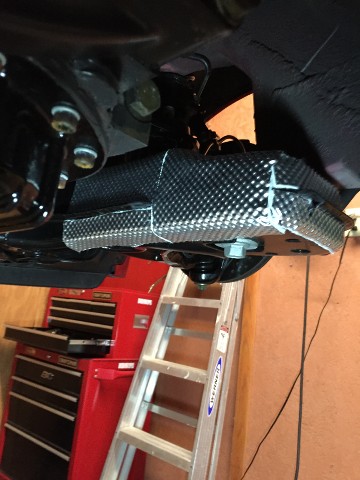
The second fitment issue was a larger hurdle to get past, and I am not sure how exactly this came to pass if it was due to a previous modification I have made, or something that was lost in translation going from chassis-jig-chassis manufacturing. The rear iron runner after its loop to overcome the motor mount is then routed to the outside of the header, after initial install I noticed this runner came extremely close to the front sub-frame pinch weld rail, and was confirmed when I installed motor mounts again the runner actually rested on the weld and kept a portion of the weight off the motor mount entirely. This was not an easy fix, but their are two options. I could either modify my motor mounts to add an additional 10mm of engine clearance or I could modify my sub-frame. As 10mm was to much out of my comfort zone I decided on the later. Ultimately about 7" of pinch weld were cut out of the sub-frame and I welded the opening together, after I was left with bare metal I laid down 3 coats of 2,000F header paint, and then covered it with 1800F direct contact DEI tunnel II heat shielding. At the beginning I was skeptical but the end result came out very well done and to the caliber or work I have come to expect.

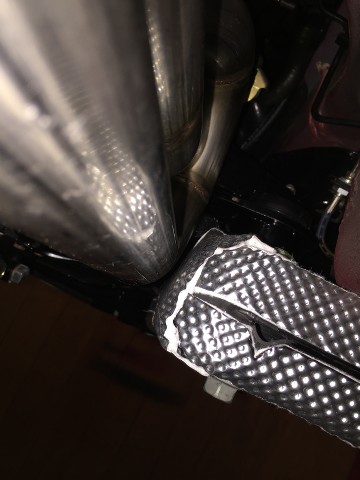
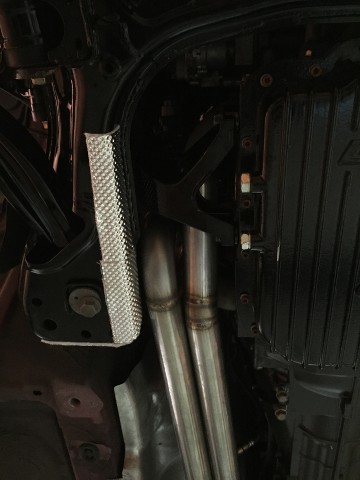
The rest of the install was very smooth, all supplied hardware was top notch to help with the install and it fit up with my catback with no issues while leaving plenty of clearance on all sides for heat dissipation and I was able to take some initial engine warm idle temps, with 956F EGT, the runners say around 650, while the flange is 250. The heat shielding stays relatively cool at 160
Install Review
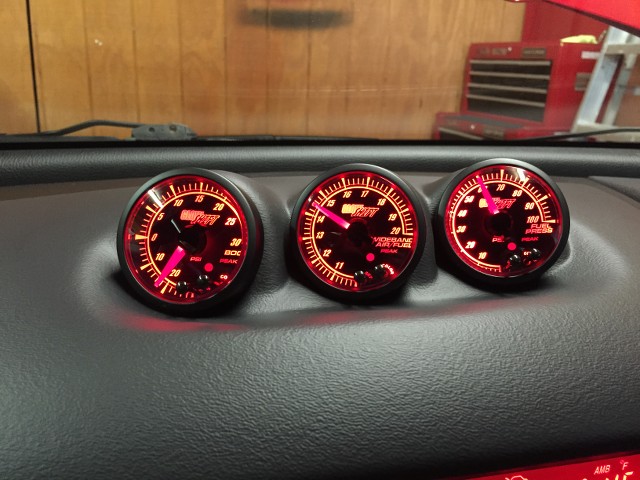
Initial review of the product installed, is much less raspy then my previous exhaust, but also better flowing system and a slight increase in throttle response as well as rev range. I have dead on AFR compared to my old system and my current map. At this time I am only able to no-load test, and due to my schedule will not be able to get it on a dyno until March, but my inital reaction is impressed with the differance over my prior system.
As far as how it compares in sound it is quieter that my previous straight pipe setup, but much more throaty and responsive as well. An Overall great change (Vid's below).
More will come, load testing as well as direct dyno comparison between my old system. I will update with more as soon as I can. In the mean time feel free to ask for any testing or specifics you would like but keep in mine all technical questions should still be directed at Charles, I can only tell you what they are, not the why.
Install Review
Initial review of the product installed, is much less raspy then my previous exhaust, but also better flowing system and a slight increase in throttle response as well as rev range. I have dead on AFR compared to my old system and my current map. At this time I am only able to no-load test, and due to my schedule will not be able to get it on a dyno until March, but my inital reaction is impressed with the differance over my prior system.
As far as how it compares in sound it is quieter that my previous straight pipe setup, but much more throaty and responsive as well. An Overall great change (Vid's below).
More will come, load testing as well as direct dyno comparison between my old system. I will update with more as soon as I can. In the mean time feel free to ask for any testing or specifics you would like but keep in mine all technical questions should still be directed at Charles, I can only tell you what they are, not the why.
Last edited by Carbon8; 01-29-2015 at 08:37 PM.

 01-03-2015, 01:16 PM
#7

nice

 01-03-2015, 04:55 PM
#9

BHR supposedly is 1-7/8"
Tubing is usuly referenced as OD though so wall thickness comes into play. 16 Ga. (1/16" thick) is common unless using T321 or Inconel then it can be thinner and still have strength.
Pipe fittings (common for turbo manifolds due to thicker wall and lower cost) are referenced as ID.
Tubing is usuly referenced as OD though so wall thickness comes into play. 16 Ga. (1/16" thick) is common unless using T321 or Inconel then it can be thinner and still have strength.
Pipe fittings (common for turbo manifolds due to thicker wall and lower cost) are referenced as ID.

 01-04-2015, 07:52 PM
#15
We think we know why this happened and will confirm after the investigation is complete. I do have visual confirmation that this issue was not present on the original header that was installed and tested.
01-09-2015, 09:27 PM
#17
Registered

The BHR long-tube header we tested on my RX8 here in Phoenix did not have that fitment issue at all. We did have to remove both motor mounts for the install, but we did not experience the fitment issue #2 you mentioned above. We did not have to cut/modify the subframe whatsoever. If that was the case, I would have not let Charles proceed any further, LOL.
Perhaps your fitment issue had to do with existing modifications to your car?
Not sure
In regards to the tone, I also noticed that it was quieter/smoother than I thought - at least that's what I noticed when we moved the car from the lift to the dyno room next to the shop after the installation was done. But I had my OE exhaust/muffler, so you should take that into account. Once my car was on the dyno it was difficult to evaluate the tone. As usual, you run into a lot of echo into those dyno rooms. So it would be hard for me to offer a fair assessment with the car under high RPMs inside an enclosed room.
We did not get to test the long-tube header on the road, since this was just fitment test and dyno run. So I cannot comment on the tone you might get driving on the road or racing your car. Plus there are other variables such the type of muffler you have, etc. But I suspect the BHR header will produce a pleasant tone regardless.
01-10-2015, 03:37 AM
#18
It has been confirmed, the pre-market headers that went out for testing are different then the one fitted to your car.
The rear iron runner is staggered about 10mm lower than the inside runner causing thee sub-frame issue. The header fit on your car both runners where level and higher up. We are not sure exactly how this came to pass but are looking into it at this time.
The rear iron runner is staggered about 10mm lower than the inside runner causing thee sub-frame issue. The header fit on your car both runners where level and higher up. We are not sure exactly how this came to pass but are looking into it at this time.
01-10-2015, 11:28 AM
#19

1) I am not sure where that impression arose, especially as regards the particular header I shipped you. The only "prototype" unit was the one I used in Phoenix for dyno and fitment testing. In other words, something is really messed up with the header you received but I am not sure how/why.
2) Yes, I am looking into it and the jig we built and used makes it impossible to err in the way that your header seems to have been built. Confusing, and I have no idea how the different pipe alignment may have occurred. I am reexamining all the jig and header details to verify everything.
2) Yes, I am looking into it and the jig we built and used makes it impossible to err in the way that your header seems to have been built. Confusing, and I have no idea how the different pipe alignment may have occurred. I am reexamining all the jig and header details to verify everything.
They are handbuilt by people...**** happens sometimes

The trick is always what happens when there is an issue...something you have always been good at solving
01-12-2015, 11:14 AM
#20
Registered

Join Date: Jan 2014
Location: MD Eastern Shore
Posts: 47
Likes: 0
Received 0 Likes
on
0 Posts
S2 owner here and avid autocrosser. This is definitely not legal for my class, but following this all the same. Looking forward to the results!
I'd love to give this a shot on my car once it's ready for market and, for better or worse, there's no emissions testing where I live. I'd be willing to change classes for this setup.
(And I'll be ordering my BHR ignition kit in the next few weeks)
I'd love to give this a shot on my car once it's ready for market and, for better or worse, there's no emissions testing where I live. I'd be willing to change classes for this setup.
(And I'll be ordering my BHR ignition kit in the next few weeks)
Last edited by motohegg; 01-12-2015 at 11:26 AM.
01-12-2015, 06:06 PM
#22
SARX Legend
iTrader: (46)

I don't see why it would not fit. But if Charles wants to test fit one I have an R3 parts car in my driveway that is pretty much complete except for body panels that it could easily be tested on 
01-13-2015, 07:58 AM
#23
Registered

I wonder, perhaps, if it was damaged in shipping and ended up bent enough to make the fitment messed up like that? Could be something that simple. Just my 2 cents.

