When you click on links to various merchants on this site and make a purchase, this can result in this site earning a commission. Affiliate programs and affiliations include, but are not limited to, the eBay Partner Network.
It’s kind of an arch shape; higher in the center and then arcing down at the front chassis rails. Ideally you’d cut the matching shape into the lower half of the crash bar and then weld in a piece of thin sheet metal to seal it back up. I’m not sure if the rules you’re using allow that or even complete removal. Other countries don’t have it.
I had a Mazdaspeed front bumper cover on my car briefly, before I destroyed it. The openings for the oil coolers and radiator are certainly much bigger. You could easily see how much more of the coolers were exposed, because the shape of the opening could be traced by the bent fins.
I'm not certain mine was a genuine Mazdaspeed part, but it was surprisingly stiff and brittle. Also, the hardware used to attach the screens in front of the radiator and oil coolers was...crappy. I ended up drilling holes and riveting little brackets I made out of aluminum stock. And i made new, very light screen out of metal lath I spray-painted black.
It’s kind of an arch shape; higher in the center and then arcing down at the front chassis rails. Ideally you’d cut the matching shape into the lower half of the crash bar and then weld in a piece of thin sheet metal to seal it back up. I’m not sure if the rules you’re using allow that or even complete removal. Other countries don’t have it.
the rules does allow replacing the front crash bar with tubular one. so that might be a better option than cutting up the stock one. not allowed to replace the front bumper, it would have been nice to be able to replace with mazdaspeed style front bumper. the series 2 front bumper seems to have larger opening for oil cooler.
Whacking or torching the front center bar section only would be fairly easy too and save you from purchasing and fabbing the rest of it. I suppose it just depends on the person and what they can or want to do. If there are limitations like it has to dimensionally meet the OE part in either size or weight then modding it is probably the way to go. No limitations; then some 20 Ga small dia cross-braced tubes, flanges, and strips meet the bare min expectation is what I�d do since that�s way out at the farthest point out past the wheelbase.
it just have to meet similar crash protection as the oem, i don't know how they would measure that. does the stock bumper cross beam support the front bumper? if that's the case, they yeah probably better to notch out the cross beam and box it in.
I wouldn't modify anything on the bumper, where you need to modify is how to get the air out?
The easy part is getting the air in through the holes of the stock bumper, duct it all up, but to make everything a lot more effective you need to find how to duct the rear of the openings to a low pressure area. Almost everyone focuses on the ducts to the inlets, but rarely the outlet ducting.
If you can duct to a low pressure area you actually suck air through the heat exchanger. You also typically only need about 1/3 the square area of the heat exchanger for it to work exceptionally well. you also want thinner heat exchangers, not super thick ones that most people go after. thin with many rows that aren't super wide. Most people get super thick and super long rows, which is opposite of what you want.
Definitely hear what you're saying, although it's much easier to duct the outlet of a purpose built racecar than a street car. Regardless, i've been doing exactly what you recommended: thinking along the lines of reducing the outlet restriction (lower pressure behind the radiator). since it's a street car i still need the cooling fans, which are a restriction. i have an AEM CAI which opens up some area behind the radiator.
A "quick and easy" is to add hood vents, which (if executed properly) can reduce underhood temps, improve air flow out of the radiator, and reduce front end lift. There's a kit from singular motorsports, but it seems to me they may be positioned a tad too far back from optimal?:
Some other DIY ideas (the S2000 on MotoIQ seemed the benefit most from the front center vent at lower speeds, probably the lowest above-hood pressure in that region:
they also talk about the OEM airbox restricting airflow out of the vents, and this forum has talked about relocating the battery and using a CAI to reduce restriction behind the radiator.
Do you guys have any other practical ideas for reducing pressure behind the radiator?
Last edited by hufflepuff; 12-16-2017 at 10:00 AM.
You’d be better served to increase and control airflow; what’s needed to the radiator and what’s needed into the engine bay. Blocking everything through the radiator only is a great way to reduce both performance and engine life.
You�d be better served to increase and control airflow; what�s needed to the radiator and what�s needed into the engine bay. Blocking everything through the radiator only is a great way to reduce both performance and engine life.
For sure. I currently have an LRB solid undertray, and high density foam around all sides of the radiator except the passenger side. i'm letting a small amount of air to bypass the passenger radiator side to enter the engine bay in the vicinity of the exhaust manifold for engine bay cooling; made a big difference when I pop the hood.
RIWWP had some really good DIY hood vents in his Mazdaspeed build thread, I think I will try to copy something like that.
I wish we had pressure data on the RX-8 hood, or else i'll just be looking at NB/NC/ND miata hood vent placement and making an educated guess.
I think I'll bite the bullet and buy a device to get the data. Although top surface pressure is only half the equation. Engine bay pressure and flow/obstructions plays a role, as does practical constraints of hood strength when cutting away material.
https://www.amazon.com/dp/B01680C4C2/ref=sspa_mw_detail_0?psc=1
Understand as you change the front openings those points will likely change as well. Don’t try to overthink it. The general layout is low pressure near the front where air is cresting over the top and high pressure at the rear as it hits the windshield and bleeds to the sides.
I’d suggest that you needs some air on the other side of the engine as well. Combustion occurs on that side, coils need cooling, the intake, and so on.
Make sure your radiator fan runs on temp only without a speed cutoff point and you don’t have to worry so much about trying to force feed it. Fwiw, getting a better radiator/fan/shroud system should be a higher priority imo.
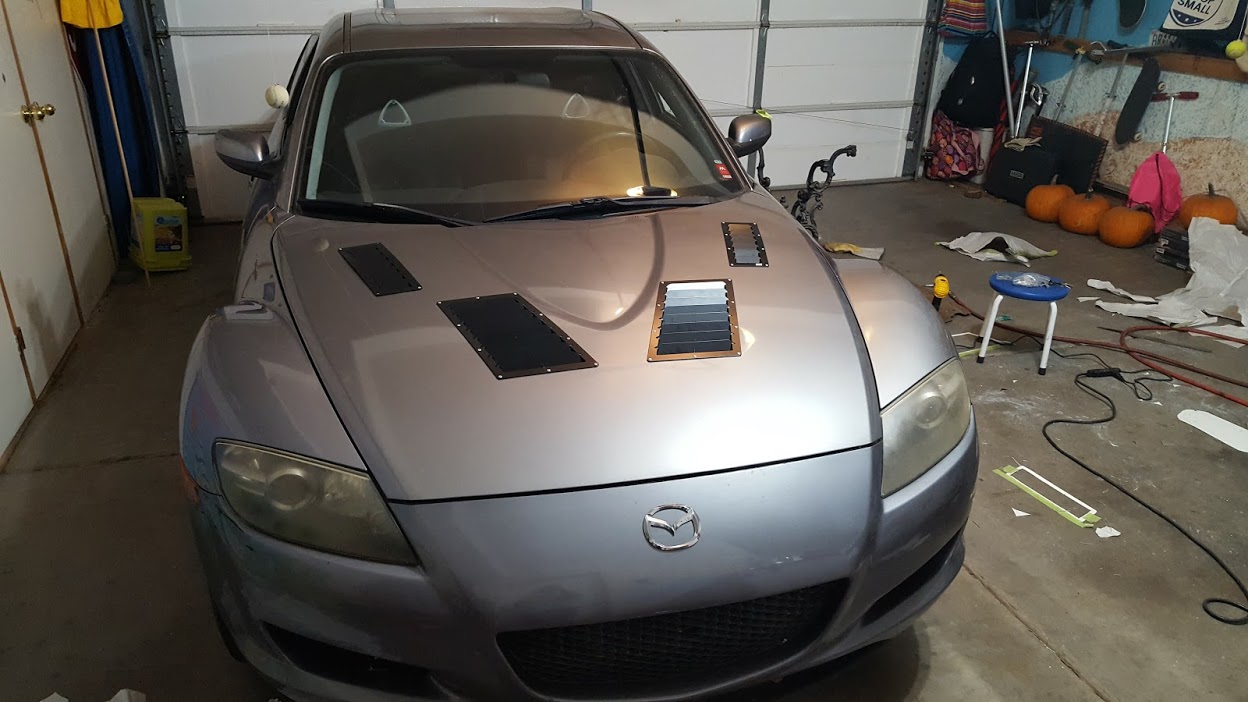
Out of curiosity, do you guys think this BMI 4 rotor rx8 is using a modified OEM hood, or aftermarket? The vents look too be in about the right place..
The aluminum OE hood is the lightest one and you already have it ...
Fully agree; I plan to modify my stock hood.
But it looks like that hood has had the underside bracing completely removed... or it's aftermarket.
I'm just curious as to whether I might be about to achieve the same effect with my OEM hood without compromising it's strength too much. The OEM hood for the most part appears to experience lift rather than downforce, which would be reduced with proper venting.
If I ever did that it was always my intention to do just that; pull the center bracing off and use the framed skin. If it needs reinforcement then some bent aluminum angle formed with some extra curvature running fore/aft with the ends pressed down into place and welded to the opposing frame ends is how I envisioned it. This way the curvature stress of the angles is pushing outward to reinforce the skin against the aero forces. You could always add dual side tape (some serious strong structural types out there now) or glue/sealant between the angle and hood skin for guaranteed strength.
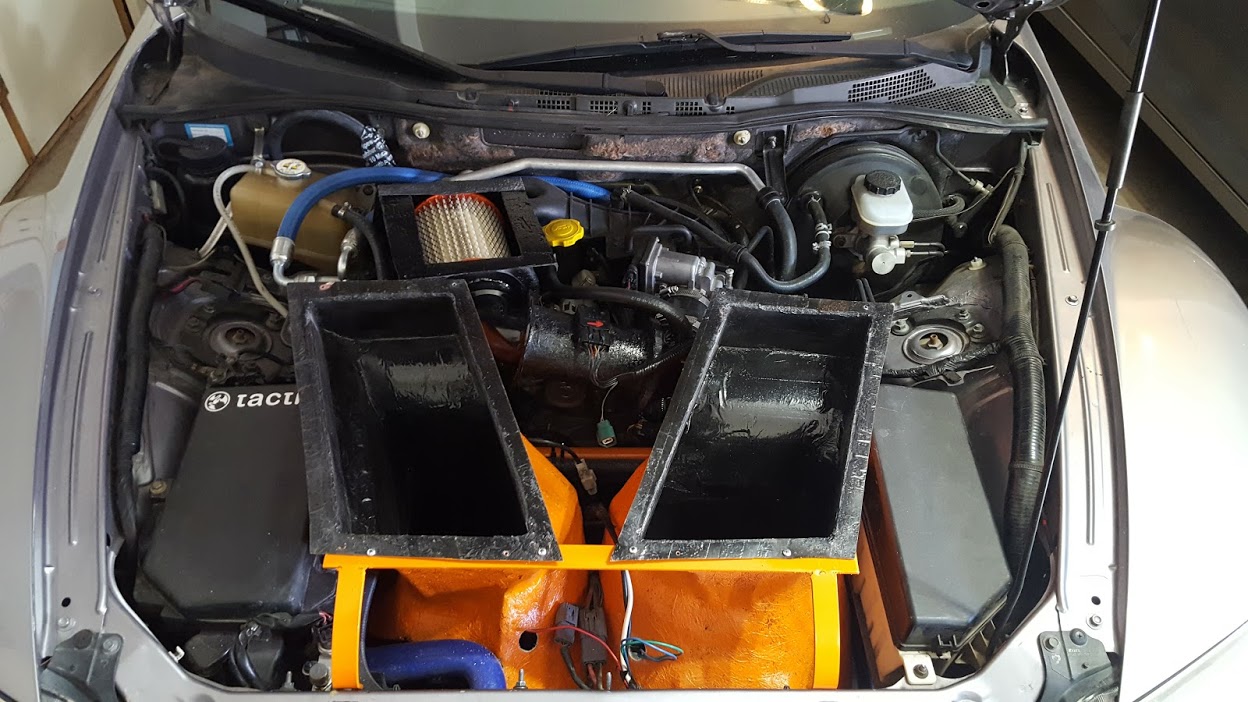
I wouldn't modify anything on the bumper, where you need to modify is how to get the air out?
The easy part is getting the air in through the holes of the stock bumper, duct it all up, but to make everything a lot more effective you need to find how to duct the rear of the openings to a low pressure area. Almost everyone focuses on the ducts to the inlets, but rarely the outlet ducting.
It's just two bolt on each duct that hold the to the orange bracket. It's very secure under the hood with the upper flanges so there's no need for too many fasteners.
Much easier than dealing with the battery and OE Airbox.
 12-05-2017, 01:40 PM