SCCA Street Modified RX-8
 12-10-2018, 08:28 PM
#51
Haven't felt like posting anything in a while. But I wrapped up the fuel system, so figured I'd put up some pictures.
Flow-through fuel rail with 6AN fittings on each end.
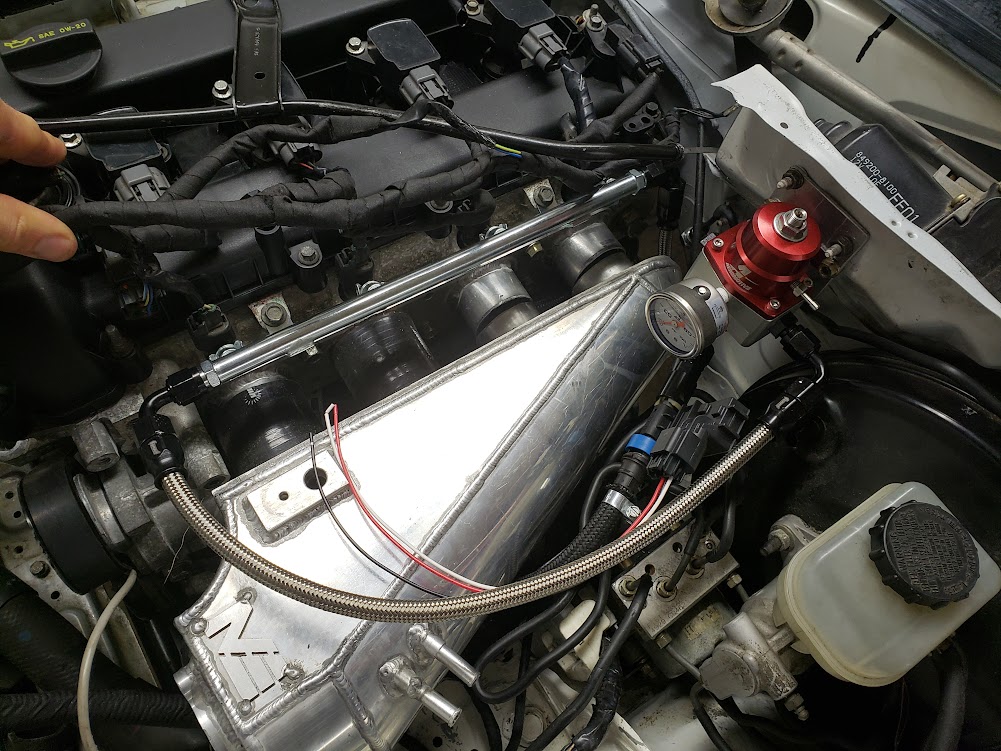
Feed line is 6AN through a 10 micron filter mounted in the trans tunnel, and 6AN all the way back to the pump.
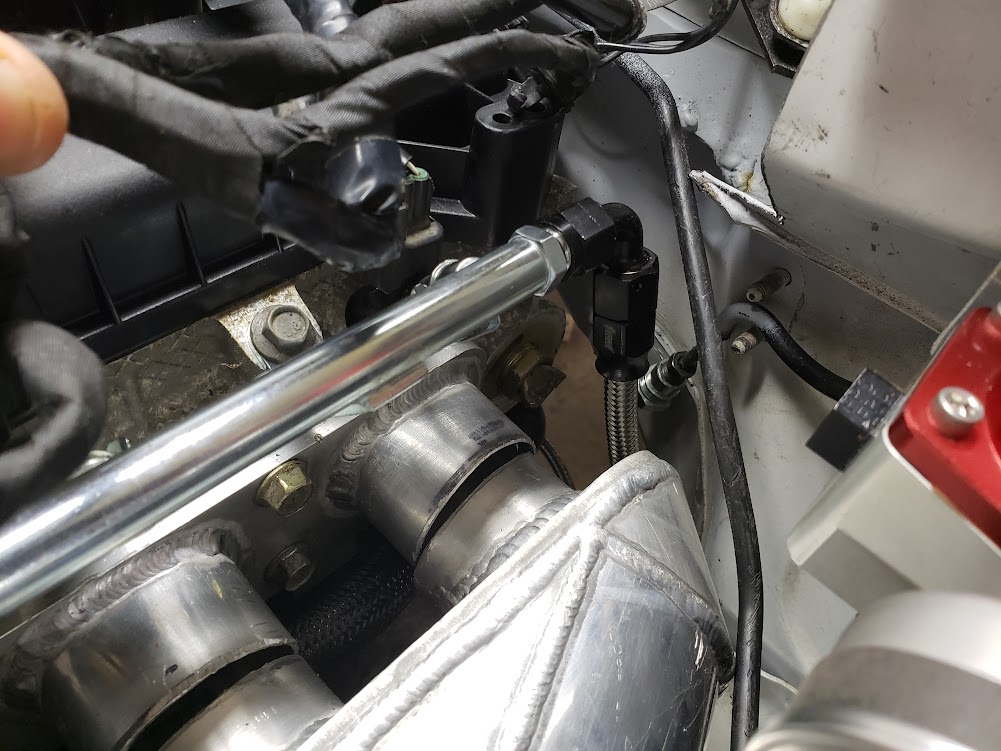

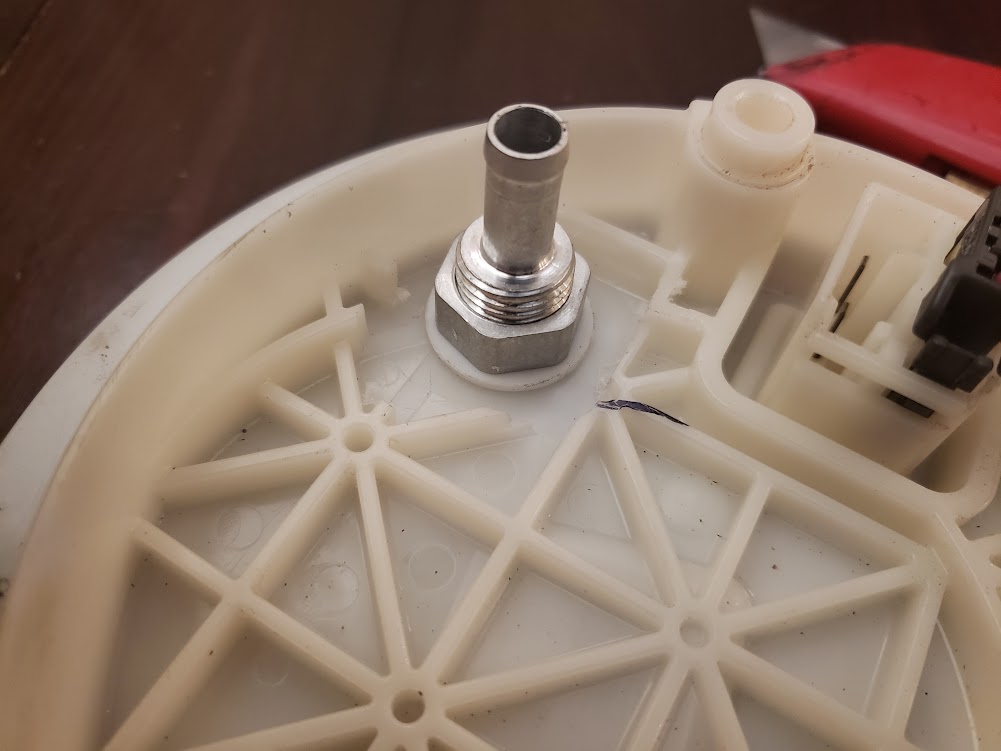
Simple plug to defeat the pressure relief valve in the S2 pump assembly.
Bulkhead fitting with a 3/8 barb inside the pump assembly and 6AN on the outlet. The barb connects right to the barb fitting on the pressure side of the pump. The stock siphon mechanism is preserved.
Flow-through fuel rail with 6AN fittings on each end.
Feed line is 6AN through a 10 micron filter mounted in the trans tunnel, and 6AN all the way back to the pump.
Simple plug to defeat the pressure relief valve in the S2 pump assembly.
Bulkhead fitting with a 3/8 barb inside the pump assembly and 6AN on the outlet. The barb connects right to the barb fitting on the pressure side of the pump. The stock siphon mechanism is preserved.
 01-02-2019, 08:35 AM
#52
I made some progress over the holidays. Because I can't seem to be bothered to take pictures of incremental progress, some of this isn't really well documented.
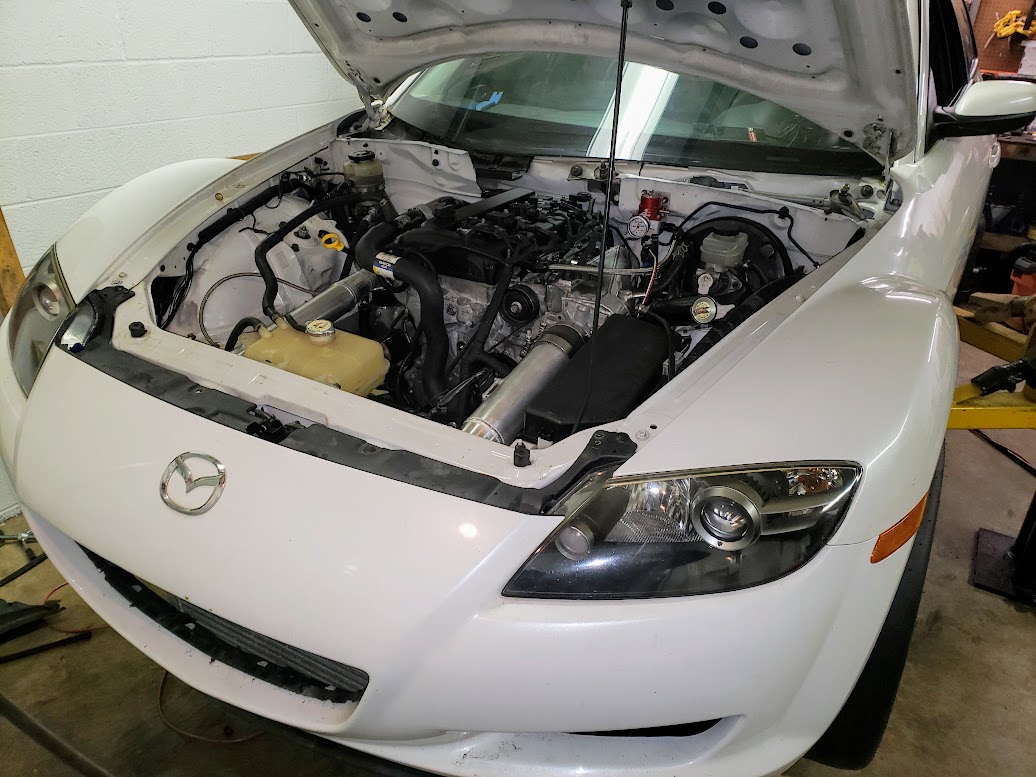
Engine is back in for the (hopefully) last time before I turn the key for the first time. I made a battery mount, finished all the battery wiring, and powered up the car. Everything works, the fuel pump primes and builds pressure, no leaks that I can see or smell. I finished up the oil plumbing, though I may shorten one hose. Sensors are in place for fuel pressure, oil pressure and oil temp to connect to the (eventual) aftermarket EFI. The DBW throttle even works without the engine running, which may be of use if I go with a Megasquirt ... could use the stock ECU to do the throttle and the Megasquirt for everything else. Not sure.
Mostly I spent a bunch of time cutting and fitting intercooler pipes until I was happy. I wanted to minimize the number of silicone couplers in the intake tract so I had a buddy TIG weld it all together for me.
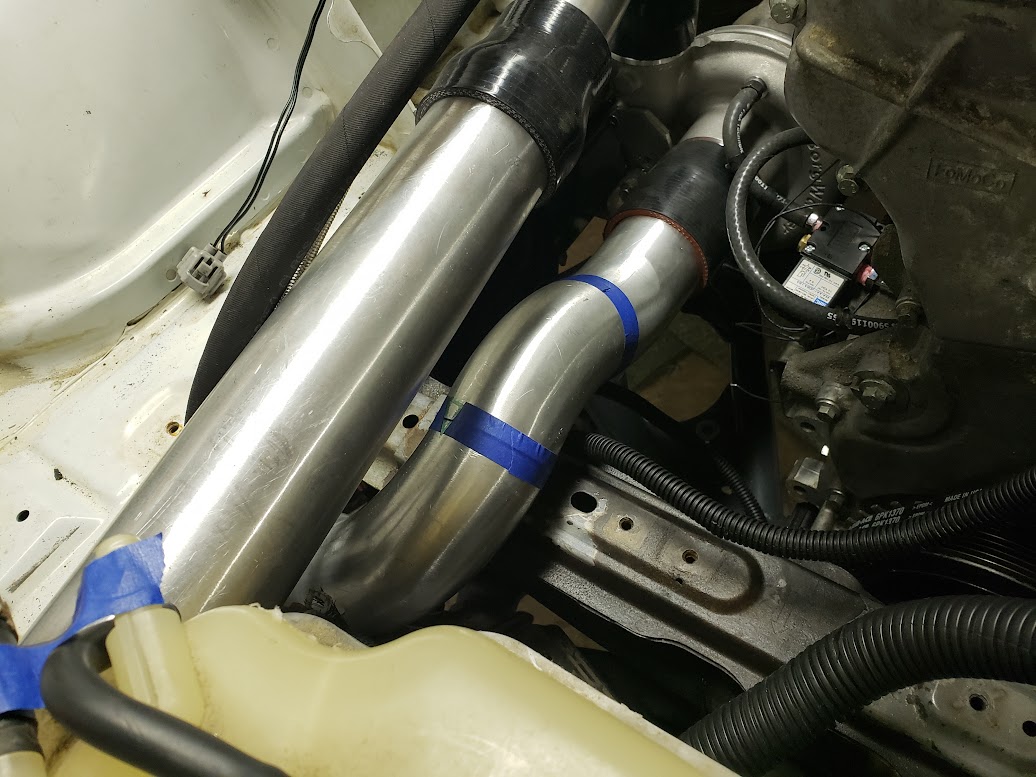
The piping is a lot easier to manage without all the couplers everywhere.

I got the clutch fitted, reinstalled the transmission and finally got to install the driveshaft that arrived months ago. Everything fit together as expected. I bled the clutch and tested its travel... it seems to fully release but it's definitely close to the floor. I may need to modify the factory clutch pedal, or at least just adjust the plunger to get a little more release, but I won't know until I can start it and test the driveline with the engine running. It's already been reinforced as I guess it's pretty common for them to break.

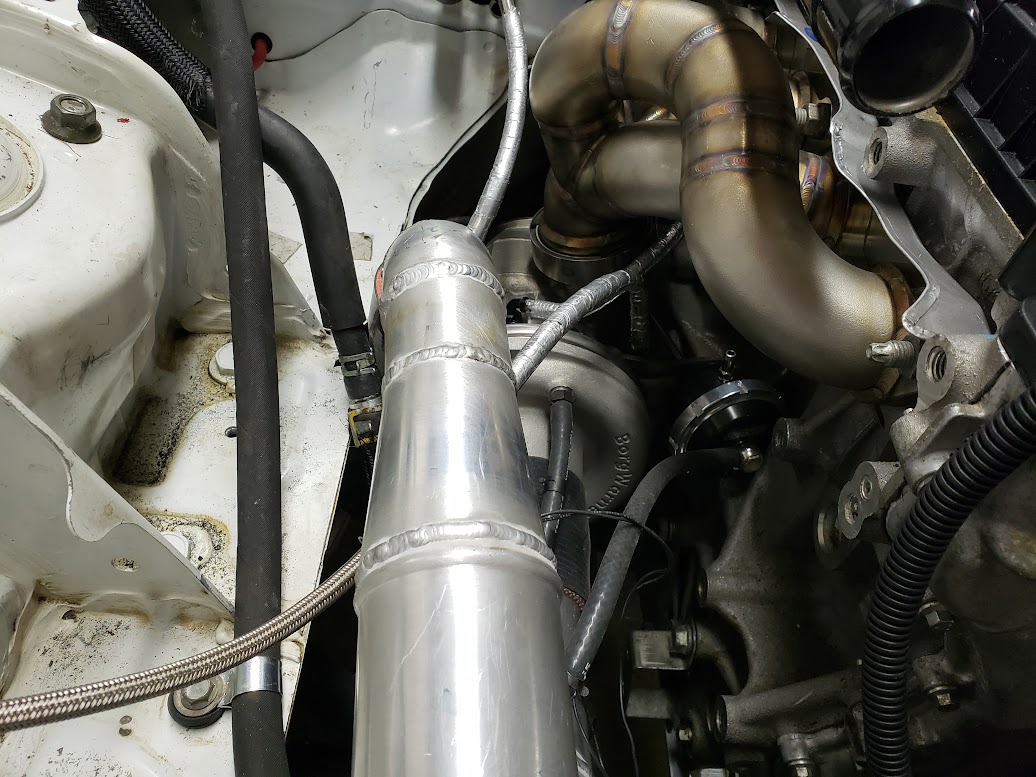
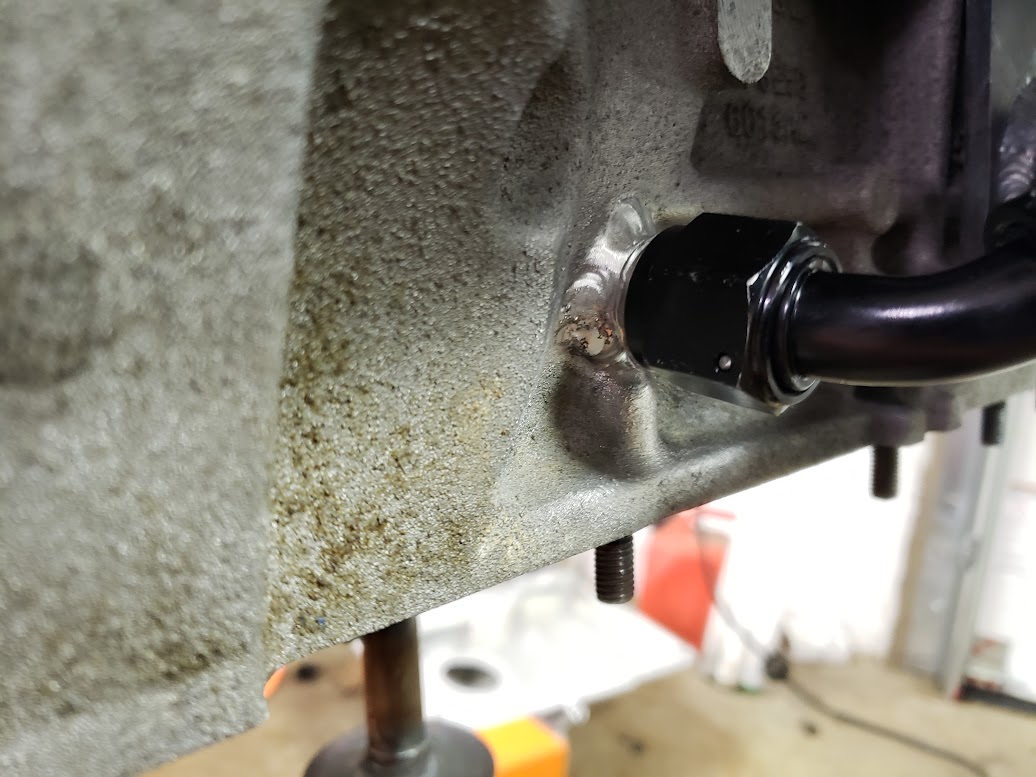
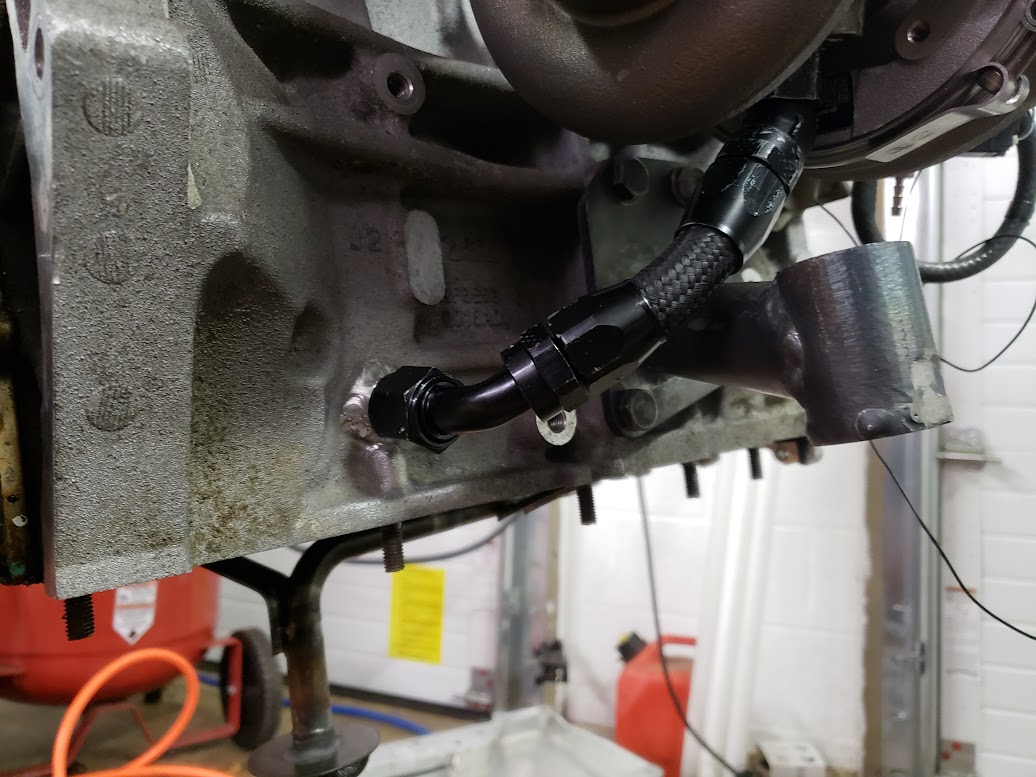
I didn't like the way the Fab9 kit had the oil drain at the block set up. They call for you to drill and tap the block in an area between two internal strengthening ribs. The problem with this is the block casting is angled there, so it's very hard to thread in the (3/8 NPT) fitting they want you to use. And the hose to the turbo is so short it's a pain to install. And everyone seems to have issues with it leaking. I saw this stripping out pretty quickly, so I turned an AN fitting to TIG weld into the block, now installing and removing the turbo oil drain is easy.
Not much to do before I can turn the key. I managed to booger up the one O-ring I had for the (Ranger) dipstick tube at the (custom) oil pan, and nothing I have in my stock will work. I need to make a plug for the stock dipstick tube (in the valve cover) since I'm not using that with this pan. I need to figure out the hot side radiator hose connection, now that the intercooler piping is done I can work that out, plus one more hose for the overflow and another one for the heater core return. Oh, and there's no exhaust, just a dump pipe off of the turbo. So, that's gonna be loud.
Engine is back in for the (hopefully) last time before I turn the key for the first time. I made a battery mount, finished all the battery wiring, and powered up the car. Everything works, the fuel pump primes and builds pressure, no leaks that I can see or smell. I finished up the oil plumbing, though I may shorten one hose. Sensors are in place for fuel pressure, oil pressure and oil temp to connect to the (eventual) aftermarket EFI. The DBW throttle even works without the engine running, which may be of use if I go with a Megasquirt ... could use the stock ECU to do the throttle and the Megasquirt for everything else. Not sure.
Mostly I spent a bunch of time cutting and fitting intercooler pipes until I was happy. I wanted to minimize the number of silicone couplers in the intake tract so I had a buddy TIG weld it all together for me.
The piping is a lot easier to manage without all the couplers everywhere.
I got the clutch fitted, reinstalled the transmission and finally got to install the driveshaft that arrived months ago. Everything fit together as expected. I bled the clutch and tested its travel... it seems to fully release but it's definitely close to the floor. I may need to modify the factory clutch pedal, or at least just adjust the plunger to get a little more release, but I won't know until I can start it and test the driveline with the engine running. It's already been reinforced as I guess it's pretty common for them to break.
I didn't like the way the Fab9 kit had the oil drain at the block set up. They call for you to drill and tap the block in an area between two internal strengthening ribs. The problem with this is the block casting is angled there, so it's very hard to thread in the (3/8 NPT) fitting they want you to use. And the hose to the turbo is so short it's a pain to install. And everyone seems to have issues with it leaking. I saw this stripping out pretty quickly, so I turned an AN fitting to TIG weld into the block, now installing and removing the turbo oil drain is easy.
Not much to do before I can turn the key. I managed to booger up the one O-ring I had for the (Ranger) dipstick tube at the (custom) oil pan, and nothing I have in my stock will work. I need to make a plug for the stock dipstick tube (in the valve cover) since I'm not using that with this pan. I need to figure out the hot side radiator hose connection, now that the intercooler piping is done I can work that out, plus one more hose for the overflow and another one for the heater core return. Oh, and there's no exhaust, just a dump pipe off of the turbo. So, that's gonna be loud.
01-10-2019, 06:49 PM
#53

Hey John, looking really good. On our XP RX-7, we just added a 17" two stage Burns Muffler and dumped it under the car straight down and have almost no problems with sound.
Is that the tranny you bought from us at Nats?
Mark
Is that the tranny you bought from us at Nats?
Mark
Last edited by Hi Flying 8; 01-11-2019 at 11:43 AM.
01-11-2019, 07:18 AM
#54
It most certainly is! Thanks again.
Your XP car has an REW, right? With the four cylinder I'm hoping it will be a little easier to manage sound and EGTs, so I bought a 3" in/out, 6.25" diameter round Borla that is about 17" long and I'm hoping it will be enough. I only have everything tacked into place right now but the muffler lives right next to the gearbox and dumps under the tailshaft area.
01-11-2019, 07:32 AM
#55
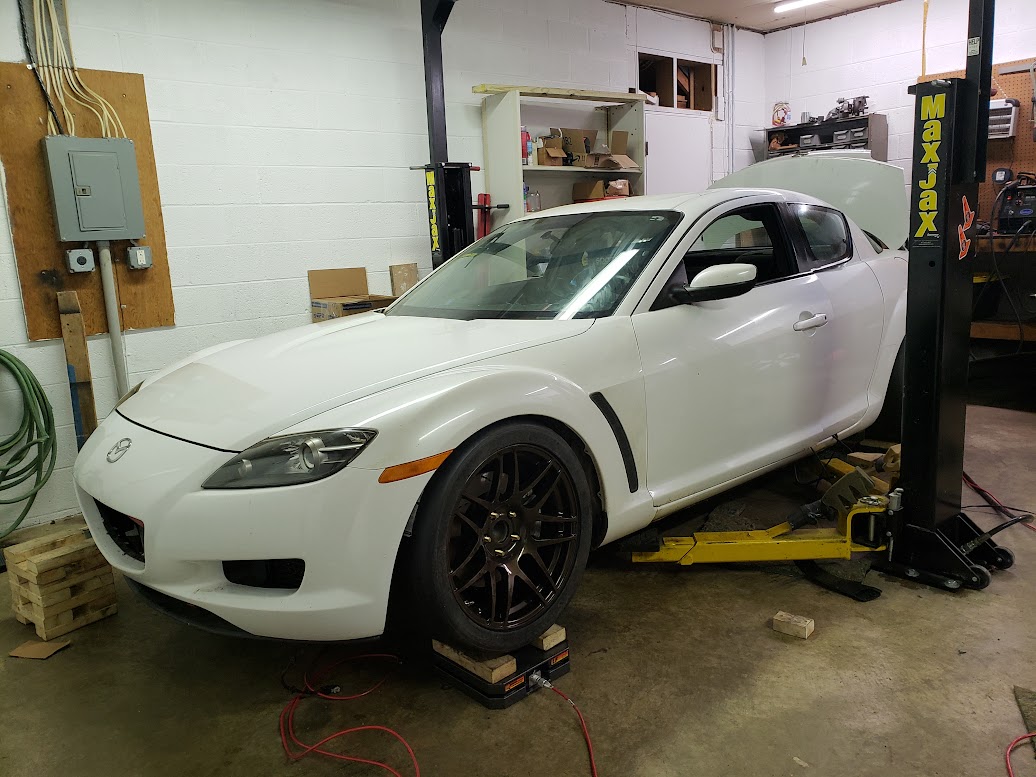
Not much interest in this thread here, but here's a small update. I have a bunch of small stuff now that needs to get wrapped up. And a couple big things - engine management (I'm thinking Haltech at this point), tuning and aero. And the inevitable long arduous debugging period that will probably consume me for the rest of the year. But it's complete enough that I put it on the scales to see where things stand.
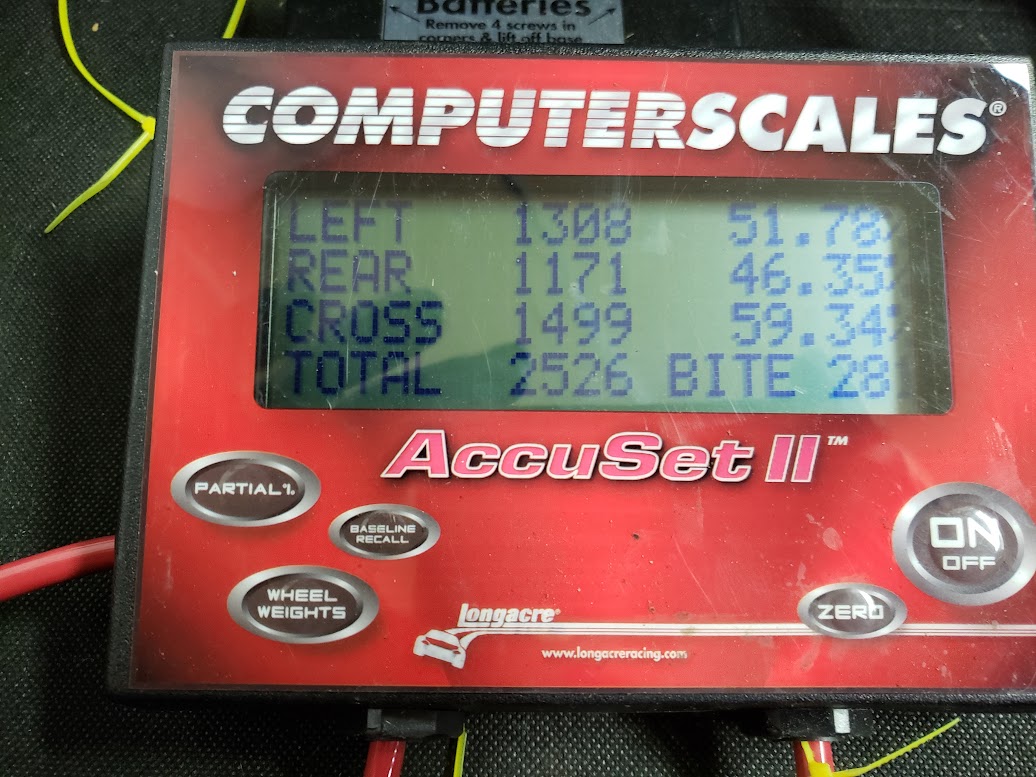
2526lbs is not bad and 25lbs lighter than I had projected when I started this whole mess. Interior is complete less the driver's seat, which is 8lbs (Sparco QRT-R). There's no muffler or piping other than the downpipe off of the turbo, but if the exhaust is more than 10lbs I'm doing something very wrong. It's probably two gallons down on fuel from where I'd normally run it, so 12lbs.
I'm estimating now that I'll probably need 20lbs of ballast, which is not a bad thing. It's annoyingly front-heavy, but that was expected as a lot of the weight came off the rear (diff, power plant frame, exhaust, trunk junk, rear seats) and the middle (gearbox, PPF) and the front weight that was added (intercooler) is way out in the nose. Crossweights are obviously way off, it's sitting on wood blocks for springs and the right rear tire is flat. At some point I'd like to convert to the smaller NC brakes and put together a setup with lighter calipers and rotors but it's not in the cards for this year. Engine management and aero are going to eat up the last of the budget for this year.
Just waiting on my factory computer to get back from having the immobilizer removed and I can fire it up... or try at least.
01-20-2019, 12:34 PM
#58
Deep annoyance overtook me when I got my ECU back ... and the immobilizer was still active. Long story short, there was a new release of the tuning software that the shop uses and the update flipped the polarity of the immobilizer. So basically the guy got my ECU, coded it for an active immobilizer, and sent it back. He is sending me one of his test ECUs that he verified works, so I should be able to try to start it soon. Still... annoying.
Still lots to get done anyway. I got started on making the rear upper shock mounts. I got this idea from Tamra and Drew, and used the same spherical bearings they did. This eliminates the factory rubber donut mounts for the rear shock shafts. I shortened the housings by a couple inches as well to get the desired bump / droop numbers relative to static ride height.
Factory rear shock hat:

Top cut off:

New top plate mocked up, with the hole for the bearing cup cut out:


Not my prettiest welding, but whatever.

I turned some simple pieces to adapt the 0.550" Penske shafts to the spherical bearing. I know people say the Grizzly mini-lathes are useless but if I can whip stuff like this up in an hour, it's totally worth having.

Next job I've been putting off is re-making the lower front crossmember. This piece braces the back of the subframe to the unibody and spans the width of the unibody rails. The stock one ran into the 2.5L engine's oil pan. I cut the center out of it and replaced it with a section of 3/4" x 1.5" x 0.063" rectangular steel tubing, then braced it with another couple of pieces of tubing. It's way stiffer than the stock piece and only weighs a half a pound more.

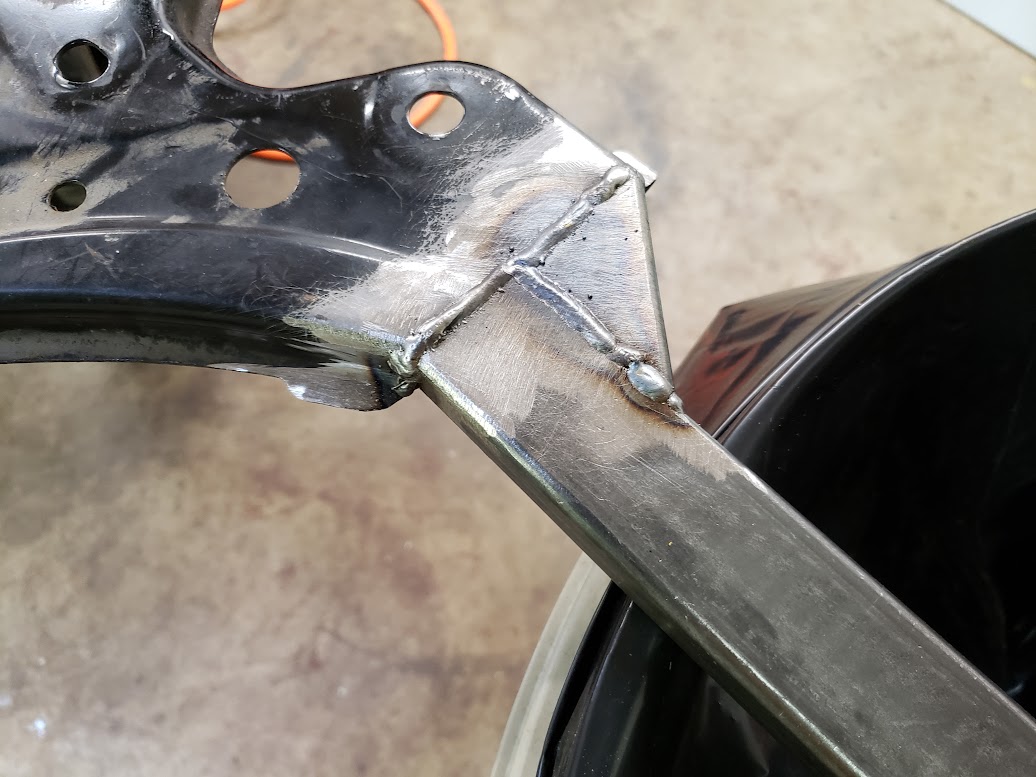


Needs a prime and a coat of paint and it'll be good to go back on the car.
Still lots to get done anyway. I got started on making the rear upper shock mounts. I got this idea from Tamra and Drew, and used the same spherical bearings they did. This eliminates the factory rubber donut mounts for the rear shock shafts. I shortened the housings by a couple inches as well to get the desired bump / droop numbers relative to static ride height.
Factory rear shock hat:
Top cut off:
New top plate mocked up, with the hole for the bearing cup cut out:
Not my prettiest welding, but whatever.
I turned some simple pieces to adapt the 0.550" Penske shafts to the spherical bearing. I know people say the Grizzly mini-lathes are useless but if I can whip stuff like this up in an hour, it's totally worth having.
Next job I've been putting off is re-making the lower front crossmember. This piece braces the back of the subframe to the unibody and spans the width of the unibody rails. The stock one ran into the 2.5L engine's oil pan. I cut the center out of it and replaced it with a section of 3/4" x 1.5" x 0.063" rectangular steel tubing, then braced it with another couple of pieces of tubing. It's way stiffer than the stock piece and only weighs a half a pound more.
Needs a prime and a coat of paint and it'll be good to go back on the car.

 03-02-2019, 04:12 PM
#64
Got some work done today. I made a couple bosses to mount my splitter support rods to the splitter.


I took an idea from Robert Thorne's SSM car to use gas struts to support the splitter, so it can deflect upwards when it hits the ground. The bosses above mate to a pair of clevises which screw to the struts.

I made a tab out of some box section steel and welded it to the crash bar. The cylinders are extended using chromoly rods that I tapped and threaded to a rod end.

With the cylinders extended the splitter is level with the ground and easily supports my weight.

Each side can compress individually without binding up. The rear of the splitter is mounted to the subframe in a way that it can pivot.

I also finally got around to making misalignment spacers for the rear sway bar end links.

I did a rough cut-out of the air dam but haven't started riveting it to the splitter. I ended up using some conveyor belt material I got from McMaster. It's a little more rigid than I hoped it would be, but it's also super cold out today so maybe it'll get a little more pliable.

I still have some engine bay clean-up to do and the final wrapping of the harness, but it really runs sweet with the Haltech, after just a bit of closed-loop O2 learning. The cooling system also bled itself while I sat here and let it idle. Fans kicked on as expected. Oil pressure and temperature are good and no odd noises yet . I need to make a clutch stop so I don't over-travel the twin-disc clutch, so the only driving I've done is in and out of the driveway. But by the end of tomorrow it'll be ready to go for a shakedown drive.
https://www.youtube.com/watch?v=dSzxMieiBuk
I took an idea from Robert Thorne's SSM car to use gas struts to support the splitter, so it can deflect upwards when it hits the ground. The bosses above mate to a pair of clevises which screw to the struts.
I made a tab out of some box section steel and welded it to the crash bar. The cylinders are extended using chromoly rods that I tapped and threaded to a rod end.
With the cylinders extended the splitter is level with the ground and easily supports my weight.
Each side can compress individually without binding up. The rear of the splitter is mounted to the subframe in a way that it can pivot.
I also finally got around to making misalignment spacers for the rear sway bar end links.
I did a rough cut-out of the air dam but haven't started riveting it to the splitter. I ended up using some conveyor belt material I got from McMaster. It's a little more rigid than I hoped it would be, but it's also super cold out today so maybe it'll get a little more pliable.
I still have some engine bay clean-up to do and the final wrapping of the harness, but it really runs sweet with the Haltech, after just a bit of closed-loop O2 learning. The cooling system also bled itself while I sat here and let it idle. Fans kicked on as expected. Oil pressure and temperature are good and no odd noises yet
. I need to make a clutch stop so I don't over-travel the twin-disc clutch, so the only driving I've done is in and out of the driveway. But by the end of tomorrow it'll be ready to go for a shakedown drive.https://www.youtube.com/watch?v=dSzxMieiBuk
03-02-2019, 08:05 PM
#65
Registered

This is an awesome build. Hopefully I'll be able to make it to one of the Pro's or Championship Tours to see it in action. The power to weight along with that massive contact patch should certainly make it a competitor in SM once you get it sorted out.
03-04-2019, 05:47 PM
#66
Registered

I'm curious if the coolant expansion tank is working like it should with this engine. With the Renesis, the full and low lines of the expansion tank are above the highest point anywhere else in the cooling system. This ensures that there is no air in the system. With your engine, you have a coolant line that seems to be over the top of the expansion tank - so I think that line is likely full of air. You might have to relocate the expansion tank to a higher point unless there's something I'm missing.
Awesome build though! I've been following along here and on the sandbox. I'm building an REW-swapped RX-8 for a similar purpose (mostly TT/time attack, but some local SM), and I'm taking some inspiration from what you're doing.
Awesome build though! I've been following along here and on the sandbox. I'm building an REW-swapped RX-8 for a similar purpose (mostly TT/time attack, but some local SM), and I'm taking some inspiration from what you're doing.
03-04-2019, 07:06 PM
#67
The coolant expansion tank, as well as the rest of the cooling system (except a few custom pieces) are from the NC Miata. The cooling system of the NC is much different than the system from the Renesis, and so far it seems to work great.
 03-17-2019, 07:21 AM
#70
Wrapped up a few things yesterday. I finished up the alignment and re-scaled the car. I cut the hood and riveted on the hood vent. I washed the car and installed most of the graphics, though I've still got a few yet to go and I don't have any of the official SCCA decals (except the Tire Rack banner). The red numbers are the same color as my old BMW which was intentional

I shouldn't have worried about the cooling system, it bled itself after a few hot/cold cycles and now seems to be working properly. I am using a stock NC radiator right now, I kind of hope it is sufficient but if not, Goodwin racing sells a nice upgraded radiator that is bolt-in for an NC.
I drove it up and down my driveway a bit, accelerating to 40MPH and standing on the brakes to bleed the air from the ABS unit. The Haltech gets better and better as I let it self-tune, but it already runs really well after a little cold-start tweaking. I got into maybe 2psi of boost without really trying and the car feels sprightly. No rubbing or anything but I do think I'm going to have to do a little more fender clearancing work (where the rear bumper attaches to the quarter panel forms a sharp tab that I'm worried about), which will mean finding a way to attach the leading edge of the bumper.
Oh, and I'm still waiting on wing parts from Ciro.
Stuff left to do... I think I am going to work on the rear spring perches a bit. I don't like the way the spring seats on the stock steel spring perches, using a delrin adapter for 2.5" race springs. I may just fab up a plate to weld on there with a ring to center the spring. I've run the fuel tank just about dry, so I'm going to go pick up 10 gallons of E85 today and see how well the ethanol content modification table works all on its own, then continue the low-load tuning with E85. I need to build a bump steer rig, because Brett set up the rear toe arms to be adjustable for bump steer and I haven't even checked that so it's probably way off. And I've got a small exhaust leak, I think at one of the V-band clamps but I'll need to check it out. A buddy was over and recorded one of my laps up and down the driveway.
Tuning trip is set up for March 30th, Peter Florance at PFTuning will work his magic on the car and I'm sure we'll find all sorts of problems, but that's how these things go. In between now and then the only thing I really need to get done is a thorough nut and bolt of the car. Pretty excited!
03-18-2019, 03:02 PM
#71
Awesome progress, John! I've been pretty low on motivation for a long time now, but this is helping.
I was pretty unhappy with the 2.5" spring solution too, even with my own adapter that didn't go smaller than the spring ID, and the best fix was switching to inverted 2812s (obviously not ideal).
I was pretty unhappy with the 2.5" spring solution too, even with my own adapter that didn't go smaller than the spring ID, and the best fix was switching to inverted 2812s (obviously not ideal).
Last edited by Kennetht638; 03-18-2019 at 03:05 PM.
03-19-2019, 11:13 AM
#72
Thanks Kenneth. I came close to doing an inverted rear shock setup but I would have needed to buy new rear shocks. I bought a set of NC shocks for a good price right after I bought the RX-8 in 2017 and I wanted to use them. I think ultimately an inverted setup is the right answer, but I'd want to reinforce the upper shock mount to handle the load and that's more work than I have time for.
As it sits I have a helper spring, a coupler, and a 2.5" chassis spring in the rear, and I can't lower the rear any more than I have it right now unless I go to a shorter (5.5"?) rear spring. If I re-engineered the upper spring perch I could solve that problem and keep the spring located.
As it sits I have a helper spring, a coupler, and a 2.5" chassis spring in the rear, and I can't lower the rear any more than I have it right now unless I go to a shorter (5.5"?) rear spring. If I re-engineered the upper spring perch I could solve that problem and keep the spring located.
 03-19-2019, 02:27 PM
#74
Registered
I have an upper spring perch design for a 2.5" spring that is just like the one from trackjunkie's build thread (plate that welds onto the tophat). I reverse engineered the shape of the tophat and 3D printed iterations with different 2.5" hole locations until the shock was centered for the full range of travel. PM me if you want the DXF file or more details. I had mine CNC plasma cut from 1/8" steel and it was pretty cheap.
03-20-2019, 06:07 AM
#75
I have an upper spring perch design for a 2.5" spring that is just like the one from trackjunkie's build thread (plate that welds onto the tophat). I reverse engineered the shape of the tophat and 3D printed iterations with different 2.5" hole locations until the shock was centered for the full range of travel. PM me if you want the DXF file or more details. I had mine CNC plasma cut from 1/8" steel and it was pretty cheap.