When you click on links to various merchants on this site and make a purchase, this can result in this site earning a commission. Affiliate programs and affiliations include, but are not limited to, the eBay Partner Network.
Ok, small update. I'm hoping to have enough buttoned up on the car to take it out to Mid-Ohio in a couple weeks. Mission: break-in the new engine, make sure nothing falls off the thing...
Front end is mostly done. Brake ducts aren't fabb'd, but I won't be pushing hard enough to really need them for this event.
Here's what I have been working with...
Old Radiator Intake: Pro-race team radiator inlet (no, that's not a typo)
"Slapped together out of multiple scrap pieces" is how I'd describe it. The mesh was on the nose, but it was thrashed and had to be replaced immediately after getting the car. Hard to see in that shot, but the angles don't even match.
This is how I roll...
New Radiator Intake: Garagista radiator inlet w/mesh
Here's a preliminary shot of how it's coming together:
Radiator Inlet w/Mesh over Oil Coolers
Pro-race team my ***.
Best,
-j
Keep up the good work on this bud, may have to have you replicate some of those parts for my white one soon. Going to start tearing into that car soon as I make room for it in my garage.
Hope all is well, glad the break in went smoothly at Mid-O I know it's been a while since you guys ran there. I took the really nice car out to Gingerman for Grid Life this past weekend. Needless to say, it left me wanting more. Dismal acceleration and front end grip, not much to be said for a stock car. 10 seconds a lap slower than my H2 civic, I guess it's to be expected.
Either way glad to see you're progressing with this project!
Wow! The drama with this car never ends. I'm hoping I can more truthfully say, it's merely slow to end. So, updates:
- New engine rebuild needed (long story, see below)
- New Racing Beat ECU flash (for ported engine)
- New MAF installed
- New break-in procedure (lower RPM range for more miles)
- Clearanced exhaust tube around differential, & a new muffler
- Re-wrapped exhaust tube, added heat shielding
The new alignment I put on was a much needed change. The car's handling now is really magnificent. The Gingerman event went well, but it was painful to keep the RPMs so low. I barely needed the brakes.
I guess I should say something about engine #3. Engine #1 was crap, it was sold to me dead on arrival. So I guess apart from a shady deal, I shouldn't be surprised engine #2 was needed. That very well-built engine suffered hyper-early compression loss, and more importantly a sizable compression split between front/rear rotors. The engine builder was very good about honoring his end of the situation and giving me a much-needed bump in his work queue. So I was able to get the newest engine out for it's first break-in session w/o missing an event (as a non-street-legal race car, there's precious little time to run it).
We suspect that the "tuned ECU" was at fault for creating a lean condition that prematurely sagged the apex seals. The engine that was built was ported, and the ECU was supposed to be tuned for this. However, upon closer examination, yep - you guessed it - that ECU was bone stock...because, why would the previous owner have told the truth about it? I just can't stress enough what a wide variation there is between "pro-race teams."
On my end, my builder wasn't too happy that I had it dyno'd at the end of the first event. It's a race car! Race car's need to be rule-compliant, and I need an official dyno report to get classified. With less than 120 miles on the thing, that run may have put the fresh engine in a dangerous state. Or it could have been a combination of that run, stock ECU, bad MAF, all conspiring against engine #2.
So I'm being extra careful with engine #3. So far, compression after the Gingerman event looks promising with both rotors holding tight together and compression climbing from the pre-event results. I'll continue to take compression after each event to chart the engine's health. When I eventually sell this car, the new owner won't get "a story" about it's history. I'll have detailed records kept since day-1 of my ownership accompanied by a photo-log of all work and fabrication done. Lesson learned: never buy a car from someone who is far less **** than you.
Here's my current rub: I get so much "promise" every time I drive the car - it gives just enough of a hint at how good it can be...it's maddening. It's so damn good, and I hate it so damn much.
Still hoping to get to post the "fun stuff" I'm working on. For now, it's just maintenance and repairing the silly stuff the "pro-team" did...
So in this corner we have a pro-race team's idea of hanging the exhaust.
TechSport Racing exhaust hanger(s)...
I was told that "the car is really hard on the differential fluid..." Um, ya' think?!? You laid the tube right on the diff - it's literally in constant contact with it.
Mmmm, warm and toasty...
So that got to go.
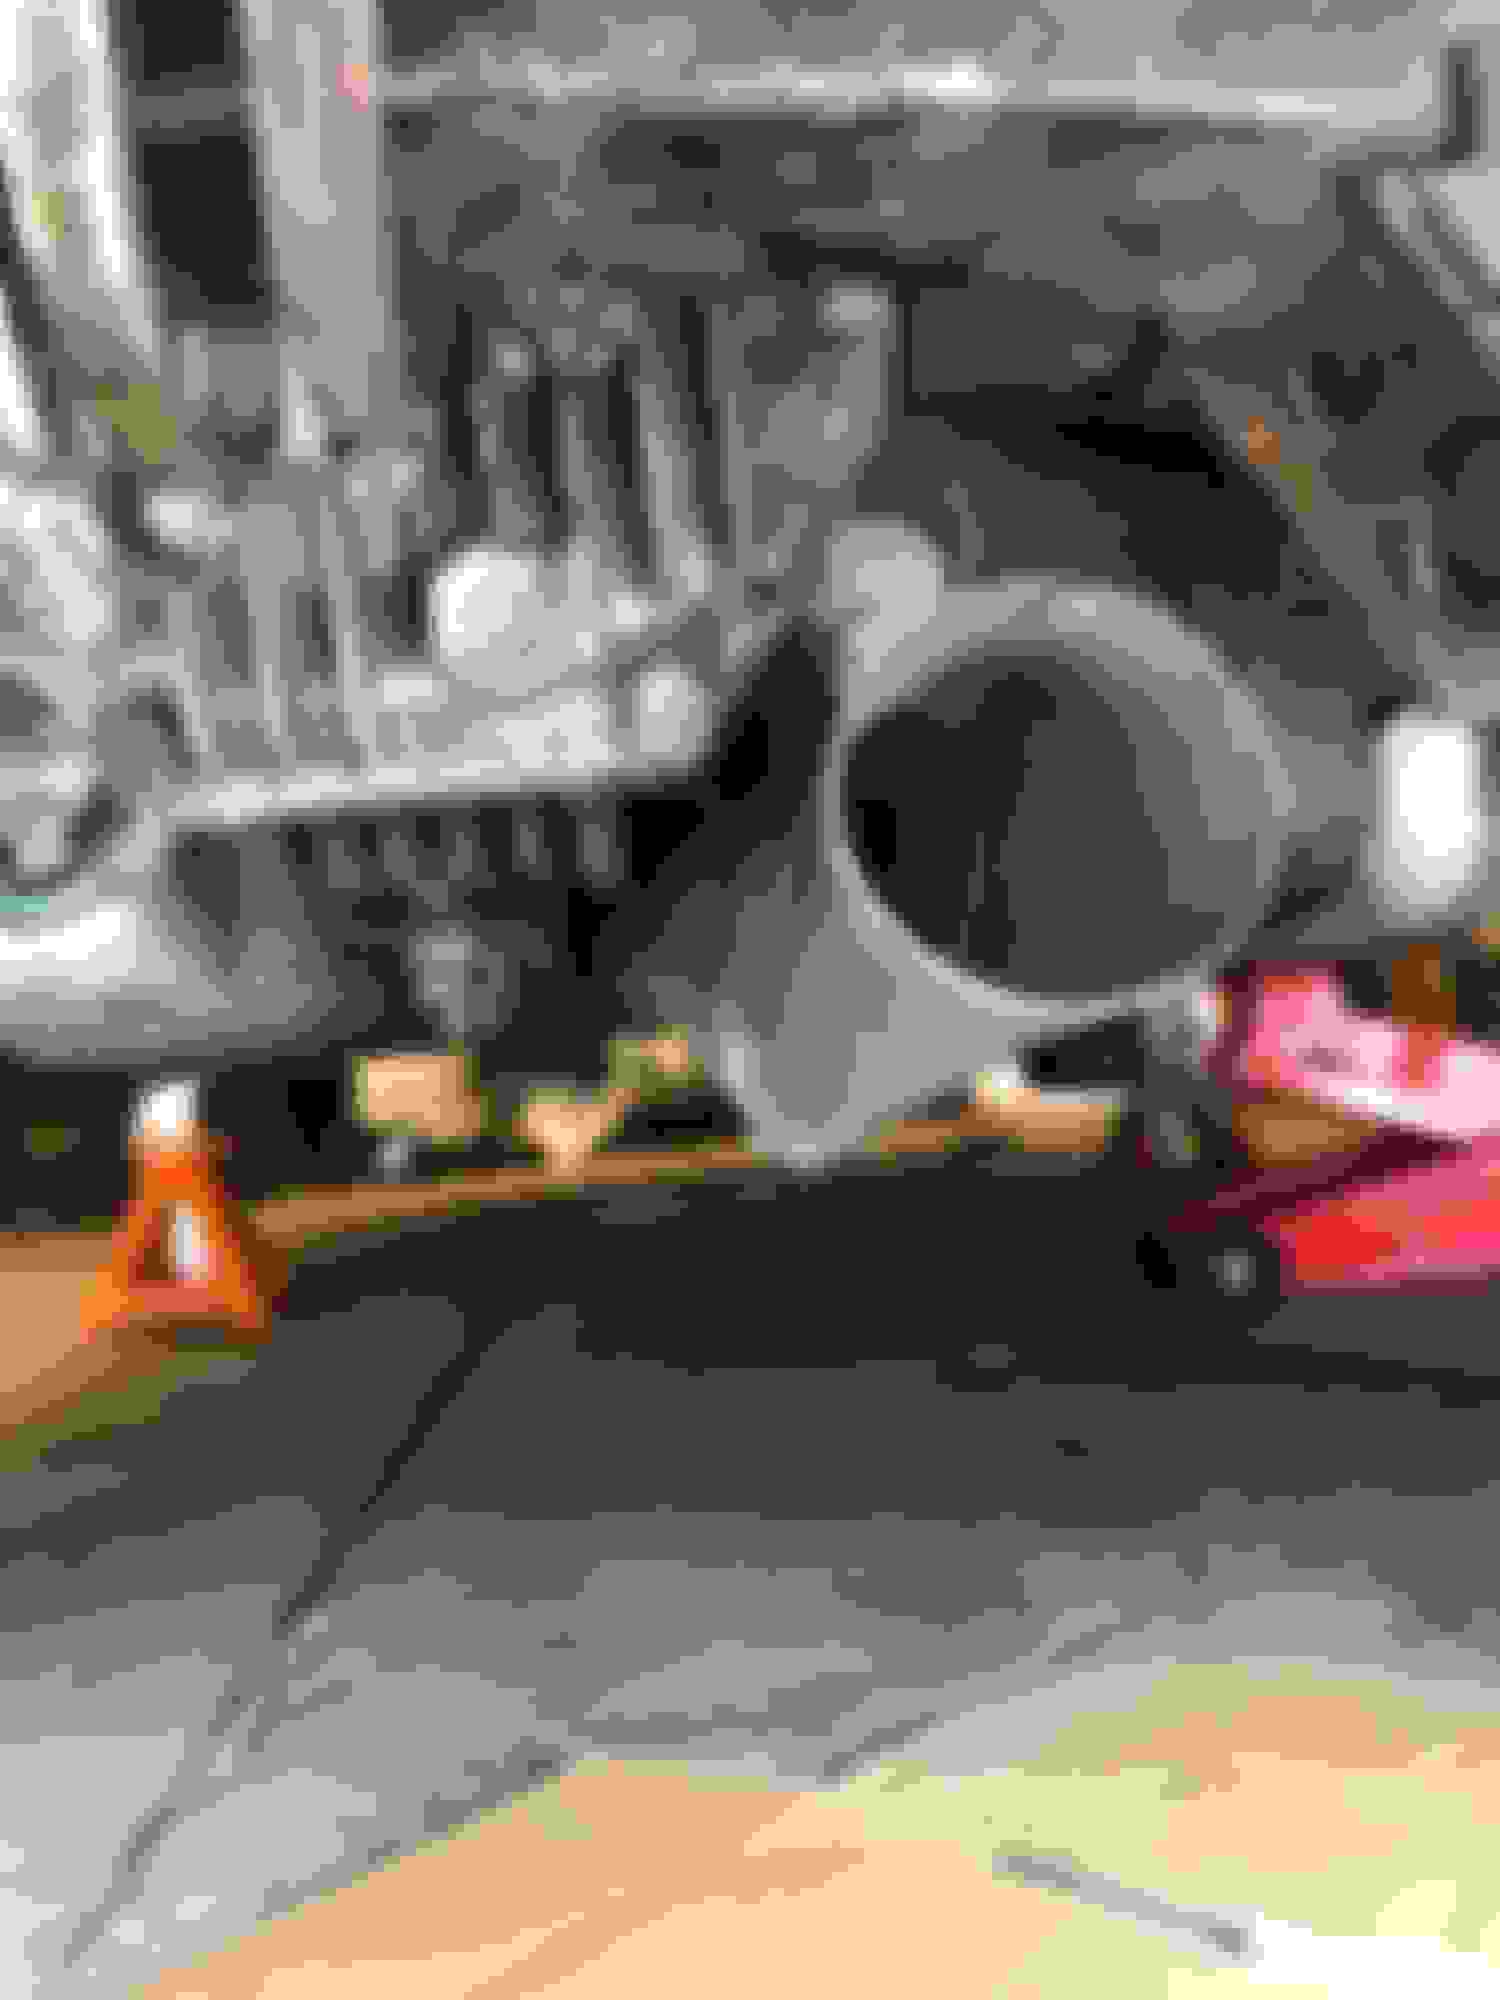
In this corner, we have the garagista team's effort.
There's not a lot of room to get a 3" tube through here. Time for arts and crafts. I ordered two 3" to 3.5" transition pieces. Then crushed down the 3.5" sides to about 1.75" or so (thank you to my 20-ton press). NOTE: You can't just squash a 3" tube down, that will result in a cross sectional area that is less than the original 3" tube. You need a larger tube, that when flattened into an oval yields a similar area as the original 3" tube. That way you don't get a loss of flow capacity. I got something like this:
Not the best fit-up, but it'll work...
Mock up the angles...and you get:
Clearance baby!!
That's 1" of clearance from the differential now. I did lose about 3/4" of ground clearance from before, but I'm happy to live with that over baking the differential every run. I also have a proper hanger (tack welded here just checking for fitment):
Oh...so that's what an exhaust hanger looks like...
So far so good. Now to address the old tattered exhaust wrap.
Are you going to be at Autobahn at the end of the month? I just signed up for it as my first NASA event in HPDE2 (on the advice of Nick after I told him I'd done 10+ trackday/PDX events with SCCA).
Exhaust wrap is a regular maintenance item. The stuff doesn't last terribly long, so I don't find fault with the condition it was in...though it could've been maintained far earlier (before it got to this state).
Here's what was left of it:
Old wrap...pretty well disintegrated.
So off with that, on with the new.
Shiny!
This stuff is basalt fabric tape - it's sold under the "titanium" moniker, but it's just basalt fabric woven into tape. The new oval clearance piece needed some as well.
Oval transition wrapped with cone insert installed.
The cone insert is an experiment. I picked up two of these years ago for another project but never used them. They're supposed to reduce noise just a bit without adding significant back-pressure. We'll see. The new muffler going on is slightly smaller than the previous one, so any additional dB reduction is welcome.
I pulled the OEM heat shield (or what was left of it).
Toasted defense...time for a refresh.
I added a fresh liner, but the new one extends much further around the trans tunnel to the other side of the floor. Forgot to take pics of it installed, but I'll post it this weekend.
Again, I can't fault wrap and shielding failure - they're all doomed, it's just a matter of time. This is just normal maintenance for this type of product. Still, should've been done long before they got to this late stage of deterioration. I figure it's an annual or maybe bi-annual maintenance item.
Hey! Yes, I'll be at Autobahn for sure. That's my 3rd "break in" event, so I'll still be RPM limited, but not quite as bad as Gingerman and the coming RA event.
I'm the HPDE 1 group leader for the NASA Great Lakes region, so I'm at just about all of the events. That means I'm also pretty easy to find. Hope to catch up with you there!
Best,
-j
Originally Posted by NotAPreppie
Are you going to be at Autobahn at the end of the month? I just signed up for it as my first NASA event in HPDE2 (on the advice of Nick after I told him I'd done 10+ trackday/PDX events with SCCA).
Really? Do you have any experience with these on a rotary? I totally do not, so I'm not denying what you're saying, and I'm not convinced these are the cat's meow. I'm just trying it out.
Going off of what Vortex says, the total open area of all the perforations is larger than the area of a straight pipe. So (the story goes) it should present no appreciable back-pressure.
Have you experience with these? A back-to-back dyno run and/or track session would be nice to try out. The insert is easy-ish enough to remove, so it's a possibility. Let me know if you've used them before. I don't know anyone who has used them, and the limited net experience I've seen suggests they're only modestly effective at noise reduction.
Me and other people here too and they don't work well on sound either, basically when it has enough flow the sound silencing is zilch, rotary sound & flow is just way different than a 4-cycle reciprocating engine
Would recommend a stainless Moroso spiral flow or BHR version for the intial resonator and Coast Fabrication muffler(s)
Is the driveshaft heat shield supposed to be lined? Or was that an addition? If it is supposed to be there, I need to add it to my car since mine is completely bare...
It shouldn't be needed on an exhaust that's been properly fabricated and supported around the differential with elbows. I can't recall ever seeing one get burnt up like that. Seems like the differential must have been getting blasted pretty good too in addition to the usual stress-load heat
No idea on whether the stock heat shield is lined or unlined. I wouldn't be surprised if it was unlined. This car had a ton of heat shielding added to it in its initial build, and as TeamRX8 suggests, the exhaust was not properly fabricated at all (though parts of it are nice - yummy headers, etc.). I suspect they had trouble figuring out what to do with the 3" tube - to my eyes, it doesn't look easy to just bend your way around the diff and still clear the rear sub-frame with that size of tube. So they just went straight...despite the obvious trouble that was going to cause the differential.
Quote of the day: "Sometimes you just really wonder what people were thinking."
There's more than one "band aid" on the car that I've had to address. Since I'm not going to deal with the redoing any more of the exhaust than I already have, I'm keeping the new shielding - the car has been hot as hell in the cabin anyway.
Thanks for the heads-up on the insert. I may still try a back-to-back test later just to get hard numbers, but for now it'll come out.
Just poking around....great craftsmanship on the car! It's a shame so much was wrong with the car to start. With your skills, I wonder if you could have built it from scratch instead of having to start with their mess.
I wanted to comment on a couple of common aero misconceptions in an early post:
To secure it to the car, the chassis wasn’t exactly helping much, so I had to make a sub-frame to properly take the load. Simply bolting it to the front fascia is a waste of opportunity. You’ll split the air and thus benefit from having less air go under the car and such, but with all the flexing the nose allows you won’t gain much from the low pressure zone under it. For that you need a rigid structure that can take the aero load and transmit it directly to the chassis.
The aerodynamic load will be transferred to the chassis irrelevant of the mounting stiffness. If the airfoil initial position and geometry are sub optimal, it may even generate more downforce with flex.
The low pressure beneath the airfoil (splitter) is generated by accelerating the air, which usually happens when a car originally meant for the street is lowered. However, preventing airflow from going under the car may choke the airfoil and result in less downforce.
This document has some pretty good wind tunnel test data on a bluff body with a diffuser (the air diffuses in the open area behind a splitter even if there are no tunnels). Here is an image of downforce versus ride height for various diffuser angles. Note how they all have an optimum, including the 0° curve, and the downforce drops dramatically if the ride height is reduced too far:
Regarding the muffler design, here is a good resource. They explain how to apply the process to design near the end of the report (fortunately, not as complicated as deriving it): https://ntrs.nasa.gov/archive/nasa/c...9930092208.pdf
New heat shielding is in. I’m pretty sure this is the same stuff that was on the car: DEI Floor & Tunnel Heat Shield II
I replaced the shielding on the OEM steel backing, but also extended it over to cover more of the trans tunnel and passenger side fuel tub.
New floor heat shield in place
We’ll see how long it lasts before needing replacement. I put a bit more under the trunk where the muffler passes, because I relocated the battery to the trunk. Even though the battery is a sealed box and should be decently insulated in its own right, I’m just being a bit enthusiastic.
I’m a total aero buff (ok, I’m a geek, an aero-geek), so I’m very happy someone has raised aero-related matters. I know just enough about it to be dangerous.
Bit of background may help frame where I’m coming from. Most of my understanding of aero comes from self-study. I started with Simon McBeath’s Competition Car Aerodynamics, which I highly recommend for anyone looking to get a solid basic introduction to aero. I moved on to Joseph Katz’ Race Car Aerodynamics: Designing for Speed – this book flat out rocks! From here I’ve been reading assorted research articles, mostly following up on Katz & McBeath’s bibliographies. Thanks for the link to the Jowsey thesis, I'm looking forward to reading it.
On my own, I have the good fortune to have access to the full suite of SolidWorks software, including their Flow Simulation. So I’ve done mini-studies of different aero devices and scenarios to test ideas/guesses and wrap my head around the software’s capabilities.
Here’s a quick study I did of an early version of the exhaust oval transition.
Exhaust tube test - offset oval transition
Note the significantly slowed area in the corner; this was due to the offset axis of the transition (the expansion was too large to one side). So that concept was ditched in favor of a symmetric oval transition.
Anyway, back to your comments. I should clarify that I wasn’t saying all aero devices should always be rigid – I was saying at some point their mount (or a relevant portion of their mount) needs to be rigid in order to be of any use. We know Ferrari has made great use of flexible aero winglets/canards (of a sort) on the front of their street cars, and Toyota has famously made illegal use of their flexing rear wing on the TS040 (*tsk-tsk* Toyota, didn’t you learn from Porsche getting busted for similar flexibility?). But all those players were well aware of the range of flexing at the design stage, thus making it possible to control their devices.
If a part flexes and that flex leads to a pressure difference that favors greater downforce, then certainly you get “more” aero load imparted on that part. So I wasn’t claiming it “won’t work” or anything generic like that. Air is air, it will do what it does, but whether or not we get anything out of the deal is what’s at stake.
As an aside, I’m well aware that the goodness of the ground effect has a limit. You can only go so low before you get viscous blockage. However, my worry in a non-rigid mount wasn’t a concern with viscous blockage, although in an extreme case of flex that might be a concern – in reality you are far more likely to experience it at the leading edge of your splitter with nose dive under heavy braking. So again, no real dispute with what you said in this regard.
Here’s another way to express my “rigid-mount” concern. Let’s accept that you will get greater aero load out of a splitter that is a bit lower to the ground (due to flexing of the mount). As you point out, the pressure between it and the road will drop more than it otherwise would’ve with a rigid mount. So let’s just say you get “more” load out of it. The question I have is, does it translate into the chassis? Where we disagree is in the idea that it doesn't matter how the part is mounted; or put differently, the idea that you'll get the same benefit out of the part regardless of its mounting.
Try this out: let’s go from a small wing on the rear deck lid to a massive one. All things being equal, we can agree that the larger wing will generate more downforce. No argument there. However, if you mounted the smaller one with stiff aluminum stanchions, but mounted the larger one with Twizzler sticks, all that extra load is not going into the chassis. You’ll just squash Twizzlers…at least up until the point they are acting as solid as the aluminum. In other words, it seems to me that more load on the part does not automatically mean more load on the chassis. Without the force making its way to the chassis, it’s just a part flying through the air, happily experiencing it’s own greater or lesser aero loads as is appropriate to the speed.
With the Ferrari, Toyota, and Porsche examples, all of those parts are rigidly mounted at some point to transmit force into the chassis – they flex along a different mount point to allow for variation in the aero load imparted to the part. To go along with my Twizzler scenario, imagine Ferrari’s front winglet/canards mounted with rubber bands – it’ll go up and down as aero loads dictate but it’ll do diddly for the car’s performance. Of course, they didn’t mount it with rubber bands, they did so rigidly.
Again, I don’t claim to be an aero expert, I know just enough to be dangerous. So I’d be SUPER happy to have my errors of understanding corrected. I will say, my own self-critique involves the downstream impact on the chassis from the lower pressure created by a droopy mount. I don’t know if enough of that lower pressure zone persists downstream under the rest of the chassis. If so, you’ll still get a lower pressure area under the car – and that would obviously directly translate into the chassis. I’m open to that possibility, but I suspect as soon as the air passes the drooping splitter it slows and returns to just about the same pressure as it would’ve been otherwise. But who knows…less air mass is less air mass, you know…
Thank you again for opening up the aero conversation.
Try this out: let’s go from a small wing on the rear deck lid to a massive one. All things being equal, we can agree that the larger wing will generate more downforce. No argument there. However, if you mounted the smaller one with stiff aluminum stanchions, but mounted the larger one with Twizzler sticks, all that extra load is not going into the chassis. You’ll just squash Twizzlers…at least up until the point they are acting as solid as the aluminum. In other words, it seems to me that more load on the part does not automatically mean more load on the chassis. Without the force making its way to the chassis, it’s just a part flying through the air, happily experiencing it’s own greater or lesser aero loads as is appropriate to the speed.
So this isn't actually an aero problem so much as it is just a force balance. Instead of your hypothetical wing, just imagine that you're using a 200 lb weight. If you set it on the stiff structure, nothing would deflect and you'd get an additional 200 lbs on the rear tires (approximately). Now if you set it on the twizzlers, it would destroy them and the 200 lbs would end up sitting on the trunk lid and you'd get an additional 200 lbs on the rear tires. If it was a wing, you wouldn't have 200 lbs anymore because air wouldn't flow under it, so this example is a little bit too ridiculous to be illustrative. But imagine that you had the weight on a 100 lb/in spring. You'd set it down, the spring would sag 2", and you'd still have an additional 200 lbs on the rear tires. That's basically what happens when you mount a wing to a less stiff structure. It'll move a bit, but it'll still transfer the load to the tires because there isn't actually anywhere else for it to go. Where aerodynamics complicates it is that if it moves enough, it affects how well the wing might work, so that 200 lbs might become 190 lbs, but the load will always be transferred into the chassis unless it breaks something and flies away.
I should also mention that I've been watching your build and it looks like you're doing a great job and I'll probably copy some of the things you've done. I was wondering where you got the MS style bumper that you showed on the first page and if you like how it fits. I'm considering getting a knockoff MS bumper, but I don't want to sink weeks into making it look right.
Also, like Team, I was able to sneak a 3" pipe by the diff without resorting to any crazy transitions. I'm probably going to have to upgrade to 3.5" or 4" soon, so that will probably be a lot harder.
I had a suspicion that the something like the spring-analogy used was the way to think of the mount. Sadly, I still don't feel I fully understand it. [I can be slow...like really...so give me time.]
Thanks for the kind words on the build so far. I got the MS style bumper from an eBay seller. It's a urethane one, and the fit is tolerable for a race piece. But your car looks awesome! So I'm not sure what your tolerance level is for fit and finish. I used the side-marker light pockets for the quick-release brackets, so I had a lot of latitude in lining things up to my satisfaction. If you were using the OEM mounts, you might have some trouble. Also, the hood gap is large, but that's probably just my car; the old nose had a large gap as well.
If my lost ground clearance proves to be troublesome, I'll be revisiting the diff-area. That's a clean install. Looks like Team's pic shows a 45 deg. bend to a 90 deg and back to another 45 deg bend. Was it really that simple? Or did you have more finicky angles to work out?
Thanks for the tip on the bumper. I'm ok with race car fit, but I don't want my car to look like a pile of junk. From what I can see in your photo, I'd be pretty ok with that piece.
As for the exhaust, I was able to use a 45-ish bend to start shooting over to the right and then a not-quite-90 degree bend to clear the subframe. You can see that there's a little pie cut just after that to get the pipe pointing upwards to tuck the muffler away after that, but this was the simplest way that I came up with.
My exhaust looks very, very similar to Kenneth's. The biggest difference is that my muffler is shorter, so the pipe doesn't have to go so far to the left. It does a jog around the diff and then straight back.
Since it's such a small muffler I have a turn-down tip and had to put a resonator in the midpipe.
Looks like Team's pic shows a 45 deg. bend to a 90 deg and back to another 45 deg bend. Was it really that simple? Or did you have more finicky angles to work out?
Sorry I missed this, easiest way is to take two 90* bends, one 90* goes in the middle unmodified. The other 90 gets cut into two pieces at the proper spot; one piece will form the lower angle transition at the front and the other longer angle piece goes at the far end. Then just two straight pieces of proper length tube between them forms the entire transition around the diff. This assumes you want it coming out straight and in the center of the centerline/subframe opening like mine
very nice build. i'm in the process of looking into getting an rx8 to do a TT4/ST4 build also. I've been doing TT3/TT4 in my Evo 9 for about 7 years and I'm ready to get into some w2w racing and the Evo is not a feasible chassis for me to do that.
I'm considering K24 or SR20 swap. cheaper to make power and more reliable?
Last edited by trackjunkie; 10-16-2017 at 11:02 PM.
very nice build. i'm in the process of looking into getting an rx8 to do a TT4/ST4 build also. I've been doing TT3/TT4 in my Evo 9 for about 7 years and I'm ready to get into some w2w racing and the Evo is not a feasible chassis for me to do that.
I'm considering K24 or SR20 swap. cheaper to make power and more reliable?
The RX-8 is super tempting, due to its exceptional handling and incredibly low price. But good god is it a pain in the ***.
 06-15-2017, 02:41 AM