Notices
RX-8 Multimedia/Photo Gallery Share your pics,videos or links to them.

kma5783's Build Thread

Thread Tools
 
Search this Thread
 
Rate Thread
 
Old 12-29-2012, 08:27 PM
  #201  
Registered
 
boostdtalon's Avatar
 
Join Date: Apr 2012
Location: Auburn, WA.
Posts: 217
Likes: 0
Received 0 Likes on 0 Posts
Looking at your pics. What all was reused from the Greddy kit. I saw oil pan, manifold, downpipe, exhaust housing, and intercooler? Did i miss anything else? Really interested to see how the 3076R works with your build. Making me wish I had kept mine from my old car.
Old 12-29-2012, 10:39 PM
  #202  
Registered
Thread Starter
iTrader: (7)
 
kma5783's Avatar
 
Join Date: Nov 2009
Location: Tampa, FL
Posts: 833
Likes: 0
Received 7 Likes on 6 Posts
Originally Posted by FIREBALL9
All this hard work is what's going to make your build perfect .
Keep it going and take your time.
I'll be looking forward to see your 8 at Dupont.
Thanks, I'm hoping to make it to Dupont on Jan 19th.

Originally Posted by boostdtalon
Looking at your pics. What all was reused from the Greddy kit. I saw oil pan, manifold, downpipe, exhaust housing, and intercooler? Did i miss anything else? Really interested to see how the 3076R works with your build. Making me wish I had kept mine from my old car.
The Greddy Oil Pan is not included with the Greddy Turbo Kit.

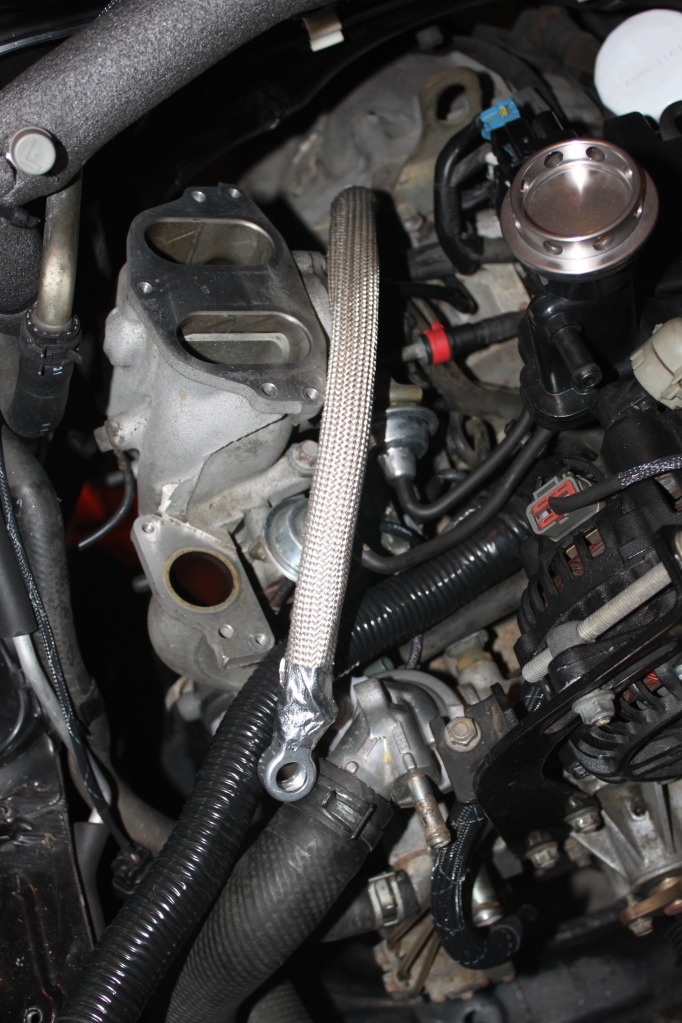
From the Greddy Kit I used the Manifold, Down Pipe, Intercooler and Piping.

I'm using a Mazsport Intake kit(Just the MAF tube and 90 degree bend that connects to the Air Filter), the piping between the Turbo and Mazsport Intake is custom, and I'm using an AEM Dryflow Filter. The Turbo had to be modified and the Wastegate setup is custom.

Last edited by kma5783; 12-29-2012 at 10:47 PM.
Old 01-01-2013, 12:33 PM
  #203  
Registered
Thread Starter
iTrader: (7)
 
kma5783's Avatar
 
Join Date: Nov 2009
Location: Tampa, FL
Posts: 833
Likes: 0
Received 7 Likes on 6 Posts
Turbo Coolant Inlet, Sleeved with Insultherm Ultraflexx ends wrapped in DEI Cool tape.
Name:  IMG_3372.jpg
Views: 161
Size:  209.3 KB

Tubo Coolant Outlet, Sleeved with Insultherm Ultraflexx ends wrapped in DEI Cool tape.
Name:  IMG_3378.jpg
Views: 181
Size:  171.0 KB

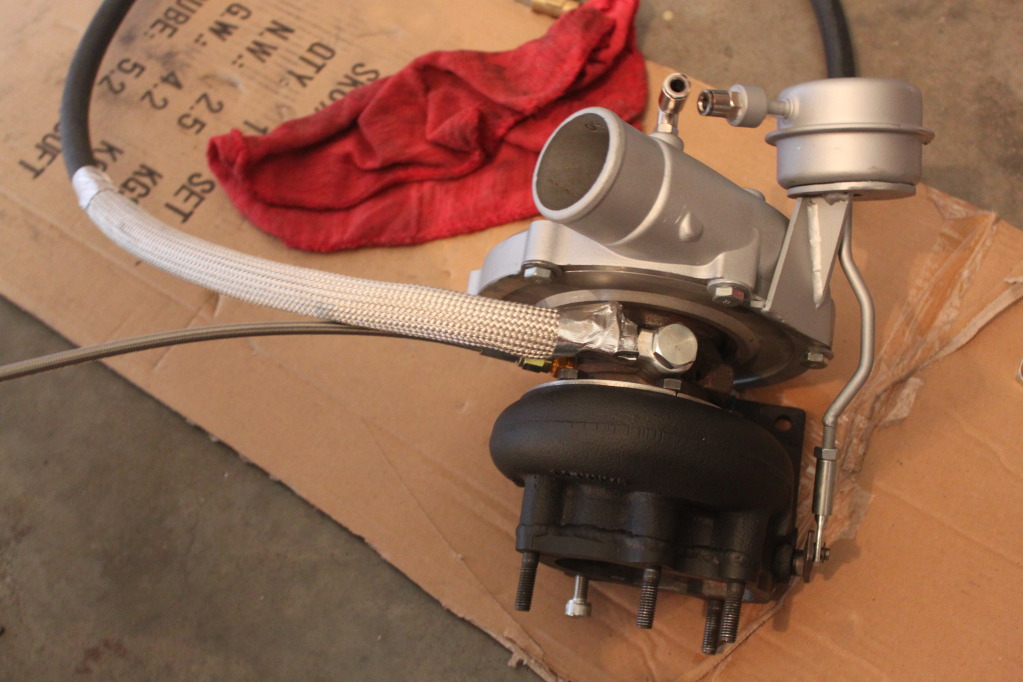
Test fitting the piping before it get Powder Coated
Name:  IMG_0244.jpg
Views: 137
Size:  226.2 KB

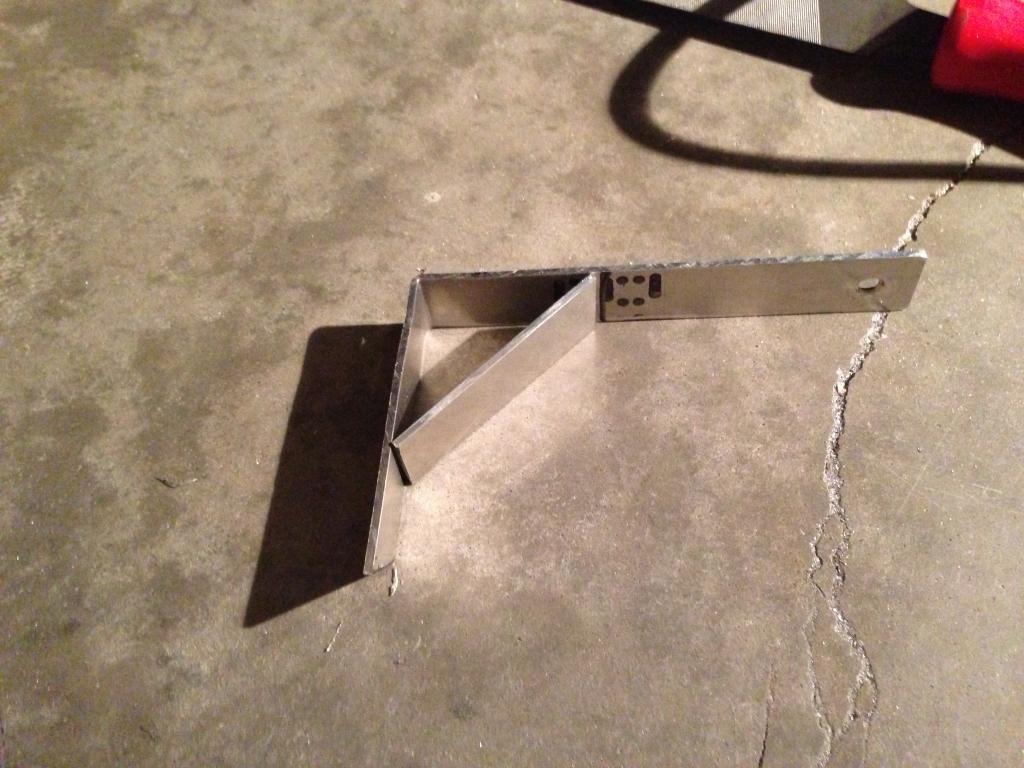
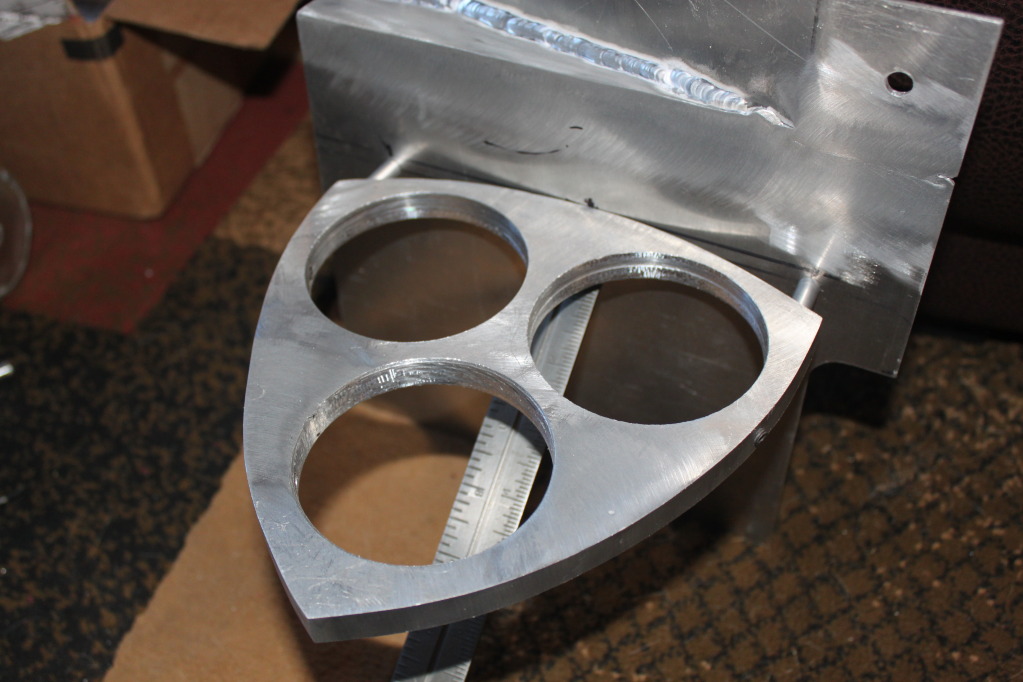
Intercooler Brackets
Name:  IMG_0246.jpg
Views: 155
Size:  223.7 KB
Old 01-01-2013, 12:46 PM
  #204  
Registered
iTrader: (10)
 
GK1707's Avatar
 
Join Date: Jan 2012
Location: Queens, NY
Posts: 1,051
Likes: 0
Received 6 Likes on 6 Posts
DEI Cool tape ftw! This build is official as hell
Old 01-04-2013, 12:37 AM
  #205  
Registered
Thread Starter
iTrader: (7)
 
kma5783's Avatar
 
Join Date: Nov 2009
Location: Tampa, FL
Posts: 833
Likes: 0
Received 7 Likes on 6 Posts
Originally Posted by GK1707
DEI Cool tape ftw! This build is official as hell
Thanks

Just a small update...

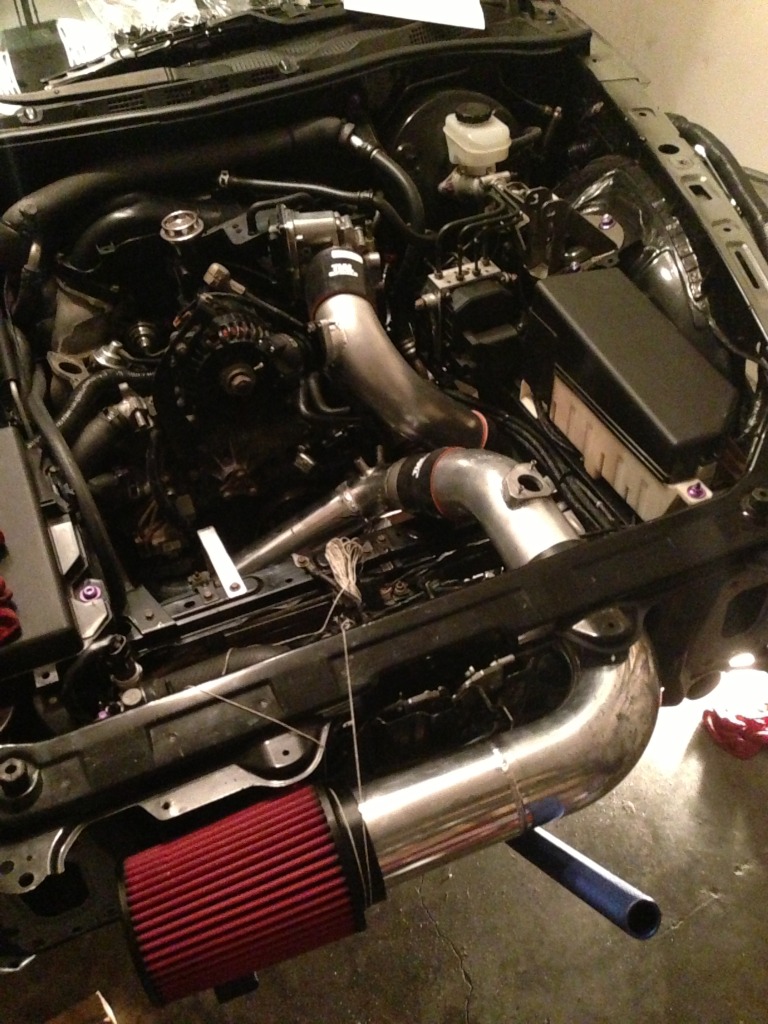
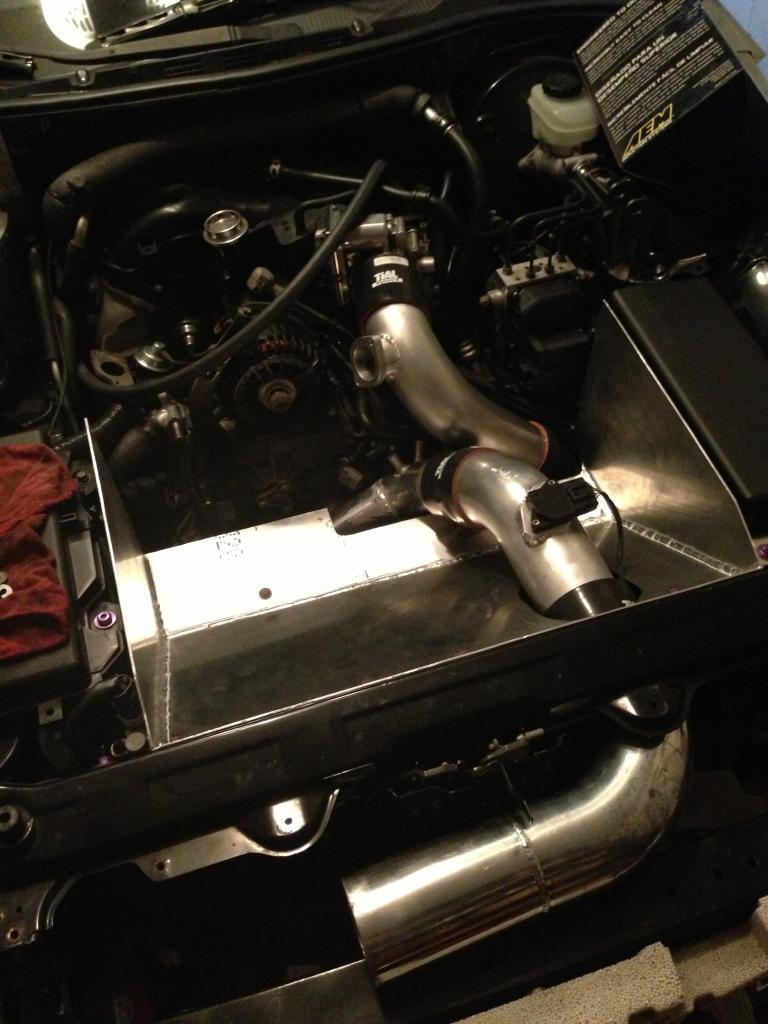
Support Bracket for Intake Pipe, attaches the pipe to the front cross bar to keep it in place there's not much clearance so proper placement is important so it doesn't interfere with the front sway bar or eccentric shaft pulley.


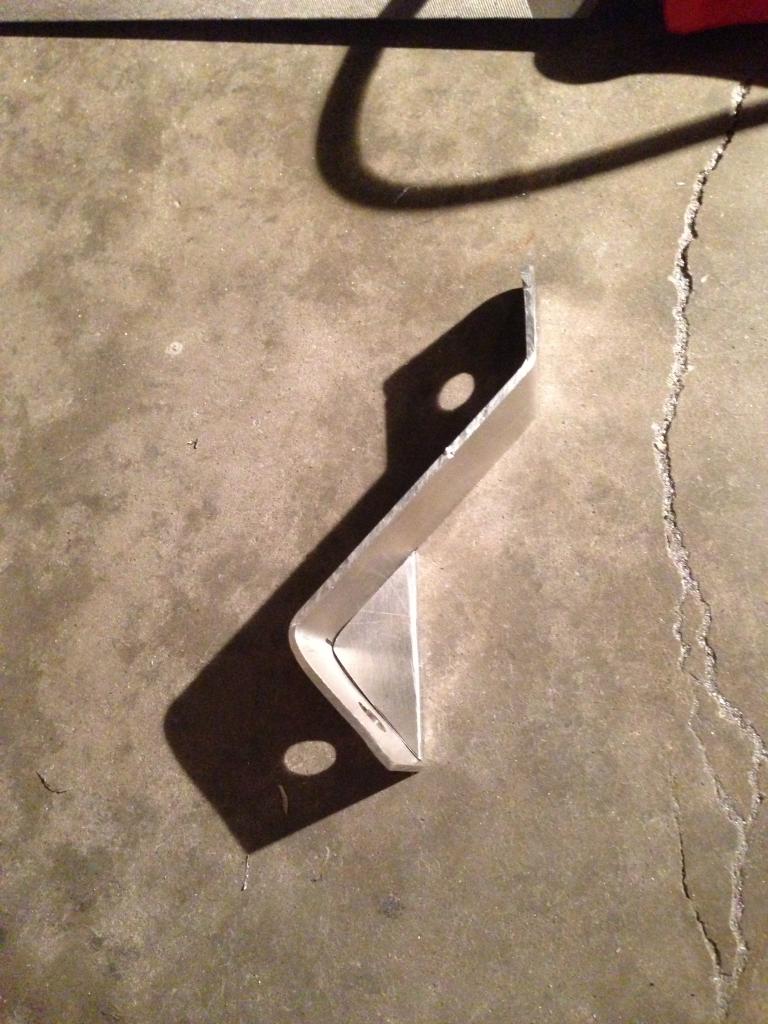
Gusseted Intercooler Bracket, One of the first ones I made snapped while bending it because of the tight radius bend so I will have the gusset welded in for strength.


Piping has all been test fit and the tray has been cut to fit.


The Turbo and Manifold are back off the car, the wastegate bracket has to be redone for proper alignment and clearance, I'm going to have this done tomorrow. Once that's done and the last few little things are welded all I need to do is have everything powder coated and it can all go back together.
Attached Thumbnails kma5783's Build Thread-img_0257_zps03fe94c4.jpg   kma5783's Build Thread-img_0255_zps0e2fe5dc.jpg   kma5783's Build Thread-img_0252_zps0edbaa18.jpg  
Old 01-04-2013, 01:47 AM
  #206  
SARX Legend
iTrader: (46)
 
9krpmrx8's Avatar
 
Join Date: Jan 2007
Location: San Antonio, Texas
Posts: 33,784
Received 452 Likes on 366 Posts
Dude that tray is legit. Can your guy make one?
Old 01-04-2013, 08:17 AM
  #207  
Registered
Thread Starter
iTrader: (7)
 
kma5783's Avatar
 
Join Date: Nov 2009
Location: Tampa, FL
Posts: 833
Likes: 0
Received 7 Likes on 6 Posts
Originally Posted by 9krpmrx8
Dude that tray is legit. Can your guy make one?
Thanks, I bought the materials and cut and fit it myself, I just had him weld it up for me.

I can have one made for you, I have to check costs on materials for just the tray and check with the guy who welded everything to find out how much he'd want just to weld the tray.
Old 01-04-2013, 08:16 PM
  #208  
SARX Legend
iTrader: (46)
 
9krpmrx8's Avatar
 
Join Date: Jan 2007
Location: San Antonio, Texas
Posts: 33,784
Received 452 Likes on 366 Posts
I would appreciate it, that would be awesome.
Old 01-04-2013, 09:54 PM
  #209  
Registered
Thread Starter
iTrader: (7)
 
kma5783's Avatar
 
Join Date: Nov 2009
Location: Tampa, FL
Posts: 833
Likes: 0
Received 7 Likes on 6 Posts
Originally Posted by 9krpmrx8
I would appreciate it, that would be awesome.
Sent you a message Scott
Old 01-05-2013, 11:57 AM
  #210  
Registered
Thread Starter
iTrader: (7)
 
kma5783's Avatar
 
Join Date: Nov 2009
Location: Tampa, FL
Posts: 833
Likes: 0
Received 7 Likes on 6 Posts
Someone correct me if I'm wrong, but on the Throttle Body coolant line, the coolant flows from the rear iron back to the thermostat housing right?

Just want to make sure I'm routing the turbo coolant lines correctly.
Old 01-05-2013, 12:18 PM
  #211  
SARX Legend
iTrader: (46)
 
9krpmrx8's Avatar
 
Join Date: Jan 2007
Location: San Antonio, Texas
Posts: 33,784
Received 452 Likes on 366 Posts
It would be the same as the REW I would think. That's what I based my routing on and it's working fine.

Old 01-05-2013, 12:22 PM
  #212  
Registered
Thread Starter
iTrader: (7)
 
kma5783's Avatar
 
Join Date: Nov 2009
Location: Tampa, FL
Posts: 833
Likes: 0
Received 7 Likes on 6 Posts
Thanks, Based on that diagram it's the same as I thought.

Just wanted to be sure especially after reading the Garrett Water Cooling White Paper you linked me to. (http://www.turbobygarrett.com/turbob...er_Cooling.pdf)

Coolant should flow from the lower port on the CHRA to the higher port.

Scott, check your messages on FB.

Last edited by kma5783; 01-05-2013 at 12:24 PM.
Old 01-05-2013, 12:24 PM
  #213  
SARX Legend
iTrader: (46)
 
9krpmrx8's Avatar
 
Join Date: Jan 2007
Location: San Antonio, Texas
Posts: 33,784
Received 452 Likes on 366 Posts
Yeah my CHRA is different than yours as well so you should follow what they recommend. Your setup is going to be legit. Proper prior planning FTW.
Old 01-05-2013, 12:30 PM
  #214  
Registered
Thread Starter
iTrader: (7)
 
kma5783's Avatar
 
Join Date: Nov 2009
Location: Tampa, FL
Posts: 833
Likes: 0
Received 7 Likes on 6 Posts
Originally Posted by 9krpmrx8
Yeah my CHRA is different than yours as well so you should follow what they recommend. Your setup is going to be legit. Proper prior planning FTW.
Yup I'm all about proper planning.

When I was training in Kempo Jiu Jitsu my Sensei's liked to use the saying
"Proper Planning Prevents **** Poor Performance" and it definitely applies here.
Old 01-05-2013, 01:04 PM
  #215  
weeeeeeeeee
iTrader: (12)
 
ShellDude's Avatar
 
Join Date: Jun 2008
Location: Outside Philadelphia
Posts: 4,200
Received 229 Likes on 153 Posts
Originally Posted by kma5783
"Proper Planning Prevents **** Poor Performance"
The 6 "P"s! Ironically used in IT dojos too
Old 01-05-2013, 01:06 PM
  #216  
Bat Mobile Driver
 
ELI063's Avatar
 
Join Date: Sep 2005
Location: From Florida back to my home lands in MIchigan
Posts: 548
Likes: 0
Received 0 Likes on 0 Posts
Nice looking good!!
Old 01-07-2013, 06:11 PM
  #217  
Registered
Thread Starter
iTrader: (7)
 
kma5783's Avatar
 
Join Date: Nov 2009
Location: Tampa, FL
Posts: 833
Likes: 0
Received 7 Likes on 6 Posts
Originally Posted by ShellDude
The 6 "P"s! Ironically used in IT dojos too
Exactly what they used to call it.

Originally Posted by ELI063
Nice looking good!!
Thanks
Old 01-07-2013, 06:25 PM
  #218  
Registered
Thread Starter
iTrader: (7)
 
kma5783's Avatar
 
Join Date: Nov 2009
Location: Tampa, FL
Posts: 833
Likes: 0
Received 7 Likes on 6 Posts
I was going to wait until I had this powder coated to post it, but I decided to just post it now.


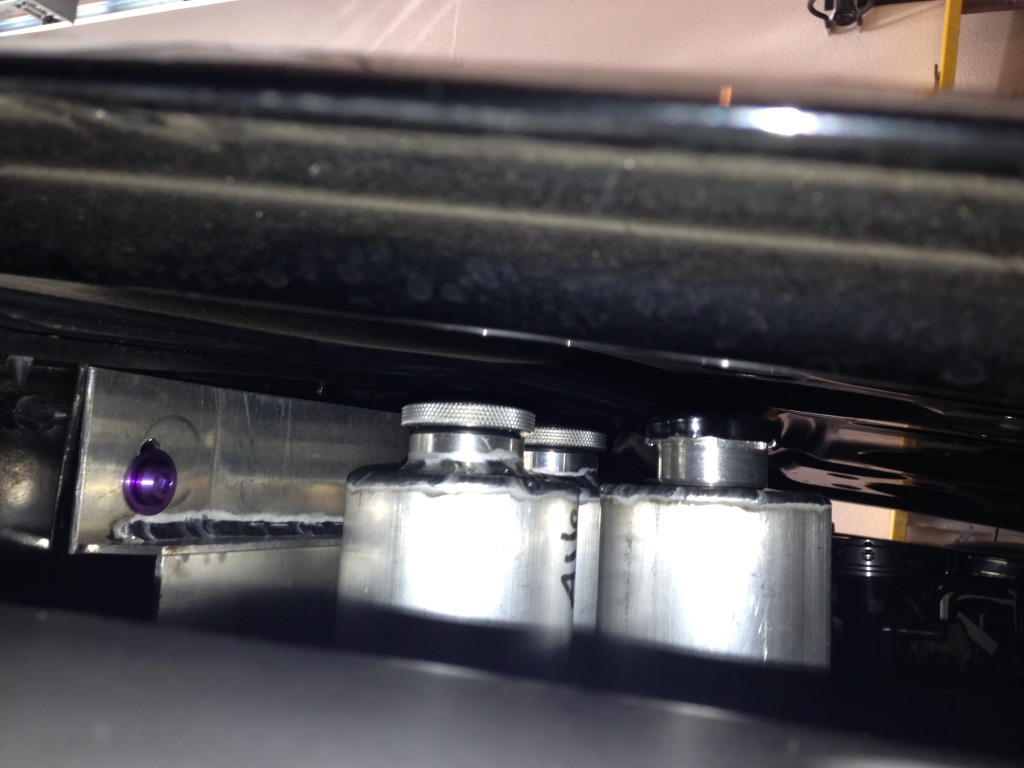
Here are pics of my Custom Canister Setup for a Catch Can, Sohn Reservoir, and Coolant Reservoir....


Name:  IMG_3321.jpg
Views: 150
Size:  157.8 KB
Name:  IMG_3322.jpg
Views: 117
Size:  141.7 KB
Name:  IMG_3323.jpg
Views: 156
Size:  148.8 KB
Name:  IMG_3328.jpg
Views: 155
Size:  184.6 KB

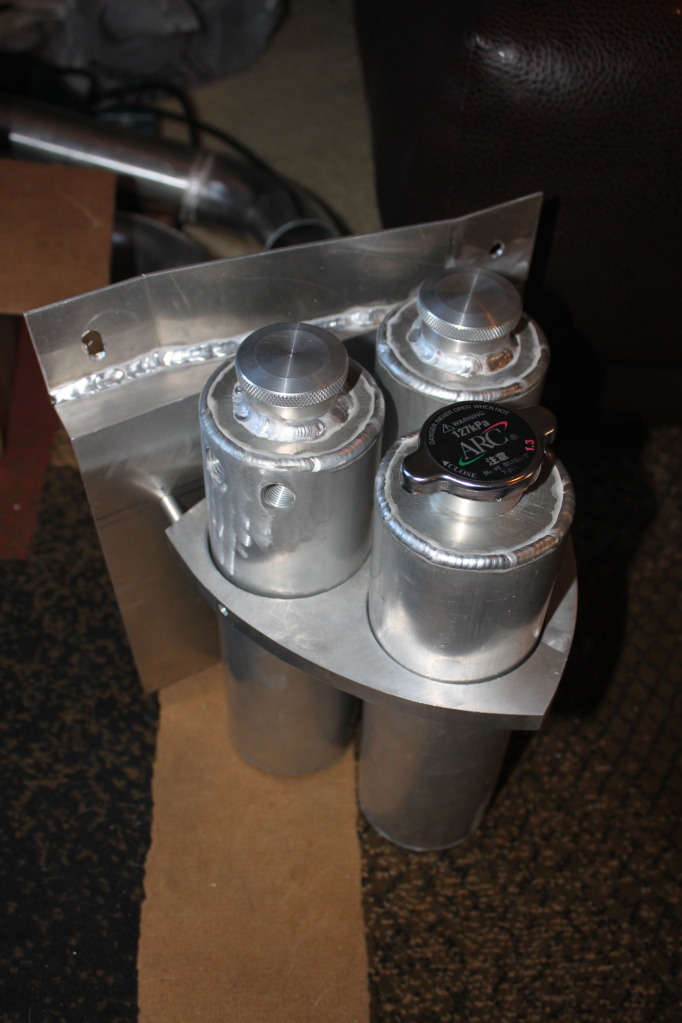
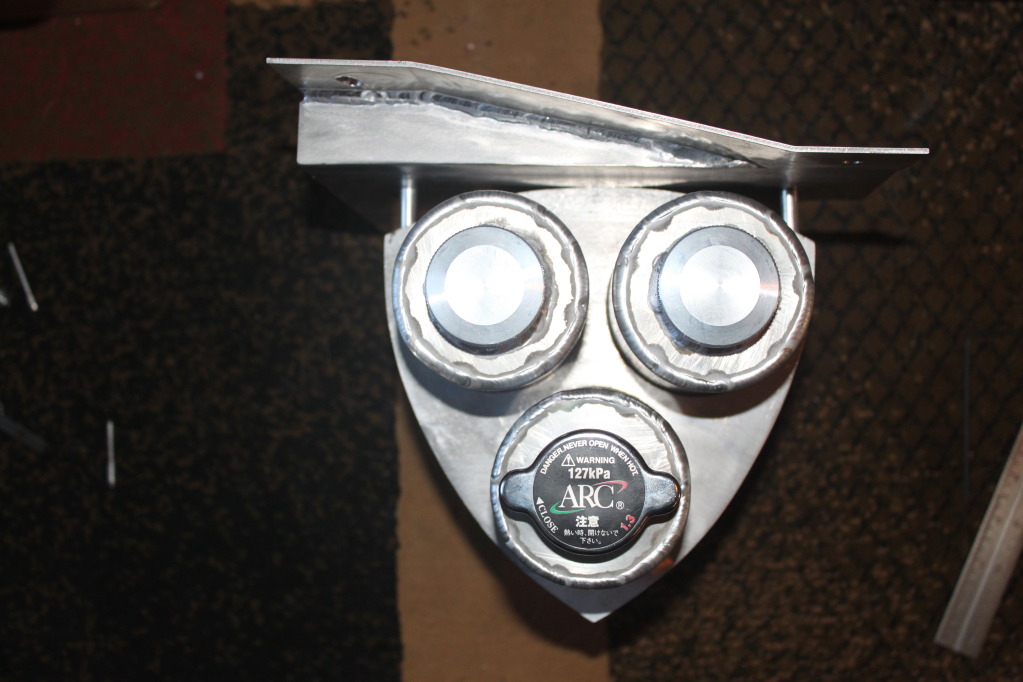
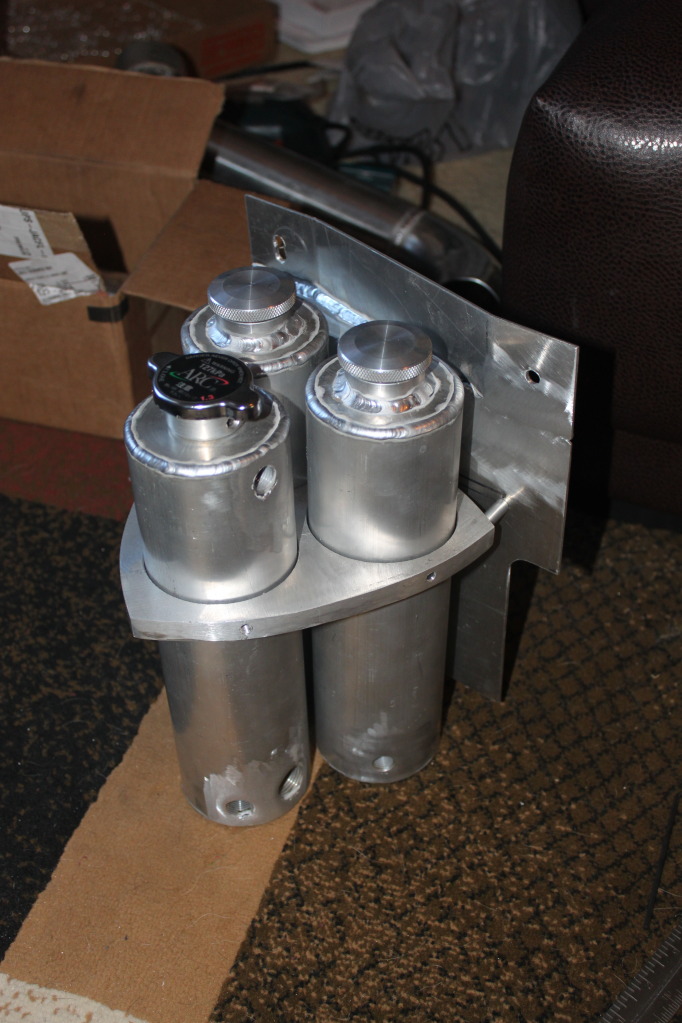
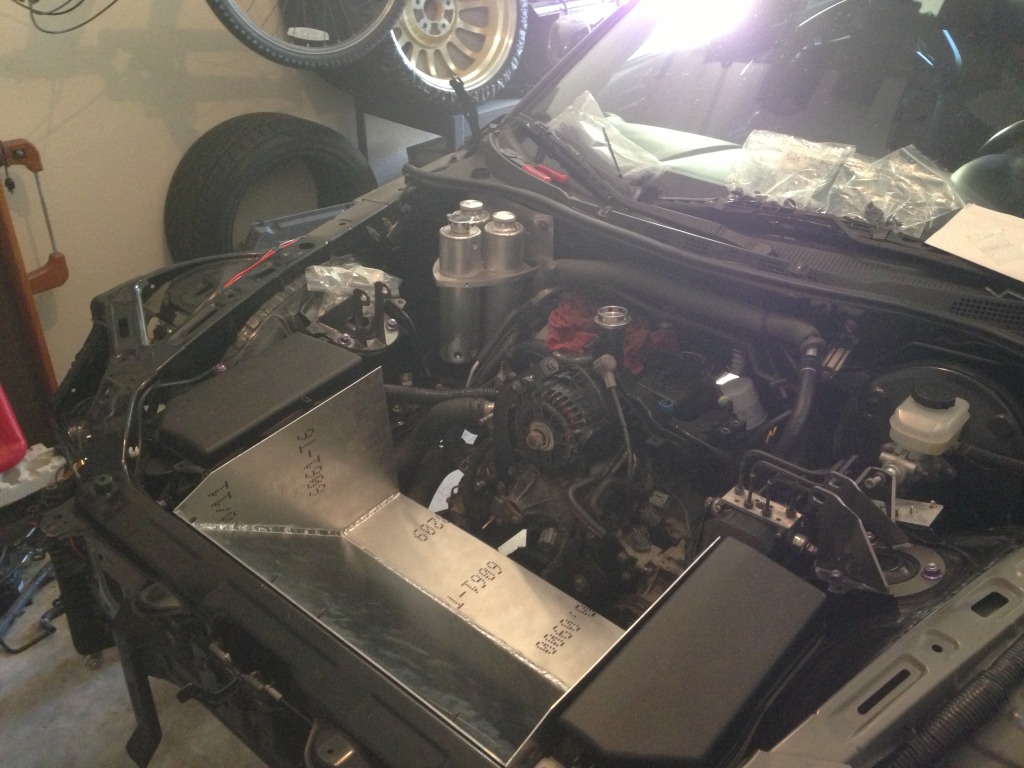
Checking Hood Clearance...
Name:  IMG_0192.jpg
Views: 156
Size:  126.6 KB

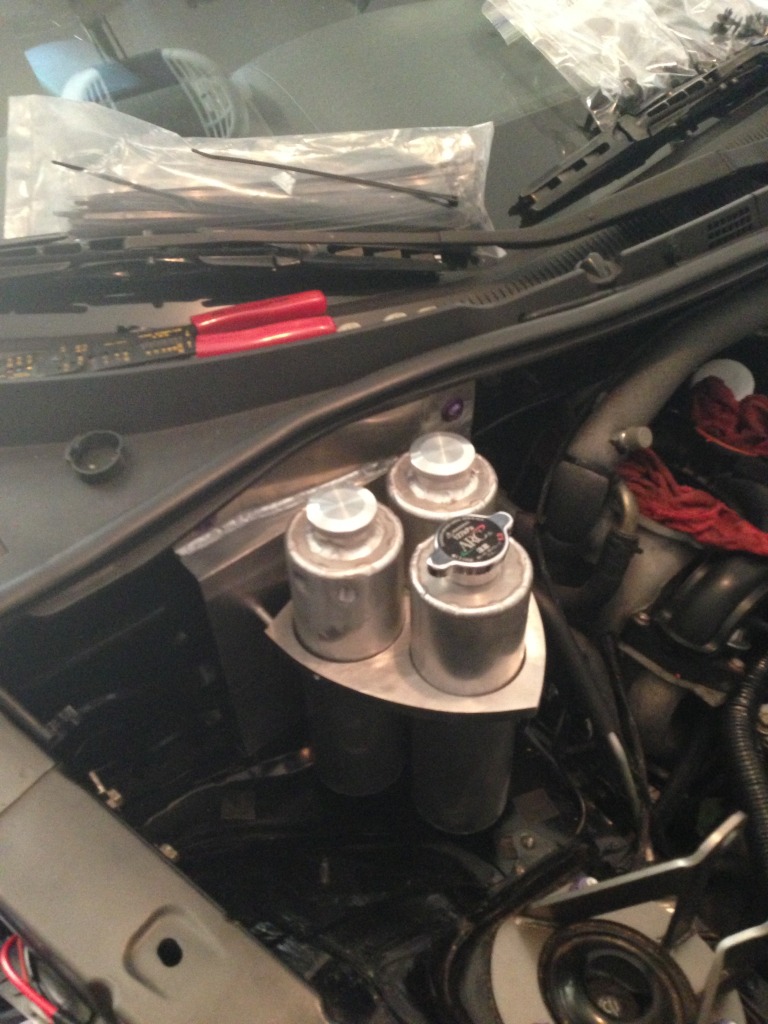
Mounted in the Car...
Name:  IMG_0201.jpg
Views: 170
Size:  188.0 KB
Name:  IMG_0203.jpg
Views: 155
Size:  185.7 KB
Old 01-07-2013, 09:23 PM
  #219  
I HATE SPEEDBUMPS!
 
monchie's Avatar
 
Join Date: Nov 2007
Location: Las Vegas, NV
Posts: 8,549
Likes: 0
Received 7 Likes on 6 Posts
You are so talented...
Old 01-08-2013, 12:45 AM
  #220  
SARX Legend
iTrader: (46)
 
9krpmrx8's Avatar
 
Join Date: Jan 2007
Location: San Antonio, Texas
Posts: 33,784
Received 452 Likes on 366 Posts
Cats out of the bag Looks great man. Do want.
Old 01-08-2013, 08:33 AM
  #221  
Turbo Member
iTrader: (10)
 
Chris's Avatar
 
Join Date: May 2006
Location: Tampa, FL
Posts: 2,496
Likes: 0
Received 14 Likes on 10 Posts
came out awesome in the end. Kyle was originally just going to do all three in a row, and then I planted the seed for rotor shaped bracket. Came out awesome! well done Kyle!
Old 01-08-2013, 08:18 PM
  #222  
Registered
Thread Starter
iTrader: (7)
 
kma5783's Avatar
 
Join Date: Nov 2009
Location: Tampa, FL
Posts: 833
Likes: 0
Received 7 Likes on 6 Posts
Originally Posted by monchie
You are so talented...
Thanks Monchie

Originally Posted by 9krpmrx8
Cats out of the bag Looks great man. Do want.
LOL Yup...Thanks

I'll work on making the last part happen.

Originally Posted by Chris
came out awesome in the end. Kyle was originally just going to do all three in a row, and then I planted the seed for rotor shaped bracket. Came out awesome! well done Kyle!
Thanks Chris, Good Idea, Once you mentioned it I had to do it.
Old 01-09-2013, 03:47 AM
  #223  
Registered
 
shr3da's Avatar
 
Join Date: Jul 2011
Posts: 346
Likes: 0
Received 1 Like on 1 Post
looks great so far, very nice detail and good canister set up!

It also looks like you removed the engine bay carpet/heat shield material, but hard to tell in the photos.
Old 01-09-2013, 10:24 PM
  #224  
Registered
Thread Starter
iTrader: (7)
 
kma5783's Avatar
 
Join Date: Nov 2009
Location: Tampa, FL
Posts: 833
Likes: 0
Received 7 Likes on 6 Posts
Originally Posted by shr3da
looks great so far, very nice detail and good canister set up!

It also looks like you removed the engine bay carpet/heat shield material, but hard to tell in the photos.
Thanks

Yea the fiberglass insulation in the engine bay is gone.
Old 01-12-2013, 11:38 PM
  #225  
Registered
Thread Starter
iTrader: (7)
 
kma5783's Avatar
 
Join Date: Nov 2009
Location: Tampa, FL
Posts: 833
Likes: 0
Received 7 Likes on 6 Posts
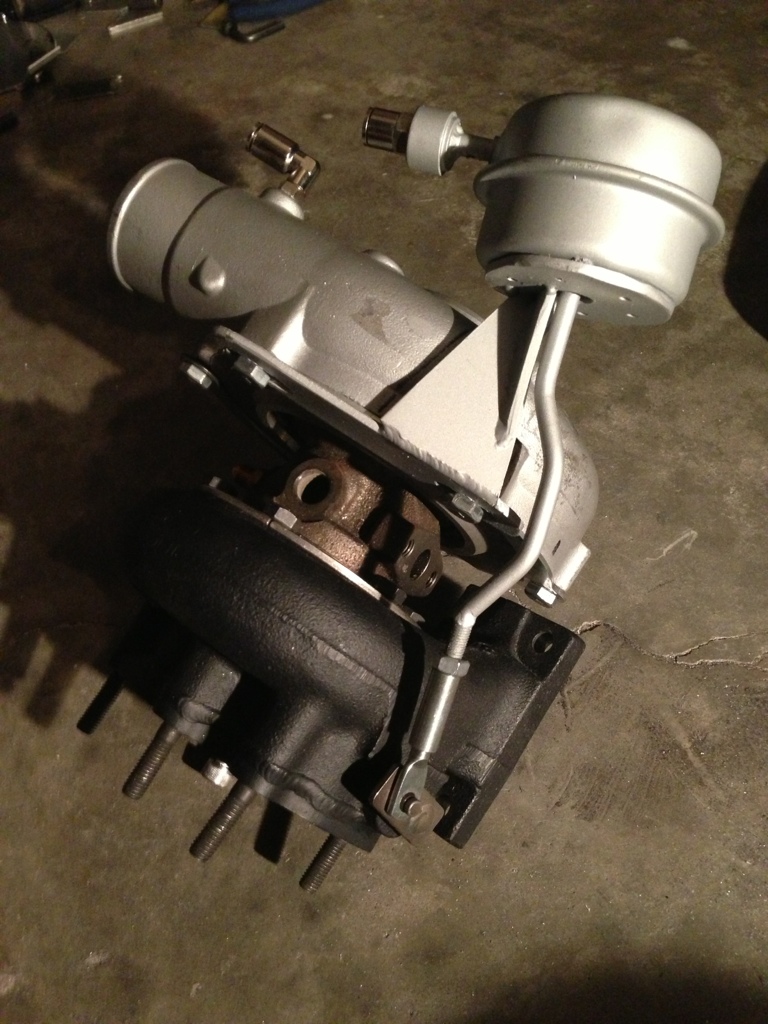
Wastegate bracket was redone, notice the elongated holes to allow for small adjustments if necessary.


Name:  62B3F3CF-0ECA-48FB-A641-915D2291A99C-7034-0000040DBD493130.jpg
Views: 170
Size:  280.0 KB

Footwell area hammered out for a little more room as is common with the Greddy installs...
Name:  21703EE1-C45C-41E0-AC56-7CD99C41D71F-7034-0000040DAA25DB0C.jpg
Views: 169
Size:  321.4 KB

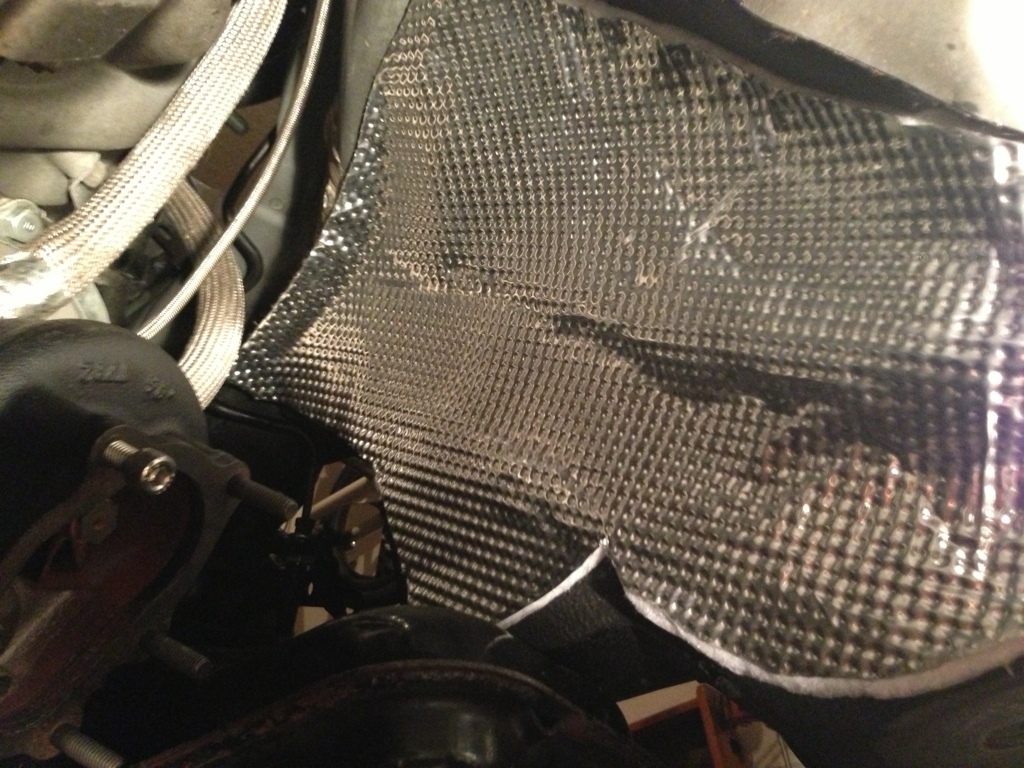
DEI Tunnel Shield Installed...
Name:  9067E6D5-C165-4064-99A9-15644A1CFE31-7034-0000040DB42C82A3.jpg
Views: 159
Size:  339.8 KB

The Turbo is now remounted in the car and the Wastegate Actuator fits this time.


.


You have already rated this thread Rating: Thread Rating: 0 votes,  average.

Quick Reply: kma5783's Build Thread


All times are GMT -5. The time now is 05:12 PM.