When you click on links to various merchants on this site and make a purchase, this can result in this site earning a commission. Affiliate programs and affiliations include, but are not limited to, the eBay Partner Network.
This is disclosed to inform basic owners about what an REW swap can entail and that it is an achievable upgrade for power and reliability. The swap process for me has been a trial and error attempt at getting basic and concrete REW install standards figured out. Hopefully this will be able answer basic questions that surface frequently regarding the swap and show how easy the swap can be completed with the variety of products that are available on the market.
*******To cut to the chase before reading, my build is mostly finalized with almost all of its break in miles complete. Drivability and function has been amazing thus far with only minor discrepancies. Soon I will crank the S362sxe turbo to 14-15 psi targeting a minimum of 400 RWHP and give it hell. I will update and edit my notes, if possible, over time to document corrections to issues that I uncover. My main issues so far concern idle control and using the FFE trigger setup with the factory tachometer. Idle will be remedied by programing the factory ECU to handle it better. basically I have experienced a fluctuating idle under various electrical loads that can occasionally stall the engine as it bounces around between 1100-500 rpm. This problem is only exhibited at idle and only with certain levels of electrical load. It has been manageable but I�d like it to be settled and perfect.
I hate to say that the FFE trigger kit appears to not work with the factory tach above 4500 rpm. Everything below that RPM is spot on and great. The FFE trigger setup does read perfectly with the PNP Adaptronic throughout the whole rpm range though (It is tunable but I want a perfect readout on the tach). If more trouble shooting steps fail, I will probably try to use a relocation bracket for the sensor and then run the Rx8�s actual trigger wheel. (Banzai needs to make that bracket and sell it!!!!)
Considerations for the swap
The REW can be installed with a variety of methods. Some of the first things to consider should be; what transmission will you use, how will you mount the engine, how will you manage the engine, and understand that it will cost money and or time to properly complete the build.
The most practical and best bolt in option for the transmission is to run the factory rx8 6 speed (or 5 speed). Going this route eliminates the need for extensive drivetrain modification. The biggest problem with bolting the REW to the Rx8 trans is that the factory REW Lower Intake Manifold will absolutely not fit due to a significant firewall clearance obstruction. An aftermarket, symmetrical, LIM must be used to clear the firewall if the REW is bolted up to the Rx8 trans. Also, the factory REW twin turbo system will not fit in this case so plan on installing a single turbo setup.
There are plenty of mounting kits available on the market now that make installing the REW a simple task. �Fabricate� your own or buy a bolt in kit and the REW can drop right in as the factory Rx8 mounts are completely different.
Engine management can be achieved with pnp aftermarket ECUs or by completely custom wiring one into the system. The Rx8�s ECU will have to be retained to control many necessities for the chassis if you are seeking a more factory fit and finish street car.
The goal of my build was to find a fairly simple way to install the REW with cost and the ease of install taken into consideration. While wanting to be capable of making a decent 400-500whp setup, this has been more of an attempt to standardize the basics of the swap for anyone wanting to drop in the REW to replace a bad Renesis. I am sure that there are many other �better� or �cheaper� methods to accomplish the swap, this is just an overview of what I experienced from start to finish. It may be bland or lacking to some people, just keep in mind what the intentions of this build are.
Basic Outline for My Setup:
Stockport REW block
REW front cover, with rx8 pattern trigger
Stock 6 speed Rx8 trans
Rx8 Throttle body
Adaptronic PNP ECU
CXRacing Full Mounting kit
98% plug and play harness and bolt in setup, For real
To start things off, there are undoubtedly some fairly substantial costs with installing this setup. Whether you are fabricating parts or buying them, your time and or money will be spent regardless. Being upfront, the entry level cost for all my swap parts besides the engine block ran me a bill of about $5990. This included all turbo kit, down pipe, mid pipe, fuel system, ignition system, pnp ECU, mounting sub frame, cooling system, clutch, TB adapter and many other necessary parts. Being patient and finding deals can drive the cost down significantly for a lot of the needed parts. In contrast to the price of decent or complete Renesis turbo kits and full rebuild measures, having a complete REW supporting package for that price really isn�t that bad, in my opinion of course.
I will upload some photos and update sections tonight.
Main components for the swap
REW Donor Parts:
REW engine block
REW front cover
REW water pump and housing
REW alternator bracket
REW UIM
Swap Kit Parts:
CXRacing Sub frame and engine mounts
CXRacing LIM
CXRacing Radiator and pipe kit
CXRacing coolant reservoir
CXRacing 11G Twin scroll t4 Turbo Manifold and EWG
CXRacing down pipe and mid pipe
CXRacing intercooler kit
CXRacing engine oil fill neck
Other:
Borg Warner s361SXE Turbo (Super core P/N 13009097056) (Exh housing P/N 177207)
Nicon Rotary TB adaptor
FFE rx8 pattern single mag FD trigger kit
Fuel System parts:
Syphon modified S1 fuel pump assembly
Aeromotive stealth 340lph drop in Fuel Pump (P/N 11142)
ID 1000cc primaries
ID 1700cc secondary�s
KG parts Primary fuel Rail
Fittings and FPD labeled in notes
The REW can be built any basic or extreme way you like. I went with a stock port build that included HD Apex, Corner, and water seals. It will have plenty of strength for the power I�m targeting. The front cover gets tricky with these swaps and seems to be the most common toss up decision for people going the REW route. I was dead sure on using the Renesis front cover at first but ended up switching. The main reason for keeping the Renesis front cover comes down to the use of its trigger placement and function with a stock rx8 trigger wheel and ECU. You also can retain the AC compressor mount and radiator hose positioning with the Renesis cover. While fitting my machined Renesis front cover to the REW I ran into more problems that seemed not worth dealing with at all. The rad hose connections were also completely in the way of my turbo and so on. With the realization that there are products out there to run an Rx8 patterned trigger wheel on the REW cover, it is a much easier way to achieve the install. Also my CX swap kit included nice aluminum water pipes to plumb up the REW cover to the factory Rx8 radiator position. The only item that I will have make and adjust for the REW cover will be a simple AC compressor adapter plate. The factory REW oil pan was used and doesn�t sit too low.
For the supplied CX kit engine mount, I had to cut down the six M12x1.25 factory high grade engine mount bolts, in half, to be able to fit due to the new mount thickness. Ideally, purchasing new properly sized bolts bolt would work best. Another final detail for the block is that you must obviously use an REW weighted flywheel paired to an rx8 (push type) clutch plate/ disc.
Premix or OMP?
In my past, I was against OMP deletion 100%. After seeing countless FC OMP�s fail over the years though and after tearing down dozens of �customer� engines (FD and FC), I prefer to run Premix only when allowable. With My FD, I run premix only and water meth and damn does it make for a clean and properly lubricated engine. Since I am not here to start a Premix discussion, I�ll keep this short. While initially machining the renesis front cover to clear the counterweight, I ran into problems with retaining the OMP�s oil flow path. I know that people have been successful with using the renesis front cover and possibly retaining the OMP but since I ended up using the REW cover I felt no regret in deleting the OMP out rightly. If you prefer to run the OMP, I�m sure there are ways to make one work with this setup.
CXRacing Mount Kit
This is probably the most controversial purchase for my build. I mostly decided on using the CXRacing kit as it supplied, but was not limited to, the subframe, centered LIM, and turbo manifold. I am not going to list all of the included parts but the full kit is lists for something around $2600. The weakest link in the kit IMO is that it normally includes a cheaply manufactured turbo. Ultimately, I was able to purchase the kit on a promotional discount and opt out of the turbo and its utility lines. Instead, I added their performance Rx8 aluminum radiator to the order. My total price, shipped, was under $2100. That still may seem steep but with the amount of parts it supplies for the swap it is a considerable way to go. One major flaw in this kit is the lack of hardware for a few parts. Anyone trying this kit will have to source some nuts and bolts here and there.
I wanted a low mounted turbo setup and the provided manifold is a fairly nice piece to make that happen. Compared to other CX parts that you commonly see in this community, the stainless gauge is actually suitable and the flanges were truly plane. It is designed with divided runners, meeting the divided T4 flange, despite sharing a single external waste gate flange. It is also a proprietary design for the REW in an Rx8 chassis only. It will not fit in an FD due to subframe clearance problems.
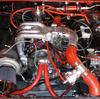
I wanted to run a specifically sized s300 series frame Borg Warner turbo, so I ordered one hoping that it would fit. It did, barely, having clearance between the LIM and the chassis frame. I was even able to squeeze a turbo blanket around the exhaust housing to help with radiant heat transfer in that area. A larger turbo will most likely not fit with this setup, but obviously, a smaller one should not be a problem. I ordered the s361 sxe for the flow characteristics I was looking for in spool and available lb/min from the compressor. Also because of its price, it can be found for very affordably for under $800. The use of this turbo leads me to the only part of the swap that had to be welded and fabricated so far, the down pipe flange. I had to get a 3� stainless marmon flange adapter for the BW and have it welded onto the supplied down pipe. Since the down pipe was manufactured to fit the cheap turbo that I didn�t get, I had to mock up the engine, manifold, and turbo to refit and weld on the new downpipe flange for the BW.
Detailed install notes:
Starting with the blown renesis in place, the first step is to remove the engine. Once it�s out and the bay is empty, I installed the new engine sub frame. 6 bolts hold the old frame cross brace in place. With the trans supported, brace removal is easy and the new sub frame install is also very easy. I recommend installing the sub frame as far forward and center as possible because the sub frames mounting holes are slotted for adjustment. With the sub frame installed you can begin installing the REW setup.
With this particular exhaust turbo manifold, it had to be installed bolted to the engine otherwise the engine exhaust studs would have to be removed to be able to bolt it on in the bay due to frame clearance issues. The REW install onto the rx8 trans was like any other install into a 7 that I�ve done before, pretty basic drop in. once the engine is resting in place I recommend leaving the engine mount to frame bolts loose, until completion, to allow for periodic placement and adjustment changes as parts are installed.
Oil filter pedestal.
The use of the rx8 filter pedestal or an aftermarket is required. Ideally, a nice relocation kit would allow for easy access oil changes. I went with a bare rx8 unit which will require me to remove my UIM to change the filter (takes 30 sec to remove so I�m not worried about it). The other benefit for me was that the Rx8�s pedestal works perfectly with the factory oil cooler feed line/ banjo bolt. Making it all direct bolt up. The Rx8 Pedestal has to be lightly ported to match the REW flange and has been well documented by people, such as Chris Sanders from Banzai Racing. After easy porting with a dremel and cutting a custom gasket, the unit is easily installed.
UIM
The UIM did have to be slightly modified to fit. Essentially the rear engine hook bracket mount, thick cast section, had to be cut from the back corner where the UIM bolts to the LIM. This allows the UIM to completely clear the fire wall. I also removed the vac chamber tab on the back of the UIM for other potential clearance issues. All equipment was removed from the UIM, including the secondary throttle plates. They were all blocked off. I also plugged all of the vac ports on the rear of the UIM. The Nicon rotary REW UIM to Rx8 TB adapter from Russia was used. It is a nice piece which included all the required installation equipment including the BAC block off plate. It is apparent that Elite Rotary makes an adapter now as well.
Throttle Body
With the TB bolted on, the TB harness plug has plenty of room to reach its new location without any adjustment. I also ran the rear irons coolant port to the TB and connected the other TB coolant port to the water pump housing. I ordered a 3� 90* coupler with 10� lengths to connect the TB to the intake charge pipe. The coupler did have to be cut properly on both ends to fit. I ended up with about a 1� leg and a 6� leg for the ends.
Alternator
The factory rx8 Alternator is basically the same as the REW�s. It bolted right up but I did have to use an REW alternator tensioner bracket. The small welded piece on the bracket, that connects it to the REW�s power steering/ AC mount (Not used), had to be cut off to clear the provided CXRacing oil fill neck.
Waterpump/ housing install.
The main changes to the waterpump housing for this setup were pretty basic. First I had to delete the turbo coolant return port on the lower radiator line because it was barely interfering with my turbos compressor housing. It needs to be removed, then welded or tapped/plugged. Next I had to remove the REW factory air pump bracket to allow the CX LIM secondary fuel rails -8, 90* fitting to clear. I cut the bracket off keeping the natural casting thickness for the thermostat housing. A portable band saw and or a 4� grinder made it very easy to remove the bracket. The REW turbo coolant feed port was plugged, water level sensor plugged and radiator fan switch plugged (sensors left in). The rx8 water thermo sensor was installed in place of the REW�s. The top rear coolant port is used for the TB coolant return, and the top front coolant port is used for the AST coolant reservoir. Installation was straight forward except that the front irons studs had to be removed and then reinstalled in place to fit the WP housing. This was due to sway bar/ steering rack clearance issues.
RMD, I see that your running 1000 primaries and 1700 secondaries. Did you simply leave the P2 injector harness unplugged and change the configuration in adaptronics to only fire the P1 and secondary injectors?
RMD, I see that your running 1000 primaries and 1700 secondaries. Did you simply leave the P2 injector harness unplugged and change the configuration in adaptronics to only fire the P1 and secondary injectors?
Basically, you have to actually run the front secondary injector to either P2 plug and the rear secondary injector to either secondary plug and then change the voltage range and injector settings in the adaptronic. Was super easy to do.
I can help you out if you have any questions on fitting parts and ecu configuration. I have also a issue with ffe trigger wheel but above 7500rpm, tach drops and tcs turns on
For sure. So far the car has been rock solid for cruising and break in. I'm having some crazy issues with ignition I believe, under boost and I hate to say that I'm blaming the FFE kit but that is where I'm currently trouble shooting. I have more of my build notes and some sub par photos to load soon but until I can tune it under boost, I'll be busy.
I'm happy with how the install has gone so far and with a few little tweaks to the factory PCM's idle control and mounting the AC compressor, this car we will be a killer daily (Obviously compared to my FD).
Yes. I have documented components describing the fuel system and other install essentials that I need to upload.
After installing the modified banzai cas bracket, most of my timing related issues have been eliminated.
Daily driving is amazing concerning drivability and relative milage. It just has ign break up issues that I need to iron out under high rpm and boost past 12 psi.
I apologise for my neglect in updating this thread. I will edit in more of my content involving the rest of my setup as well as photos for each section.
Driving update: the car has been a very solid performer on 15psi with all of the tuning ironed out. Daily driving has been fantastic and I've loved cutting down mustangs, sti's etc that think they are going to get an easy pull on an 8.
Im still hoping I can pickup the new modular ECU on the "upgrade" plan I was promised when I purchased the select version. Until then, I will try to get all my info up ASAP
Awesome! There is no better feeling than seeing the face of someone who just got gapped by an rx8 who expected an easy win, especially as loud as these BW turbos are.
If one were to go even more "basic" and forego air conditioning with a standalone ECU (maybe Haltech or Microtech), would a machined Renesis front cover even be necessary? What other features would be lost -- gauges, EPS, ABS, TCS?
(Sorry for hijacking your post, but for whatever reason I am unable to start my own threads).
Yes, you use the standard M2000 ecu instead, which the series 1 ecu is just a vehicle-specific version of, and you can have all the same functions. The main difference is you�ll have to make your own boomslang harness and add the modules that come included in the S1 ecu. They actually pulled a lot of the factory logic used for the S1 ecu by reverse mapping an S2. If you read through the linked thread you�ll see some S2 cars in there.
Originally Posted by Adaptronic S1 RX8 Modular ECU
- If OEM harness is not available or in good condition; Adaptronic Wire In Models(M2000/M6000) are available with either flying lead or terminated wiring harnesses.
- Available for S1 Rx8s only, S2 require a wire in M1200/M2000/m6000 ecu( M2000/M6000 with DBW modular required for DBW control)- See video below for S2 cars
6.) Q: My car was manufactured after 1999 and came equipped with a �return-less� fuel system, will the 340 Stealth Pump work with factory fuel systems like this?
A: The Aeromotive Stealth 340 Pump is typically not listed as compatible with OEM returnless fuel systems, for good reason. The advent of the �returnless� fuel system, introduced by the OEM for passenger cars in 1999, was created in response to new, more stringent EPA, EEC (evaporative emissions control) regulations which took effect in that year. That a system would be classified as �returnless� does not necessarily mean that it does not have a bypass style regulator, only that the regulator is before the engine, perhaps on the frame rail or even in the tank. In fact even the most sophisticated �returnless� systems from Ford Motor Company, where the speed of the pump is extensively varied to control pressure, have integral bypass mechanisms that promote flow through the pump�s electric motor for cooling purposes.
What is most important to understand is that today�s �returnless� systems are extensively engineered as a system and very finely balanced, including intricate confinement reservoirs in which the pump is fitted, siphon-jet pumps that are used to transfer fuel within the tank(s) and into the reservoir (and which are often fed from special ports in the OEM pump), integral remote regulators in the tank or reservoir and sophisticated electronics, all of which must work together to provide fuel tank level, fuel pump flow, and pressure, necessary to meet the factory engine�s torque and horsepower production. Of course, all of these fuel system components are engineered around the OEM pump and its flow, pressure and current draw characteristics.
Installation of a fuel pump like the 340 Stealth into today�s �returnless� systems, when you consider that it flows 2-3 times as much volume, draws 2-3 times as much current and is not necessarily the exact size and configuration of the pump it replaces, will very probably throw the OEM fuel system substantially out of balance, and if run for any length of time, may very well damage either the fuel system components or the 340 Stealth Pump itself.
Modifications can be made to the OEM �returnless� fuel system, to the various hydraulic components and electrical supply, to incorporate such a 340 Stealth Pump, and it has been done successfully and with amazing results, BUT, it truly requires re-engineering much of the OEM fuel system components and controls, and is not something the average enthusiast will be capable of handling on their own. For this reason you won�t find recommendations for the 340 Stealth pump to be used in returnless fuel systems in Aeromotive�s application guide.
So what exactly did you do to the Banzai CAS bracket to modify it ? I just got one from them and they told me there are tolerance issues in the forming process and might need some modifying to work correctly but I see some people are using them with good results.
 04-14-2017, 06:06 PM