LS1/T56 RX8 (Build thread).
 04-27-2014, 10:36 PM
#1

LS1/T56 RX8 (Build thread).
Little bit of background i have a 2006 Mazda Rx8 and put a greddy turbo kit on it and ran it for a while then got board with it, then i decided i wanted to do an engine swap. After bouncing back and fourth between either doing a 3 rotor swap, or a 2jz.. i finally landed on the lsx swap.
So finally here are the pics i have so far. Keep in mind im a college student so funds are not that adundant lol, but as i get the money i will keep getting more parts as available.
This was what the car started as, when i started tearing into it, had the greddy turbo kit and alot of goodies on it.
Got some progress done on getting every thing off, and out of the way
Motors out!!, sold it to a guy on the rx8club forum
Tranny came out next, also was sold to a guy on rx8club.

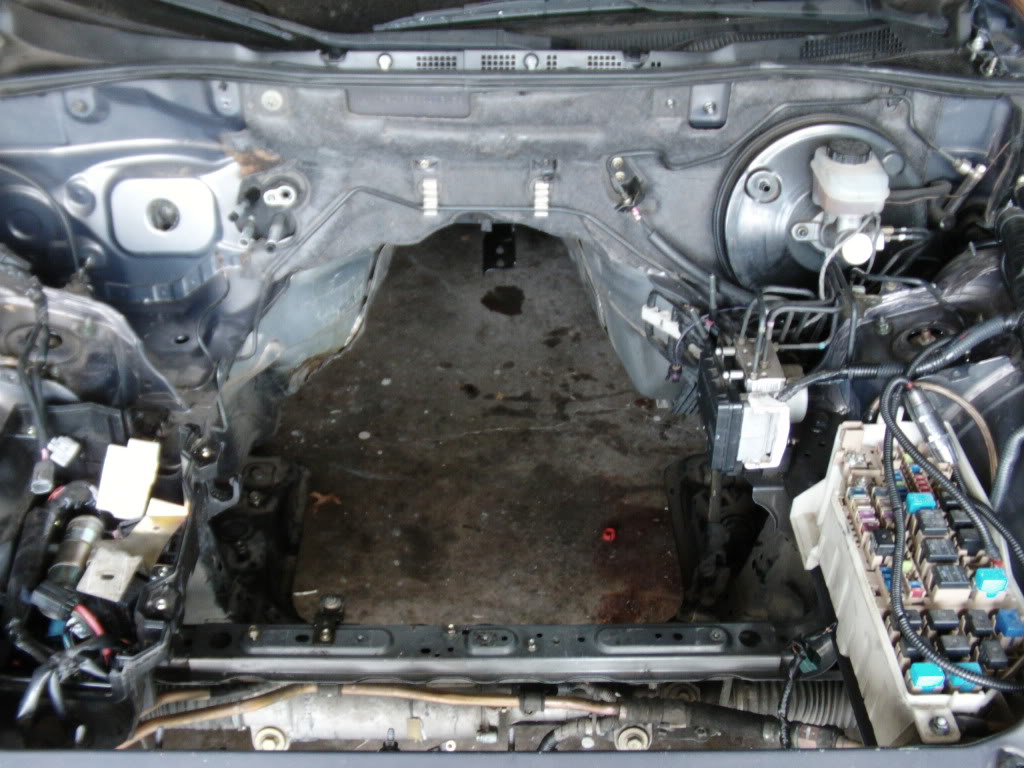
AC lines and other misc stuff came out, im actually surprised at how much room the engine bay has, it looked so cluttered with the small rotary, but actaully its pretty big
-Brief summary of where i am at before i start spamming pictures...Was gonna go the 5.3 (LM7) cheaper route so i started piecing together pieces like the motor, ls6 intake, 243 heads, 228R 112 LSA Camshaft...ect around the past 2-3 years so when i had the time i would be ready. However plans change!
Got a killer deal on a low milage LS1/T56 pullout from a 2004 GTO...and this thing is beautiful lol. Complete from oil pan to intake.
[IMG] [/IMG]
[IMG]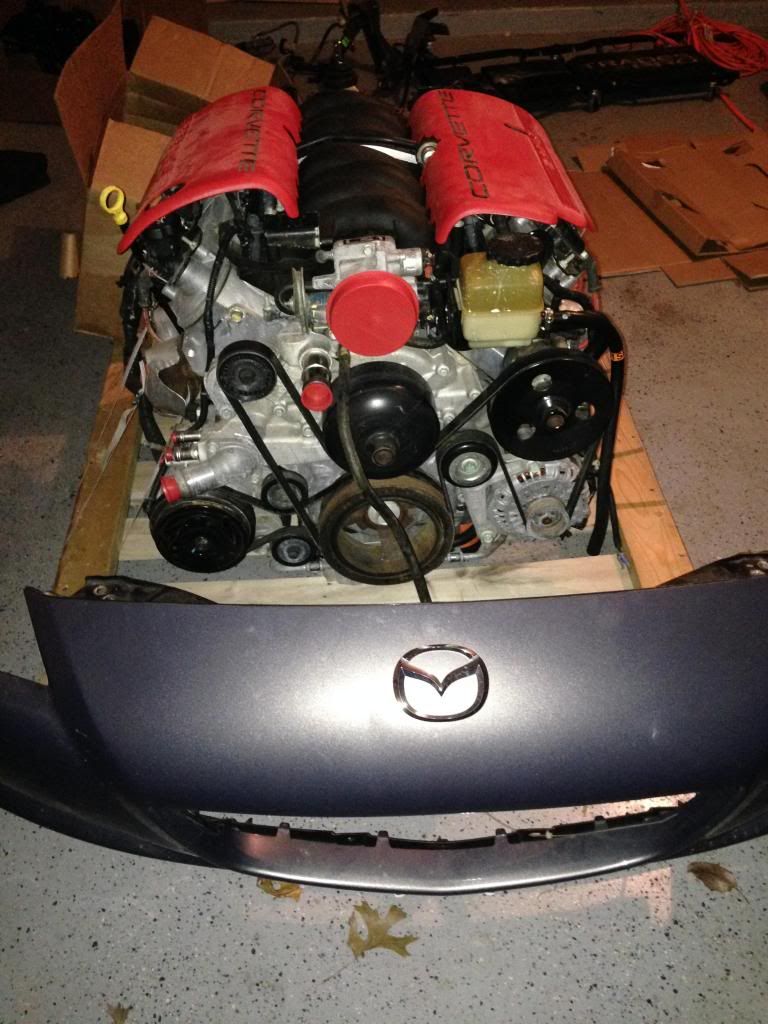 [/IMG]
Clutch, fylwheel, T56 all running great before pull so im optimistic.
[IMG]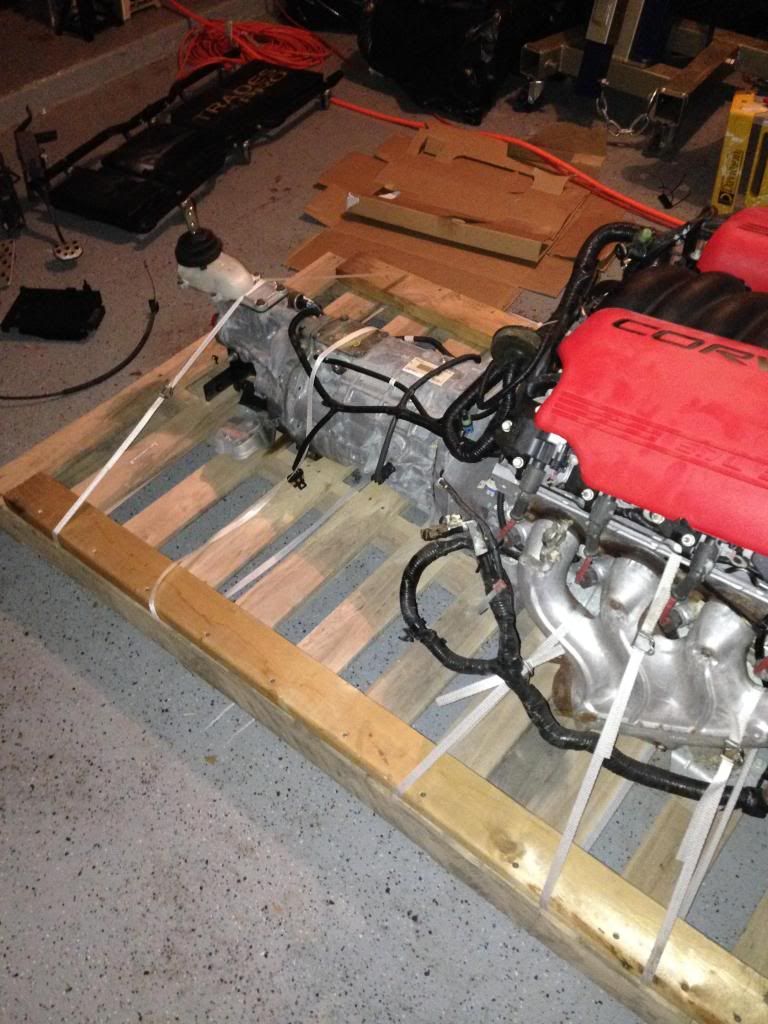 [/IMG]
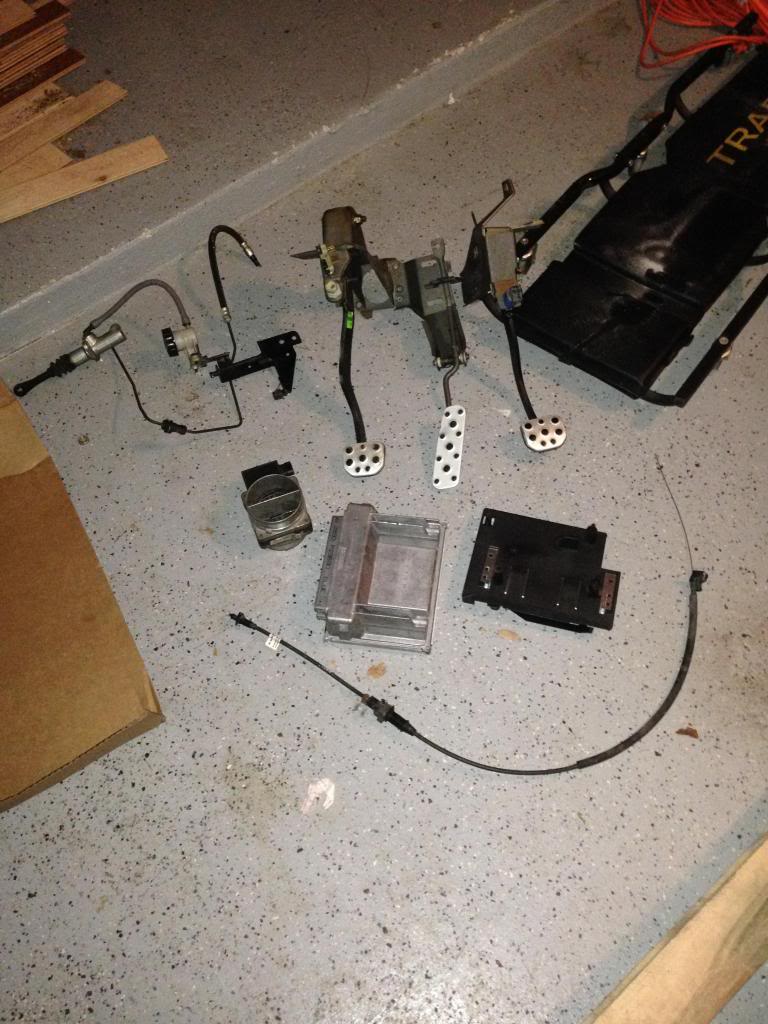
The pullout also came with the complete pedal assembly, throttle linakge, clutch linkage/slave cylnider, PCM, Maf, ect...
These are some of the swap parts/hardware i have been collecting over the past couple years in preparation for the project.
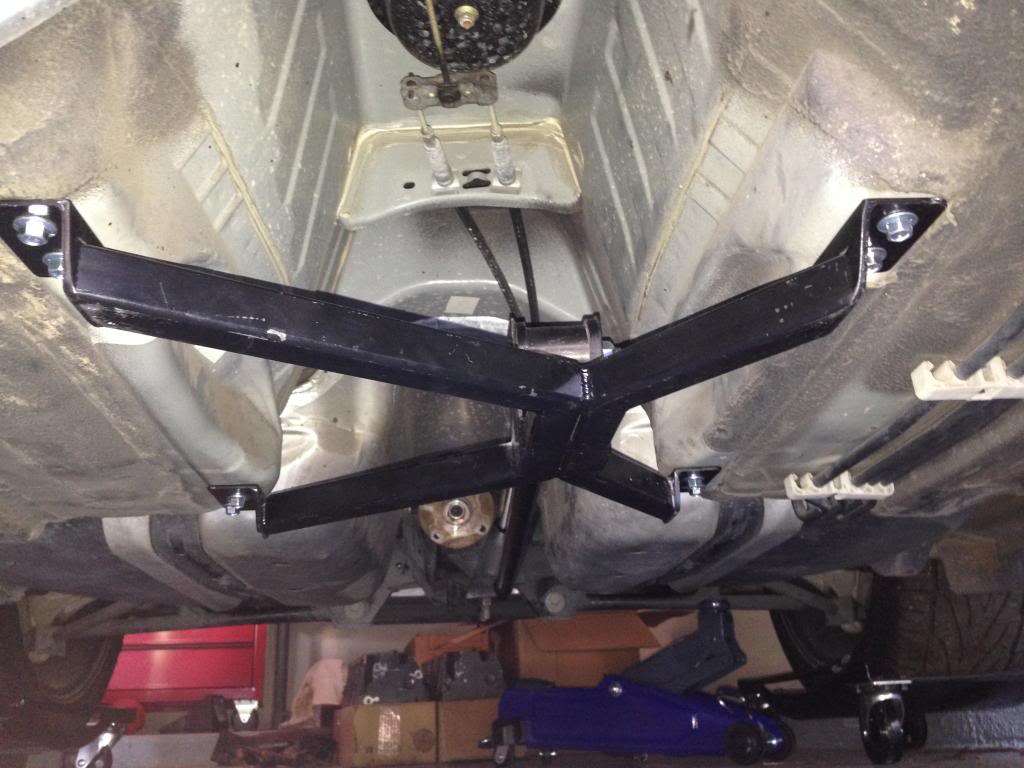
Crossmember from hinson
[IMG]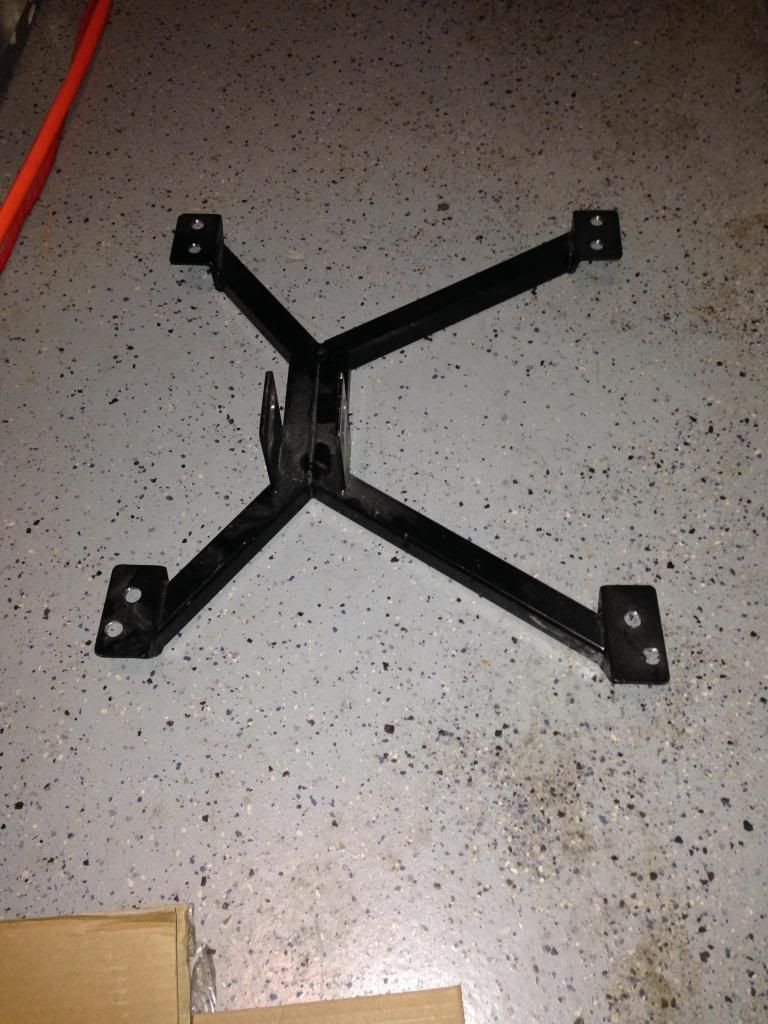 [/IMG]
Bad pic but torque arm from Hinson, installed on the rear diff..then the front is just on jacks because i didnt have time for that today.
[IMG]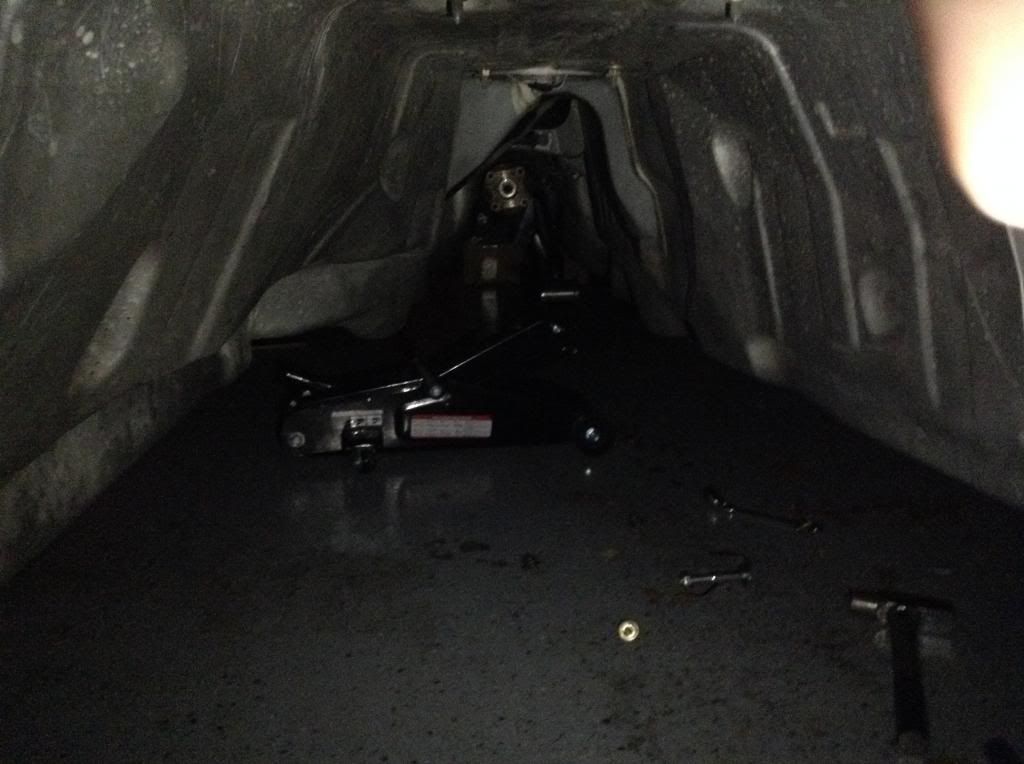 [/IMG]
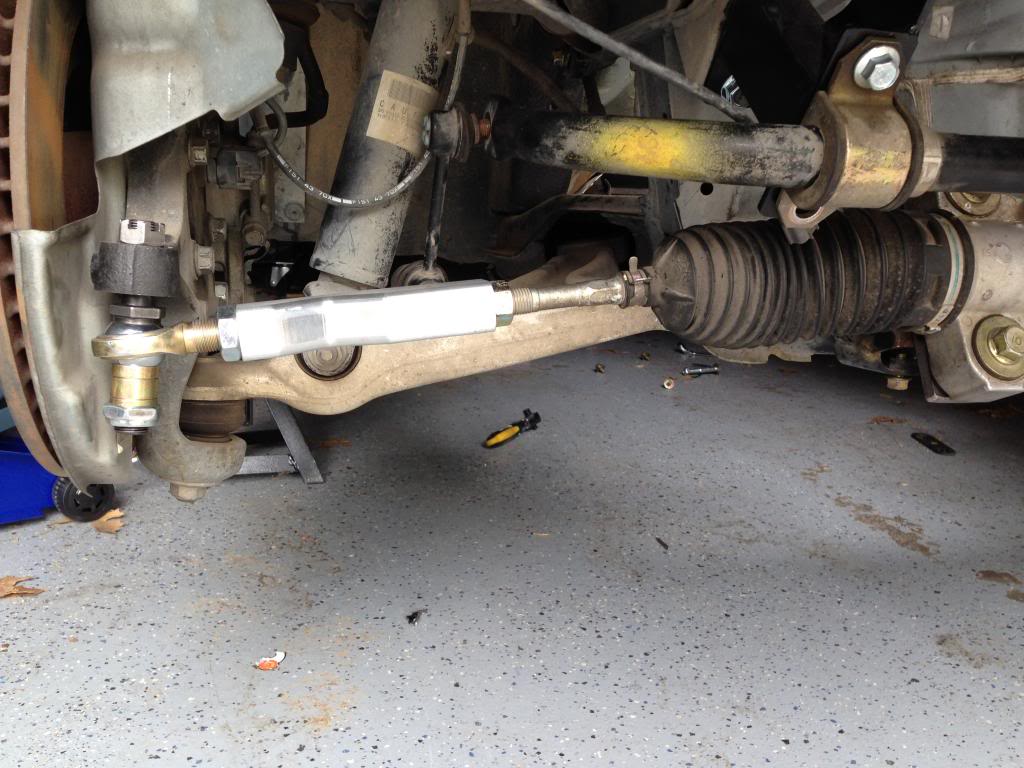
Steering rack relocation, drops the rack about 2, 2-1/2 inches, mounts are from Hinson as well.
[IMG]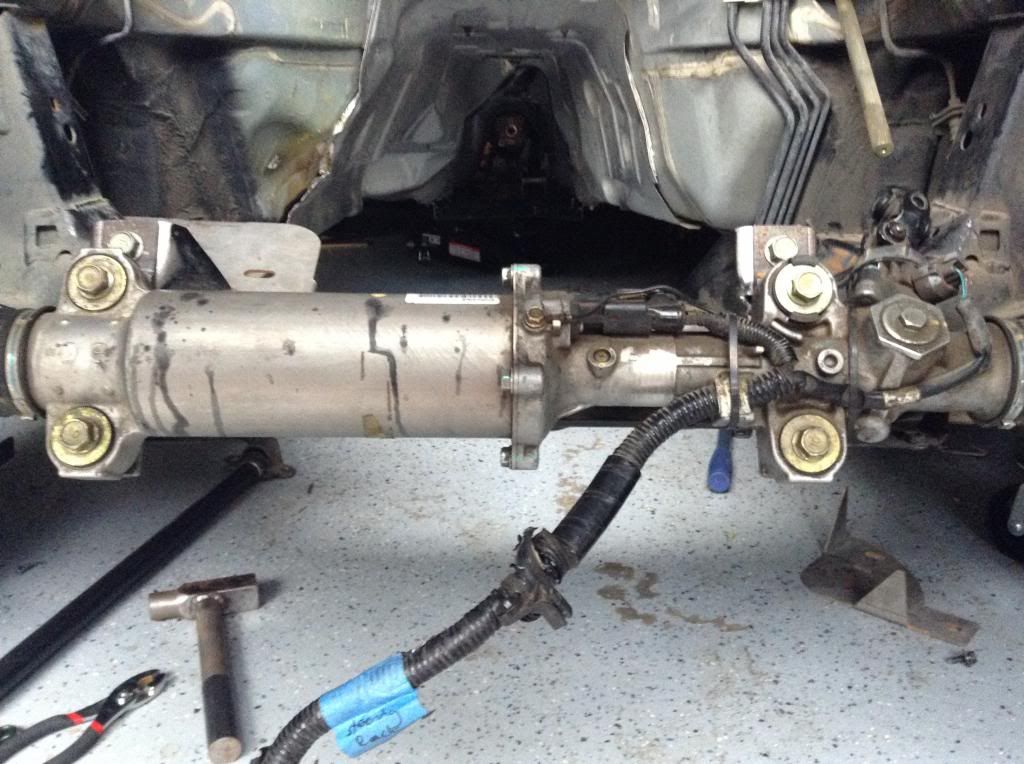 [/IMG]
another shot of the steering rack relocation, feel like this pic gives a better idea of the clearance needed to clear the ls oil pan.
[IMG]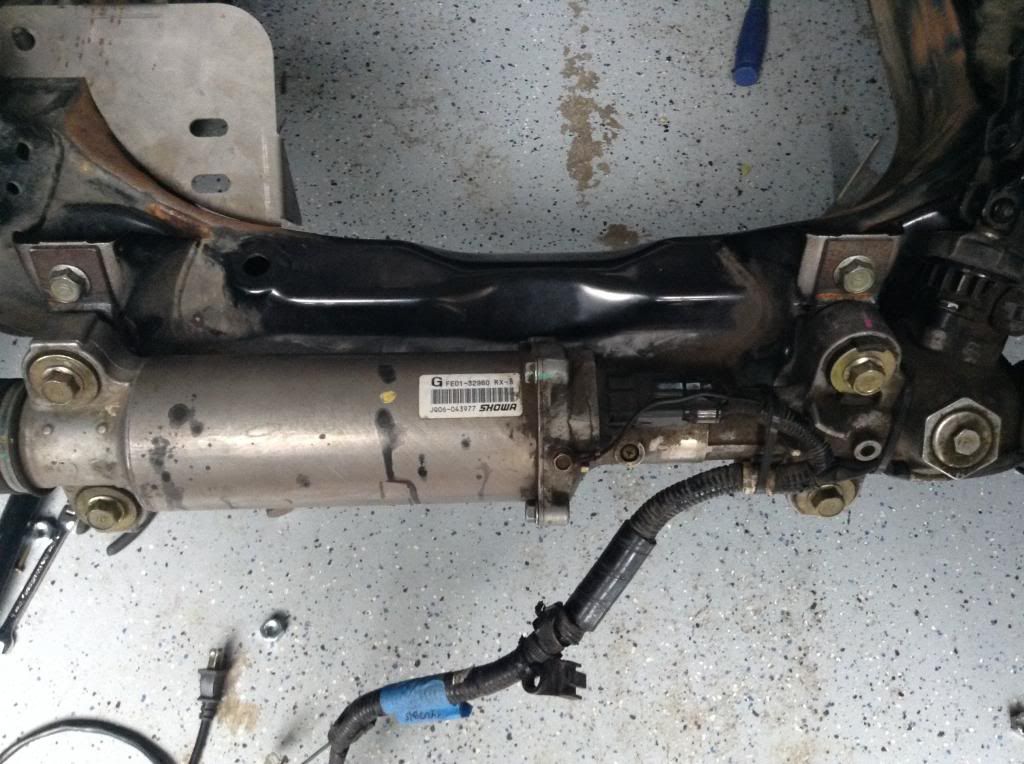 [/IMG]
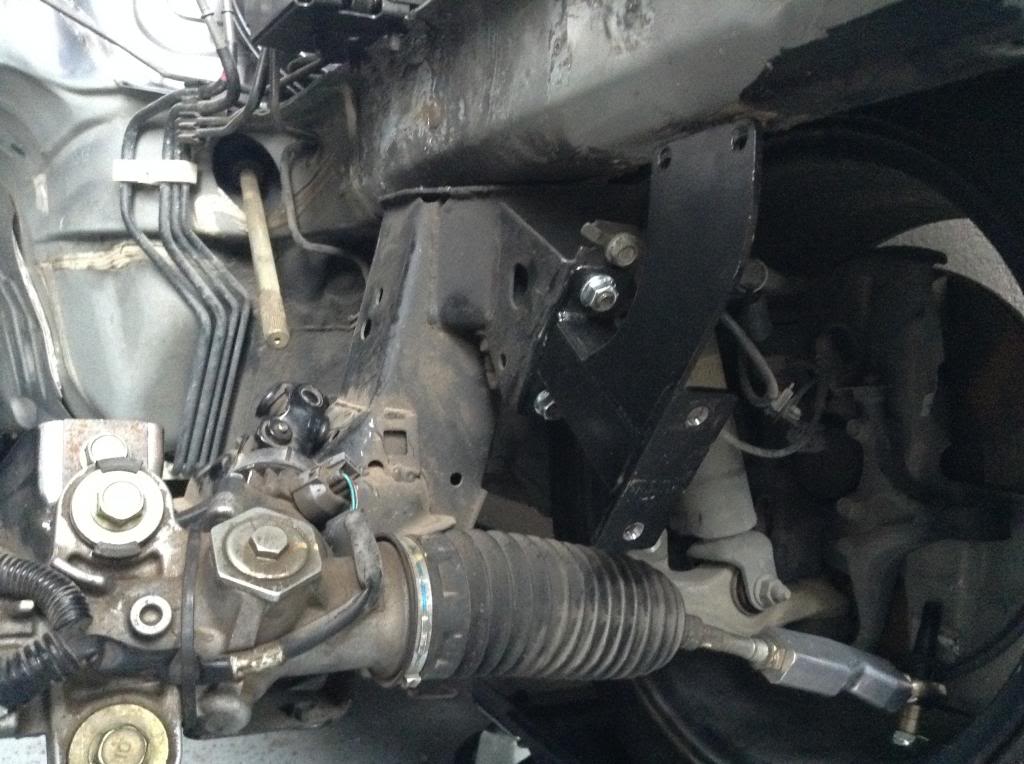
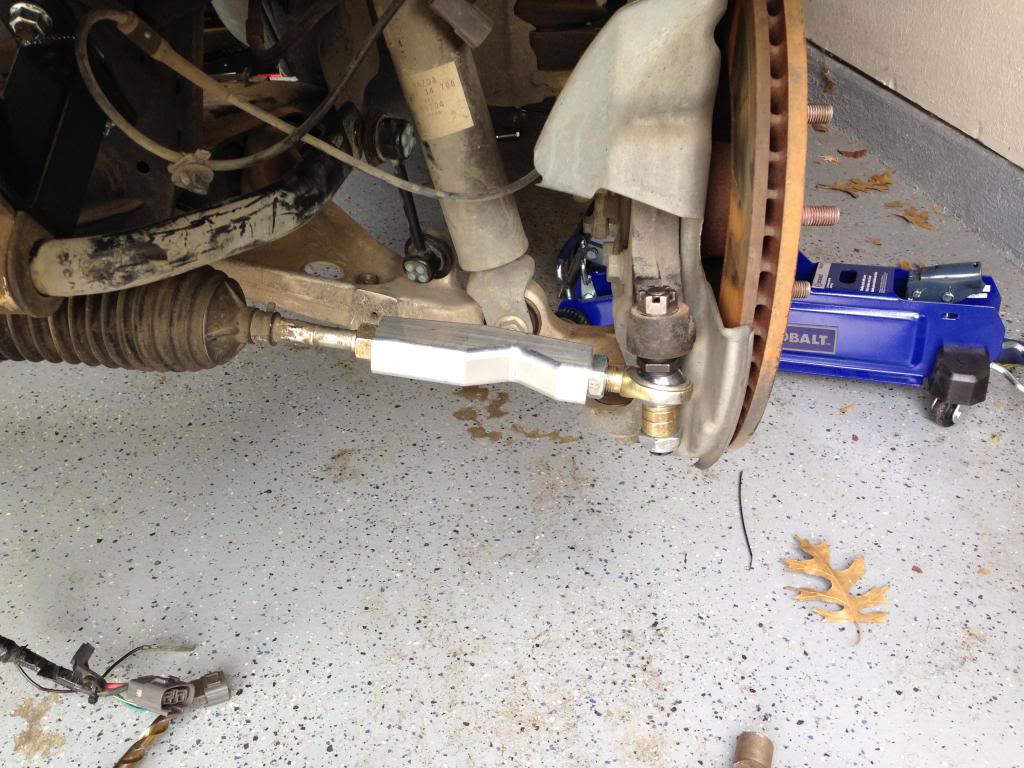
Also had to relocate the front sway bar due to the rack coming down 2 inches or so, sway bar mounts...passenger and driver side.
[IMG]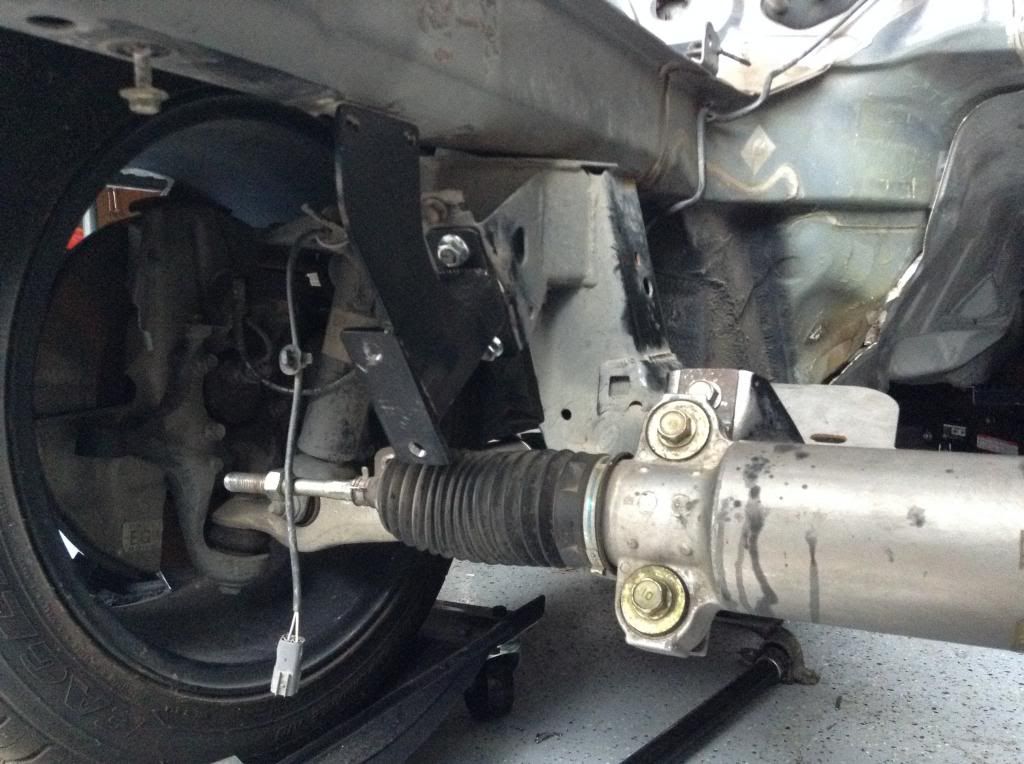 [/IMG]
Also started test fitting the bump steer kit...here is just a shot of it on the steering rack.
[IMG]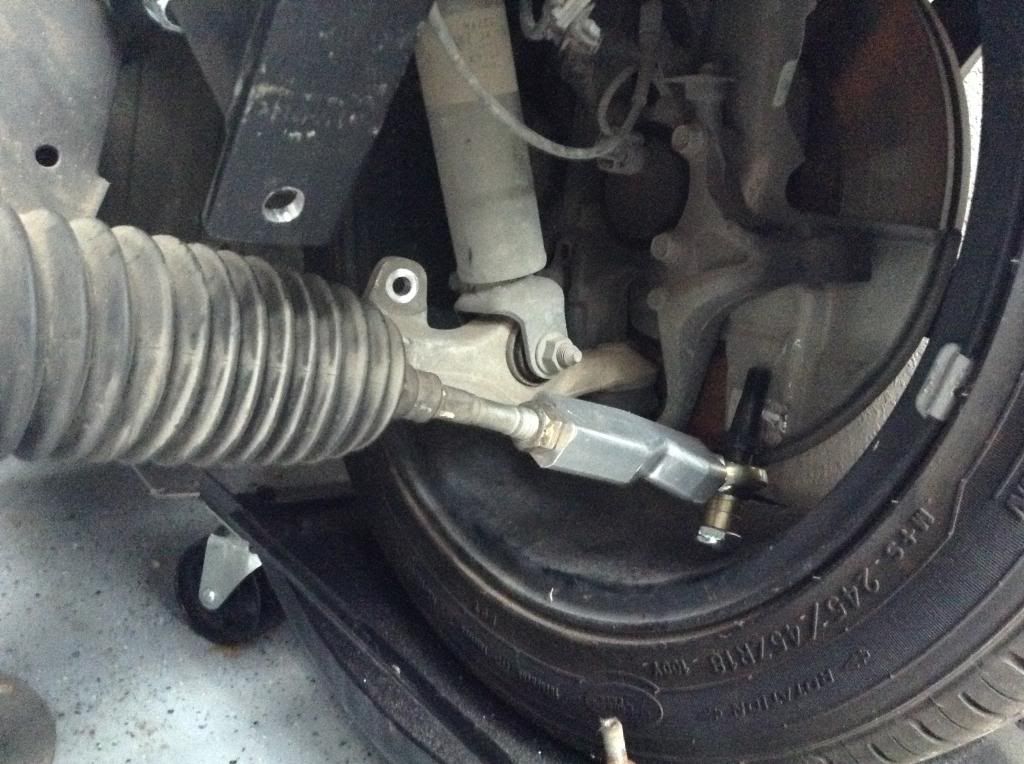 [/IMG]
Didnt seem to be fitting correctly, but it was the end of the day and i was exhausted so im gonna look at it and im sure figure it out tomorrow. Then updates will follow.
Here is a couple close ups on the bump steer kit nice looking pieces
[IMG]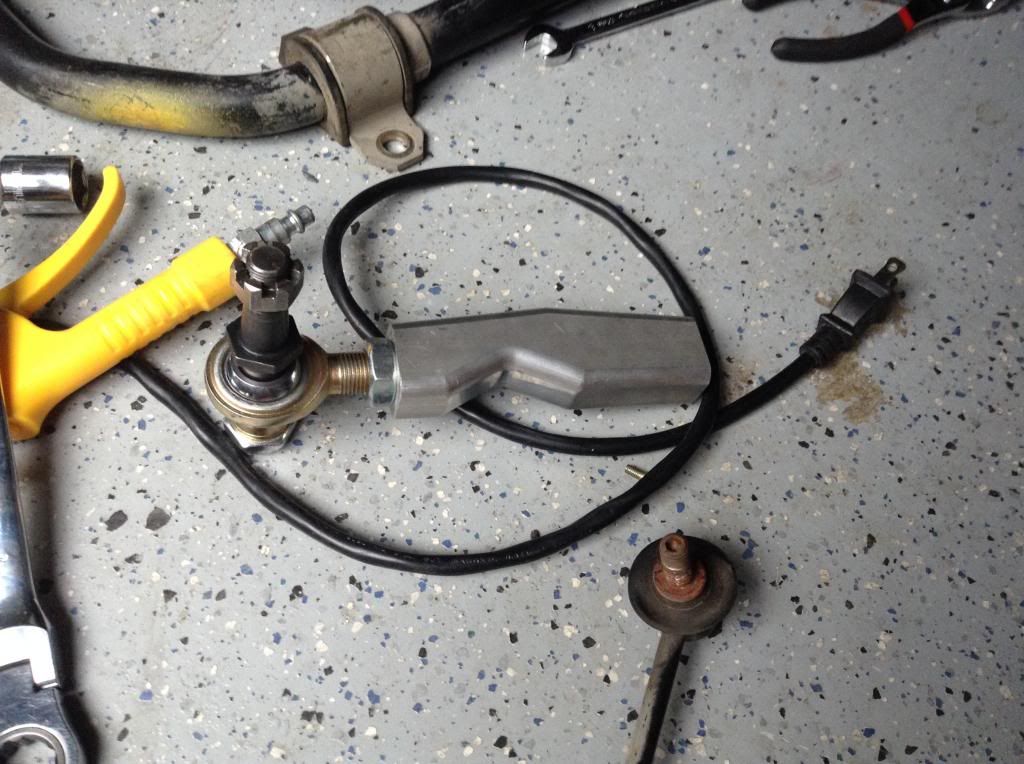 [/IMG]
[IMG]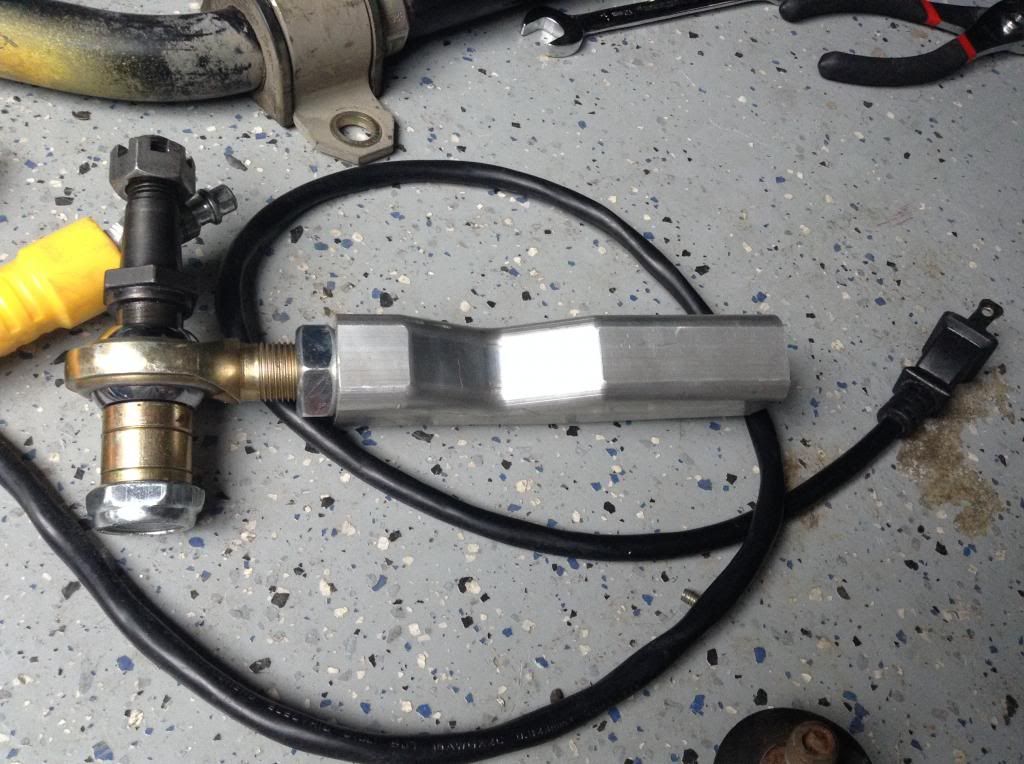 [/IMG]
Started looking into the bump steer fitment issue...so i started measuring the tie rod end bolts to see if there was noticeable differences. The OEM tie rod bolt diameter is 14.85mm at its widest, and is 41.68mm long.
[IMG]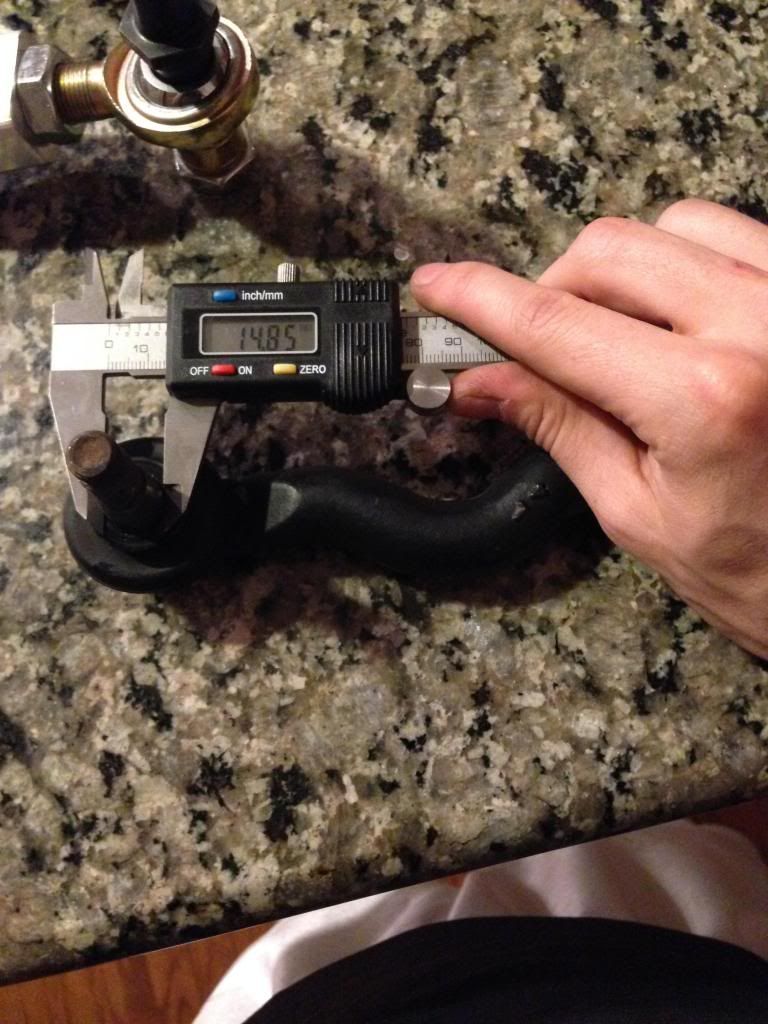 [/IMG]
While the bump steer tie rob end has a bolt assembly that measures 15.49mm in diameter at its widest, and 34.33mm long (starting from 14.85mm diameter, it tapers down from threads to 15.49mm at the base)
[IMG]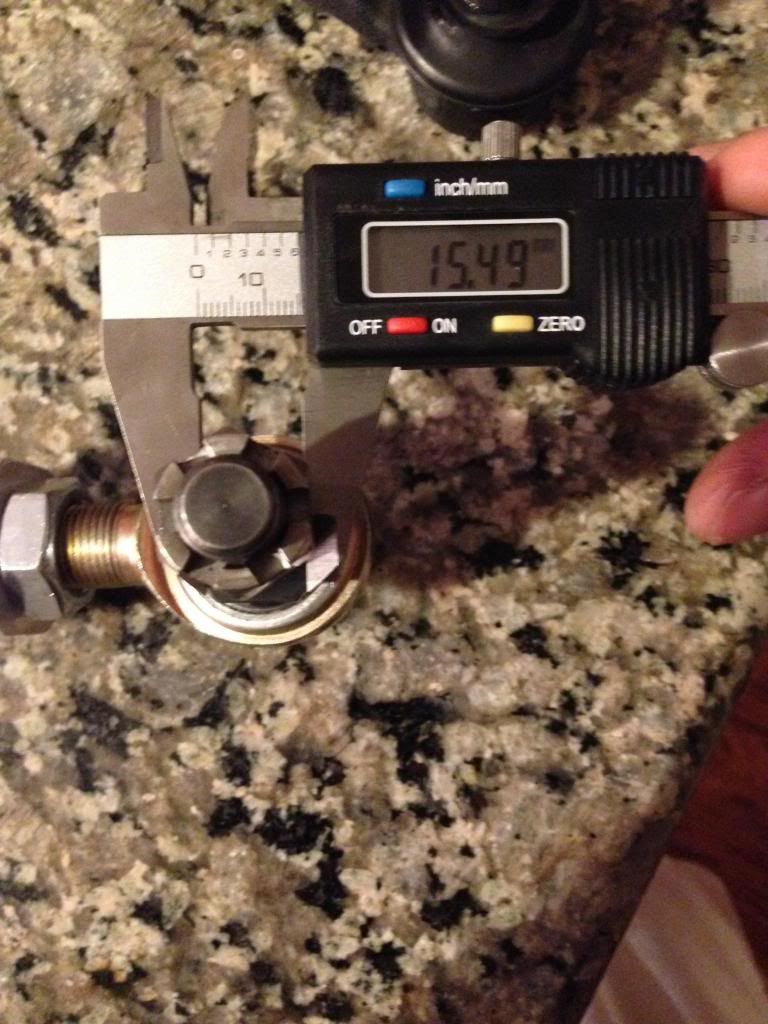 [/IMG]
I dont really know what to make of it honestly..judging by the numbers the bump steer tie rod end bolt is over half a mm wider at the base over the OEM tie rod bolt, 0.64mm to be exact, and 7.35mm shorter. Guess i will just see what im gonna do tomorrow haha. Hope yall enjoy!
More Progress
Made some good progress today, however when i woke up this morning to pick up where i left off last night...I noticed my Air Compressor's drain/relief bolt was leaking by. Anyway had to make a trip to the Lowes and fix it. I think it came out great, and now is even better/ easier to drain.
[IMG]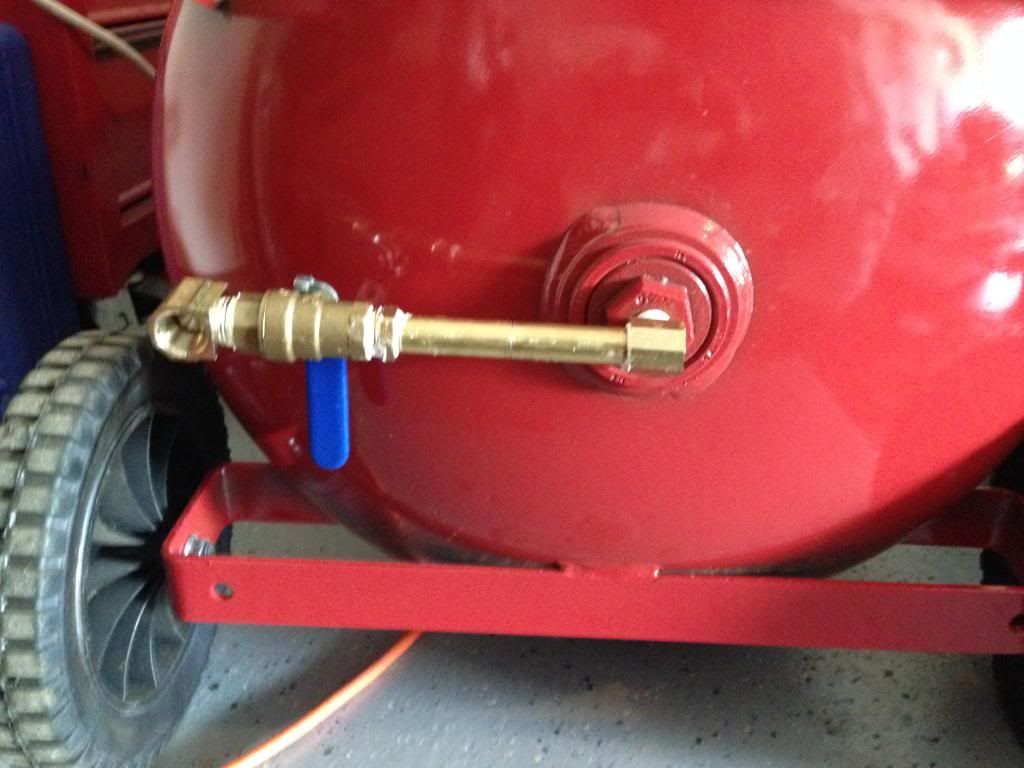 [/IMG]
[IMG]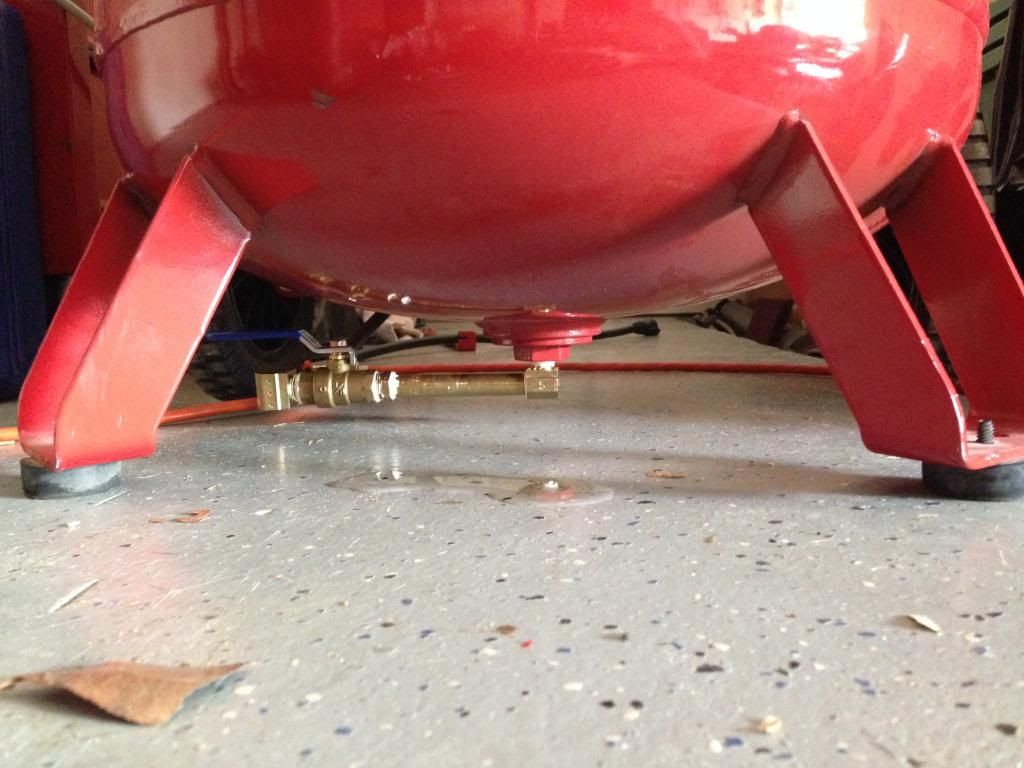 [/IMG]
Clearance looks great, think it ended up pretty good. Now onto the car progress. Got the bump steer tie rod ends worked out...just had to do a little grinding to get the tie rod end bolt to fit.
Passenger
driver side
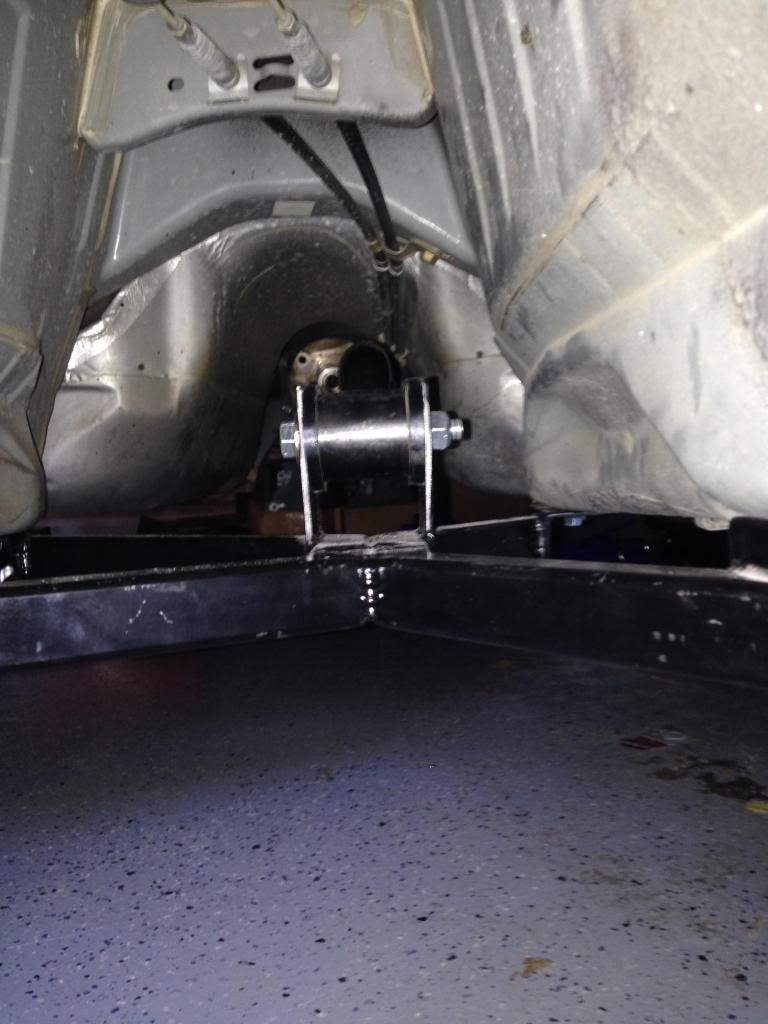
Got the crossmember, and torque arm installed today. Looks pretty rigid.
Got the front sway bar fully bolted in and relocated. Clearance looks good.
Passenger Side
[IMG]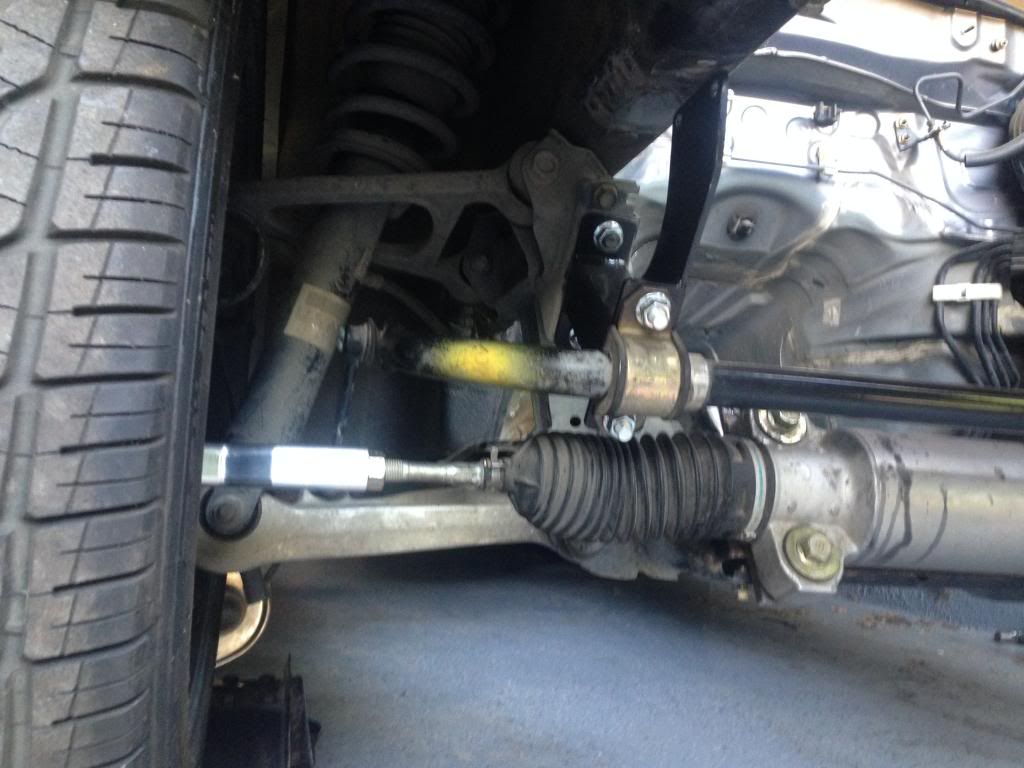 [/IMG]
Drivers Side
[IMG]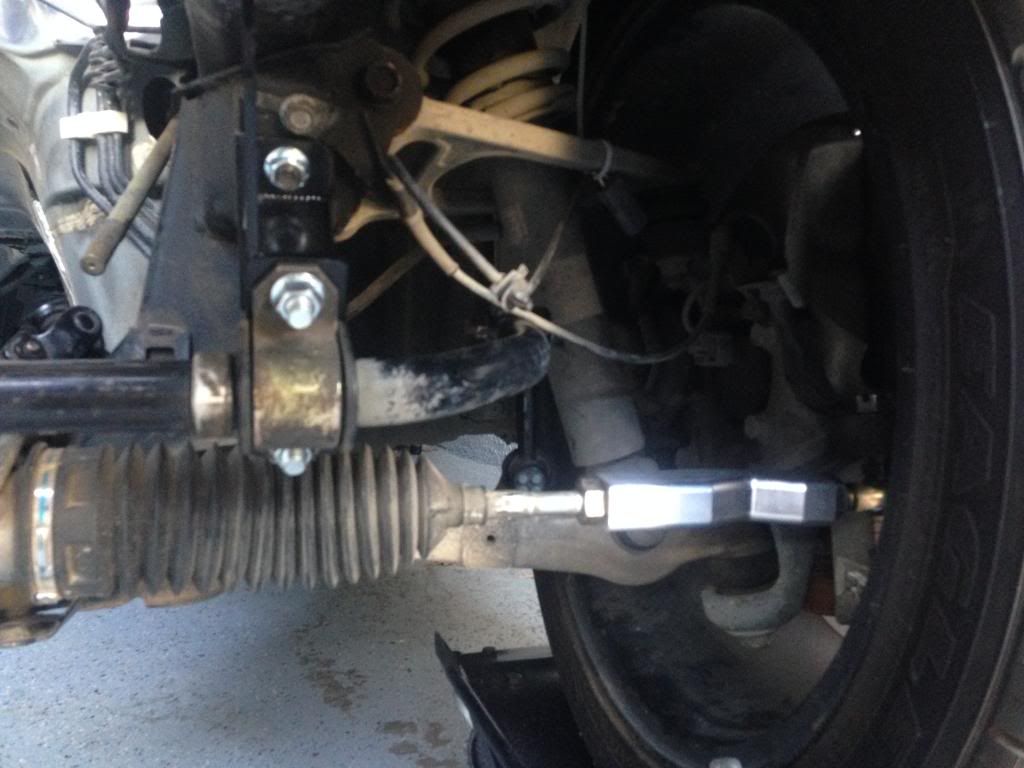 [/IMG]
Im at a point now where the majority of parts i have gathered for my swap are already bolted on the car...so now im off to order some parts to finish up the mounting/fuel system.. Then it will be time to drop that bad boy in!! I'll update again soon. Just for kicks this is how it sits now with all the front suspension work done, and frame/rear end bracing complete.
[IMG]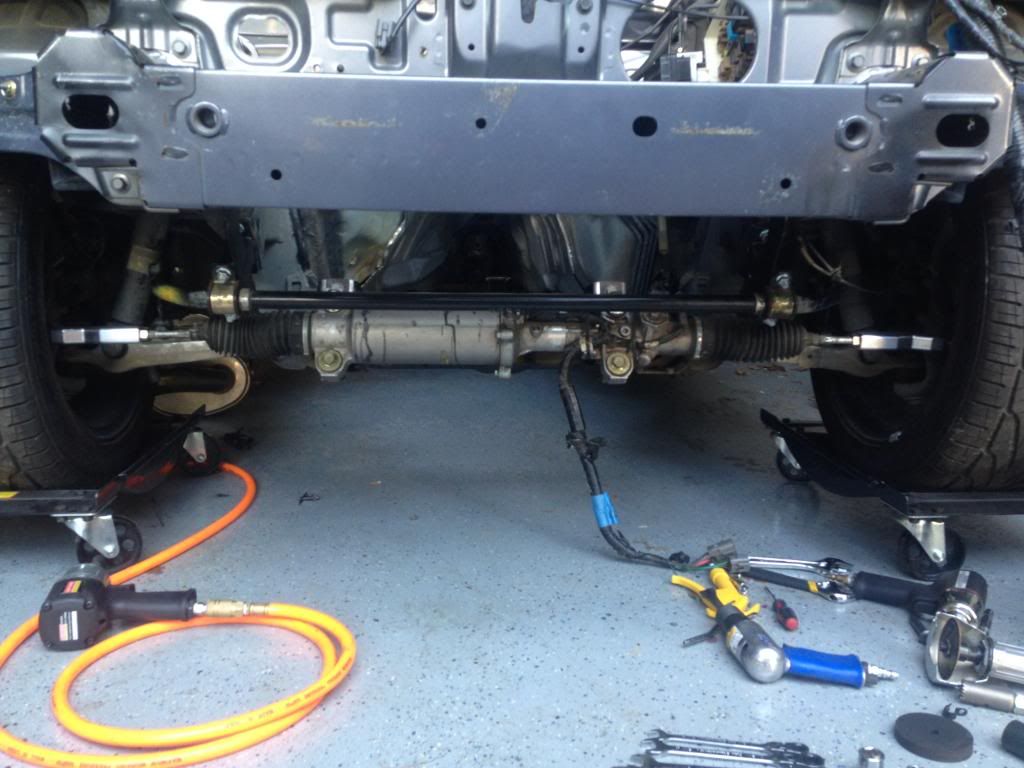 [/IMG]
So finally here are the pics i have so far. Keep in mind im a college student so funds are not that adundant lol, but as i get the money i will keep getting more parts as available.
This was what the car started as, when i started tearing into it, had the greddy turbo kit and alot of goodies on it.
Got some progress done on getting every thing off, and out of the way
Motors out!!, sold it to a guy on the rx8club forum
Tranny came out next, also was sold to a guy on rx8club.
AC lines and other misc stuff came out, im actually surprised at how much room the engine bay has, it looked so cluttered with the small rotary, but actaully its pretty big
-Brief summary of where i am at before i start spamming pictures...Was gonna go the 5.3 (LM7) cheaper route so i started piecing together pieces like the motor, ls6 intake, 243 heads, 228R 112 LSA Camshaft...ect around the past 2-3 years so when i had the time i would be ready. However plans change!
Got a killer deal on a low milage LS1/T56 pullout from a 2004 GTO...and this thing is beautiful lol. Complete from oil pan to intake.
[IMG]
 [/IMG]
[IMG]
 [/IMG]
Clutch, fylwheel, T56 all running great before pull so im optimistic.
[IMG]
 [/IMG]
The pullout also came with the complete pedal assembly, throttle linakge, clutch linkage/slave cylnider, PCM, Maf, ect...

These are some of the swap parts/hardware i have been collecting over the past couple years in preparation for the project.
Crossmember from hinson
[IMG]
 [/IMG]
Bad pic but torque arm from Hinson, installed on the rear diff..then the front is just on jacks because i didnt have time for that today.
[IMG]
 [/IMG]
Steering rack relocation, drops the rack about 2, 2-1/2 inches, mounts are from Hinson as well.
[IMG]
 [/IMG]
another shot of the steering rack relocation, feel like this pic gives a better idea of the clearance needed to clear the ls oil pan.
[IMG]
 [/IMG]
Also had to relocate the front sway bar due to the rack coming down 2 inches or so, sway bar mounts...passenger and driver side.
[IMG]
 [/IMG]
Also started test fitting the bump steer kit...here is just a shot of it on the steering rack.
[IMG]
 [/IMG]
Didnt seem to be fitting correctly, but it was the end of the day and i was exhausted so im gonna look at it and im sure figure it out tomorrow. Then updates will follow.
Here is a couple close ups on the bump steer kit nice looking pieces
[IMG]
 [/IMG]
[IMG]
 [/IMG]
Started looking into the bump steer fitment issue...so i started measuring the tie rod end bolts to see if there was noticeable differences. The OEM tie rod bolt diameter is 14.85mm at its widest, and is 41.68mm long.
[IMG]
 [/IMG]
While the bump steer tie rob end has a bolt assembly that measures 15.49mm in diameter at its widest, and 34.33mm long (starting from 14.85mm diameter, it tapers down from threads to 15.49mm at the base)
[IMG]
 [/IMG]
 I dont really know what to make of it honestly..judging by the numbers the bump steer tie rod end bolt is over half a mm wider at the base over the OEM tie rod bolt, 0.64mm to be exact, and 7.35mm shorter. Guess i will just see what im gonna do tomorrow haha. Hope yall enjoy!
More Progress
Made some good progress today, however when i woke up this morning to pick up where i left off last night...I noticed my Air Compressor's drain/relief bolt was leaking by. Anyway had to make a trip to the Lowes and fix it. I think it came out great, and now is even better/ easier to drain.
[IMG]
 [/IMG]
[IMG]
 [/IMG]
Clearance looks great, think it ended up pretty good. Now onto the car progress. Got the bump steer tie rod ends worked out...just had to do a little grinding to get the tie rod end bolt to fit.

Passenger

driver side
Got the crossmember, and torque arm installed today. Looks pretty rigid.


Got the front sway bar fully bolted in and relocated. Clearance looks good.
Passenger Side
[IMG]
 [/IMG]
Drivers Side
[IMG]
 [/IMG]
Im at a point now where the majority of parts i have gathered for my swap are already bolted on the car...so now im off to order some parts to finish up the mounting/fuel system.. Then it will be time to drop that bad boy in!! I'll update again soon. Just for kicks this is how it sits now with all the front suspension work done, and frame/rear end bracing complete.
[IMG]
 [/IMG]
 04-28-2014, 09:09 AM
#2

What are you calling a killer deal?
I'm spec'ing my setup right now (LM7/T56 + Ford 8.8), and I'm up to $8200 including the expected cost of the v8 roadsters mounting kit + power steering. Cheapest I've found a complete pullout with an LS1/T56 is ~4500, which is at least 1200 more than the LM7 setup.
Very cool. Can't wait to see it finished. Good luck.
 04-29-2014, 08:58 PM
#4
What are you calling a killer deal?
I'm spec'ing my setup right now (LM7/T56 + Ford 8.8), and I'm up to $8200 including the expected cost of the v8 roadsters mounting kit + power steering. Cheapest I've found a complete pullout with an LS1/T56 is ~4500, which is at least 1200 more than the LM7 setup.
Very cool. Can't wait to see it finished. Good luck.
I'm spec'ing my setup right now (LM7/T56 + Ford 8.8), and I'm up to $8200 including the expected cost of the v8 roadsters mounting kit + power steering. Cheapest I've found a complete pullout with an LS1/T56 is ~4500, which is at least 1200 more than the LM7 setup.
Very cool. Can't wait to see it finished. Good luck.
I got my pullout for 4500 plus 375 for shipping, but it was low mileage clean pullout that has everything i need. Motor/trans, pedal assembly, wiring harness/pcm, maf, throttle linkage, clutch master cylinder the list goes on. Other than that the misc things i need for the swap i was able to get while staying around 400 dollars under my 7000 dollar budget.
06-02-2014, 09:52 PM
#5
Bit of an update
Not to much of an update today, but I got the engine stands mocked up to see how everything will sit in the engine bay. Looks pretty good, seems like the motor will be centered up real nice with these mounts/stands.
Give you an idea of how the subframe is gonna be modified to allow stock c5 corvette mounts to work nicely.
[IMG] [/IMG]
Close up on drivers side stand..fit looks good along the subframe, just need to get them tacked up and welded on..hopefully will be able to get it done by the weekend.
[IMG] [/IMG]
shot of the passenger stand
[IMG] [/IMG]
Here is a shot of the mock up with the c5 engine mounts/pedestals ill be using
[IMG] [/IMG]
Just for the hell of it i mocked the c5 mounts up with the stock rubber mount to see if there was any real difference in height over the aftermarket ones in the pic above...difference was negligible.
[IMG] [/IMG]
Also figured out what/how im gonna mount my radiator and fan shroud, tried to take pics, but it was too dark. Ill get better ones by the weekend and add them along with another update on progress hopefully!
Hey all, got my radiator and fan shroud all mocked up for the swap. Should have plenty of room for an interesting intake tube/filter routing.
Shot of it mocked up Mishimoto Radiator looks good. (Get an idea for wanted position).
[IMG]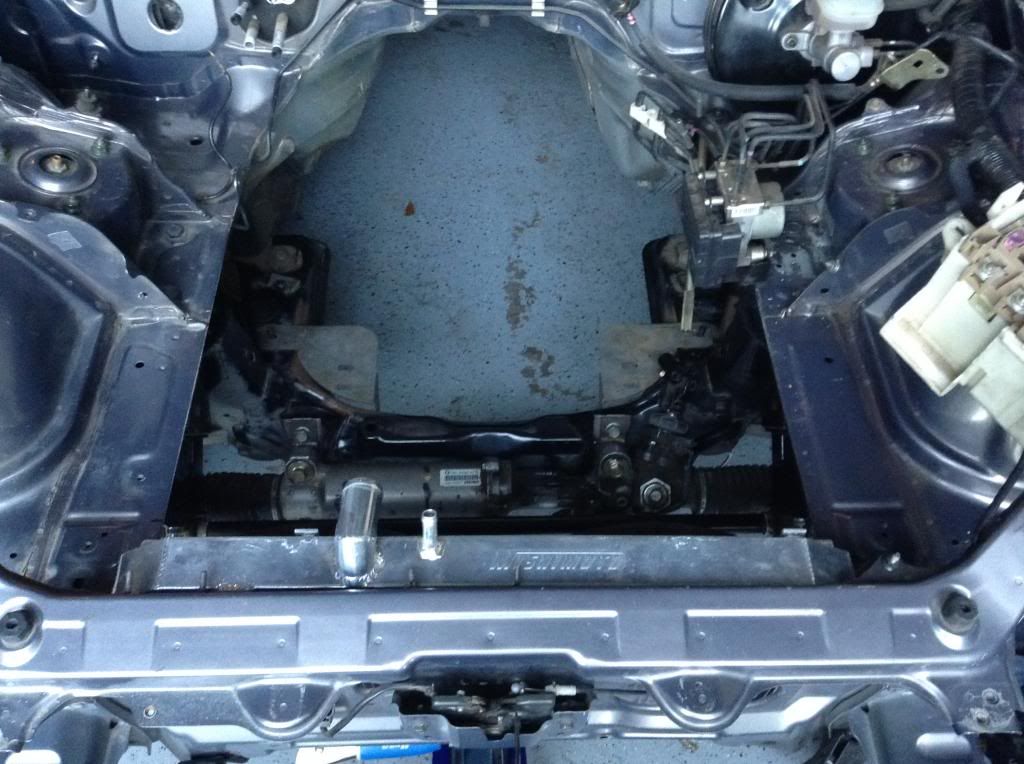 [/IMG]
Clearance of the left and right side
[IMG]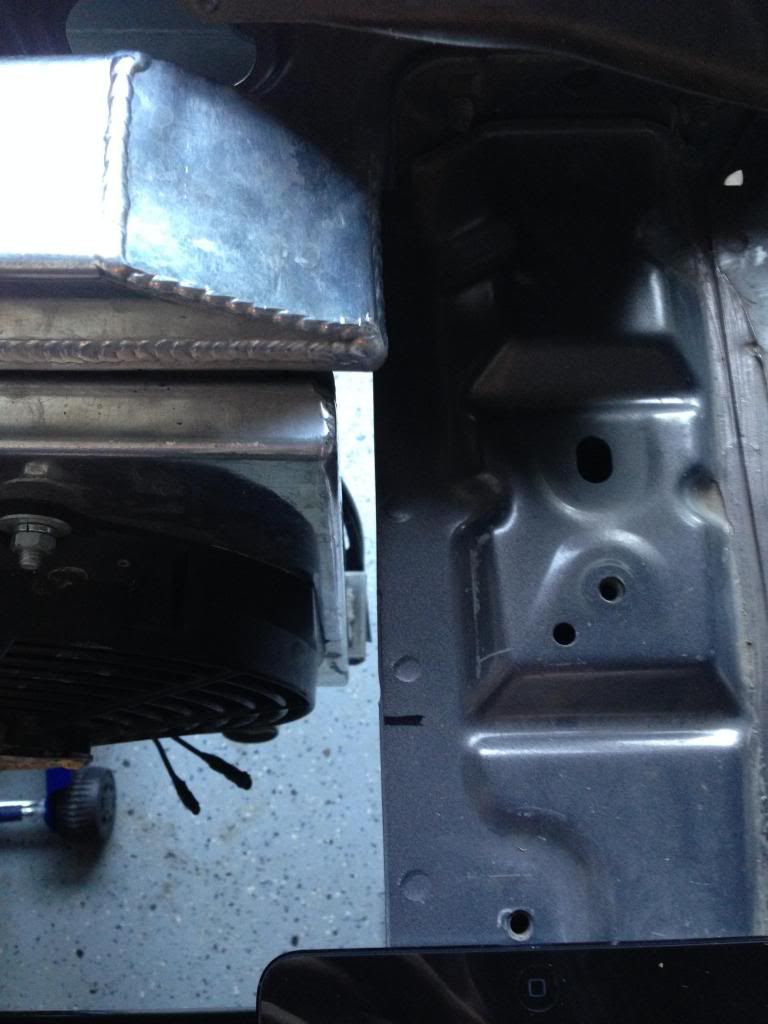 [/IMG]
[IMG]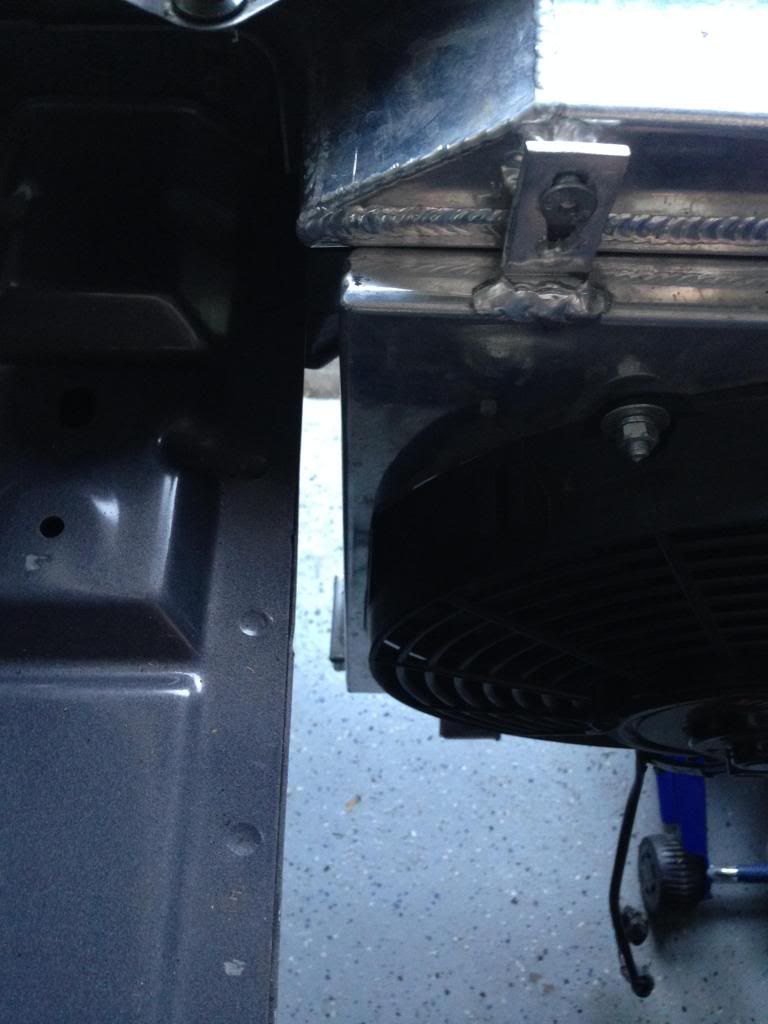 [/IMG]
Shot of the Mishimoto aluminum fan shroud with twin 12'' slim fans.
[IMG] [/IMG]
Shot of the notchs ill cut for finally rigid fitment.
[IMG]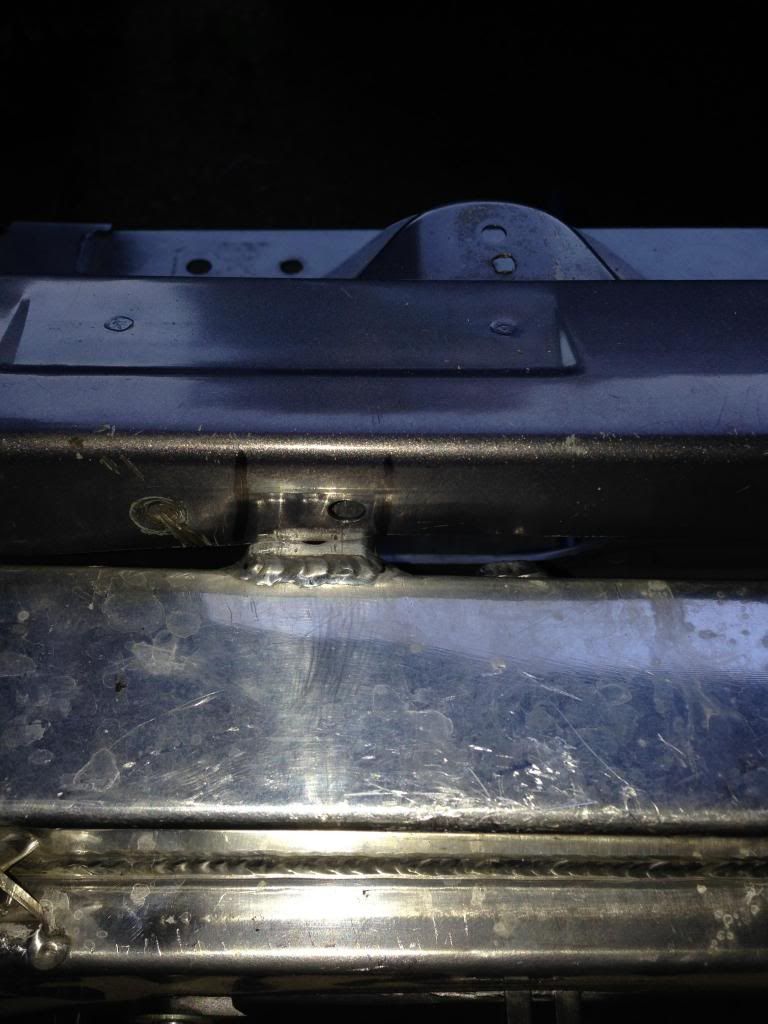 [/IMG]
[IMG]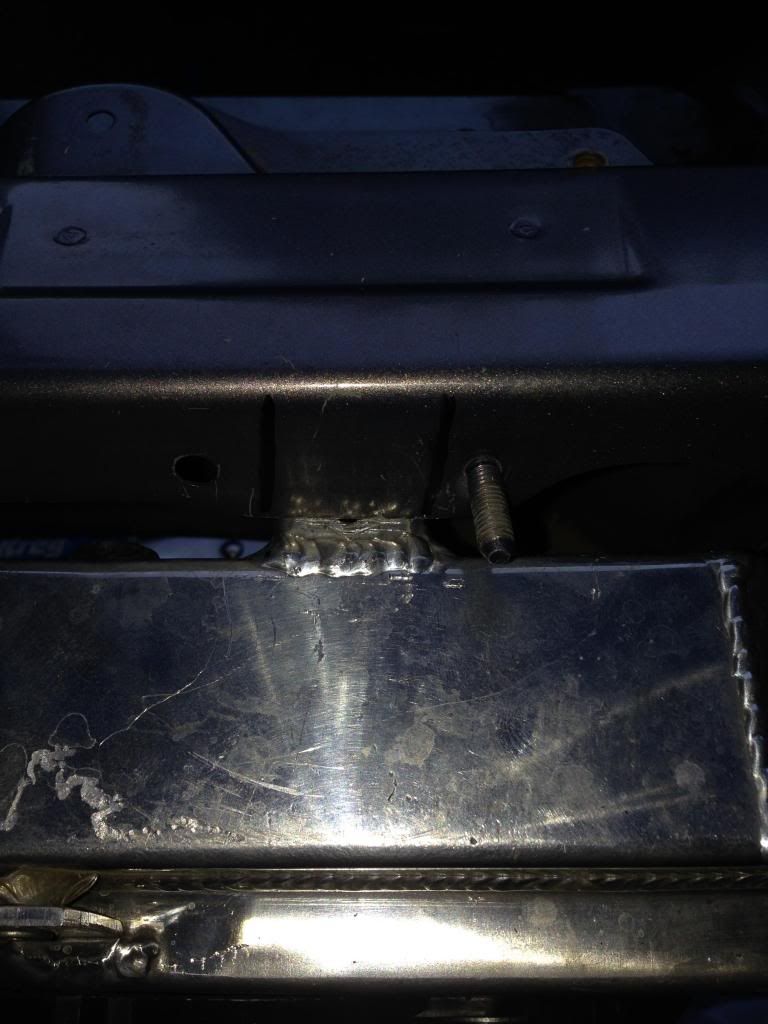 [/IMG]
Mount setup to hold up the bottom of the rad (just clamped on for known to look at clearance)
Bottom of mount.
[IMG] [/IMG]
Side profile of the mount.
[IMG]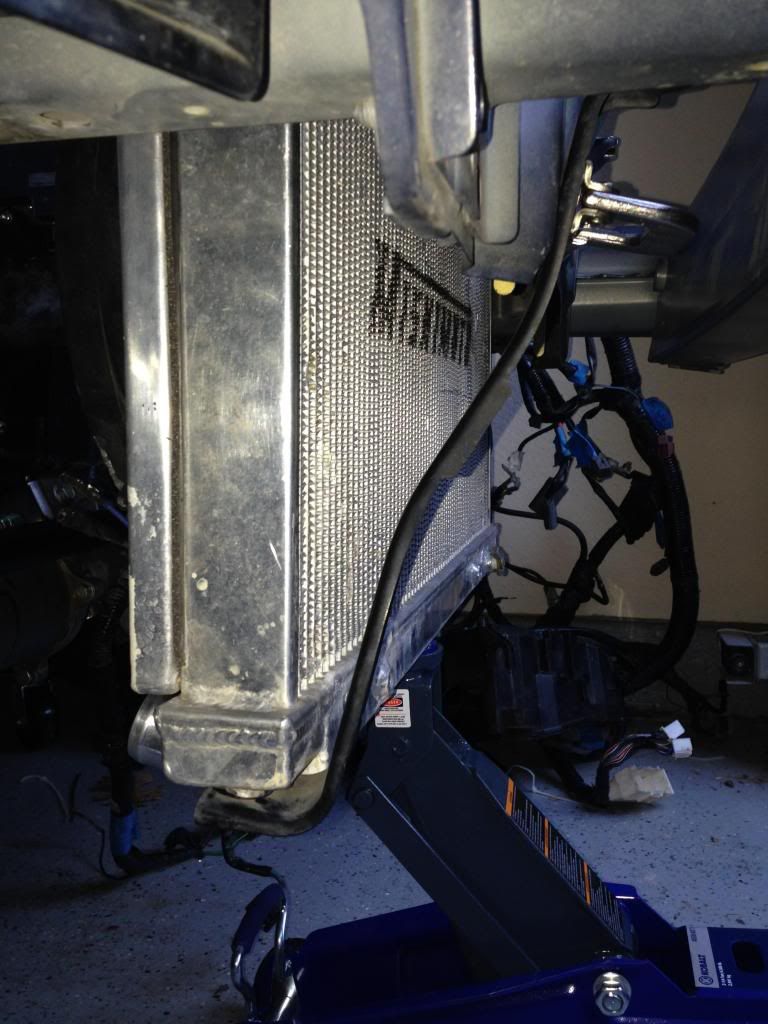 [/IMG]
Looks good and sturdy..gonna be finishing up fabrication of the radiator mounts, and engine stands this week, hopefully have the motor/trans dropped in this weekend!! Update will follow. Speartech should be getting my PCM and harness for rework and tune any day now so everything is coming together nicely.
Hey guys, sorry i know it has been awhile since the last update, but i have just been busy....However, lets to cut to the chase. Had my engine stands, and transmission cross member plates welded up this weekend. They look fantastic imo. Also got the motor torn down, with the ls engine lift plate on, heads taped up.
[IMG]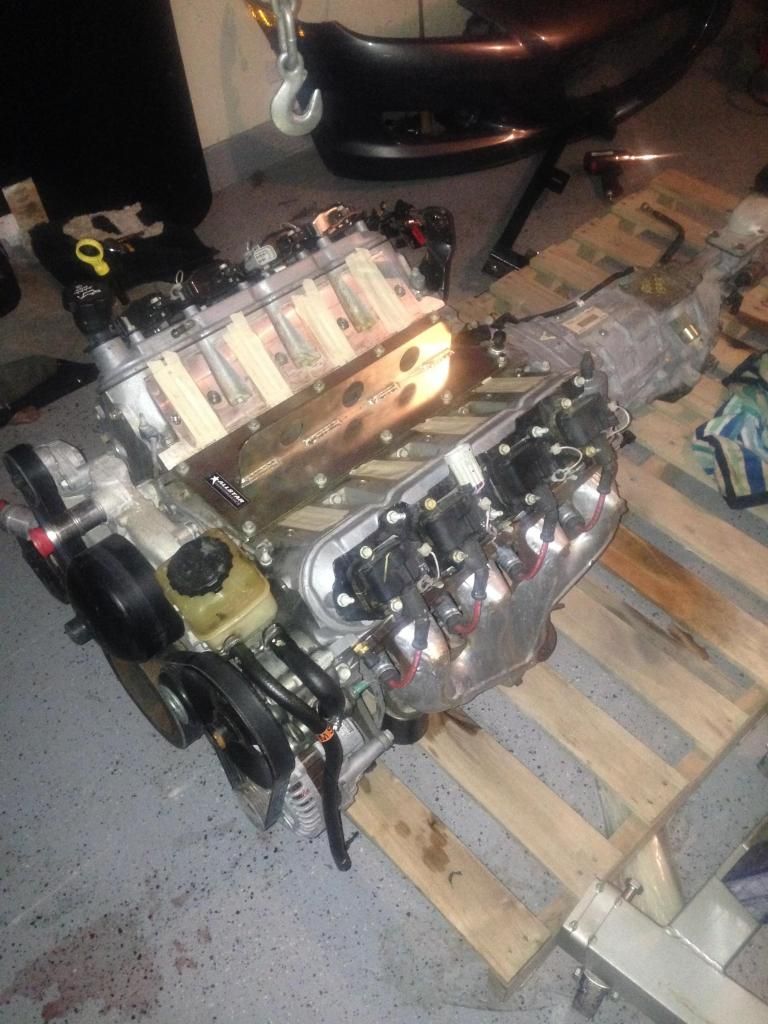 [/IMG]
Some shots of the engine stands welded up (before a good clean to get the slag off)...great work by the welder. By the way if your in the dfw area, and a novice welder who isnt comfortable welding on your subframe i recommend Rosado Welding. Great guy,fast and reliable work, clean welds, can come to your house if the car doesn't move . Awesome!!
[IMG]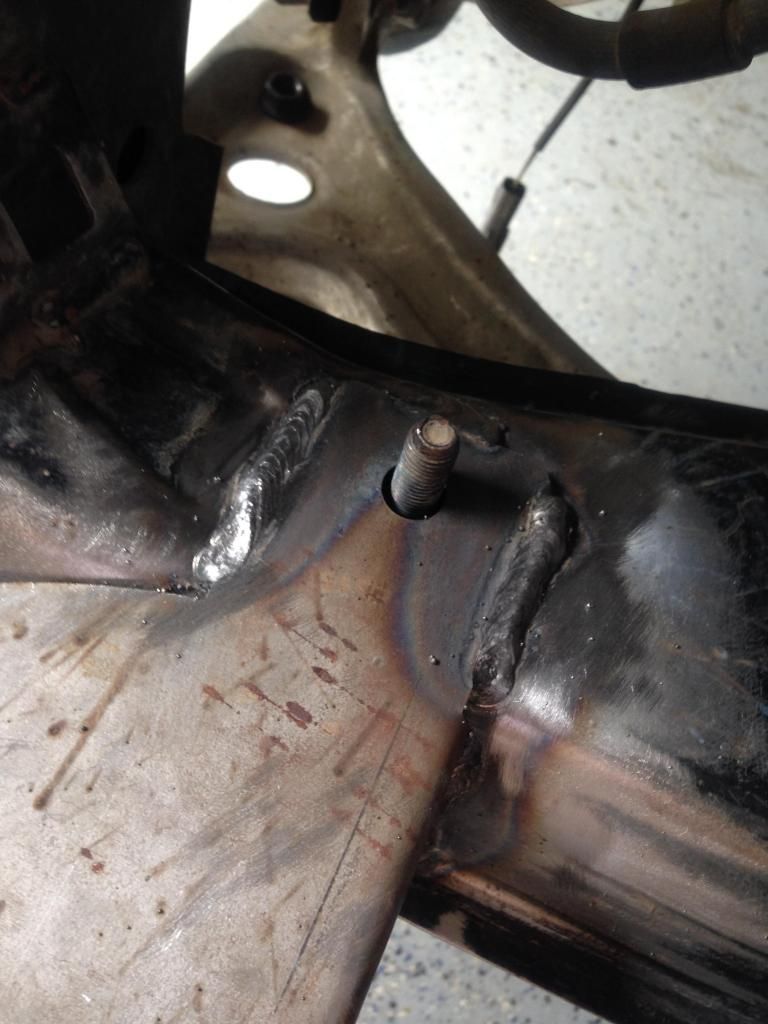 [/IMG]
[IMG]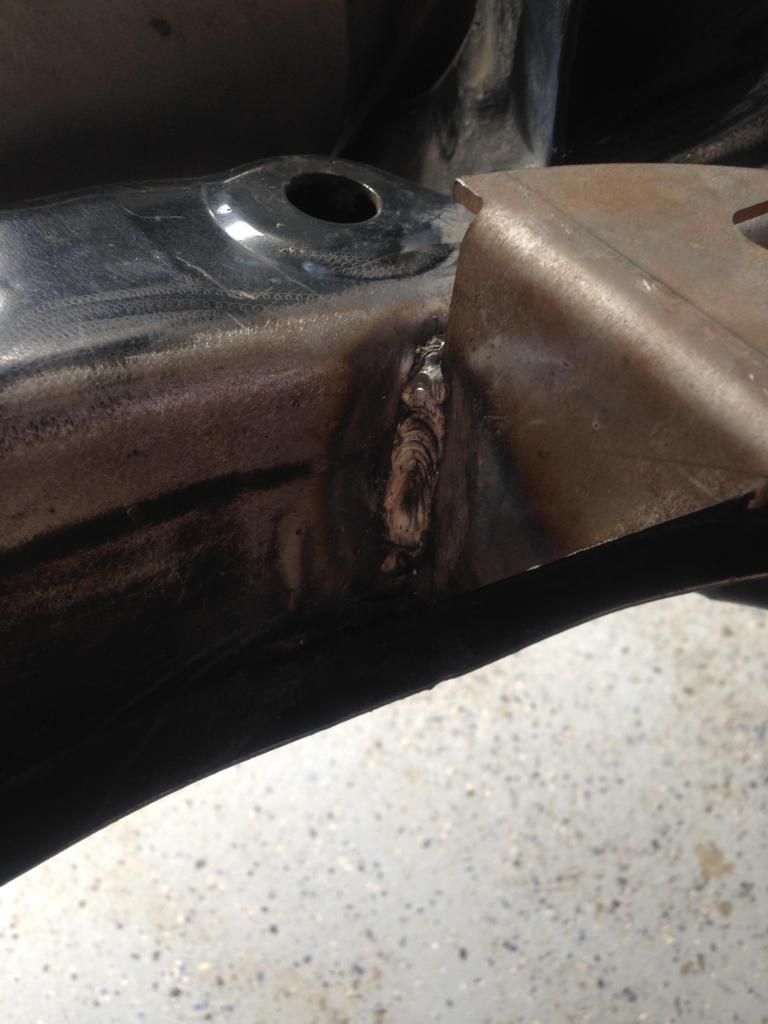 [/IMG]
[IMG] [/IMG]
[IMG]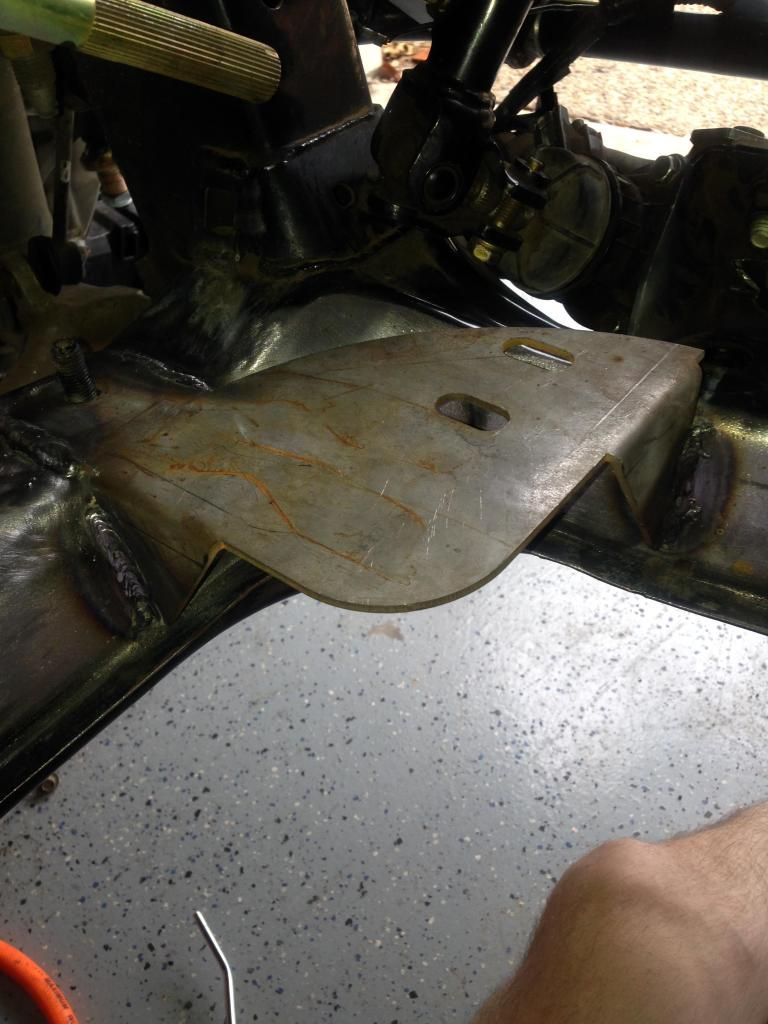 [/IMG]
And the transmission cross member mounting plates i was reffering to eariler.
[IMG]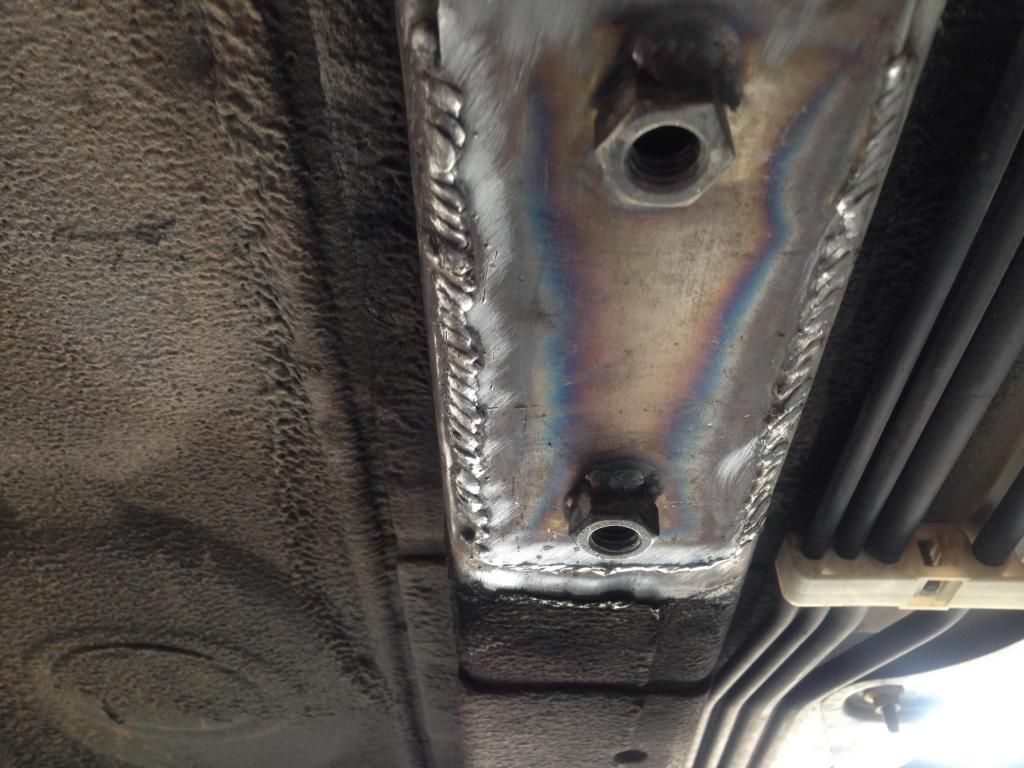 [/IMG]
Getting ready for the first test fit!!
[IMG]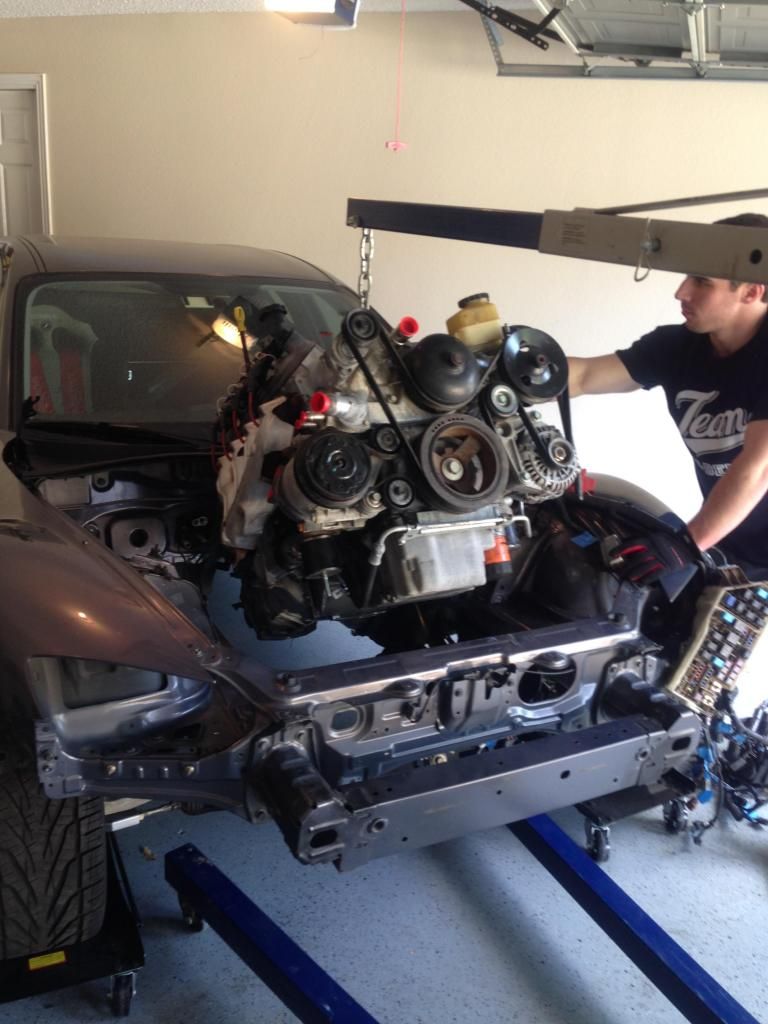 [/IMG]
Fits like a glove...so happy to see the engine bay full once more.
[IMG]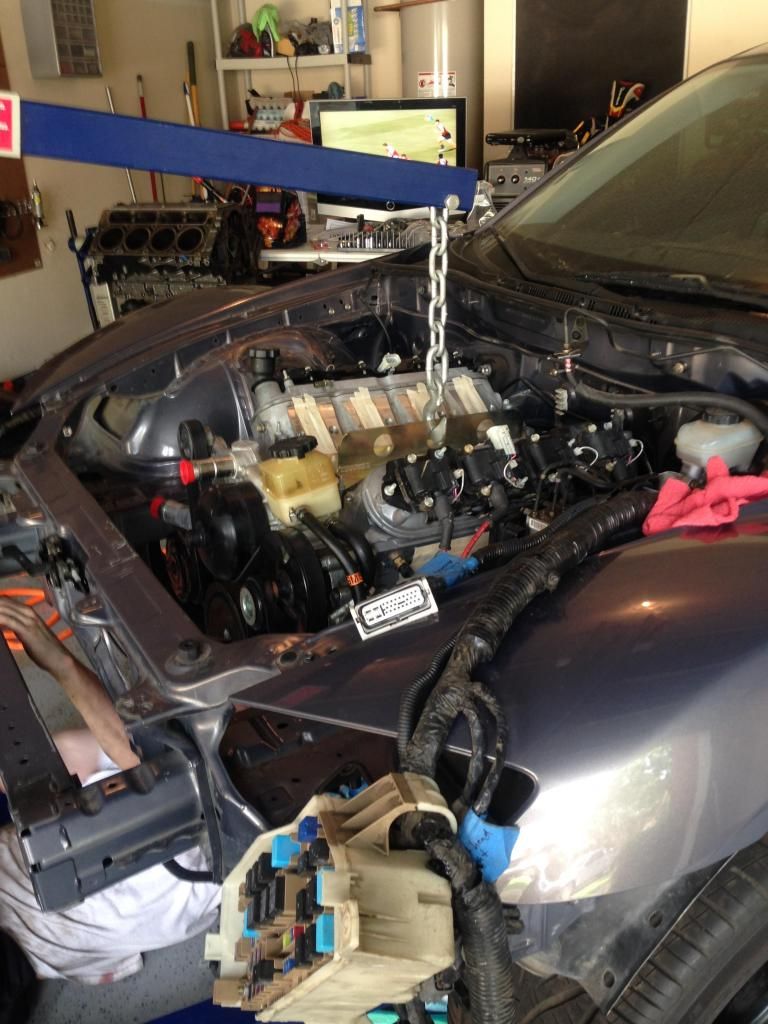 [/IMG]
[IMG]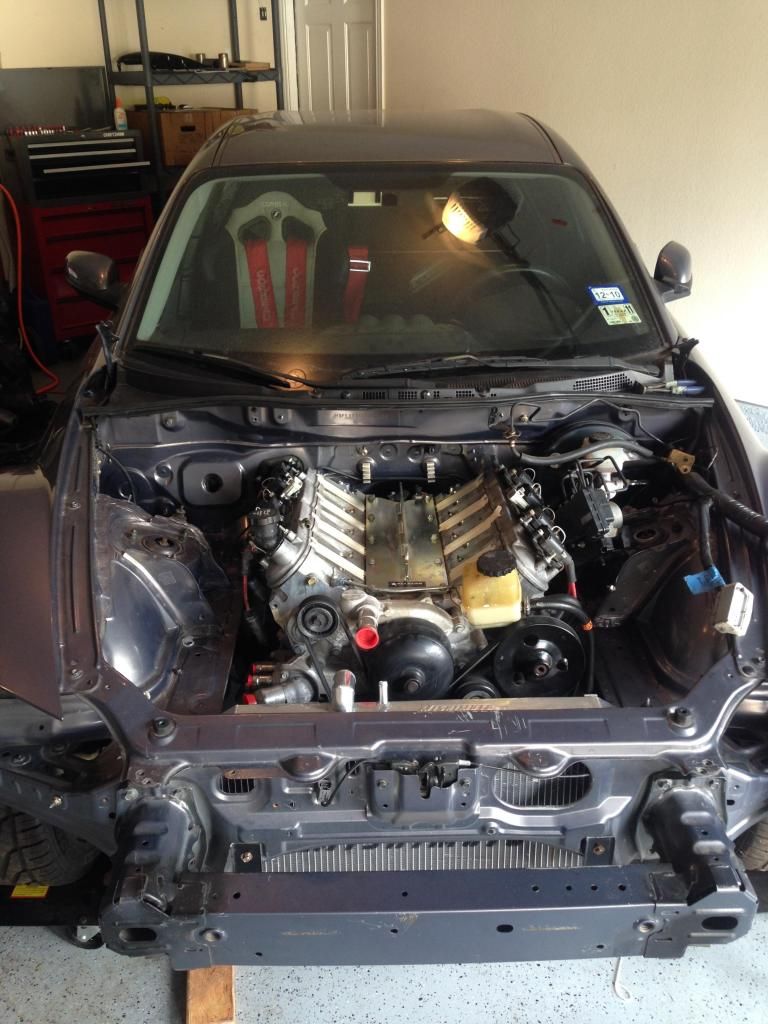 [/IMG]
I was a little nervous to mock up my radiator mounts before the test fit, but I lucked out there is plenty of room for the front accessories, and the intake to be routed.
[IMG] [/IMG]
[IMG]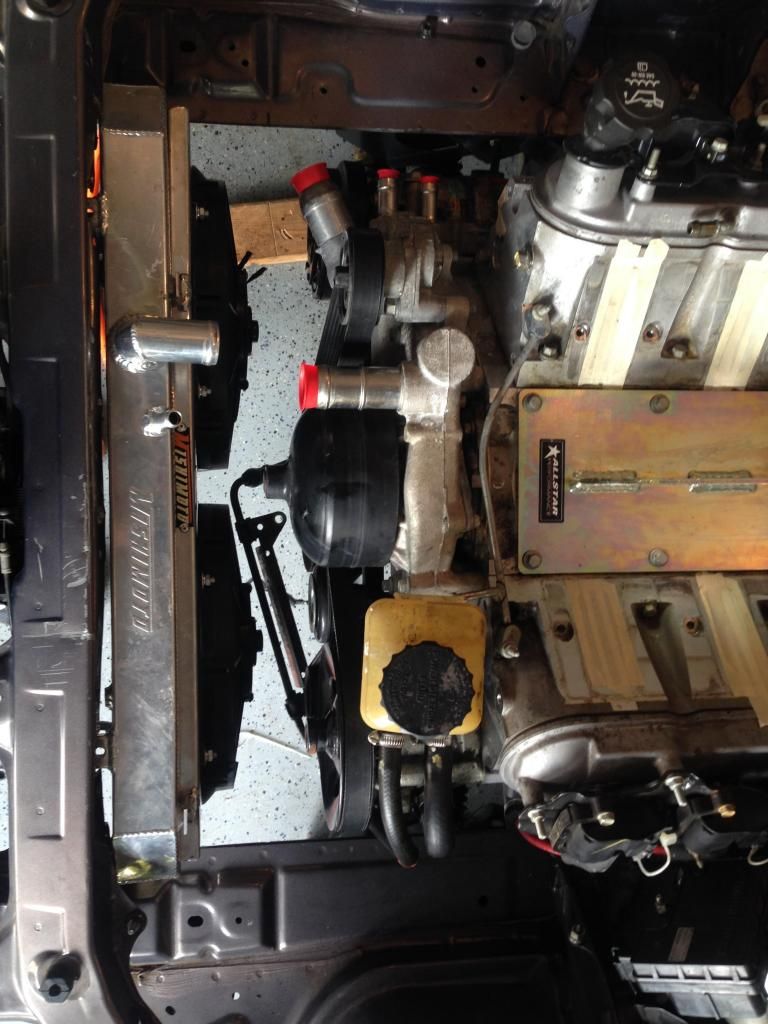 [/IMG]
Some pics of the mounts im using for the swap. Just a reminder im using the stock C5 Corvette engine pedestal....then the actual engine mount is the C5 corvette performance urethane mount.
[IMG]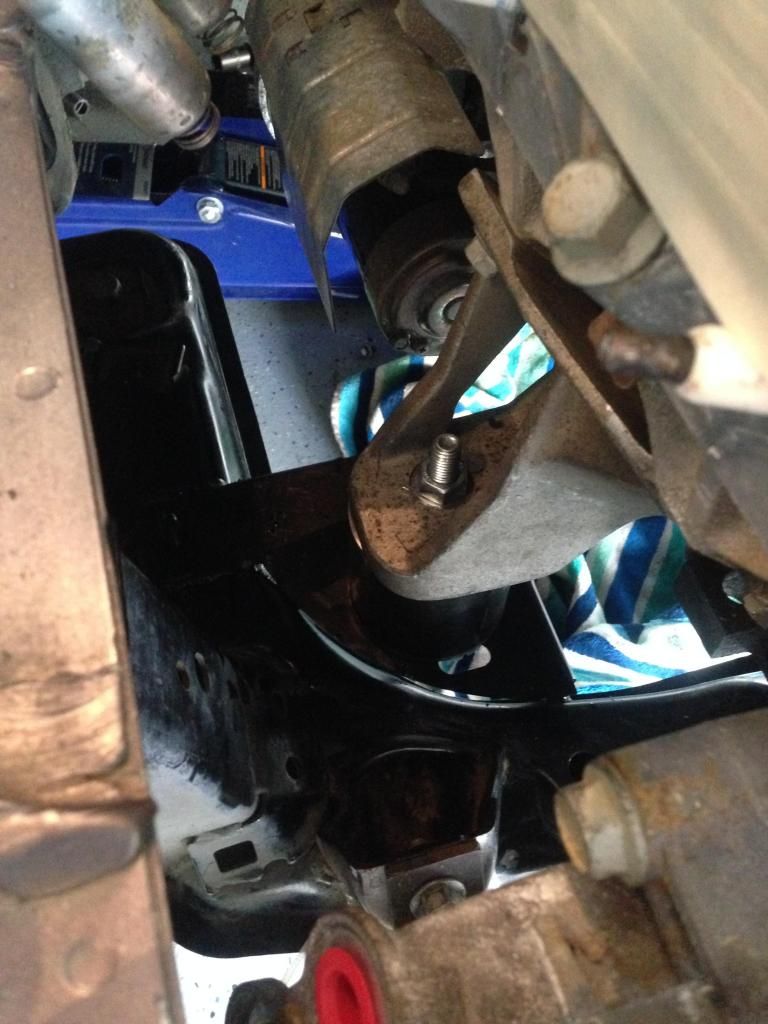 [/IMG]
[IMG]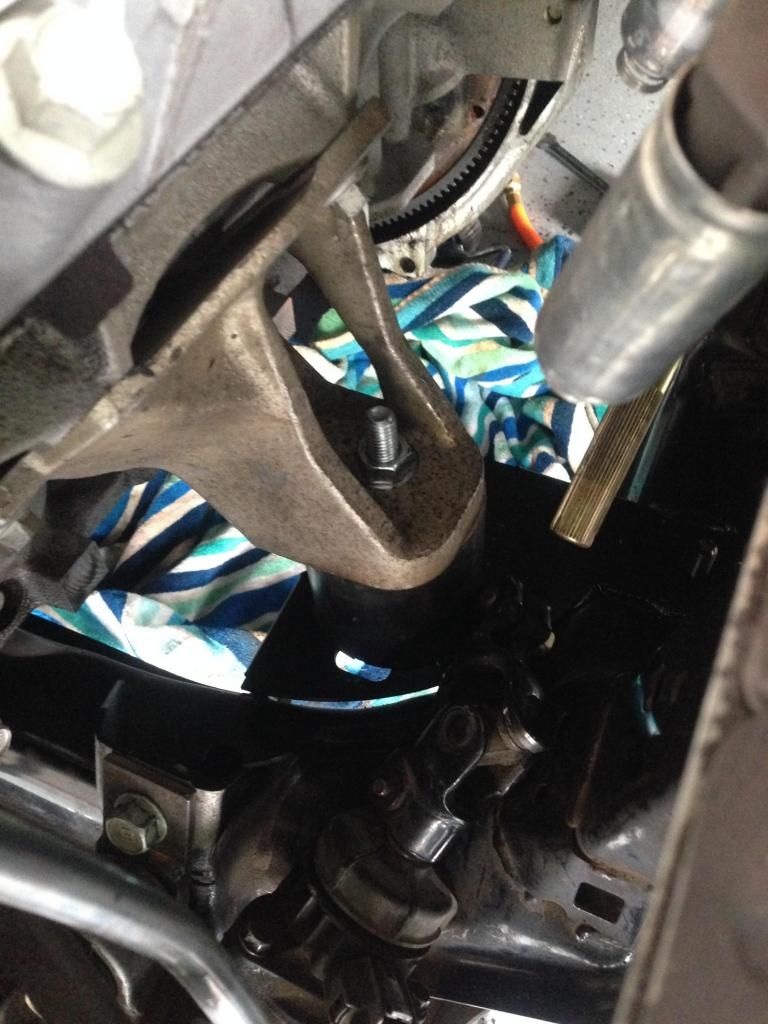 [/IMG]
Man so glad on the fit, the engine stands that got welded on, are right on the money (I'm using back hole in the stand..because that lines up the shifter perfect in the car)... Also forgot to mention i cleaned up the welds with the wire wheel, then painted the engine stands, and tranny mount plates with some VHT Chassis/RollBar Paint..black of course..
[IMG]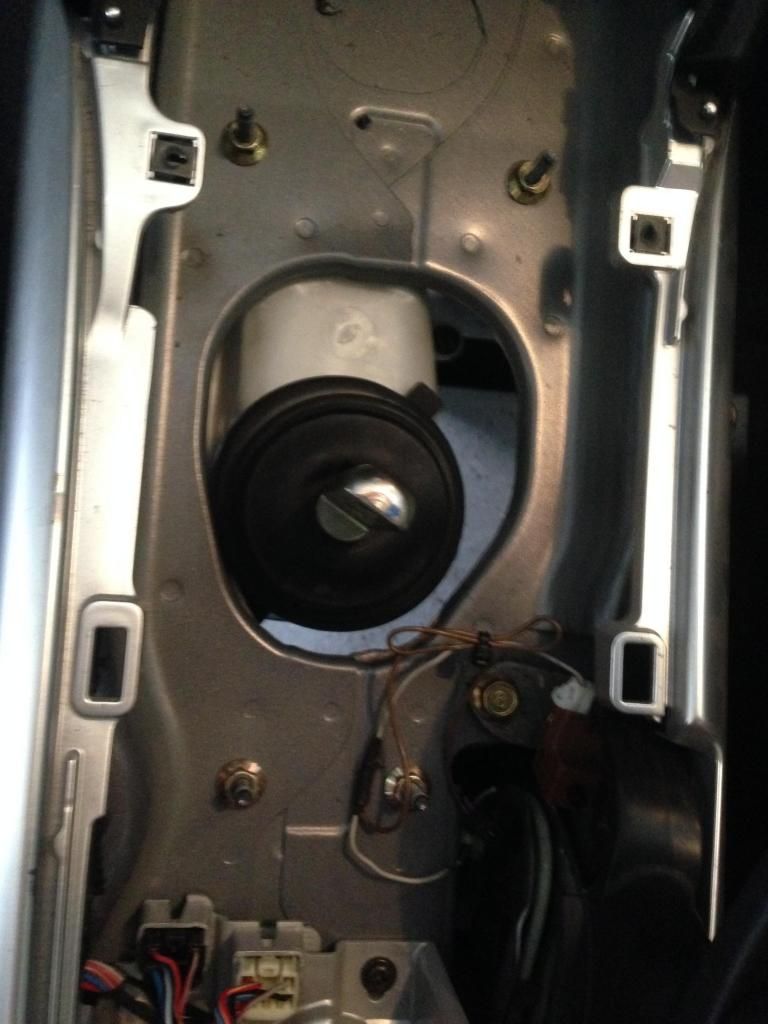 [/IMG]
Remember if you are doing a rx8 swap as well to take note of which t56 you have, because i was honestly unaware of any real differences till i started doing research...so to help save someone the time hopefully here is an awesome reference pic i stumbled across somewhere on some forum.
[IMG]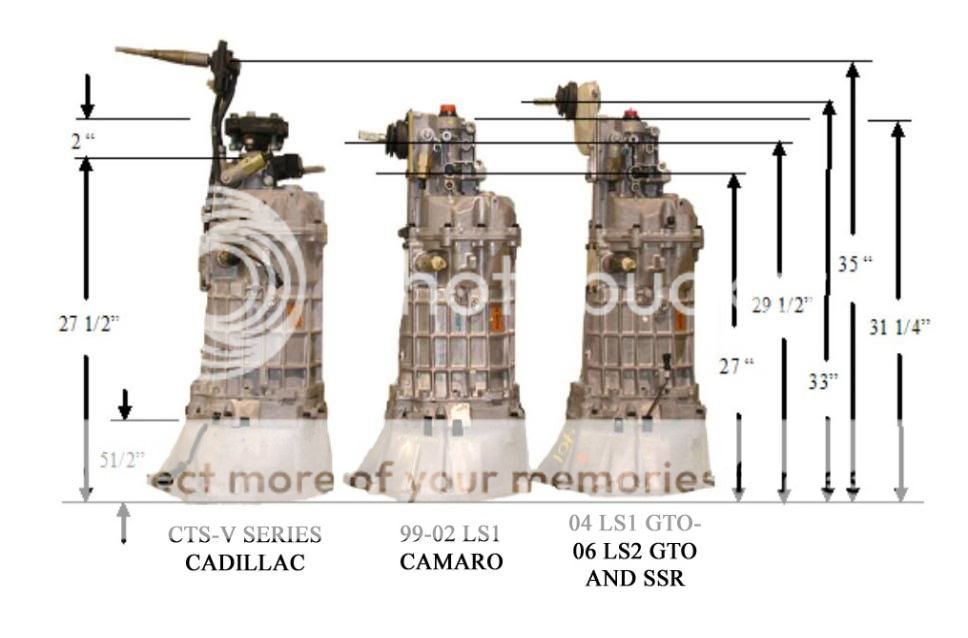 [/IMG]
Give you an idea of how the subframe is gonna be modified to allow stock c5 corvette mounts to work nicely.
[IMG]
 [/IMG]
Close up on drivers side stand..fit looks good along the subframe, just need to get them tacked up and welded on..hopefully will be able to get it done by the weekend.
[IMG]
 [/IMG]
 shot of the passenger stand
[IMG]
 [/IMG]
Here is a shot of the mock up with the c5 engine mounts/pedestals ill be using
[IMG]
 [/IMG]
Just for the hell of it i mocked the c5 mounts up with the stock rubber mount to see if there was any real difference in height over the aftermarket ones in the pic above...difference was negligible.
[IMG]
 [/IMG]
 Also figured out what/how im gonna mount my radiator and fan shroud, tried to take pics, but it was too dark. Ill get better ones by the weekend and add them along with another update on progress hopefully!
Hey all, got my radiator and fan shroud all mocked up for the swap. Should have plenty of room for an interesting intake tube/filter routing.
Shot of it mocked up Mishimoto Radiator looks good. (Get an idea for wanted position).
[IMG]
 [/IMG]
Clearance of the left and right side
[IMG]
[IMG]
 [/IMG]
Shot of the Mishimoto aluminum fan shroud with twin 12'' slim fans.
[IMG]
 [/IMG]
Shot of the notchs ill cut for finally rigid fitment.
[IMG]
 [/IMG]
[IMG]
 [/IMG]
Mount setup to hold up the bottom of the rad (just clamped on for known to look at clearance)
Bottom of mount.
[IMG]
 [/IMG]
Side profile of the mount.
[IMG]
 [/IMG]
Looks good and sturdy..gonna be finishing up fabrication of the radiator mounts, and engine stands this week, hopefully have the motor/trans dropped in this weekend!! Update will follow. Speartech should be getting my PCM and harness for rework and tune any day now so everything is coming together nicely.
Hey guys, sorry i know it has been awhile since the last update, but i have just been busy....However, lets to cut to the chase. Had my engine stands, and transmission cross member plates welded up this weekend. They look fantastic imo. Also got the motor torn down, with the ls engine lift plate on, heads taped up.
[IMG]
 [/IMG]
Some shots of the engine stands welded up (before a good clean to get the slag off)...great work by the welder. By the way if your in the dfw area, and a novice welder who isnt comfortable welding on your subframe i recommend Rosado Welding. Great guy,fast and reliable work, clean welds, can come to your house if the car doesn't move
. Awesome!![IMG]
 [/IMG]
[IMG]
 [/IMG]
[IMG]
 [/IMG]
[IMG]
 [/IMG]
And the transmission cross member mounting plates i was reffering to eariler.
[IMG]
 [/IMG]
Getting ready for the first test fit!!
[IMG]
 [/IMG]
Fits like a glove...so happy to see the engine bay full once more.
[IMG]
 [/IMG]
[IMG]
 [/IMG]
I was a little nervous to mock up my radiator mounts before the test fit, but I lucked out there is plenty of room for the front accessories, and the intake to be routed.
[IMG]
 [/IMG]
[IMG]
Some pics of the mounts im using for the swap. Just a reminder im using the stock C5 Corvette engine pedestal....then the actual engine mount is the C5 corvette performance urethane mount.
[IMG]
 [/IMG]
 [IMG]
 [/IMG]
Man so glad on the fit, the engine stands that got welded on, are right on the money (I'm using back hole in the stand..because that lines up the shifter perfect in the car)... Also forgot to mention i cleaned up the welds with the wire wheel, then painted the engine stands, and tranny mount plates with some VHT Chassis/RollBar Paint..black of course.
.[IMG]
 [/IMG]
 Remember if you are doing a rx8 swap as well to take note of which t56 you have, because i was honestly unaware of any real differences till i started doing research...so to help save someone the time hopefully here is an awesome reference pic i stumbled across somewhere on some forum.
[IMG]
 [/IMG]
06-02-2014, 09:54 PM
[/IMG]
06-02-2014, 09:54 PM
#6
Have a steering linkage extension/adapter coming which is perfect, because it lines right up and clears everything, just a couple inches off from the steering rack relocation.
[IMG] [/IMG]
Some undercarriage shots of the tranny mount, and cross member all bolted up.
[IMG]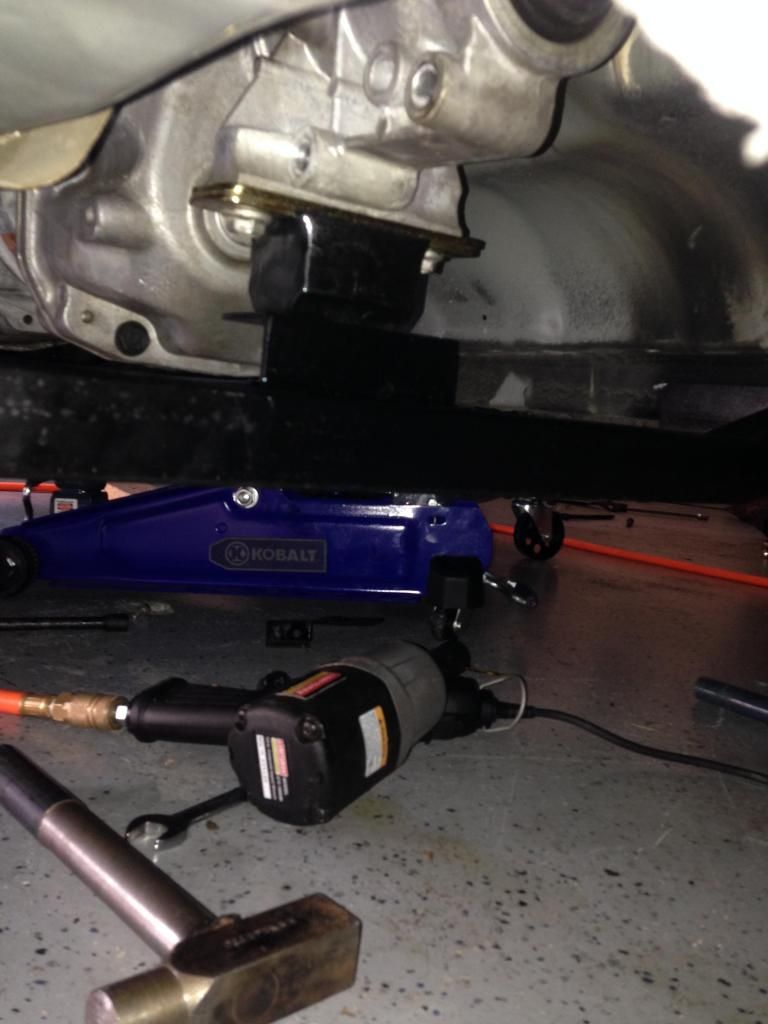 [/IMG]
[IMG]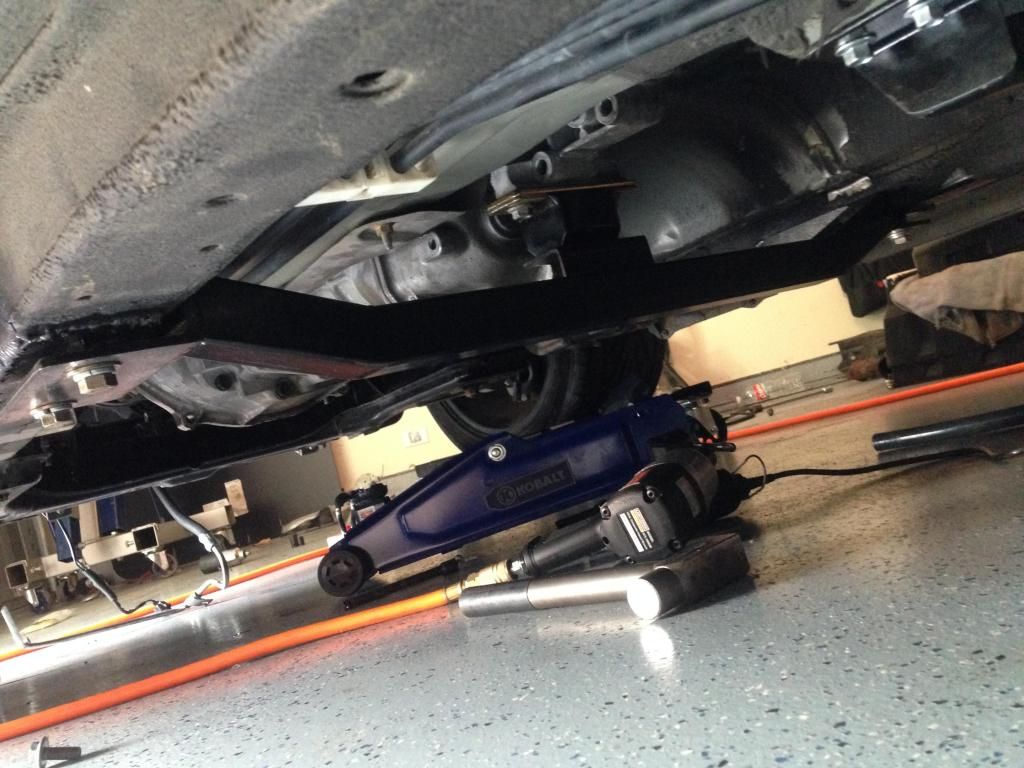 [/IMG]
Driveshaft comparison....stock rx8 on the right, custom driveshaft for the swap on the left.
[IMG]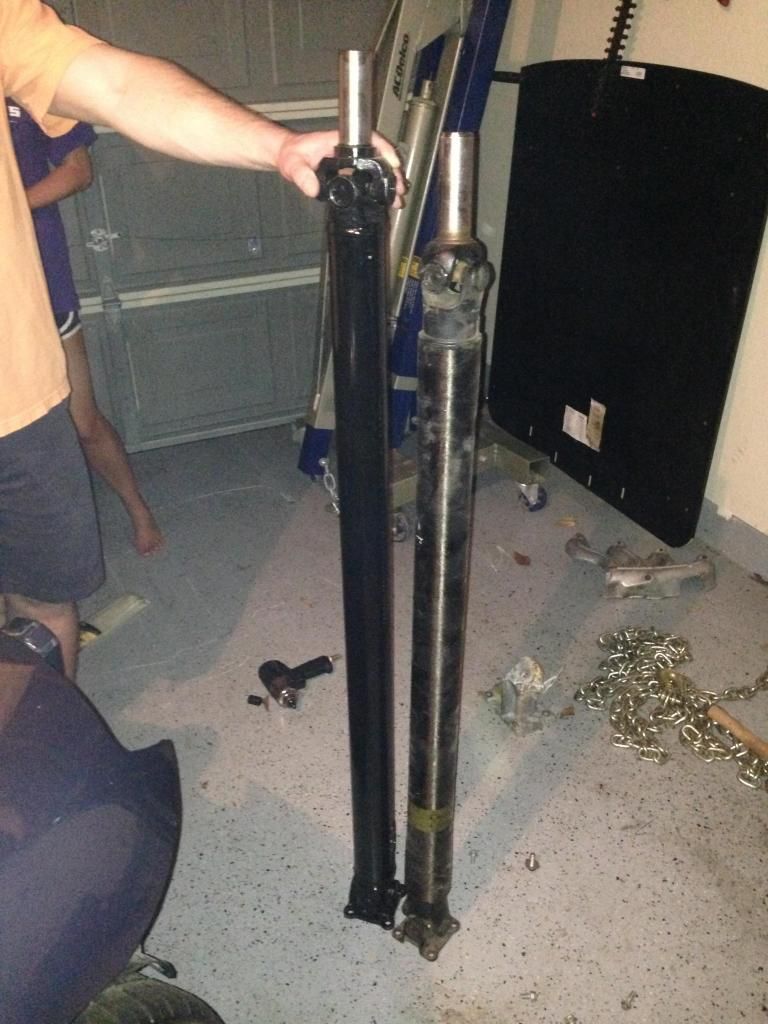 [/IMG]
Up close shot of the spline custom shaft on top, stock rx8 on bottom.
[IMG]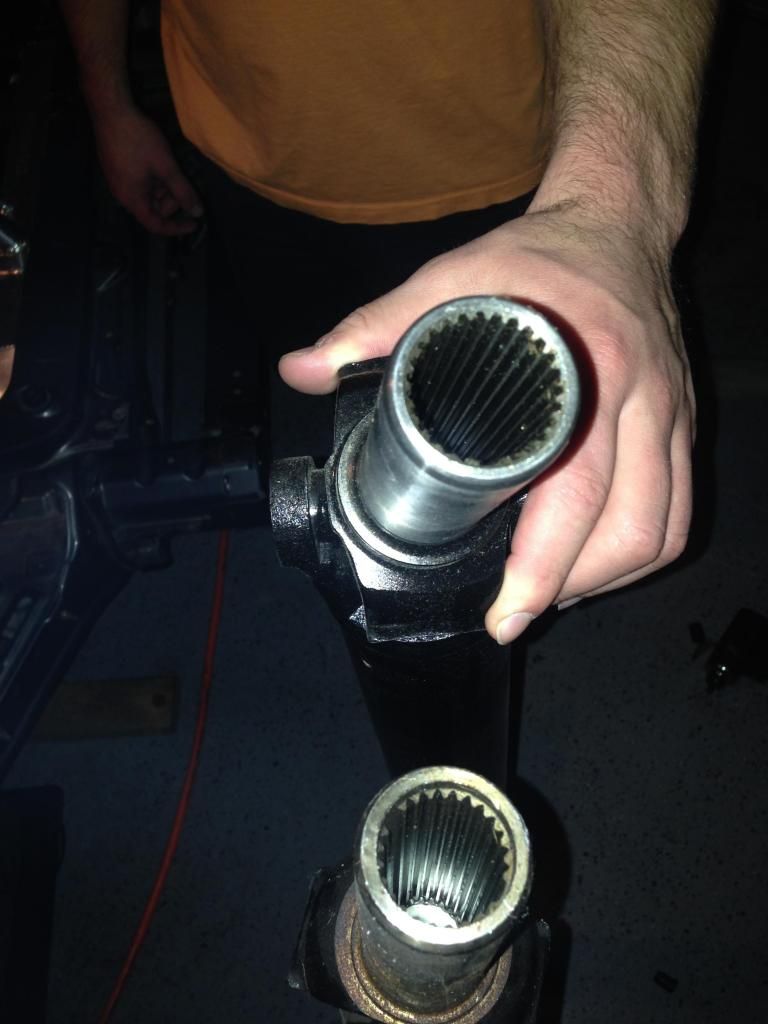 [/IMG]
Got the stock rx8 wire harness, computer box, and fuse block back in...need to start on the wiring chapter of this beast lol.
[IMG]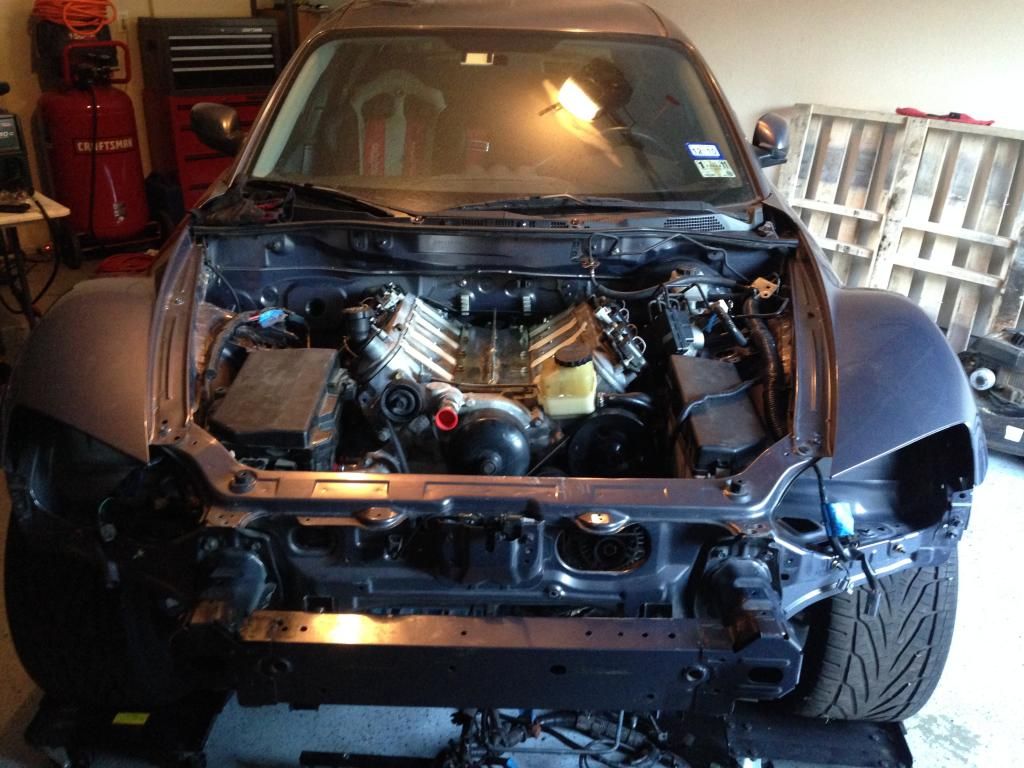 [/IMG]
[IMG]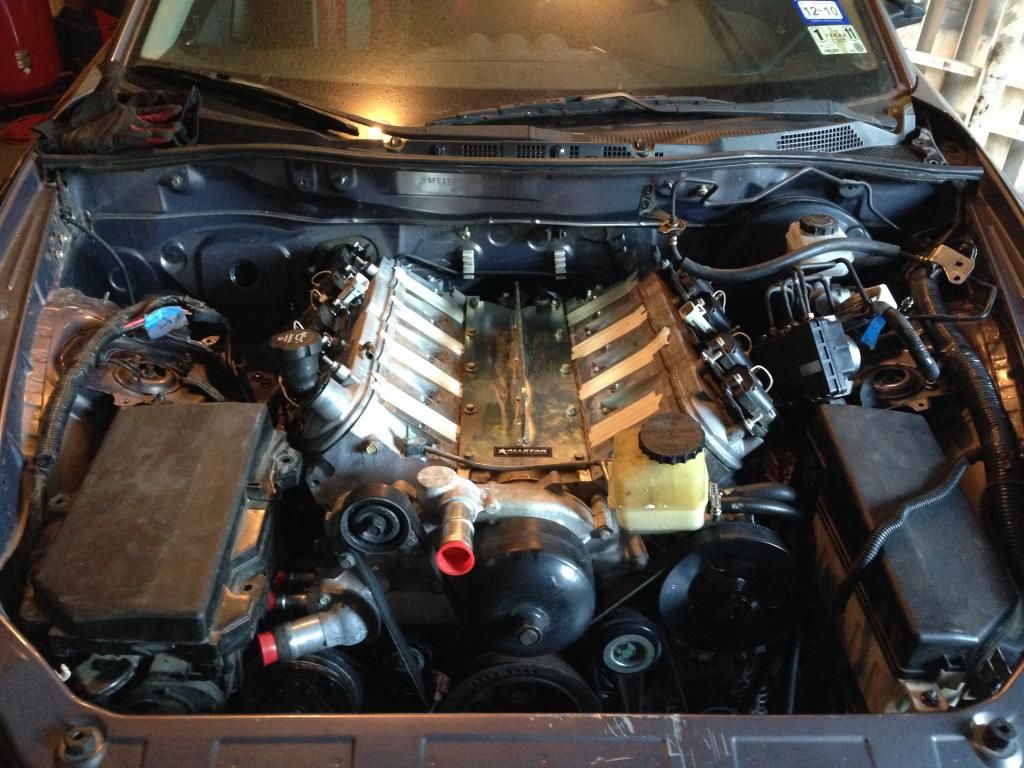 [/IMG]
Now after the first test fit is done, i have some new things i need to purchase lol...like some block hugger headers, exhaust piping, a different oil pan (GTO pan does not even come close to clearing, sitting in there with it off at the moment)....most likely the stock camaro one below is what i will go with because it has the most clearance in the front.
[IMG]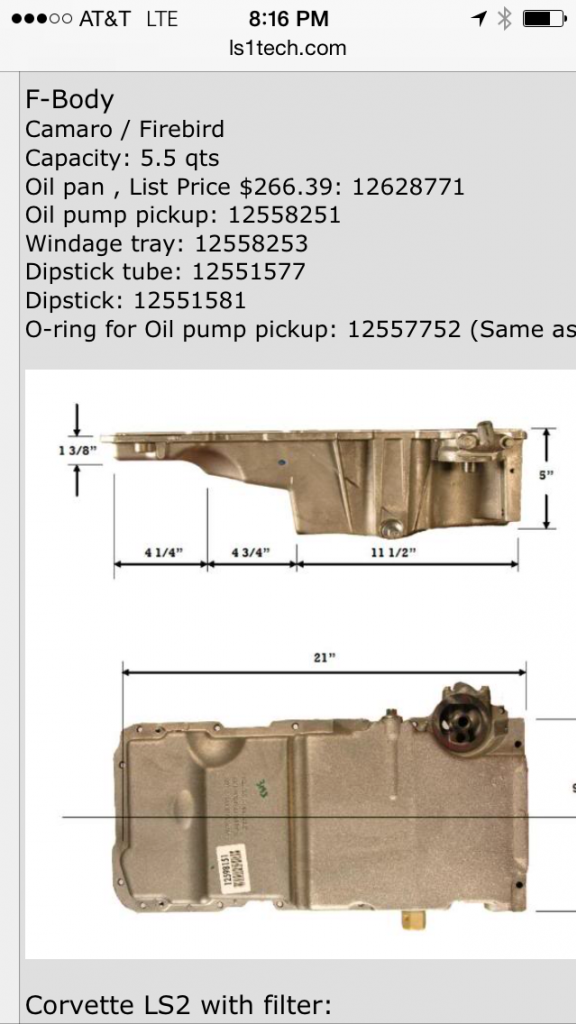 [/IMG]
Next update should be soon (like by the weekend hopefully)...have alot of things to work on in the mean time..like the fuel system, clutch linkage, throttle linkage, and the list goes on.....luckily though most of the stuff i have already...Thank you UPS!!
[IMG]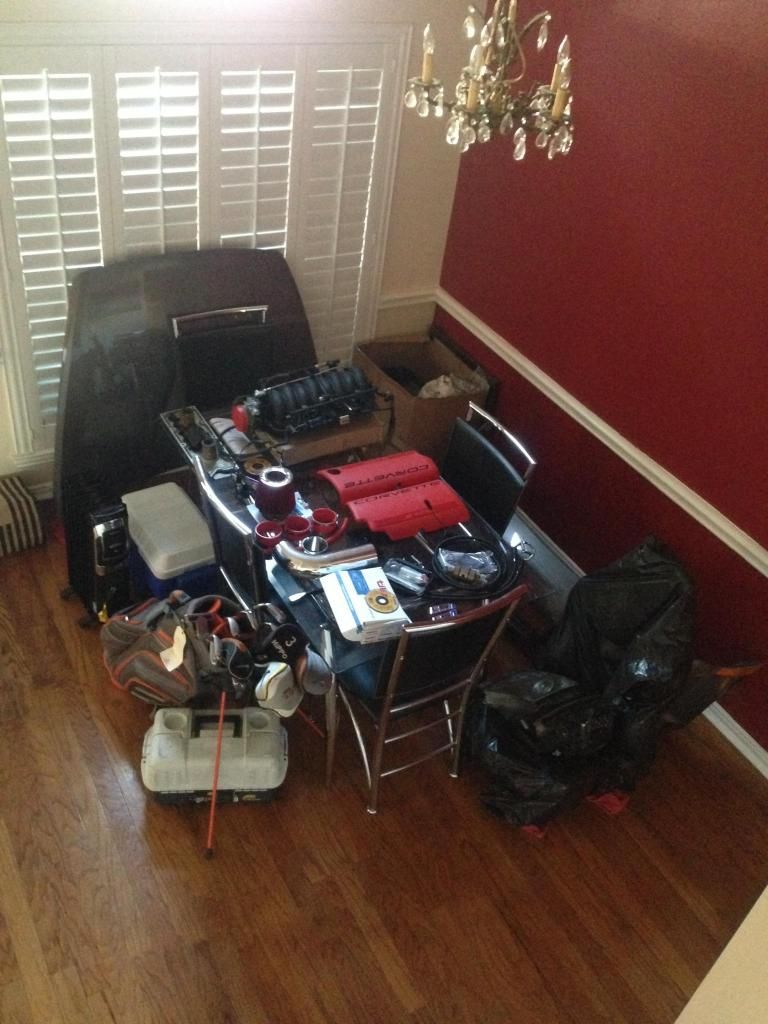 [/IMG]
[IMG]
 [/IMG]
Some undercarriage shots of the tranny mount, and cross member all bolted up.
[IMG]
 [/IMG]
[IMG]
 [/IMG]
Driveshaft comparison....stock rx8 on the right, custom driveshaft for the swap on the left.
[IMG]
 [/IMG]
Up close shot of the spline custom shaft on top, stock rx8 on bottom.
[IMG]
 [/IMG]
Got the stock rx8 wire harness, computer box, and fuse block back in...need to start on the wiring chapter of this beast lol.
[IMG]
 [/IMG]
[IMG]
 [/IMG]
Now after the first test fit is done, i have some new things i need to purchase lol...like some block hugger headers, exhaust piping, a different oil pan (GTO pan does not even come close to clearing, sitting in there with it off at the moment)....most likely the stock camaro one below is what i will go with because it has the most clearance in the front.
[IMG]
 [/IMG]
Next update should be soon (like by the weekend hopefully)...have alot of things to work on in the mean time..like the fuel system, clutch linkage, throttle linkage, and the list goes on.....luckily though most of the stuff i have already...Thank you UPS!!
[IMG]
 [/IMG]

 Nice! Good luck and keep us posted.
06-05-2014, 11:02 PM
Nice! Good luck and keep us posted.
06-05-2014, 11:02 PM
#8
Another Update!
Got some more done on the car. Had to pull the motor back out to finish up some things...but man is it a breeze to get this thing out..did it solo in 20 minutes haha.
[IMG]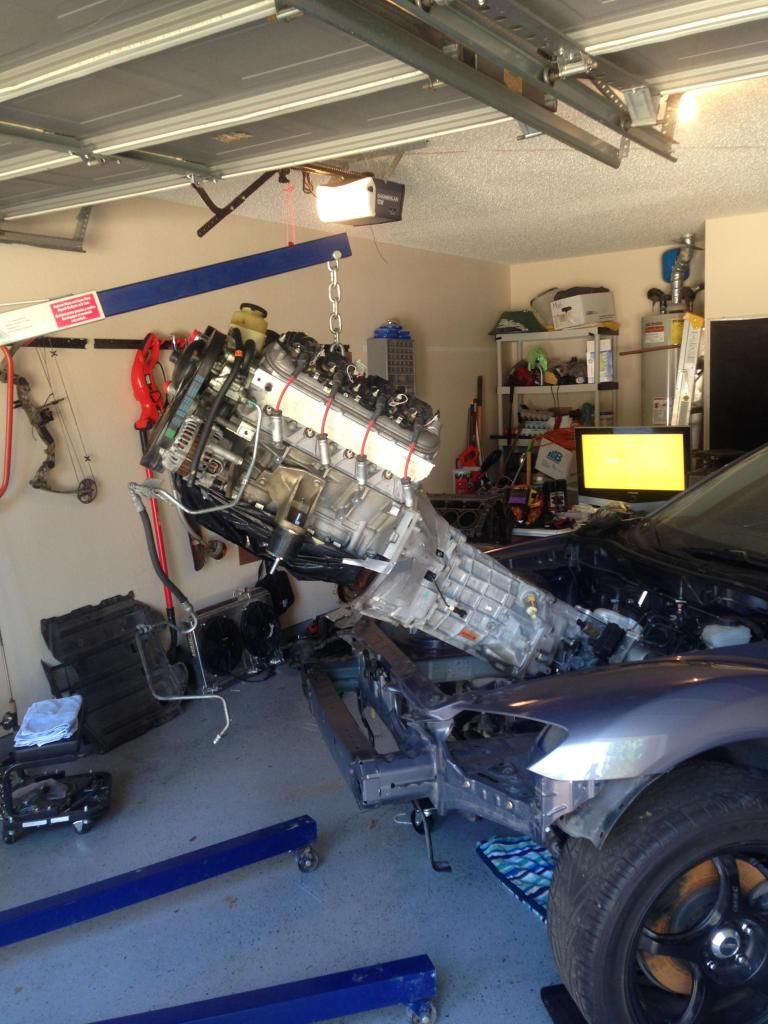 [/IMG]
Out and setup to put the new oil pan on
[IMG]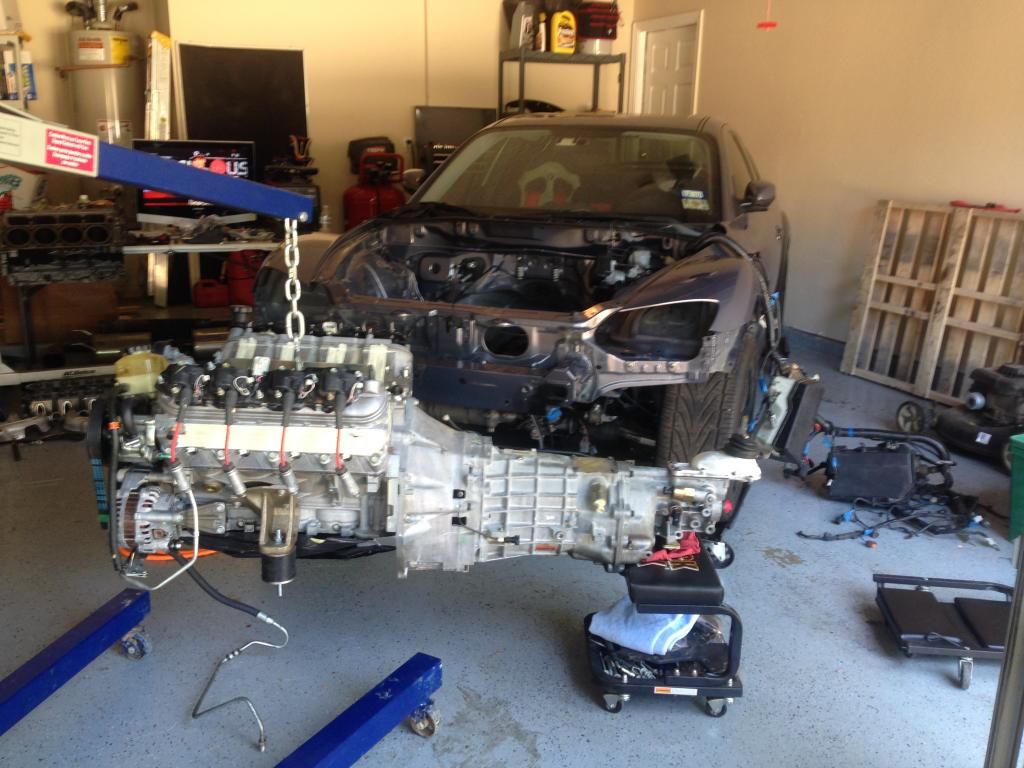 [/IMG]
New f body oil pan, gasket, windage tray, oil pickup tube and oring installed. Remember to install the pan tightening from the center to the outside so it seals correctly..and the M8 bolts are 18 ft-lbs and the 2 longer M6 are 8 ft-lbs
[IMG]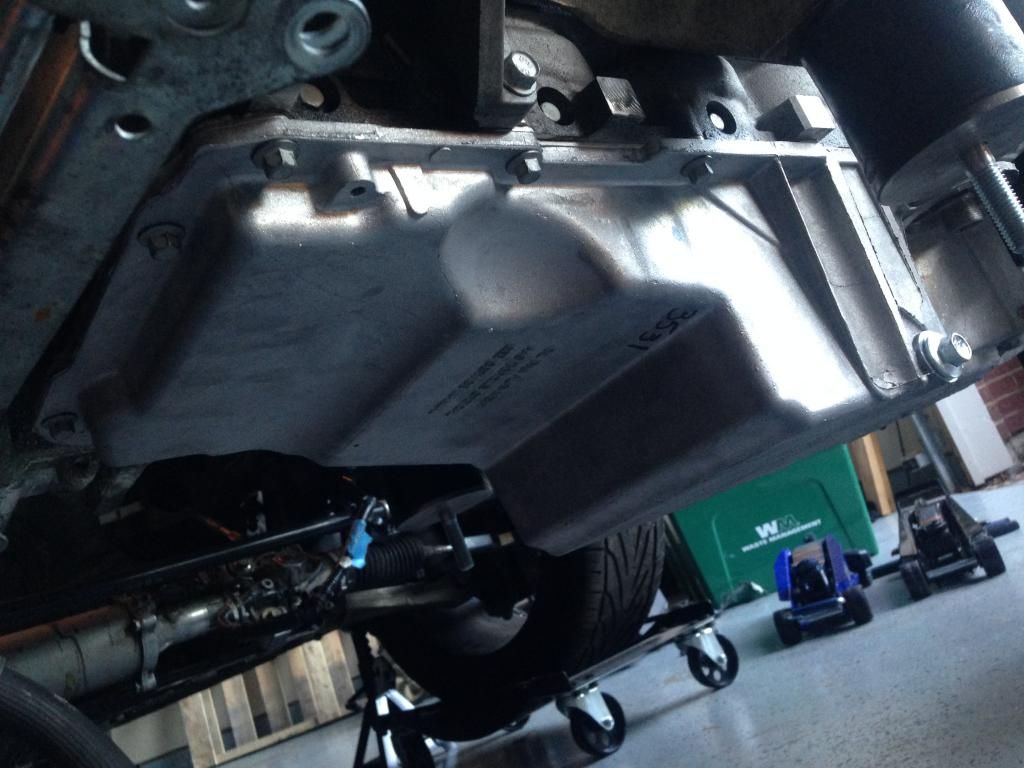 [/IMG]
Oil pan Looks great nice and thin at the front should fit like a glove. Below are some shots of the steering shaft extension...just have it tack welded in the aligned position...forgot to snap pics after i fully welded it up
[IMG]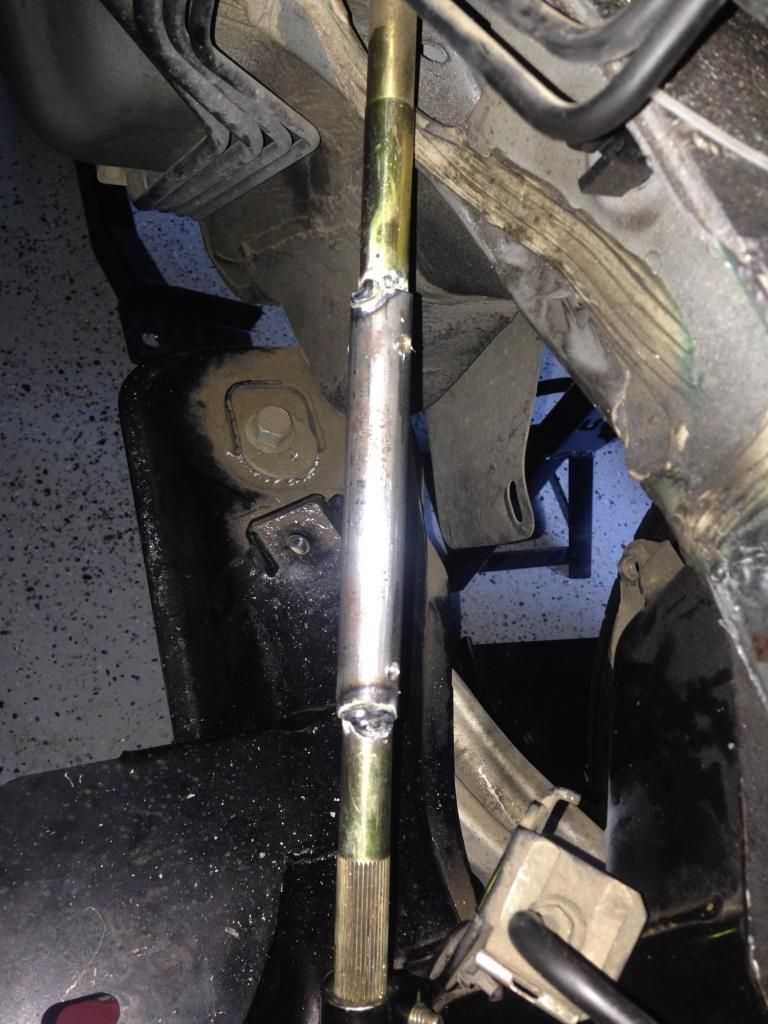 [/IMG]
[IMG]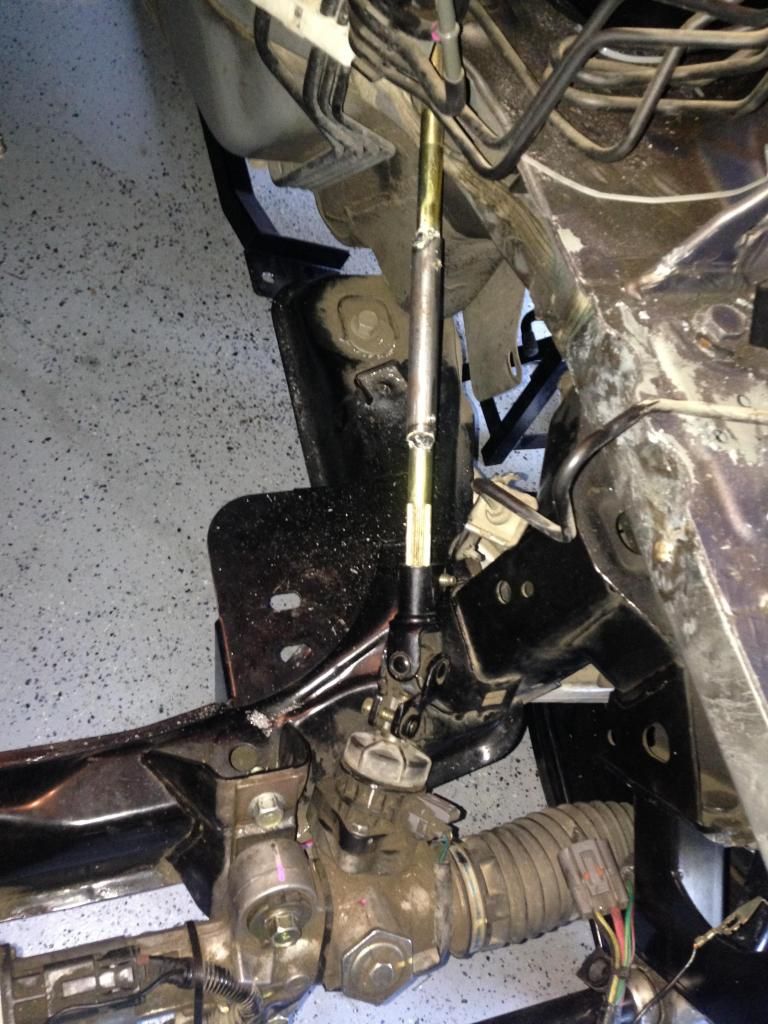 [/IMG]
Hard to tell from this pic, but the steering shaft u-joint clears the stock sub frame perfect....because i had to add steel spacers to the steering rack mounts to move it up ever so slightly to clear and have full motion with no interference.
[IMG]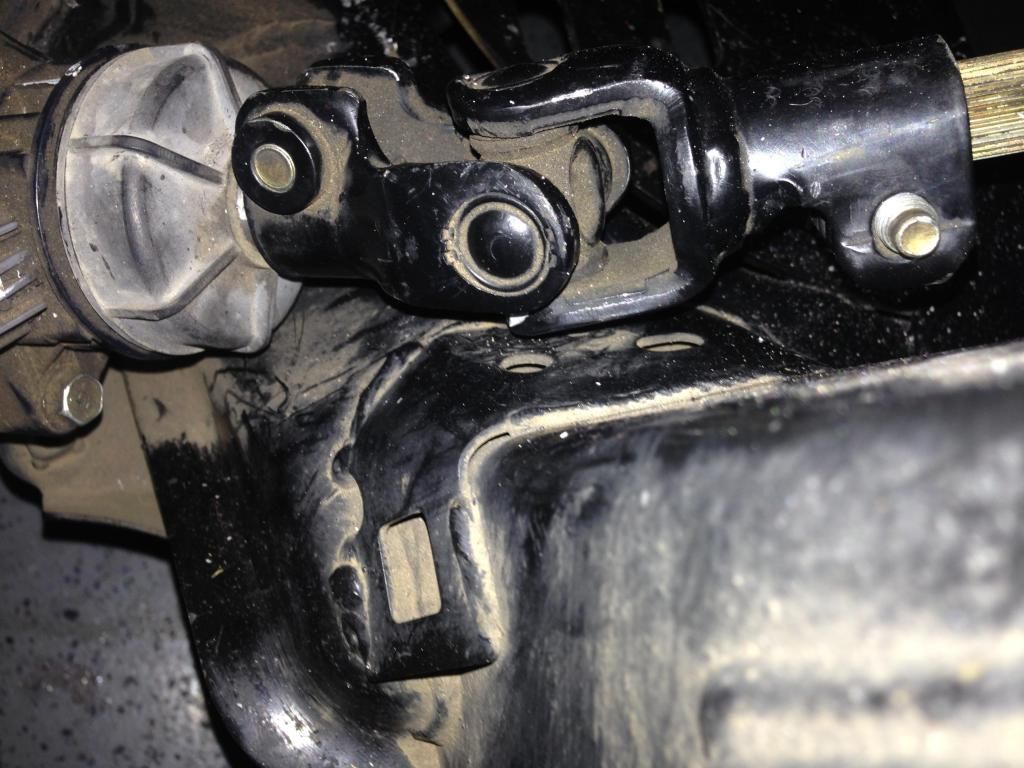 [/IMG]
Here are the spacers i was referring to...really just a really thick washer
[IMG]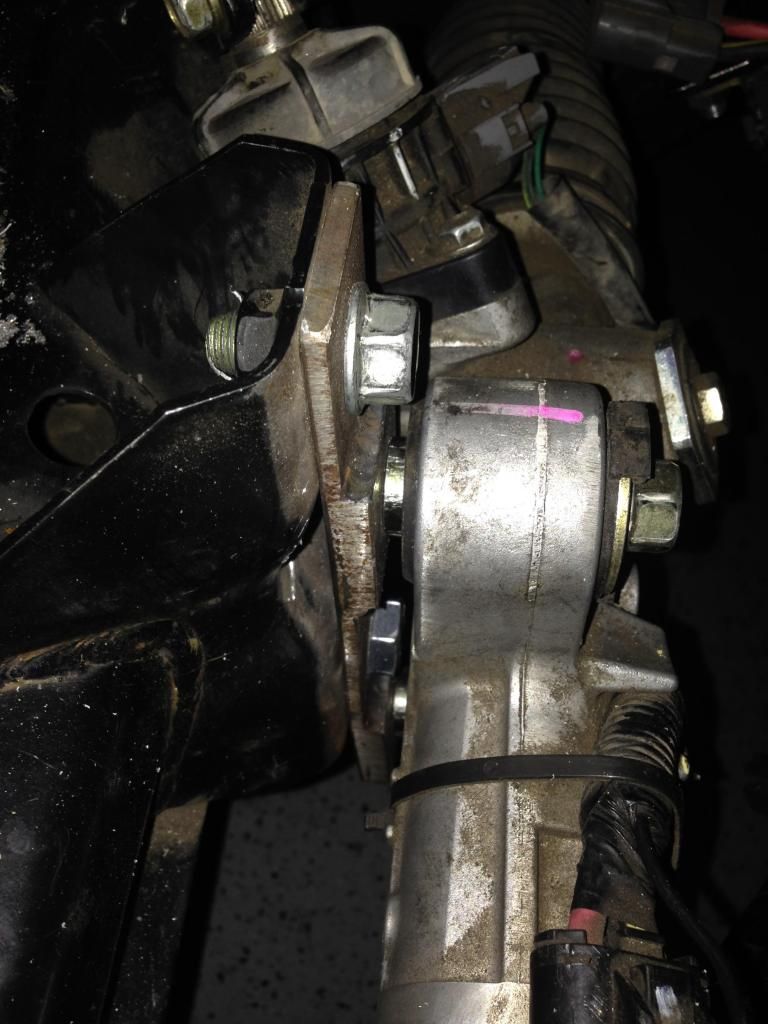 [/IMG]
When the motor was in the car i took measurements for headers, since the gto exhaust manifolds wouldn't fit. I went ahead and found a set that should work (crossing my fingers lol), so i ordered them along with new gaskets and ARP bolts. Once they arrive ill bolt them on and drop the motor back in for one of its last test fits. Then the real fun begins!! Update soon to follow.
[IMG]
 [/IMG]
Out and setup to put the new oil pan on
[IMG]
 [/IMG]
New f body oil pan, gasket, windage tray, oil pickup tube and oring installed. Remember to install the pan tightening from the center to the outside so it seals correctly..and the M8 bolts are 18 ft-lbs and the 2 longer M6 are 8 ft-lbs
[IMG]
 [/IMG]
Oil pan Looks great nice and thin at the front should fit like a glove. Below are some shots of the steering shaft extension...just have it tack welded in the aligned position...forgot to snap pics after i fully welded it up
[IMG]
 [/IMG]
[IMG]
 [/IMG]
Hard to tell from this pic, but the steering shaft u-joint clears the stock sub frame perfect....because i had to add steel spacers to the steering rack mounts to move it up ever so slightly to clear and have full motion with no interference.
[IMG]
 [/IMG]
Here are the spacers i was referring to...really just a really thick washer
[IMG]
When the motor was in the car i took measurements for headers, since the gto exhaust manifolds wouldn't fit. I went ahead and found a set that should work (crossing my fingers lol), so i ordered them along with new gaskets and ARP bolts. Once they arrive ill bolt them on and drop the motor back in for one of its last test fits. Then the real fun begins!! Update soon to follow.
 06-08-2014, 08:51 PM
#10
UPDATE..The headers fit! lol
Got some parts from the UPS man on friday, so i was able to get some more done on the car. Got the new Hooker LS swap headers on, with new gaskets and ARP Fastners...remember to use nickel anti seize on the header bolts and the bolt size is M8x1.25.
[IMG]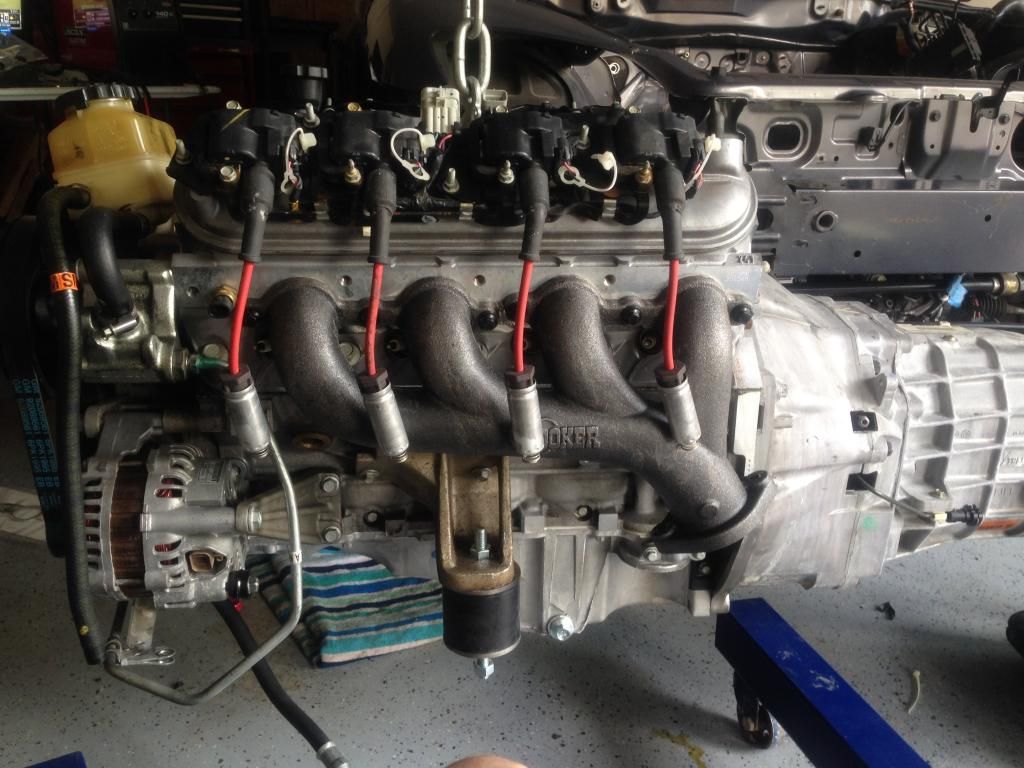 [/IMG]
[IMG]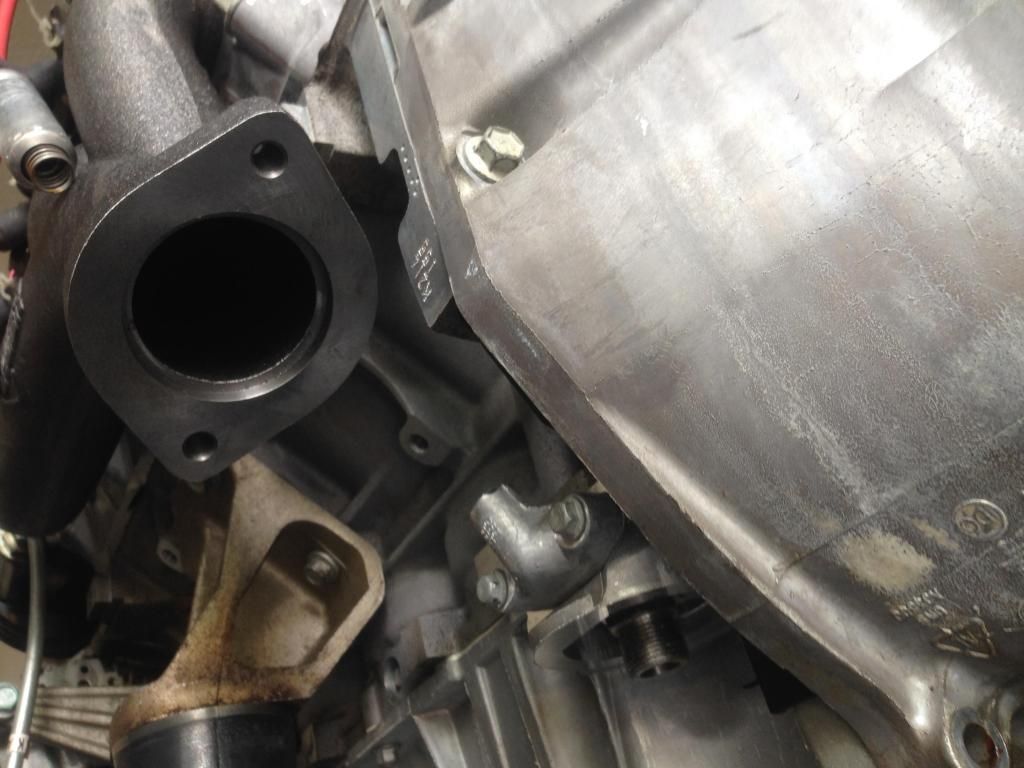 [/IMG]
[IMG] [/IMG]
[IMG]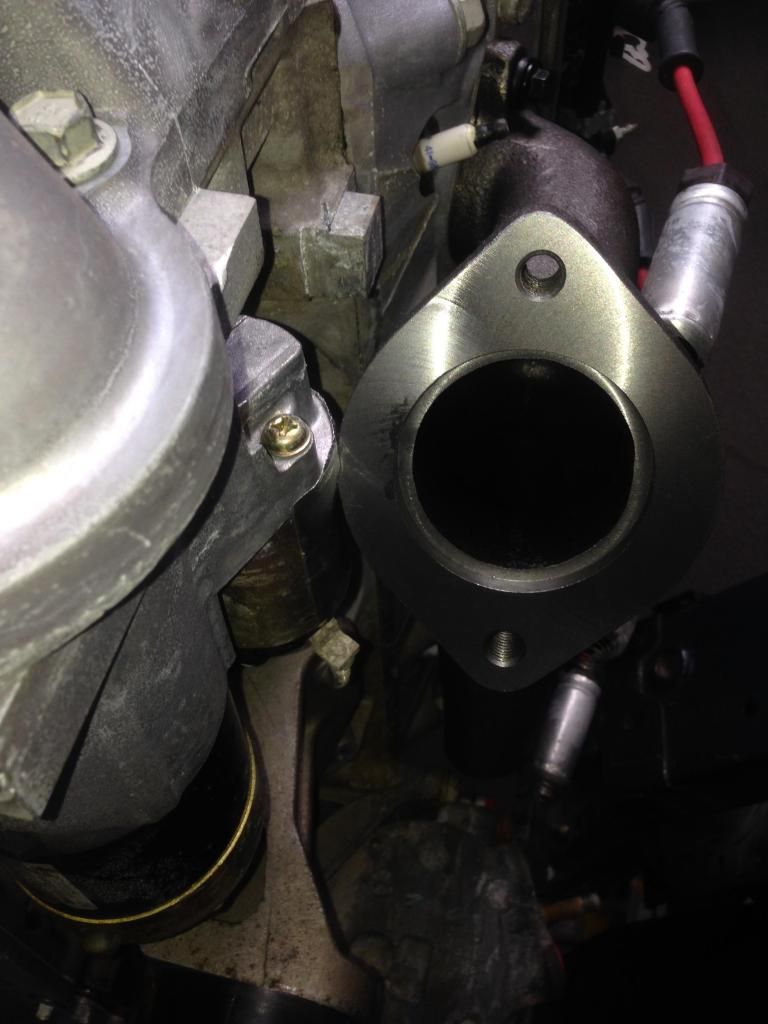 [/IMG]
They look great and fit nice and tight! Nice clean look. And its comfirmed LS swapped rx8s work best with the f body oil pan...the rear sump clears our subframe perfect, and the slim front clears the relocated steering rack/subframe.
[IMG]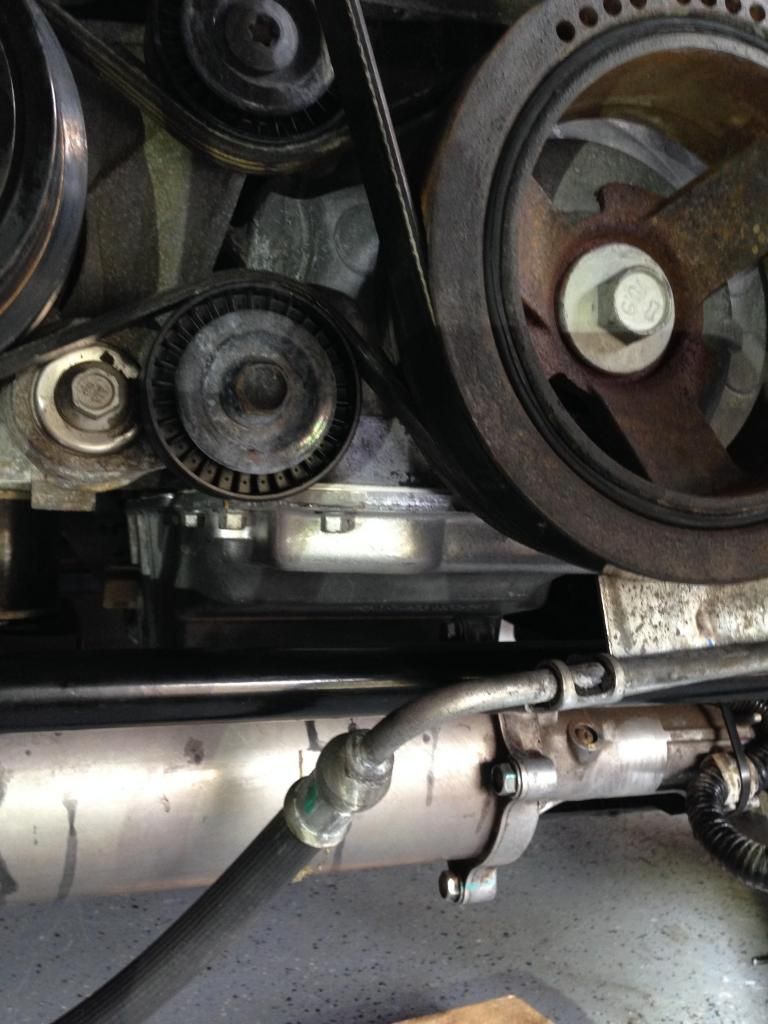 [/IMG]
Shot of the header collectors under the car...now i have to design my exhaust system! Im pumped...
[IMG]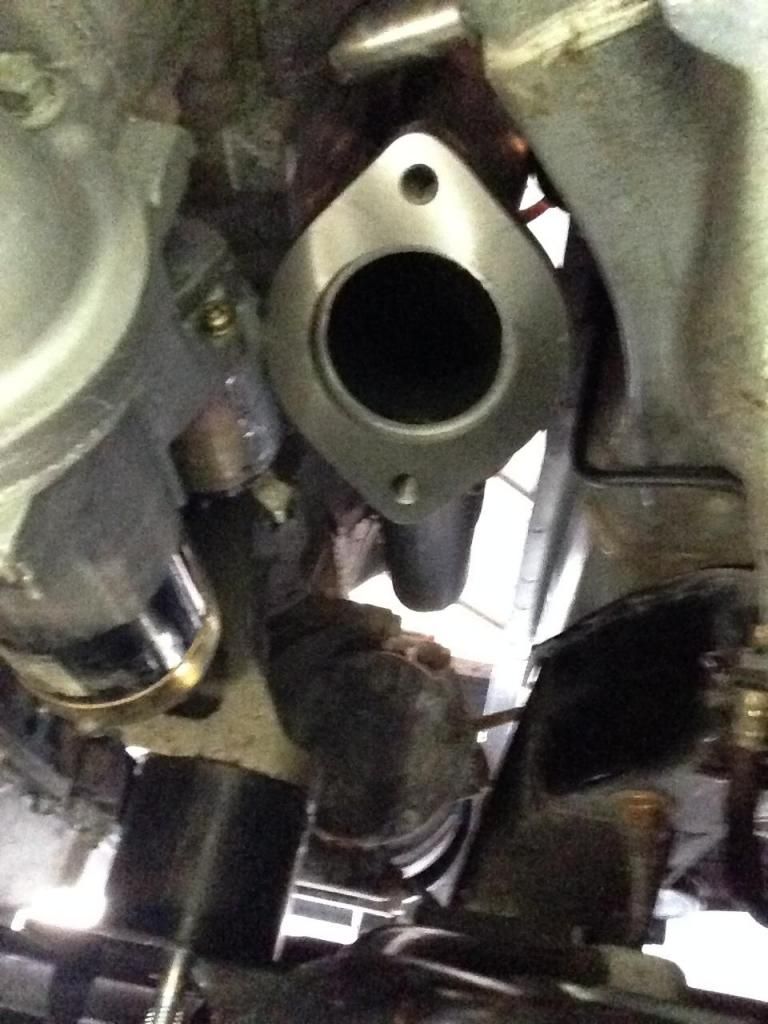 [/IMG]
[IMG]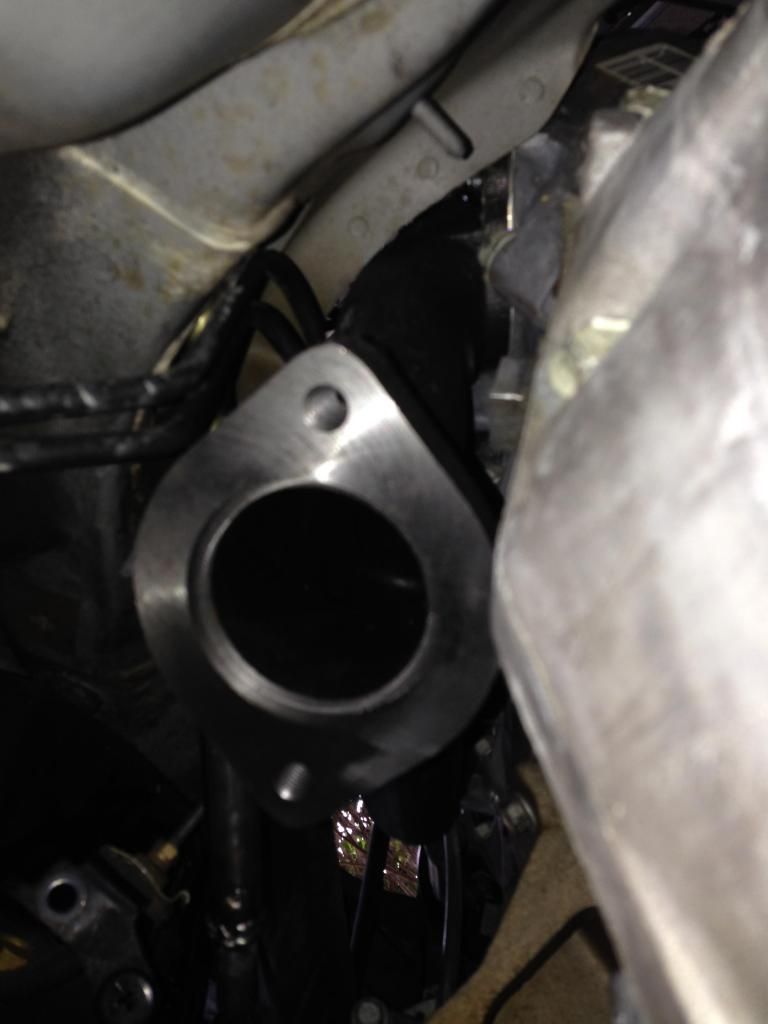 [/IMG]
Everything back in after the new pan, and headers...everything fits nice and clean...have room for exhaust system, steering shaft has full motion with no interference...totally pumped at how its coming together.
[IMG]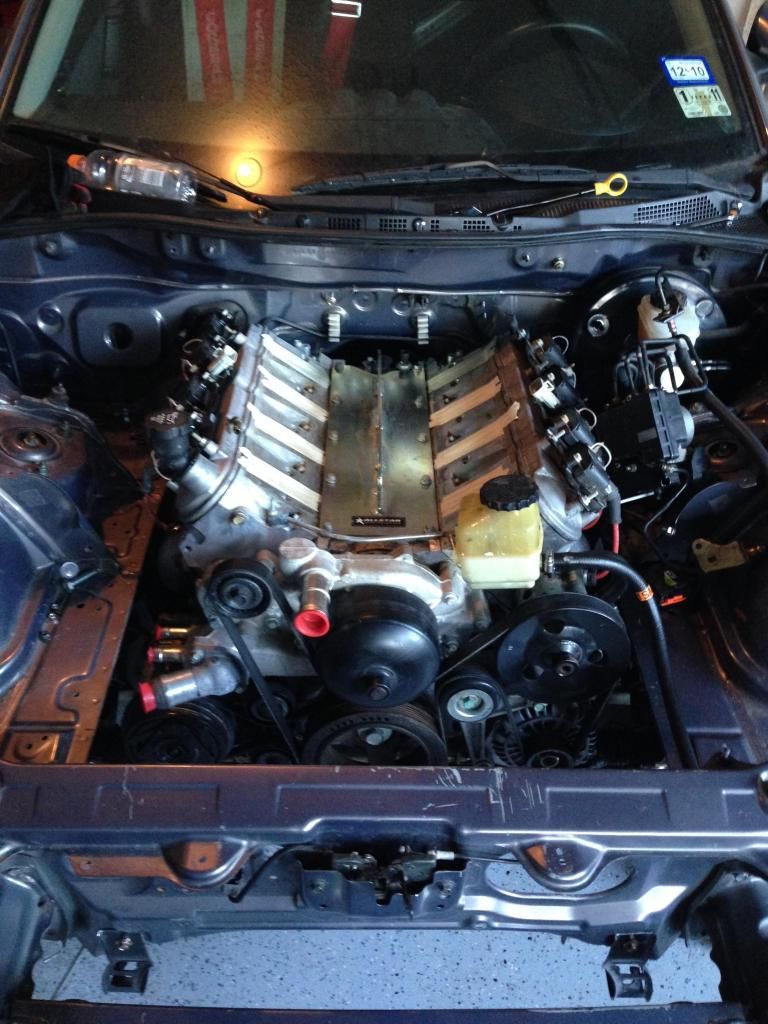 [/IMG]
[IMG] [/IMG]
Everything looking good so far...now onto designing exhaust system, plumping fuel system, and the electrical part of the build...still waiting on my harness and pcm to get back from speartech wiring...Update as soon as i can...in the mean time let me just leave you with this....lol
[IMG]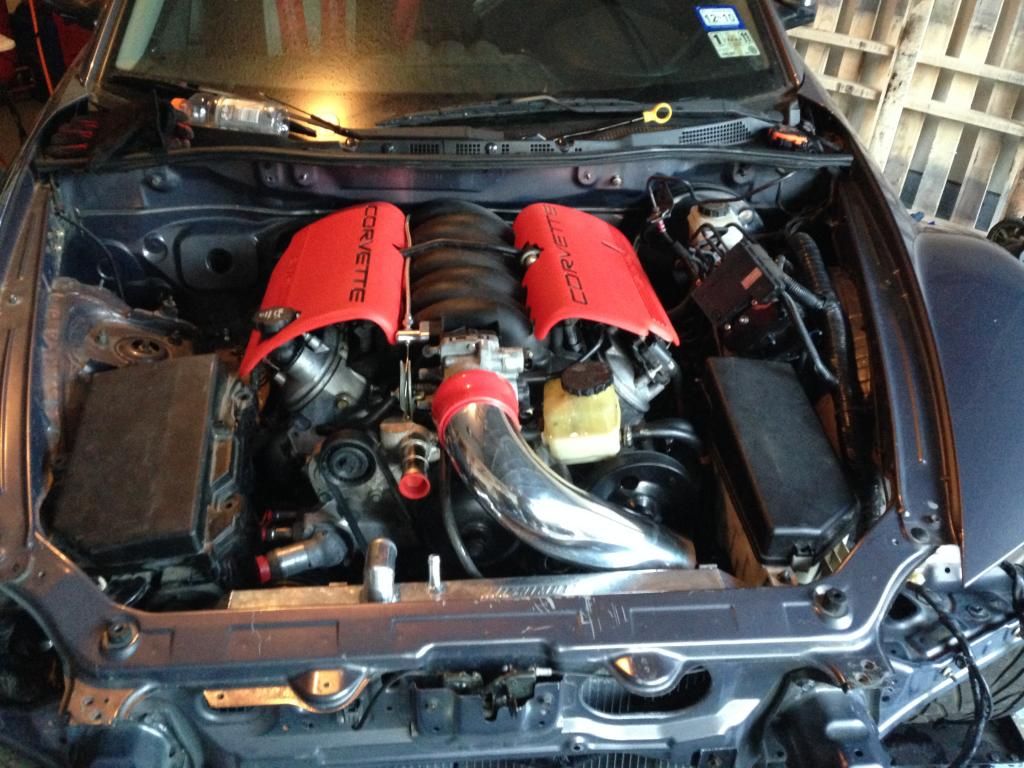 [/IMG]
Looks wicked!! Cant wait till its running again. Update soon hopefully.
[IMG]
 [/IMG]
[IMG]
 [/IMG]
[IMG]
 [/IMG]
[IMG]
 [/IMG]
They look great and fit nice and tight! Nice clean look. And its comfirmed LS swapped rx8s work best with the f body oil pan...the rear sump clears our subframe perfect, and the slim front clears the relocated steering rack/subframe.
[IMG]
 [/IMG]
Shot of the header collectors under the car...now i have to design my exhaust system! Im pumped...
[IMG]
 [/IMG]
[IMG]
 [/IMG]
Everything back in after the new pan, and headers...everything fits nice and clean...have room for exhaust system, steering shaft has full motion with no interference...totally pumped at how its coming together.
[IMG]
 [/IMG]
[IMG]
Everything looking good so far...now onto designing exhaust system, plumping fuel system, and the electrical part of the build...still waiting on my harness and pcm to get back from speartech wiring...Update as soon as i can...in the mean time let me just leave you with this....lol
[IMG]
 [/IMG]
Looks wicked!! Cant wait till its running again. Update soon hopefully.
 06-14-2014, 09:47 PM
#15
Small Update
Hey guys..got another couple things done on the car...just trying to be productive while i wait for the UPS man again haha. Finished off the top radiator mounts...since im getting a custom hood..im gonna have it "pinned"...so the top radiator "mount" has a stud through the center of each cut to serve as mounting points for the hood pins as well..so i can just thread the hood pins onto the top of the radiator studs, then cut the holes in the hood as needed.
[IMG]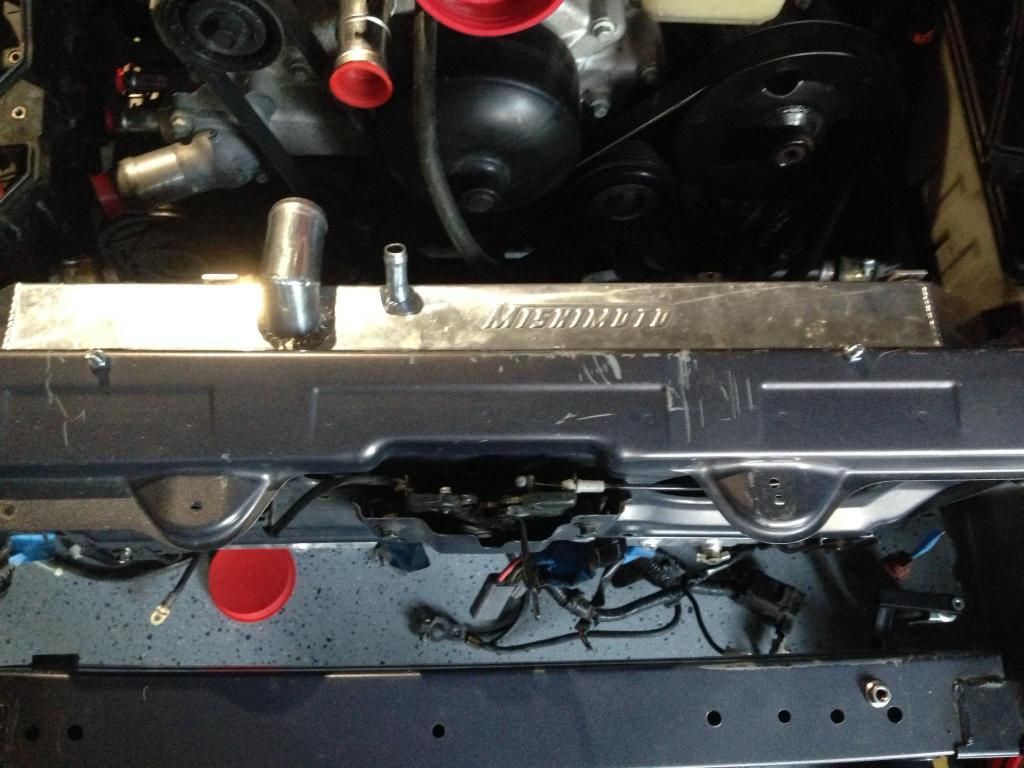 [/IMG]
Relocated my Mazda PCM/Computer...gonna sit right to the left of where the spear-tech harness will enter the engine bay...Also Relocated the computer to the front of the left strut mount (this might not be permanent..might need to fab up a bracket or something).
[IMG]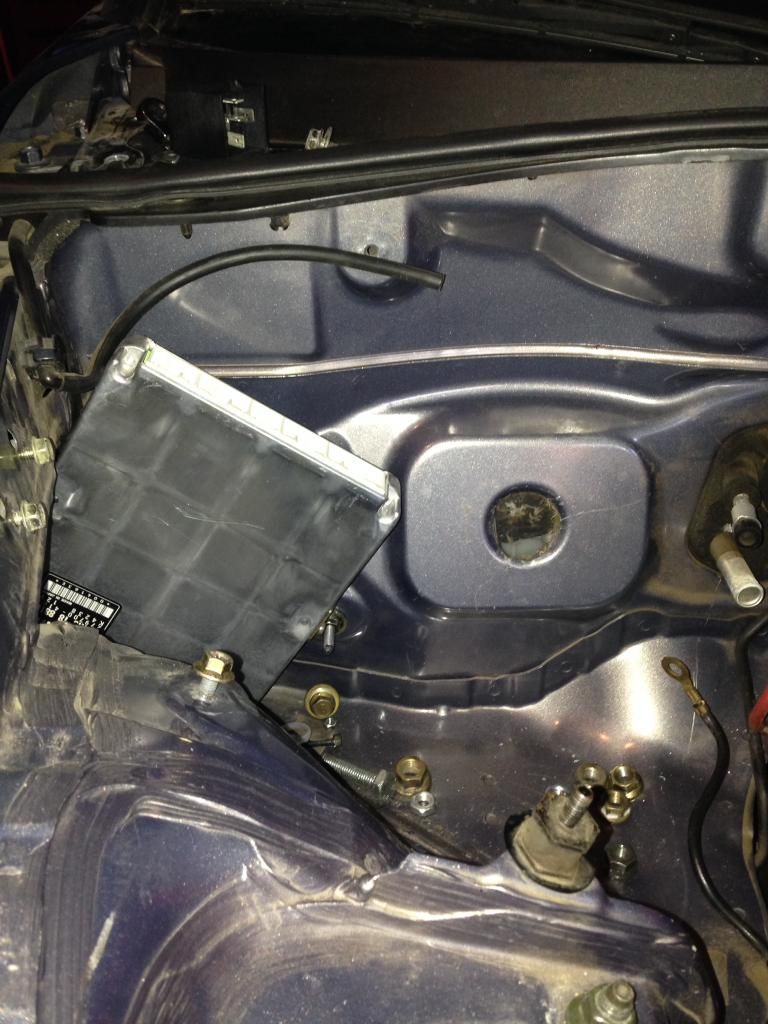 [/IMG]
[IMG] [/IMG]
[IMG]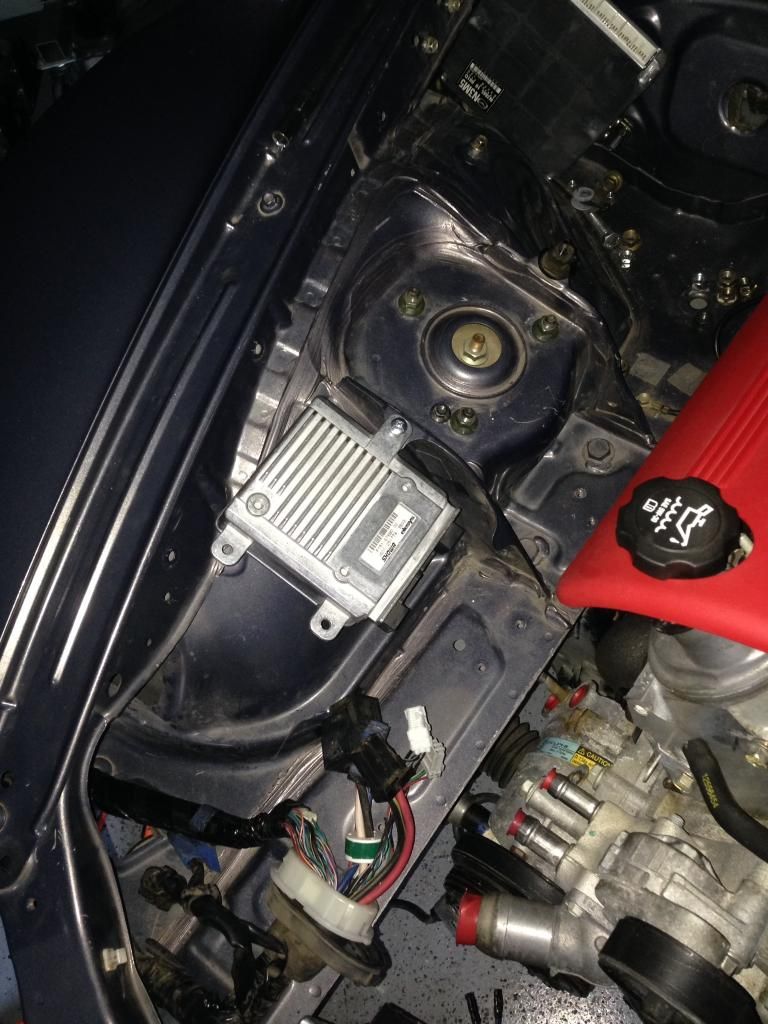 [/IMG]
Also loosely fabbed up the intake..gonna need to make a cut and put the MAF in still...but it looks good.
[IMG]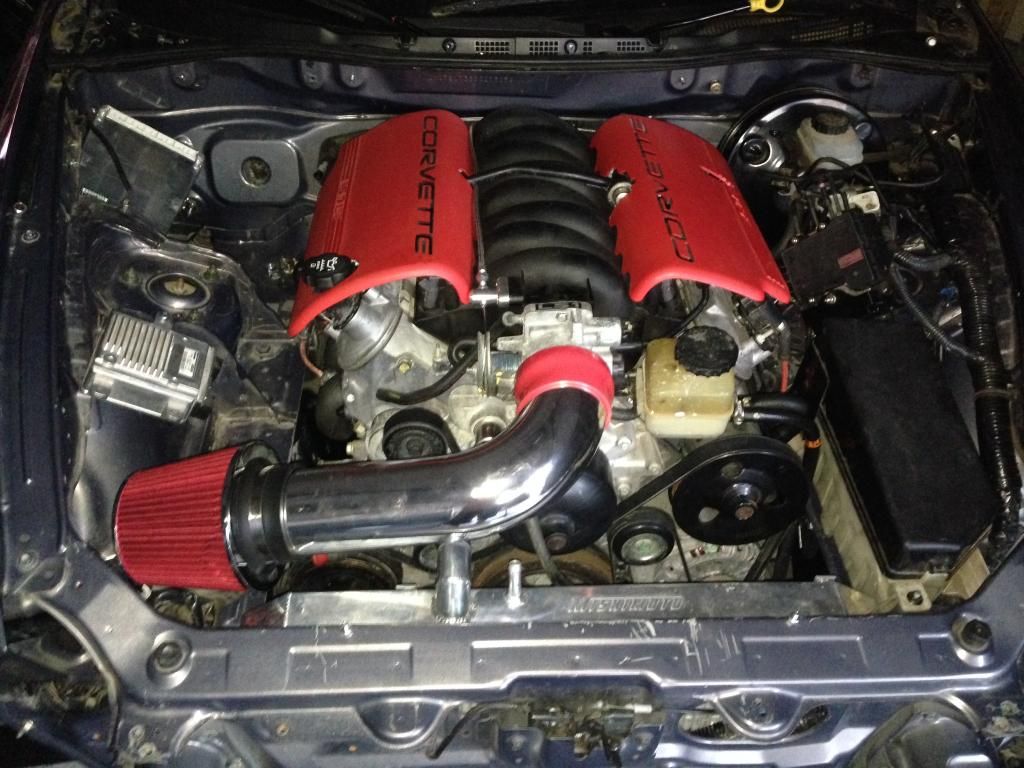 [/IMG]
Thats about it..however i also am working on a 3 relay harness to connect to my speartech harness for control of my radiator fans. Next update will include the details about that...and much more!
Best,
Joey
[IMG]
 [/IMG]
 Relocated my Mazda PCM/Computer...gonna sit right to the left of where the spear-tech harness will enter the engine bay...Also Relocated the computer to the front of the left strut mount (this might not be permanent..might need to fab up a bracket or something).
[IMG]
 [/IMG]
[IMG]
 [/IMG]
[IMG]
 [/IMG]
Also loosely fabbed up the intake..gonna need to make a cut and put the MAF in still...but it looks good.
[IMG]
 [/IMG]
Thats about it..however i also am working on a 3 relay harness to connect to my speartech harness for control of my radiator fans. Next update will include the details about that...and much more!
Best,
Joey
06-18-2014, 11:33 PM
#16
Update... Attention to Detail!
Hey guys, got some more work done on the car...mainly little things, but progress none the less. Finished up my LS1 Radtior Fan Relay Bank. Came out pretty good.
[IMG]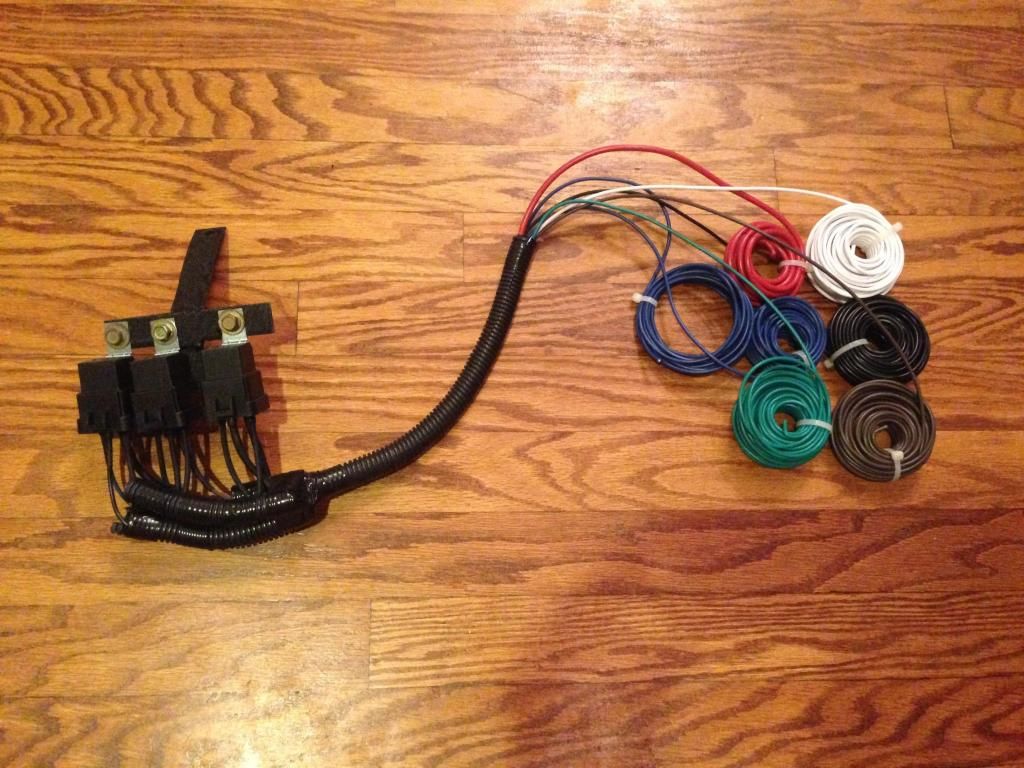 [/IMG]
[IMG]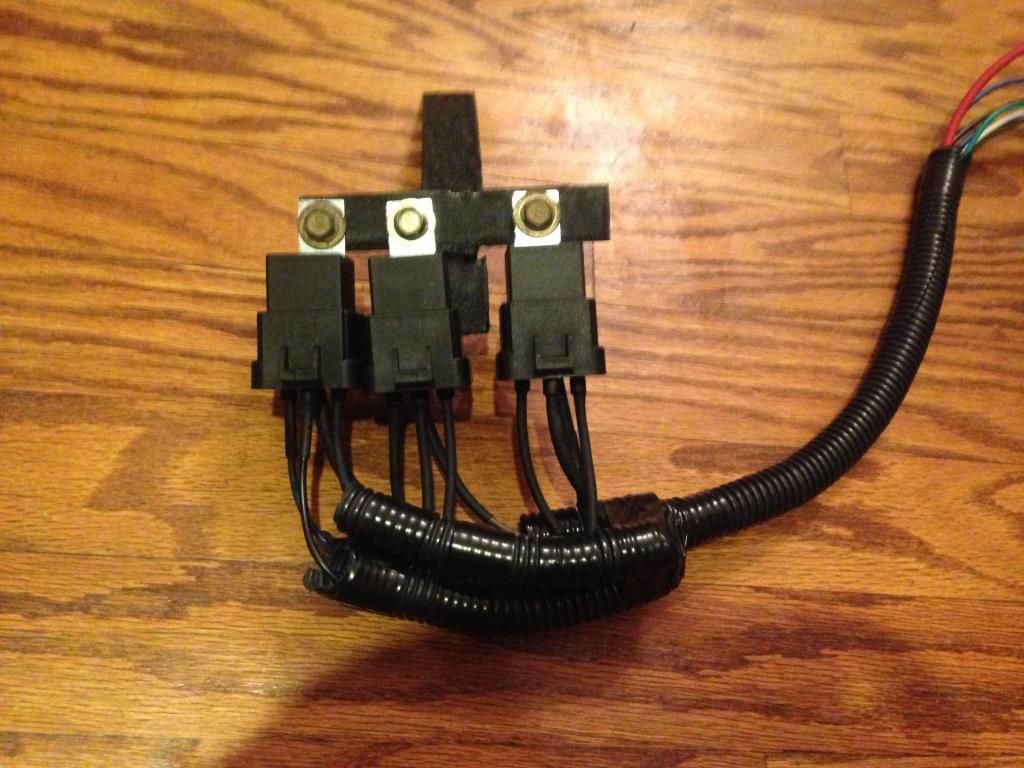 [/IMG]
Made a mounting bracket for the relay bank out of welded 16ga Steel Sheet Metal..then painted it in VHT Black Wrinkle Paint...the texture looks pretty cool.
[IMG]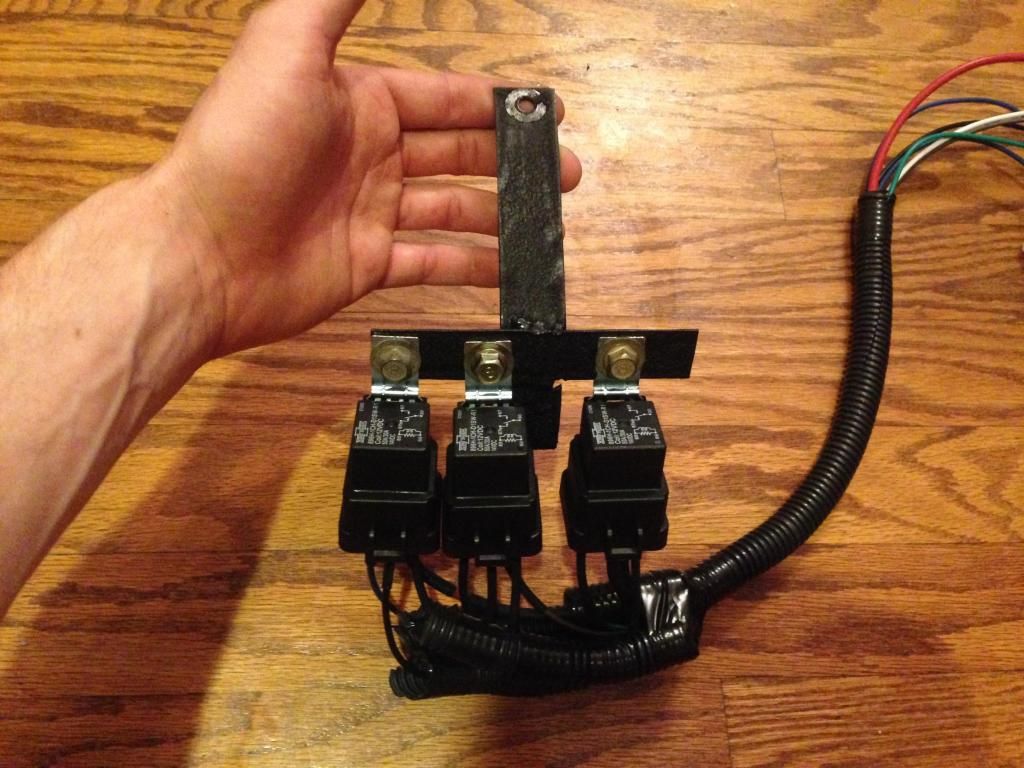 [/IMG]
I think it looks pretty good, and should be able to route the wires nice along the factory harness postion. Relay is going too allow both fans to run at low speed (voltage is stepped down for each fan), then full speed for high temp situations.
[IMG]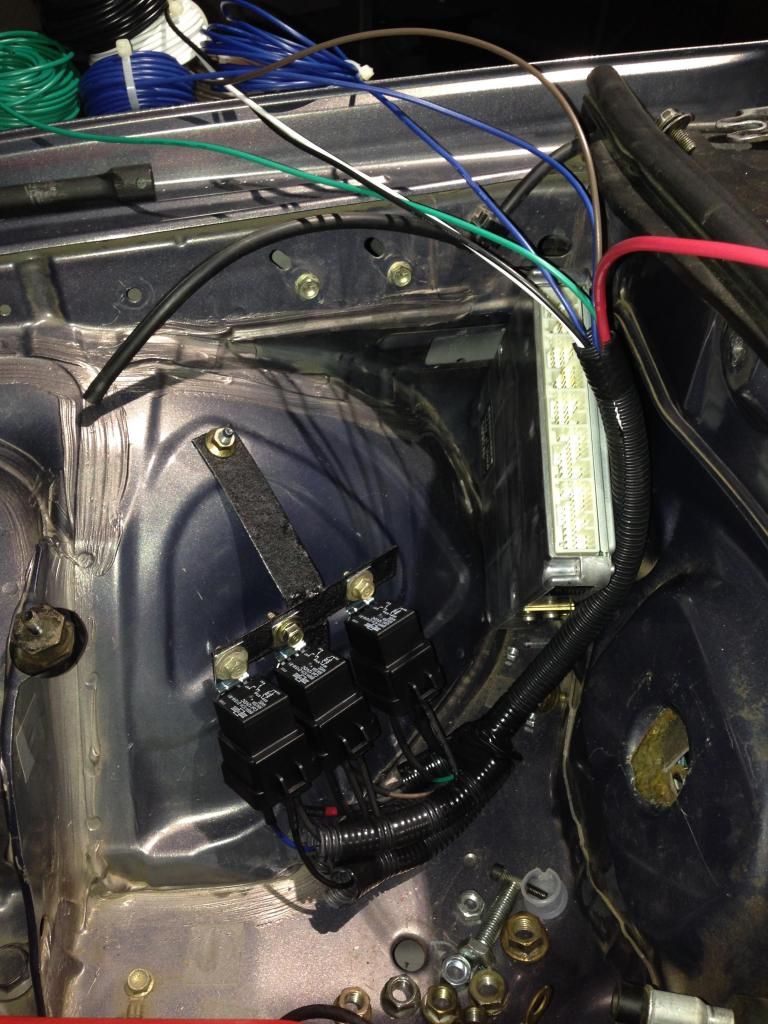 [/IMG]
Starting looking into my clutch pedal situation.... Un-packaged my Clutch Master Cylinder... Removed the stock clutch master clyinder, and clutch pedal.
[IMG]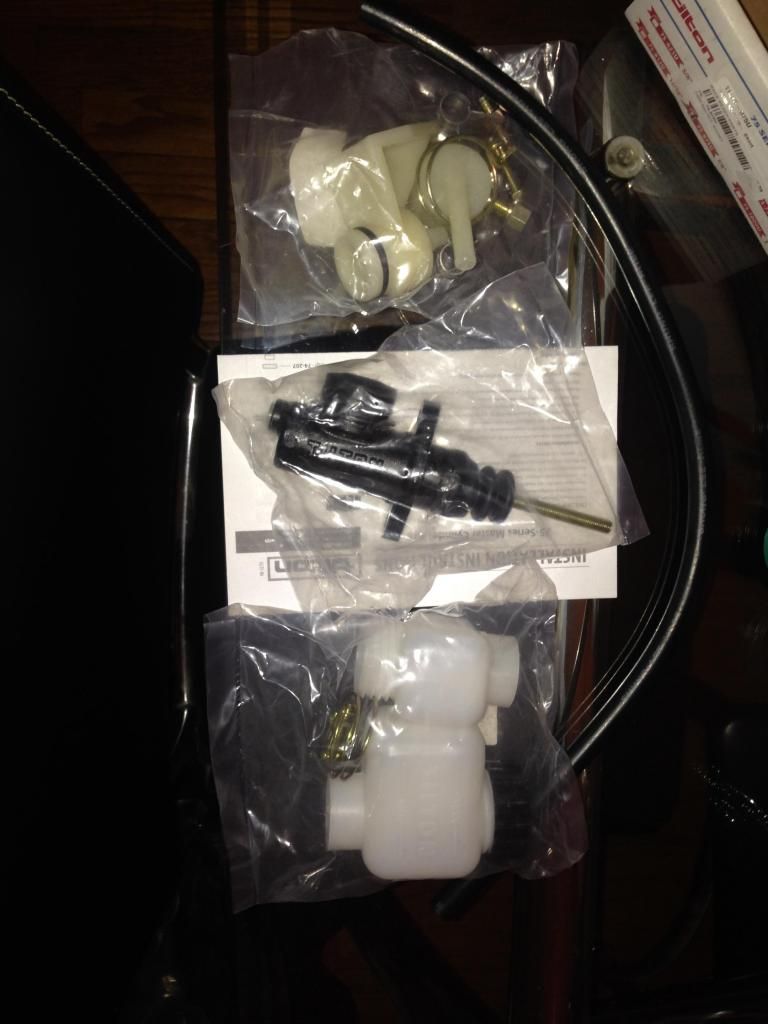 [/IMG]
[IMG] [/IMG]
[IMG]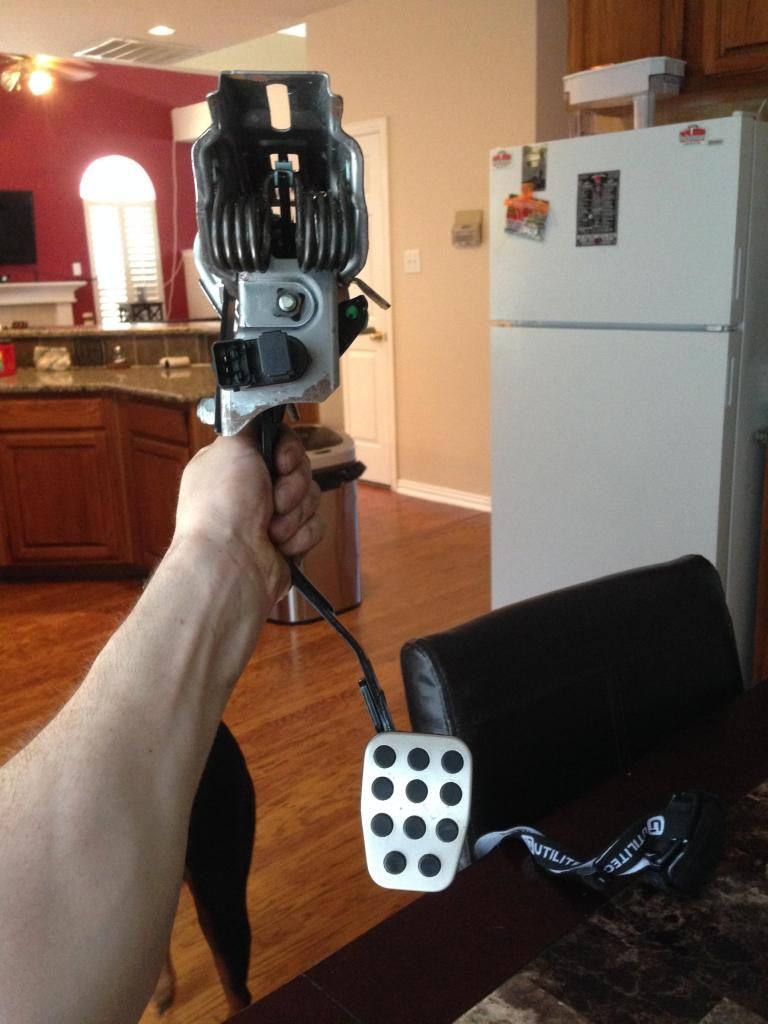 [/IMG]
Its looking like i lucked out..the clutch master cylinder i got fits the stock rx8 pedal perfect...gonna workout nice and i get to retain factory pedal/reinforcement bracket.
[IMG] [/IMG]
Also finally got around to mocking up my header reducers...they look great and nice quality at 20.00 bucks shipped from summitracing, 2-1/4 to 3 in.
[IMG]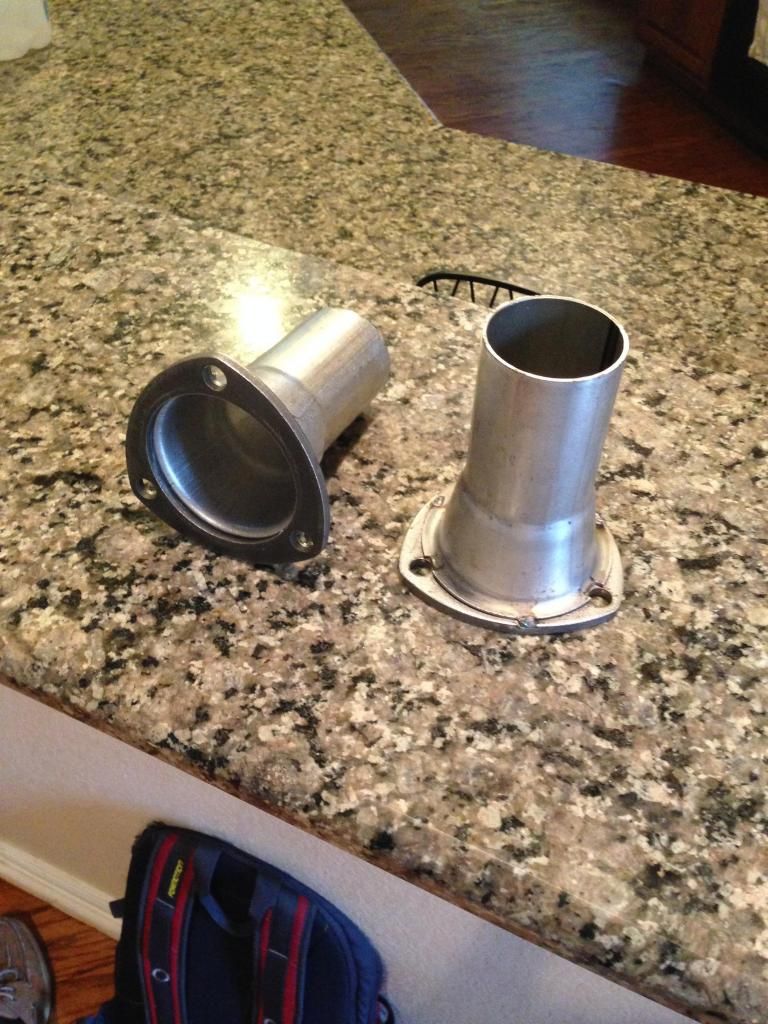 [/IMG]
Fuel system consisting of corvette fuel filter/regulator, in tank high flow fuel pump, custom quick disconnect supply,return, and feed line. Mazda SST for fuel pump assembly.
[IMG] [/IMG]
Plan is to run the return and supply line from the fuel pump assembly to the dual inlet side of the corvette fuel filter/regulator. Then single outlet side to the ls1 fuel rail. Nothing crazy.
Also finally got around to "looming" my battery reloaction cables..looks very nice in my opinion.
[IMG] [/IMG]
[IMG] [/IMG]
Speartech Harness is flawless...great quality product, everything labeled, instructions are easy to follow.. Should hopefully not be bad to figure out.
[IMG] [/IMG]
Finally i knocked another thing off the list that i keep pushing back...my throttle pedal situation...I lucked out again, but it looks like i will be able to use my stock throttle pedal as well. Plan is to replace the little white shim in the pedal with a piece of equally thick steel sheet metal in a lever arm design...then i will just drill a hole in the appropriate spot of the lever arm and the throttle linkage can pin right in.
[IMG] [/IMG]
[IMG]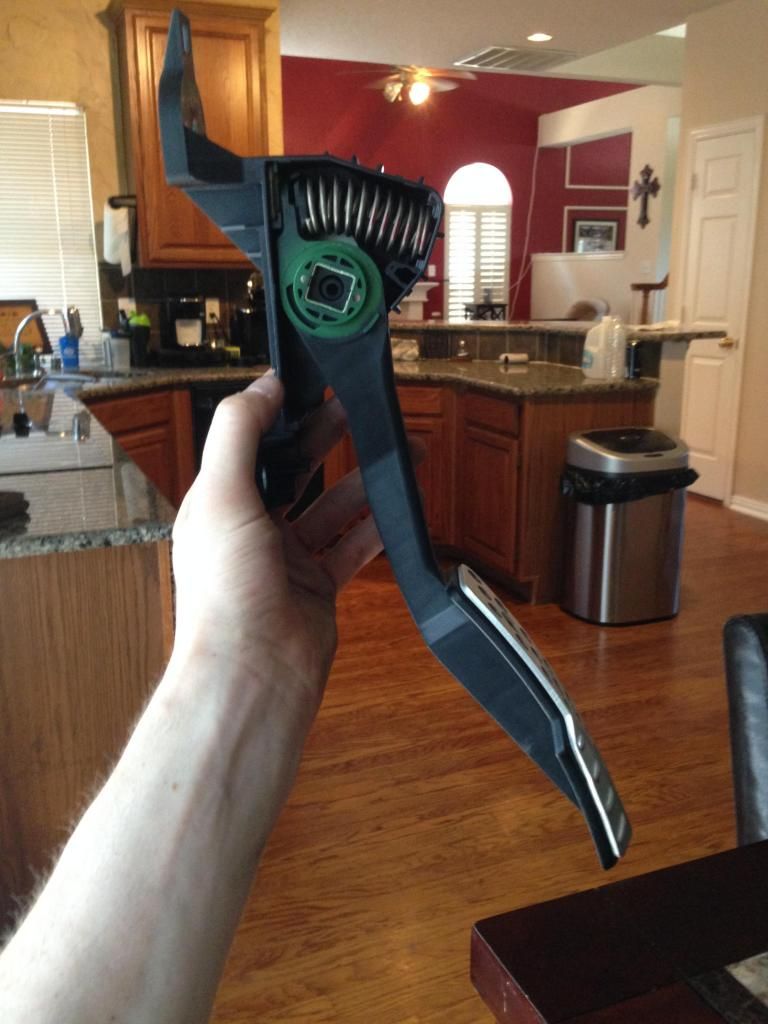 [/IMG]
[IMG]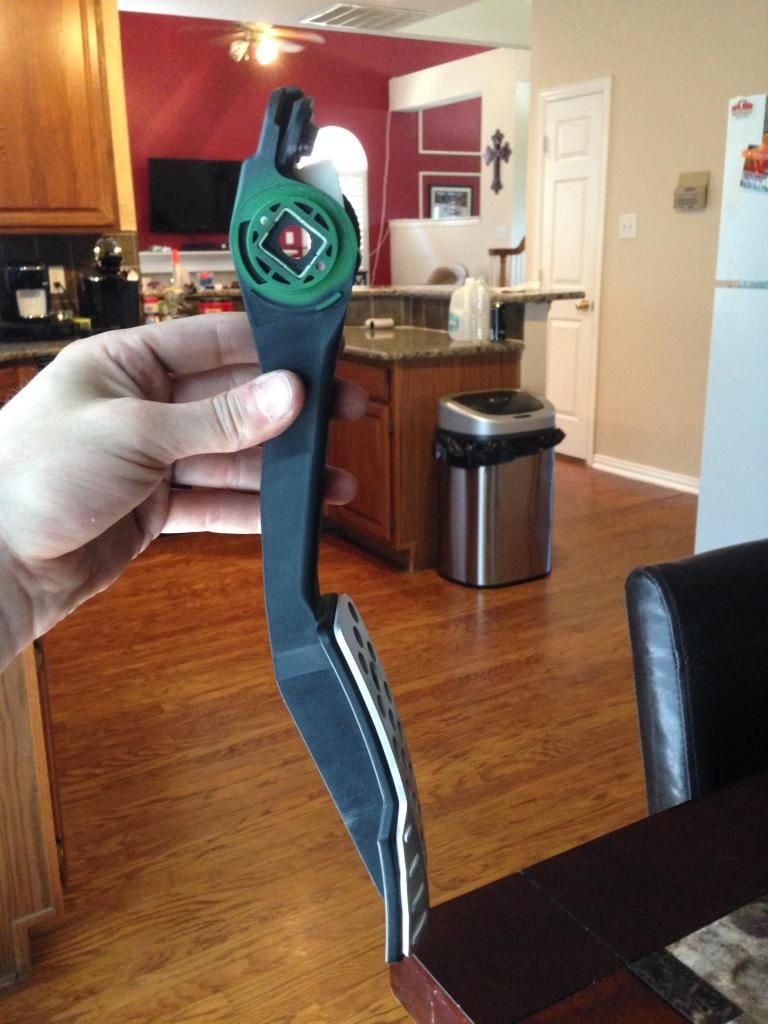 [/IMG]
This is the white "shim i am referring to that i will replace with a lever arm for the mechanical linkage..again im hoping it works, because i would love to retain the factory accelerator pedal along with the clutch.
[IMG]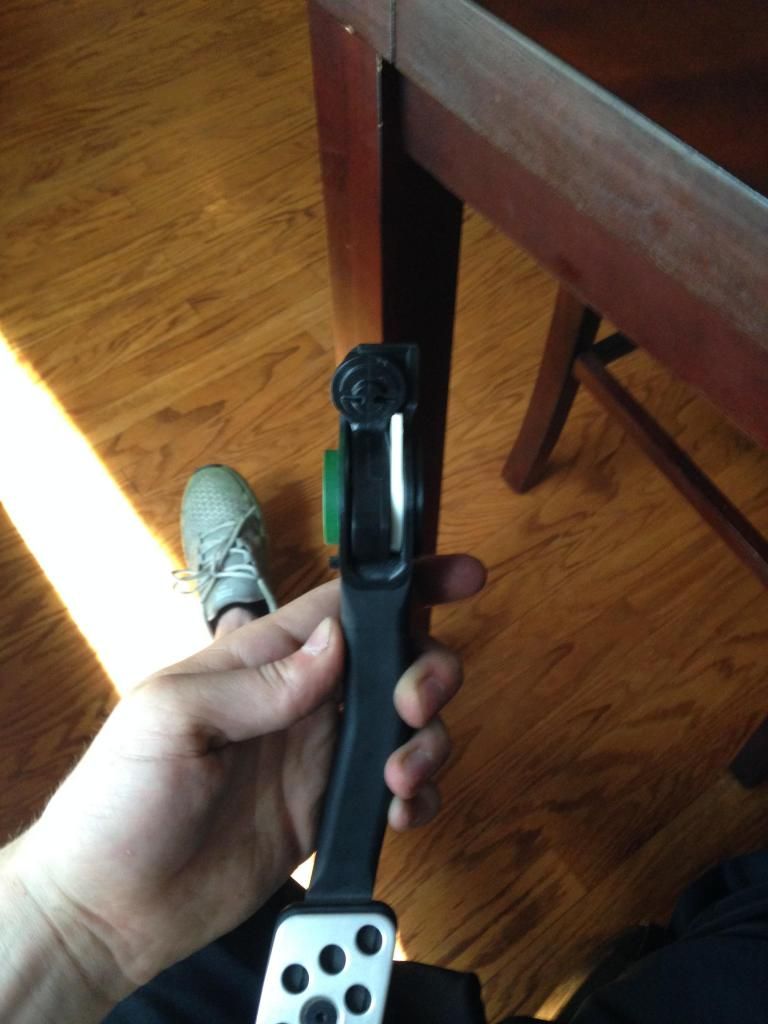 [/IMG]
[IMG]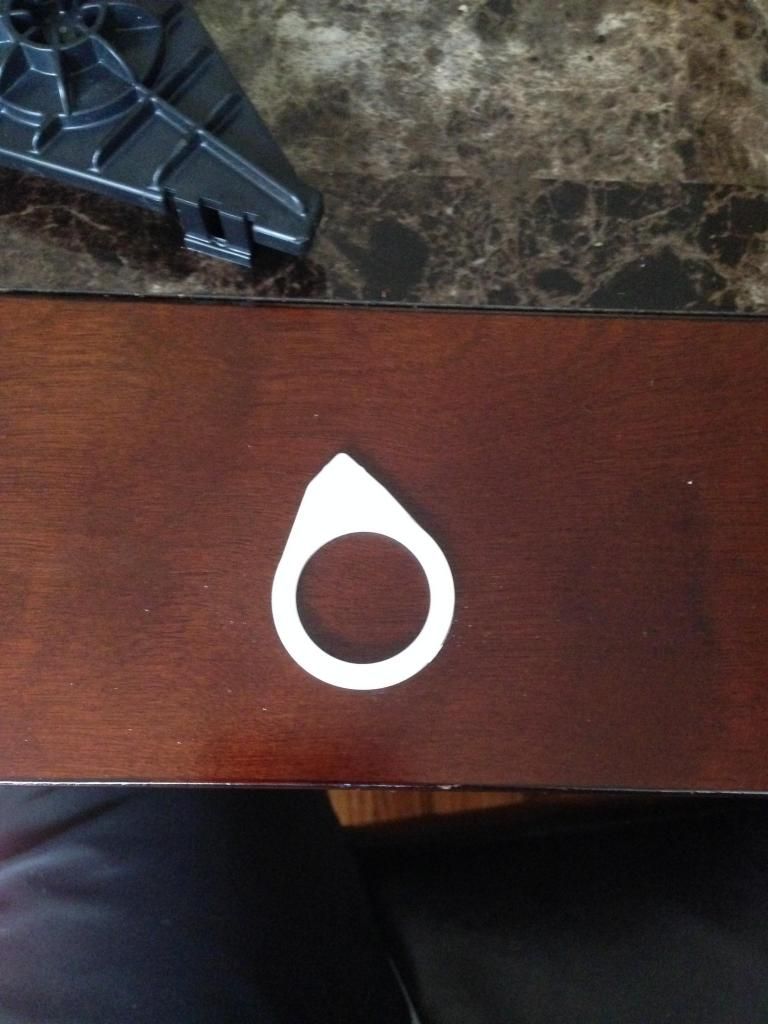 [/IMG]
I got this idea when i was doing research a couple days ago..i think this is it..
06 Lexus IS250 LS1 Build - LS1TECH
Now the plan is to pull the motor, measure for stainless steel braided brake lines for ABS module relocation. Then Plumb my fuel system, wrap my headers, measure for a top radiator hose, and heater hoses. Permanently relocate my power steering module, fab up my intake with the MAF installed, make lever arm for throttle pedal, install clutch master cylinder/pedal, prep the engine bay for paint , and finally paint the engine bay. Not like there's nothing to do...lol Once bay is painted and looking good reassembly begins.
Ill update as soon as i can!
Best
[IMG]
 [/IMG]
[IMG]
 [/IMG]
Made a mounting bracket for the relay bank out of welded 16ga Steel Sheet Metal..then painted it in VHT Black Wrinkle Paint...the texture looks pretty cool.
[IMG]
 [/IMG]
I think it looks pretty good, and should be able to route the wires nice along the factory harness postion. Relay is going too allow both fans to run at low speed (voltage is stepped down for each fan), then full speed for high temp situations.
[IMG]
 [/IMG]
Starting looking into my clutch pedal situation.... Un-packaged my Clutch Master Cylinder... Removed the stock clutch master clyinder, and clutch pedal.
[IMG]
 [/IMG]
[IMG]
 [/IMG]
[IMG]
 [/IMG]
Its looking like i lucked out..the clutch master cylinder i got fits the stock rx8 pedal perfect...gonna workout nice and i get to retain factory pedal/reinforcement bracket.
[IMG]
 [/IMG]
Also finally got around to mocking up my header reducers...they look great and nice quality at 20.00 bucks shipped from summitracing, 2-1/4 to 3 in.
[IMG]
 [/IMG]
Fuel system consisting of corvette fuel filter/regulator, in tank high flow fuel pump, custom quick disconnect supply,return, and feed line. Mazda SST for fuel pump assembly.
[IMG]
 [/IMG]
Plan is to run the return and supply line from the fuel pump assembly to the dual inlet side of the corvette fuel filter/regulator. Then single outlet side to the ls1 fuel rail. Nothing crazy.
Also finally got around to "looming" my battery reloaction cables..looks very nice in my opinion.
[IMG]
 [/IMG]
[IMG]
 [/IMG]
Speartech Harness is flawless...great quality product, everything labeled, instructions are easy to follow.. Should hopefully not be bad to figure out.
[IMG]
 [/IMG]
Finally i knocked another thing off the list that i keep pushing back...my throttle pedal situation...I lucked out again, but it looks like i will be able to use my stock throttle pedal as well. Plan is to replace the little white shim in the pedal with a piece of equally thick steel sheet metal in a lever arm design...then i will just drill a hole in the appropriate spot of the lever arm and the throttle linkage can pin right in.
[IMG]
 [/IMG]
 [IMG]
 [/IMG]
[IMG]
 [/IMG]
This is the white "shim i am referring to that i will replace with a lever arm for the mechanical linkage..again im hoping it works, because i would love to retain the factory accelerator pedal along with the clutch.
[IMG]
 [/IMG]
[IMG]
 [/IMG]
I got this idea when i was doing research a couple days ago..i think this is it..
06 Lexus IS250 LS1 Build - LS1TECH
Now the plan is to pull the motor, measure for stainless steel braided brake lines for ABS module relocation. Then Plumb my fuel system, wrap my headers, measure for a top radiator hose, and heater hoses. Permanently relocate my power steering module, fab up my intake with the MAF installed, make lever arm for throttle pedal, install clutch master cylinder/pedal, prep the engine bay for paint
, and finally paint the engine bay. Not like there's nothing to do...lol Once bay is painted and looking good reassembly begins.Ill update as soon as i can!
Best
06-24-2014, 05:14 PM
#17
Pistons Please

Your project is coming along beautifully! I may have missed in your thread where you mentioned electronics, but what do you have planned for BCM/ECM functions?
Glad to see the GTO T56 fit perfect! I am having a hell of a time finding a good deal on one, it is the current hold up on my swap haha.
Glad to see the GTO T56 fit perfect! I am having a hell of a time finding a good deal on one, it is the current hold up on my swap haha.
01-11-2015, 09:54 AM
#18
New Member

Join Date: Jan 2015
Posts: 1
Likes: 0
Received 0 Likes
on
0 Posts
rx8 build
Couple quick questions if u have time to answer would be great 1-did u have to cut or bend over the lip in your engine bay? 2- where did you get your engine stands or are they made I really like that stand/mount setup compared to some of the kits I've seen
 06-01-2018, 10:34 AM
#21
New Member

Join Date: May 2018
Posts: 2
Likes: 0
Received 0 Likes
on
0 Posts
Not to much of an update today, but I got the engine stands mocked up to see how everything will sit in the engine bay. Looks pretty good, seems like the motor will be centered up real nice with these mounts/stands.
Give you an idea of how the subframe is gonna be modified to allow stock c5 corvette mounts to work nicely.
[IMG]
Close up on drivers side stand..fit looks good along the subframe, just need to get them tacked up and welded on..hopefully will be able to get it done by the weekend.
[IMG]
shot of the passenger stand
[IMG]
Here is a shot of the mock up with the c5 engine mounts/pedestals ill be using
[IMG]
Just for the hell of it i mocked the c5 mounts up with the stock rubber mount to see if there was any real difference in height over the aftermarket ones in the pic above...difference was negligible.
[IMG]
Also figured out what/how im gonna mount my radiator and fan shroud, tried to take pics, but it was too dark. Ill get better ones by the weekend and add them along with another update on progress hopefully!
Hey all, got my radiator and fan shroud all mocked up for the swap. Should have plenty of room for an interesting intake tube/filter routing.
Shot of it mocked up Mishimoto Radiator looks good. (Get an idea for wanted position).
[IMG]
Clearance of the left and right side
[IMG]
[IMG]
Shot of the Mishimoto aluminum fan shroud with twin 12'' slim fans.
[IMG]
Shot of the notchs ill cut for finally rigid fitment.
[IMG]
[IMG]
Mount setup to hold up the bottom of the rad (just clamped on for known to look at clearance)
Bottom of mount.
[IMG]
Side profile of the mount.
[IMG]
Looks good and sturdy..gonna be finishing up fabrication of the radiator mounts, and engine stands this week, hopefully have the motor/trans dropped in this weekend!! Update will follow. Speartech should be getting my PCM and harness for rework and tune any day now so everything is coming together nicely.
Hey guys, sorry i know it has been awhile since the last update, but i have just been busy....However, lets to cut to the chase. Had my engine stands, and transmission cross member plates welded up this weekend. They look fantastic imo. Also got the motor torn down, with the ls engine lift plate on, heads taped up.
[IMG]
Some shots of the engine stands welded up (before a good clean to get the slag off)...great work by the welder. By the way if your in the dfw area, and a novice welder who isnt comfortable welding on your subframe i recommend Rosado Welding. Great guy,fast and reliable work, clean welds, can come to your house if the car doesn't move. Awesome!!
[IMG]
[IMG]
[IMG]
[IMG]
And the transmission cross member mounting plates i was reffering to eariler.
[IMG]
Getting ready for the first test fit!!
[IMG]
Fits like a glove...so happy to see the engine bay full once more.
[IMG]
[IMG]
I was a little nervous to mock up my radiator mounts before the test fit, but I lucked out there is plenty of room for the front accessories, and the intake to be routed.
[IMG]
[IMG]
Some pics of the mounts im using for the swap. Just a reminder im using the stock C5 Corvette engine pedestal....then the actual engine mount is the C5 corvette performance urethane mount.
[IMG]
[IMG]
Man so glad on the fit, the engine stands that got welded on, are right on the money (I'm using back hole in the stand..because that lines up the shifter perfect in the car)... Also forgot to mention i cleaned up the welds with the wire wheel, then painted the engine stands, and tranny mount plates with some VHT Chassis/RollBar Paint..black of course..
[IMG]
Remember if you are doing a rx8 swap as well to take note of which t56 you have, because i was honestly unaware of any real differences till i started doing research...so to help save someone the time hopefully here is an awesome reference pic i stumbled across somewhere on some forum.
[IMG]
Give you an idea of how the subframe is gonna be modified to allow stock c5 corvette mounts to work nicely.
[IMG]
Close up on drivers side stand..fit looks good along the subframe, just need to get them tacked up and welded on..hopefully will be able to get it done by the weekend.
[IMG]
shot of the passenger stand
[IMG]
Here is a shot of the mock up with the c5 engine mounts/pedestals ill be using
[IMG]
Just for the hell of it i mocked the c5 mounts up with the stock rubber mount to see if there was any real difference in height over the aftermarket ones in the pic above...difference was negligible.
[IMG]
Also figured out what/how im gonna mount my radiator and fan shroud, tried to take pics, but it was too dark. Ill get better ones by the weekend and add them along with another update on progress hopefully!
Hey all, got my radiator and fan shroud all mocked up for the swap. Should have plenty of room for an interesting intake tube/filter routing.
Shot of it mocked up Mishimoto Radiator looks good. (Get an idea for wanted position).
[IMG]
Clearance of the left and right side
[IMG]
[IMG]
Shot of the Mishimoto aluminum fan shroud with twin 12'' slim fans.
[IMG]
Shot of the notchs ill cut for finally rigid fitment.
[IMG]
[IMG]
Mount setup to hold up the bottom of the rad (just clamped on for known to look at clearance)
Bottom of mount.
[IMG]
Side profile of the mount.
[IMG]
Looks good and sturdy..gonna be finishing up fabrication of the radiator mounts, and engine stands this week, hopefully have the motor/trans dropped in this weekend!! Update will follow. Speartech should be getting my PCM and harness for rework and tune any day now so everything is coming together nicely.
Hey guys, sorry i know it has been awhile since the last update, but i have just been busy....However, lets to cut to the chase. Had my engine stands, and transmission cross member plates welded up this weekend. They look fantastic imo. Also got the motor torn down, with the ls engine lift plate on, heads taped up.
[IMG]
Some shots of the engine stands welded up (before a good clean to get the slag off)...great work by the welder. By the way if your in the dfw area, and a novice welder who isnt comfortable welding on your subframe i recommend Rosado Welding. Great guy,fast and reliable work, clean welds, can come to your house if the car doesn't move
. Awesome!![IMG]
[IMG]
[IMG]
[IMG]
And the transmission cross member mounting plates i was reffering to eariler.
[IMG]
Getting ready for the first test fit!!
[IMG]
Fits like a glove...so happy to see the engine bay full once more.
[IMG]
[IMG]
I was a little nervous to mock up my radiator mounts before the test fit, but I lucked out there is plenty of room for the front accessories, and the intake to be routed.
[IMG]
[IMG]
Some pics of the mounts im using for the swap. Just a reminder im using the stock C5 Corvette engine pedestal....then the actual engine mount is the C5 corvette performance urethane mount.
[IMG]
[IMG]
Man so glad on the fit, the engine stands that got welded on, are right on the money (I'm using back hole in the stand..because that lines up the shifter perfect in the car)... Also forgot to mention i cleaned up the welds with the wire wheel, then painted the engine stands, and tranny mount plates with some VHT Chassis/RollBar Paint..black of course.
.[IMG]
Remember if you are doing a rx8 swap as well to take note of which t56 you have, because i was honestly unaware of any real differences till i started doing research...so to help save someone the time hopefully here is an awesome reference pic i stumbled across somewhere on some forum.
[IMG]


Thread
Thread Starter
Forum
Replies
Last Post