
DIY: Open Headlights - Taillights.


Thread Starter
Living is best Modified.
Joined: Jul 2007
Posts: 479
Likes: 1
From: South Carolina
DIY: Open Headlights - Taillights.
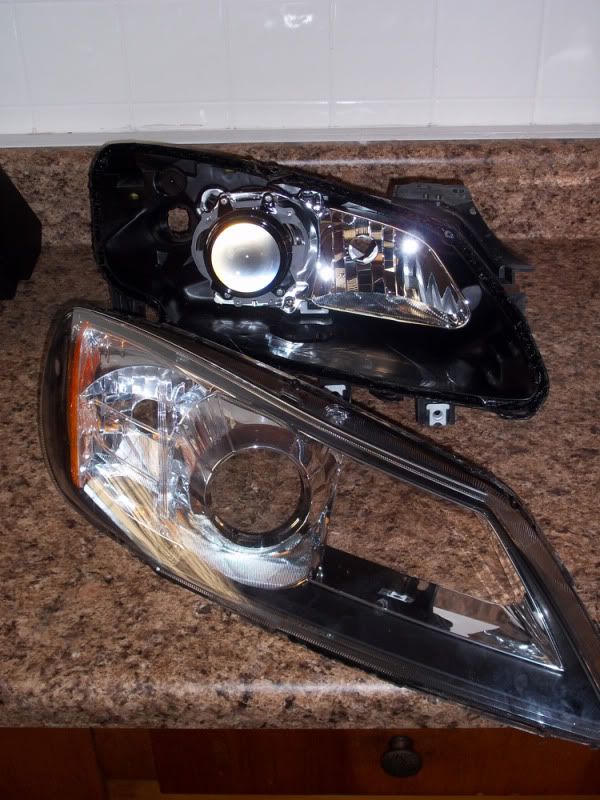
Welcome Ladies and Gentlemen to yet another DIY. This time, it's going to be cracking open your headlights and putting them back together.
Are you scared about doing this or atleast a little afraid of doing something wrong? You should be. Atleast for my set of headlamps you can not find easily on Ebay (In one piece) and they cost a whopping $1093.79 a HID headlamp assembly from my dealer. That's one major screw up. This tutorial will cover the specific disassembly of a Series 2 (2009+) Mazda RX-8, with HID headlights. You may need to adjust settings - and I will do my best to point out these settings that you may need to adjust. For these settings, please do research and make sure you track down what has worked for other people. What I describe here may not work for your headlights. Heck, you'll need a dremel to open up some headlights- as an example.
Warning: While I have done a lot of research and I have every confidence that you will be able to seal your headlamp after taking it apart: I am not responsible for any injuries or damages to you, the headlamp assembly, any lights, any vehicle, any appliances, anything at all in effect by reading this forum post. Follow the thread at your own risk!
Video (skubee): How To: BAKE, OPEN & PAINT Headlights! by DECALFX.COM
Spare Parts(Benz05ZZ): Head Lamp Assembly, Tail Light Assembly
Index:
Post #1:
A. Basic Tools
I. Headlamp Preparation
II: Heating Option:
II.a: Baking
II.b: Heatgun
II.c: Boiling
II.d: Microwave
Post #2
III: Headlamp Disassembled
IV: Headlamp Sealing
X: Faqs
XI: Other Tips
Post #3
A: Forewords
I: Tail light preparation.
II: Tail light Opening.
III: Tail light Closing.
///////////////////////////////////////////////////
A. Basic Tools
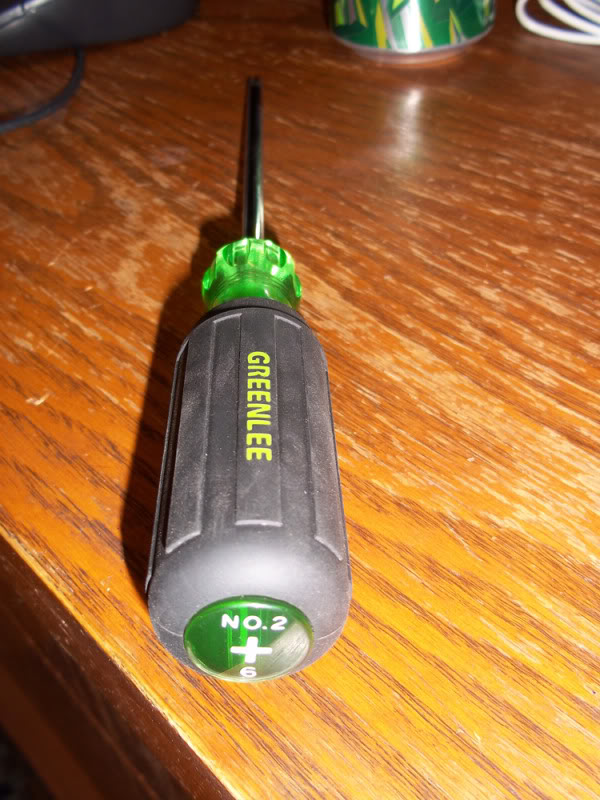
1.(Ph2/No.2/6) Philips Drive head screw driver.
Note: Note the exact size. You definitely don't want to toss out a 'spare' screw with these headlights. Im using "GreenLee", from Lowes
2. A long, thin something tool. It needs to have a smaller diameter than the screw driver I described above. I know, that's completely opposite. But this tool will make your life a lot easier.. That is if you don't decide to give into using scissors. Yikes. Trust me on this one, I'll explain in the Headlight Preparation section of this tutorial.
3. Lunch Baggies. I used 6 for my second time around. 1) HID bulb 2) 1x Turning Signal / Parking Light 3) High Beam Bulb 4) Balast/Balast to Bulb Wire/Balast screws [4] 5) All screws inside the lens [4] 6) HID Bulb Cover.
4. ???: The rest of the tools you need to figure out based on "How" you want to seperate the lens from the rest of the whole light assembly.
///////////////////////////////////////////////////
I. Headlamp Preparation
Following these steps, you'll be able to make sure that the headlamp assembly will be much easier, and enjoyable to work on. These steps will prepare you and the headlight for the cooking.
If you are Re-assembling your headlights, please follow separate directions below.
1. Take off the front bumper. [My Tutorial][Video Tutorial]
2. At the car, Unscrew the headlamp at these points.
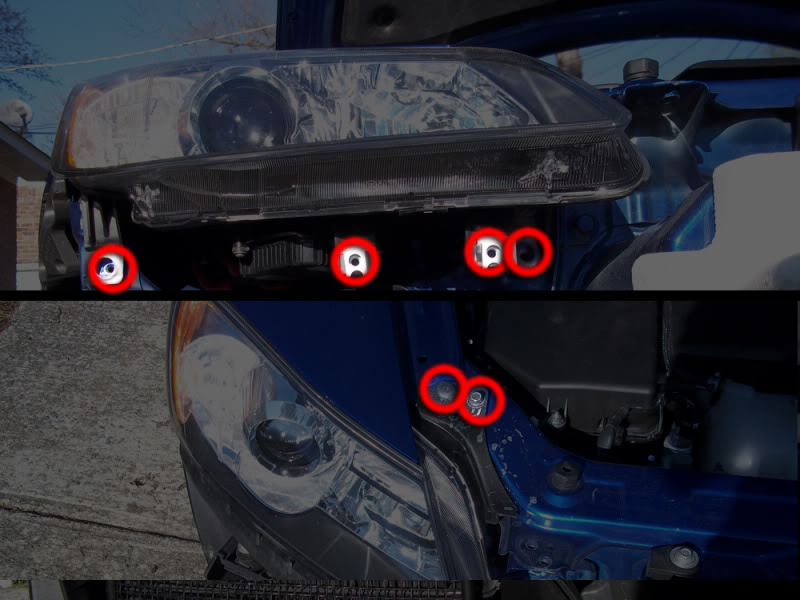
3. Unclip the power to the TurnSignals and to the driving lights
4. If you have a vinyl cover on the headlights, take it off.
5. Clean your headlight Lens.
5-a. You may need to wet-sand the headlights to remove the layer of plastic if it's been oxidized.
5-b. Invisible Glass is recommended to clean the headlight.
6. Remove the High-Beam bulb
7. Remove the Parking/Turning Signal bulb.
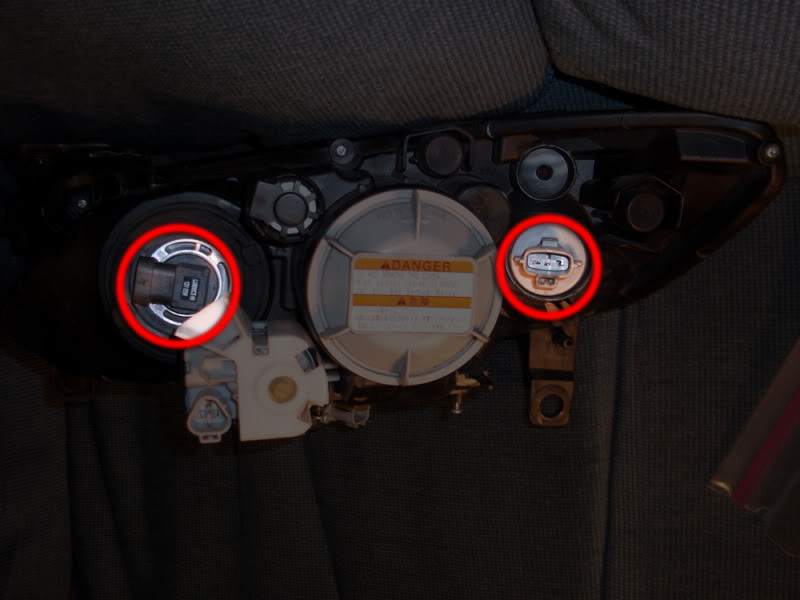
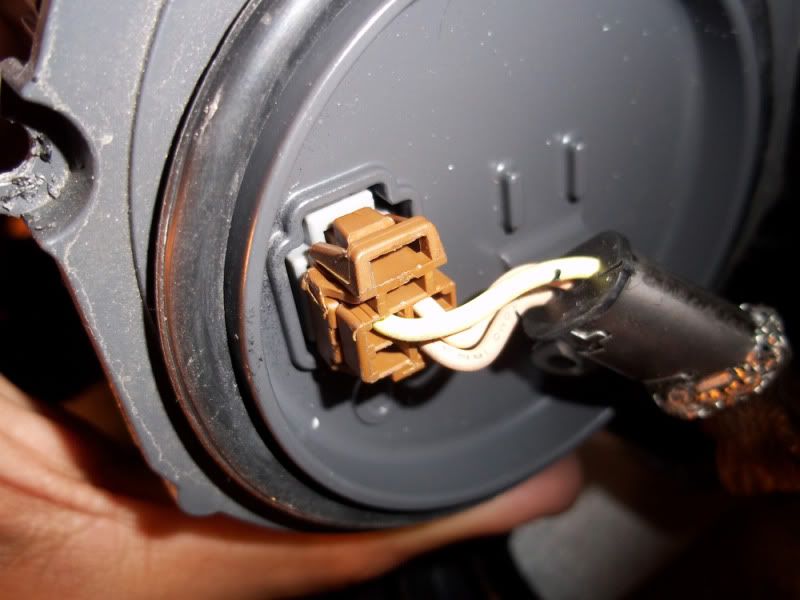
8. Unclasp the wiring harness from all the connections.
9. Unscrew the HID Balast at the bottom of the Headlamp.
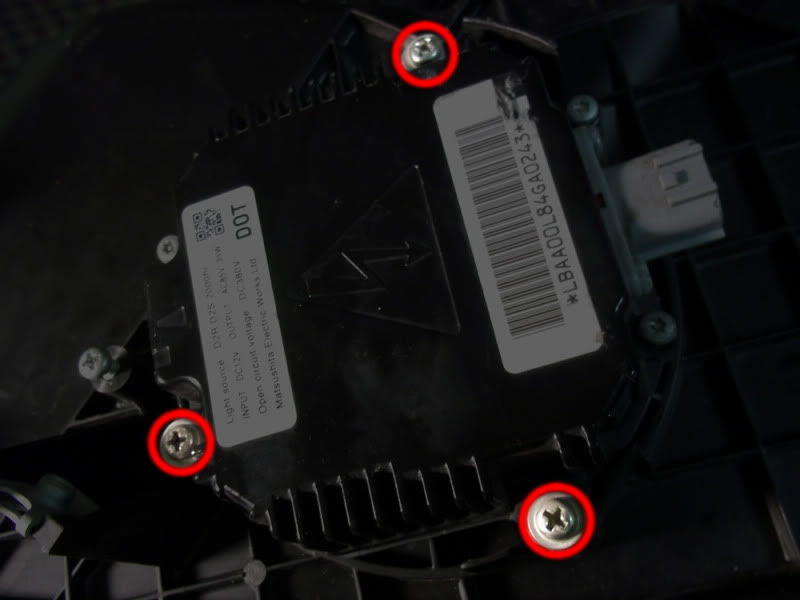
10. Moving the balast out of the way, there will be another smaller screw with several washers attached.
Note: Make sure to get the O ring with the balast.
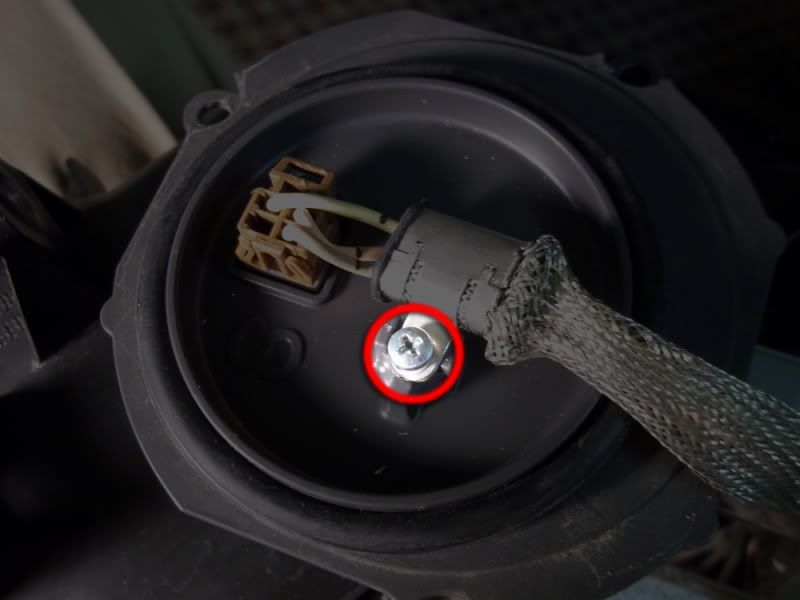
11. Unclasp the wiring to the HID bulb. (Sticking a small flat head near the balast side will help) Place Balast in Bag 1.
12. Remove the HID Bulb Covering. It will take some strength to turn.
Note: Make sure to get the O ring with the HID Bulb Covering.
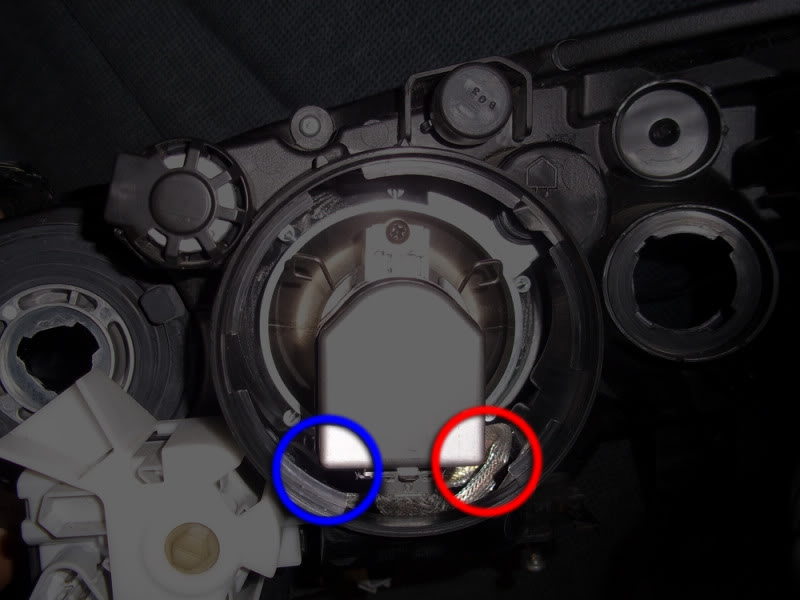
13. Remove the silver connector from the HID bulb. It has a lightning bulb. Don't worry about pulling the wire mesh through yet.
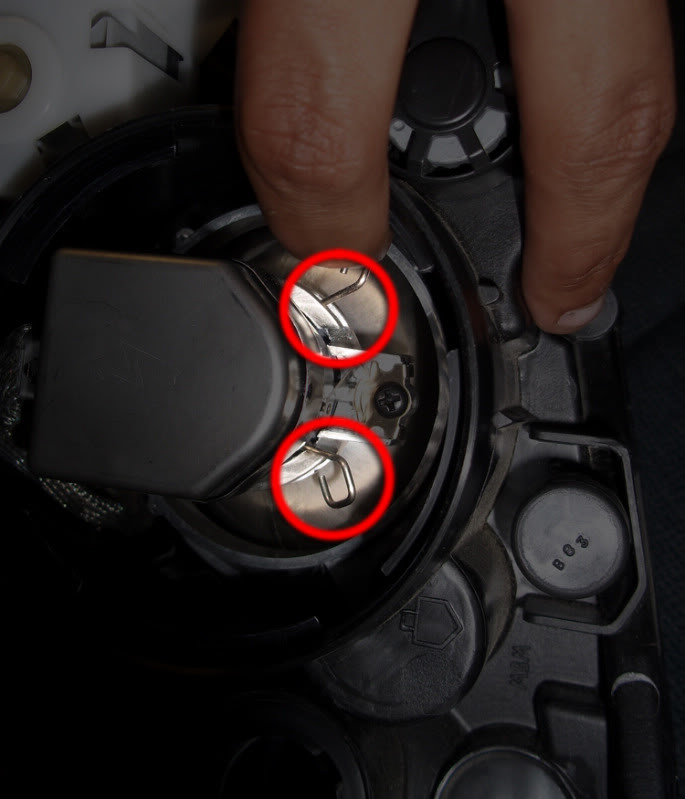
14. Remove the HID bulb by pressing both tabs up towards the middle. They'll spring out of lock and the bulb will pull straight out.
15. Remove the Balast to Bulb wiring. This is the hardest step in the whole tutorial, It took me three times before I could get it through the headlight in one piece. [Exp: The first time I did it I cut the wire in frustration. Something, by the way, I don't recommend.
Note: It's hard to get good pictures of the inside.
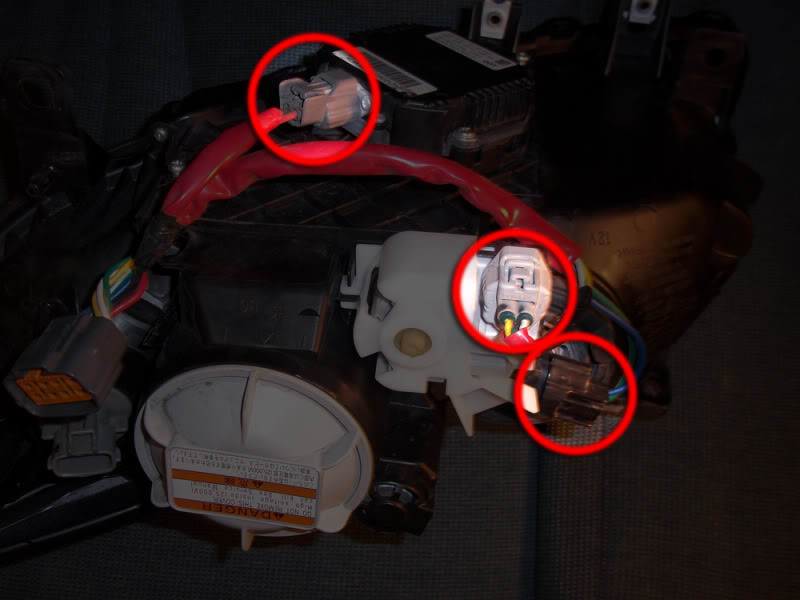
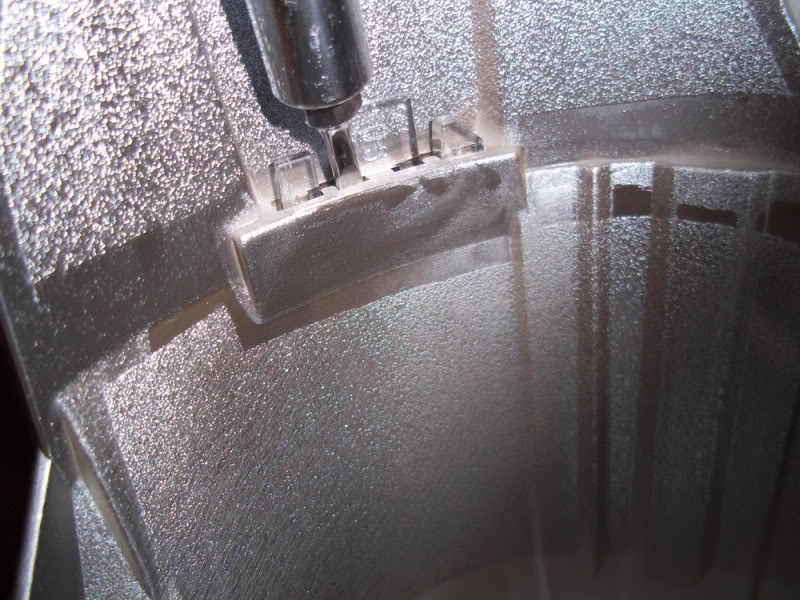
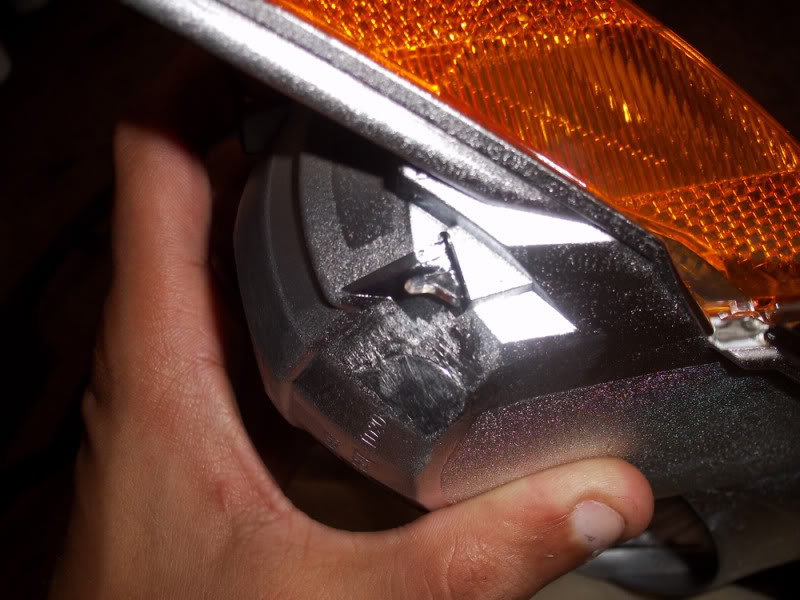
15-a: Here are some major tips: 1) Use gravity to help you. 2)Don't be afraid to stab (with some effort) the connector through. 3)Twist the wire to the screw connector (silver connector) can slip through. 4)Use the thin, long tool to maneuver the wire mesh and connector through the headlamp
15-b: Below Picture will show where the connector will be coming from.
15-c: Move the silver wire mesh over to the Red circle.
15-d: With a small, really thin tool, move the wire mesh inside the plastic housing also to the red circle.
15-e: At this point all you need to do is feed the wire mesh along that opening. Not too difficult right?

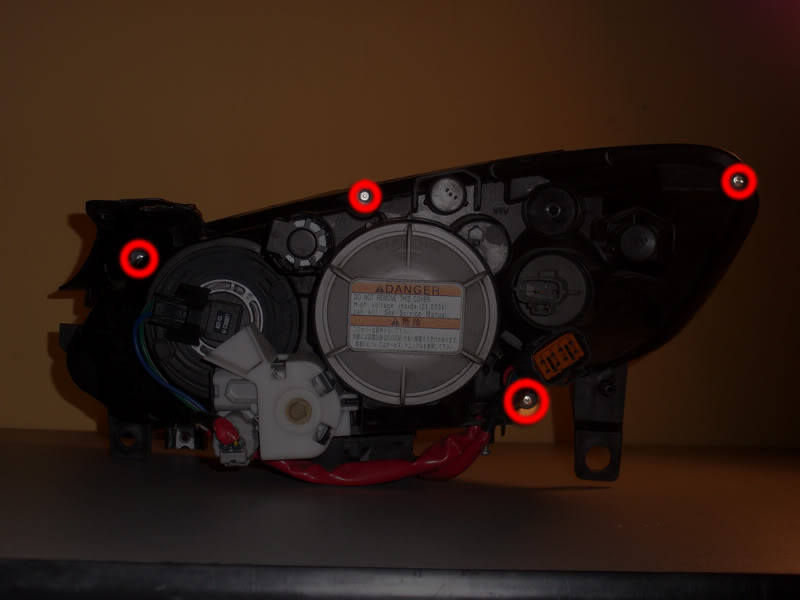
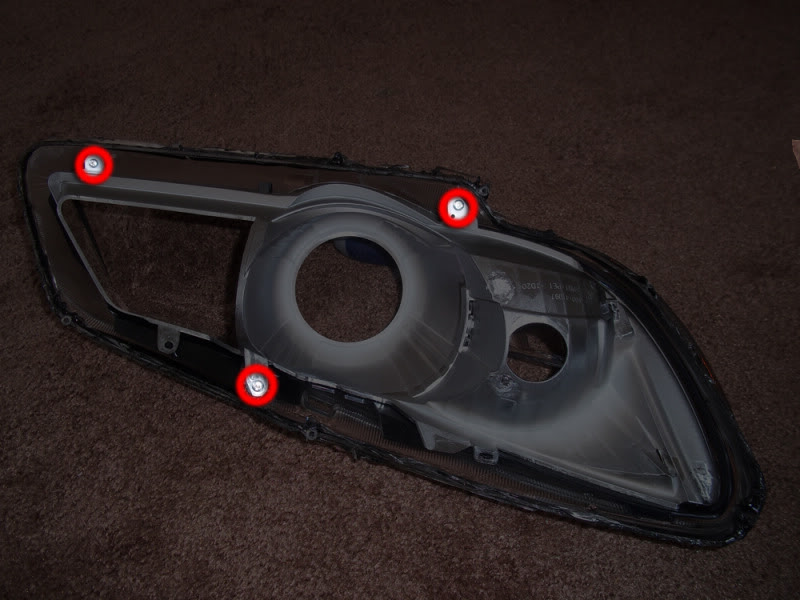
16. Remove the screws from the headlamp assembly.
----Comments:
My RX-8 is my daily driver and is also exposed to the elements. I used zip ties and a plastic bag to make sure the connectors won't get wet. The wiring lasted through a major rain storm this past weekend without any headlamps on the car.
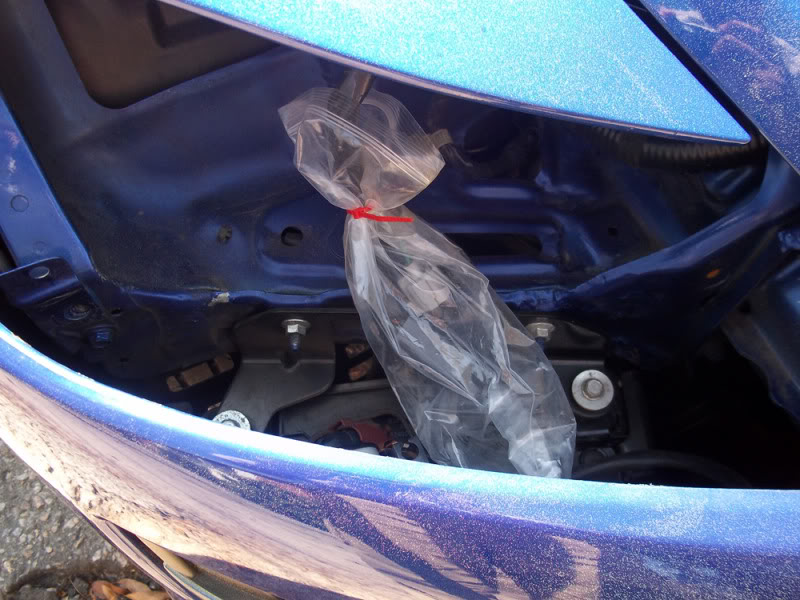
If you must drive with your car here's a few tips: Don't drive during inclement weather, or during night time. Make sure to really be on the defensive on the roads as well.
Also, be prepared to be stopped during your drive... I was.
///////////////////////////////////////////////////
II.a: Baking
----Materials:
1x Oven. Using "Bake" NOT "Broil"
1x Temperature Sensor for Oven. [Walmart 19$. Has a digital sensor, with alarm- no batteries included]
1x Cookie Sheet.
[Note: I've heard of using wet cardboard instead. Somehow I don't think this is a great idea to put cardboard in the oven]
2x Oven Mittens
1x Butter Knife
----Comments:
Using an oven gives you major advantages over the other sources.
1: By using an oven, you can "Set it and Forget it." This means you will not have to wait around for 8,10,15,20 minutes for the headlamp assembly to get hot enough to melt or unsticky the sealant.
2: You get fine control over the heat. This is especially important as if you heat the headlamp too much, you'll melt the lense, or any of the chrome housing pieces inside the headlamp. If you have a doubt in your mind about the reliability of your oven, purchase a thermometer that'll show you (Digitally) how hot it is inside the oven. I strongly urge this purchase- Im talking from experience. Trust me. Long story short: I bought two broken headlamps to test opening... I melted the Lens because the oven never stopped at 220. It stopped around 500. Mind you, I never used the oven before either.
3: Faster
----Directions (Short Version):
1. Follow the "Headlight Preparation".
2. Remove all racks from the oven.
2-a: Set a rack on the lowest level of the oven
3. Place a Cookie Sheet in the oven.
4. Test the oven that it will stay at 200-300. Yes, Make sure the oven is reliable. Unless you want to melt your headlights.
5. Preheat the oven to the desired temperture. [220F]
6. Stick in the headlamp assembly for 8 minutes.
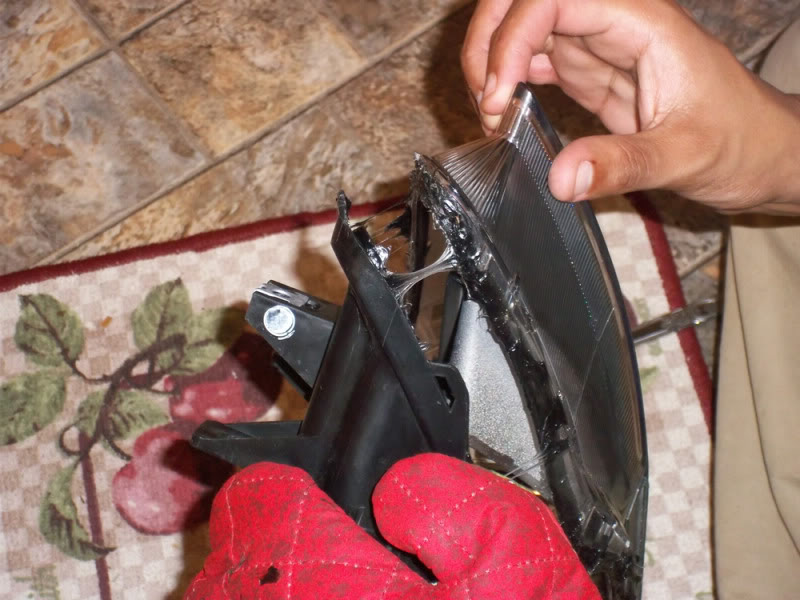
7. Insert the butter knife into one of the slits, and push down to seperate the lens from the rest of the headlamp. You'll see the glue coming apart in a "Gooey cheese" way.
8. Slowly go around the headlamp. If at anytime you can't get the glue to come up, stick it back in the oven for a re-heat. You may need to do this 3 times.
9. When you feel you can safely pull the lens from the rest of the headlamp, grab on size and pull it apart.
----Directions (Detailed Version):
1. Follow the "Headlight Preparation". Remove all screws, bulbs and wiring harness
2. Remove the racks in the oven so the headlight will be able to sit in the middle of the oven. As best as possible.
3. Place headlamp on cookie sheet. This is to make sure any of the glue does not melt and fall into the oven. [Note: I didn't use a cookie sheet and the sealant dripped through rack. My significant other didn't like that...)
4. Test the oven. Try to see how hot the oven will be.
5. Target Temperature is going to be around 220.
5-a. You can bake the headlight at higher temperatures. I successfully baked it around 270.
5-b. The higher temperatures will make it a lot harder to handle with bare hands. The lower temperature will give you more hands on, but will also make the sealant harden quicker.
5-c. Do NOT trust the oven. Make the small investment and find a digital thermometer be 100% sure.
6. Preheat the oven to 225. Make sure it reaches 225 before you put the headlamp inside the oven.
7. Stick the headlamp in. Top down. This will allow the headlamp to sit solid, and will also give the screw tabs a break.
8. Insert a butter knife into the top section. In the middle of the lamp you can see a small opening. In this picture it's above the HID bulb. Using this location, work to the left to the top corner. Also work from the right down to the right-tab.
8-a: The technique I used to quickly get through this is: Knife in, Pull Up. Act like you're prying the lens away from the rest of the unit.
9. Insert the headlamp back into the oven. Same temperature if you baked it for higher than 240. Increase the temperature to 260 if you did the first time around 220. Top-side down. 8 minutes.
10. Take the headlamp out with mittens. It'll be really hot. Use your hand with the mitten to turn and hold. Use the butter knife to work around the bottom of the headlamp.
10-a. Work towards the reflector corner first. You should be able to, almost pull it apart. Gently begin to pull the headlight apart. Do NOT force the lens apart without going through all of the seams.
10-b. While you pull it apart, Use your butter knife to grab the sealant that's stringing together. This will help to decrease the chance it'll fall onto the lense, chrome or any internal parts.
11. Continue to pry and separate the halves.
12. Carefully set aside both halves to cool down.
///////////////////////////////////////////////////
II.b: Heatgun
----Materials:
1Heatgun
1-a: Hairdryer
2: Butter Knife
3: Patience
----Comments:
Warning: Using a heatgun, or a hair dryer can be a risky odeal. Temperatures with low-costing heatguns have an extremely large range. As an exmaple: Wel-Bilt Heat Gun - 1600 Watt has two temperature settings: 572 and 932. Other heatguns have dial settings. Higher still, digital heatguns give precise control over the heat.
FYI: The lens of the headlights are made from polycarbonate plastic: (Wikipedia)
- Melting Point: 267�C (512�F).
- Heat Deflection : 128�C (262.4�F) @ 1.8 MPa (264 psi).
It should also be noted that heat guns need to be fairly close to the object to heat at that set temperature.
A hairdryer can be worse, settings wise. Most hair dryers do not advertise their heat settings. I would stay away from purchasing a hair dryer for this application. Atleast with a cheap heatgun you know the temperature. Hair dryers can range in watts and in my search of 20 hair dryers - ranging in price (upto $239) I have found no mention of actual heat temperatures. But, they do mention they have multiple heat settings. Vague? Yes, when im melting something that's worth $1000, I like to know what Im getting myself into. Stay away from these, if you can.
If you do choose to go with a heatgun, or hair dryer. Please keep in mind your model of heatgun or hair dryer. If your heat gun only has two settings - 572 and 932 - use the lower setting. I probably didn't need to mention that. For hair dryers, use a temperature guage - like ones for an oven. It's a cheap investment that may save a lot in the long run. To decrease the surface temp., you may need to prop the tool on a box and test the distance with both items propped up. You'll definitely need to get the digital oven sensor from walmart (19$) and youll need to test how far away you can keep the tool.
- Not always guanteed heat.
- You get what you pay for. Low models usually have not as many heat settings.
- You will be bored. It's going to take a long time.
- It takes a LONG time to do this method.
+ Precise control on the location of heat. There are benefits for using a heatgun, over an oven. As you do have more control over where the heat is applied, you can apply the heat directly to the seam of the headlamp. This means you don't need to find a way to remove all of the parts or worry about something that you just couldn't remove. I'm looking at you HID balast light-wire.
+ Safer... depending on what heating tool you're using.
----Directions:
Separating the headlamp assembly into quadrants, work with the outside corner (Reflector-side) first, bottom. I heated my headlamp higher than 220. I went to a full 350 (I got anxious really quickly)
///////////////////////////////////////////////////
II.c: Boiling
----Materials:
1x Pasta Strainer that sits in a counter sink.
1x Butter Knife
1x Huge Pot.
1x Enough water to cover the lens.
1x Make sure to have ample room as the boiling level will need to be at the final, "Raging torrent/Rolling Boil" stage to melt the sealant.
----Comments:
This is not recommended for those with HID bulbs. Water may affect the lens of the projector and creating a "frost" effect, or deflect the light in ways due to left over water residue.
This is a very intriguing method for me. I have not done it and will not. It doesn't seem like it would be as controllable. I'm also not partial to getting really hot water all over my pants or countertop.
///////////////////////////////////////////////////
II.c: Microwave
Do not attempt this method.
I included this section for those people that are just "wondering" if they could. No. Do Not.
Are you scared about doing this or atleast a little afraid of doing something wrong? You should be. Atleast for my set of headlamps you can not find easily on Ebay (In one piece) and they cost a whopping $1093.79 a HID headlamp assembly from my dealer. That's one major screw up. This tutorial will cover the specific disassembly of a Series 2 (2009+) Mazda RX-8, with HID headlights. You may need to adjust settings - and I will do my best to point out these settings that you may need to adjust. For these settings, please do research and make sure you track down what has worked for other people. What I describe here may not work for your headlights. Heck, you'll need a dremel to open up some headlights- as an example.
Warning: While I have done a lot of research and I have every confidence that you will be able to seal your headlamp after taking it apart: I am not responsible for any injuries or damages to you, the headlamp assembly, any lights, any vehicle, any appliances, anything at all in effect by reading this forum post. Follow the thread at your own risk!
Video (skubee): How To: BAKE, OPEN & PAINT Headlights! by DECALFX.COM
Spare Parts(Benz05ZZ): Head Lamp Assembly, Tail Light Assembly
Index:
Post #1:
A. Basic Tools
I. Headlamp Preparation
II: Heating Option:
II.a: Baking
II.b: Heatgun
II.c: Boiling
II.d: Microwave
Post #2
III: Headlamp Disassembled
IV: Headlamp Sealing
X: Faqs
XI: Other Tips
Post #3
A: Forewords
I: Tail light preparation.
II: Tail light Opening.
III: Tail light Closing.
///////////////////////////////////////////////////
A. Basic Tools
1.(Ph2/No.2/6) Philips Drive head screw driver.
Note: Note the exact size. You definitely don't want to toss out a 'spare' screw with these headlights. Im using "GreenLee", from Lowes
2. A long, thin something tool. It needs to have a smaller diameter than the screw driver I described above. I know, that's completely opposite. But this tool will make your life a lot easier.. That is if you don't decide to give into using scissors. Yikes. Trust me on this one, I'll explain in the Headlight Preparation section of this tutorial.
3. Lunch Baggies. I used 6 for my second time around. 1) HID bulb 2) 1x Turning Signal / Parking Light 3) High Beam Bulb 4) Balast/Balast to Bulb Wire/Balast screws [4] 5) All screws inside the lens [4] 6) HID Bulb Cover.
4. ???: The rest of the tools you need to figure out based on "How" you want to seperate the lens from the rest of the whole light assembly.
///////////////////////////////////////////////////
I. Headlamp Preparation
Following these steps, you'll be able to make sure that the headlamp assembly will be much easier, and enjoyable to work on. These steps will prepare you and the headlight for the cooking.
If you are Re-assembling your headlights, please follow separate directions below.
1. Take off the front bumper. [My Tutorial][Video Tutorial]
2. At the car, Unscrew the headlamp at these points.
3. Unclip the power to the TurnSignals and to the driving lights
4. If you have a vinyl cover on the headlights, take it off.
5. Clean your headlight Lens.
5-a. You may need to wet-sand the headlights to remove the layer of plastic if it's been oxidized.
5-b. Invisible Glass is recommended to clean the headlight.
6. Remove the High-Beam bulb
7. Remove the Parking/Turning Signal bulb.
8. Unclasp the wiring harness from all the connections.
9. Unscrew the HID Balast at the bottom of the Headlamp.
10. Moving the balast out of the way, there will be another smaller screw with several washers attached.
Note: Make sure to get the O ring with the balast.
11. Unclasp the wiring to the HID bulb. (Sticking a small flat head near the balast side will help) Place Balast in Bag 1.
12. Remove the HID Bulb Covering. It will take some strength to turn.
Note: Make sure to get the O ring with the HID Bulb Covering.
13. Remove the silver connector from the HID bulb. It has a lightning bulb. Don't worry about pulling the wire mesh through yet.
14. Remove the HID bulb by pressing both tabs up towards the middle. They'll spring out of lock and the bulb will pull straight out.
15. Remove the Balast to Bulb wiring. This is the hardest step in the whole tutorial, It took me three times before I could get it through the headlight in one piece. [Exp: The first time I did it I cut the wire in frustration. Something, by the way, I don't recommend.
Note: It's hard to get good pictures of the inside.
15-a: Here are some major tips: 1) Use gravity to help you. 2)Don't be afraid to stab (with some effort) the connector through. 3)Twist the wire to the screw connector (silver connector) can slip through. 4)Use the thin, long tool to maneuver the wire mesh and connector through the headlamp
15-b: Below Picture will show where the connector will be coming from.
15-c: Move the silver wire mesh over to the Red circle.
15-d: With a small, really thin tool, move the wire mesh inside the plastic housing also to the red circle.
15-e: At this point all you need to do is feed the wire mesh along that opening. Not too difficult right?
16. Remove the screws from the headlamp assembly.
----Comments:
My RX-8 is my daily driver and is also exposed to the elements. I used zip ties and a plastic bag to make sure the connectors won't get wet. The wiring lasted through a major rain storm this past weekend without any headlamps on the car.
If you must drive with your car here's a few tips: Don't drive during inclement weather, or during night time. Make sure to really be on the defensive on the roads as well.
Also, be prepared to be stopped during your drive... I was.
///////////////////////////////////////////////////
II.a: Baking
----Materials:
1x Oven. Using "Bake" NOT "Broil"
1x Temperature Sensor for Oven. [Walmart 19$. Has a digital sensor, with alarm- no batteries included]
1x Cookie Sheet.
[Note: I've heard of using wet cardboard instead. Somehow I don't think this is a great idea to put cardboard in the oven]
2x Oven Mittens
1x Butter Knife
----Comments:
Using an oven gives you major advantages over the other sources.
1: By using an oven, you can "Set it and Forget it." This means you will not have to wait around for 8,10,15,20 minutes for the headlamp assembly to get hot enough to melt or unsticky the sealant.
2: You get fine control over the heat. This is especially important as if you heat the headlamp too much, you'll melt the lense, or any of the chrome housing pieces inside the headlamp. If you have a doubt in your mind about the reliability of your oven, purchase a thermometer that'll show you (Digitally) how hot it is inside the oven. I strongly urge this purchase- Im talking from experience. Trust me. Long story short: I bought two broken headlamps to test opening... I melted the Lens because the oven never stopped at 220. It stopped around 500. Mind you, I never used the oven before either.
3: Faster
----Directions (Short Version):
1. Follow the "Headlight Preparation".
2. Remove all racks from the oven.
2-a: Set a rack on the lowest level of the oven
3. Place a Cookie Sheet in the oven.
4. Test the oven that it will stay at 200-300. Yes, Make sure the oven is reliable. Unless you want to melt your headlights.
5. Preheat the oven to the desired temperture. [220F]
6. Stick in the headlamp assembly for 8 minutes.
7. Insert the butter knife into one of the slits, and push down to seperate the lens from the rest of the headlamp. You'll see the glue coming apart in a "Gooey cheese" way.
8. Slowly go around the headlamp. If at anytime you can't get the glue to come up, stick it back in the oven for a re-heat. You may need to do this 3 times.
9. When you feel you can safely pull the lens from the rest of the headlamp, grab on size and pull it apart.
----Directions (Detailed Version):
1. Follow the "Headlight Preparation". Remove all screws, bulbs and wiring harness
2. Remove the racks in the oven so the headlight will be able to sit in the middle of the oven. As best as possible.
3. Place headlamp on cookie sheet. This is to make sure any of the glue does not melt and fall into the oven. [Note: I didn't use a cookie sheet and the sealant dripped through rack. My significant other didn't like that...)
4. Test the oven. Try to see how hot the oven will be.
5. Target Temperature is going to be around 220.
5-a. You can bake the headlight at higher temperatures. I successfully baked it around 270.
5-b. The higher temperatures will make it a lot harder to handle with bare hands. The lower temperature will give you more hands on, but will also make the sealant harden quicker.
5-c. Do NOT trust the oven. Make the small investment and find a digital thermometer be 100% sure.
6. Preheat the oven to 225. Make sure it reaches 225 before you put the headlamp inside the oven.
7. Stick the headlamp in. Top down. This will allow the headlamp to sit solid, and will also give the screw tabs a break.
8. Insert a butter knife into the top section. In the middle of the lamp you can see a small opening. In this picture it's above the HID bulb. Using this location, work to the left to the top corner. Also work from the right down to the right-tab.
8-a: The technique I used to quickly get through this is: Knife in, Pull Up. Act like you're prying the lens away from the rest of the unit.
9. Insert the headlamp back into the oven. Same temperature if you baked it for higher than 240. Increase the temperature to 260 if you did the first time around 220. Top-side down. 8 minutes.
10. Take the headlamp out with mittens. It'll be really hot. Use your hand with the mitten to turn and hold. Use the butter knife to work around the bottom of the headlamp.
10-a. Work towards the reflector corner first. You should be able to, almost pull it apart. Gently begin to pull the headlight apart. Do NOT force the lens apart without going through all of the seams.
10-b. While you pull it apart, Use your butter knife to grab the sealant that's stringing together. This will help to decrease the chance it'll fall onto the lense, chrome or any internal parts.
11. Continue to pry and separate the halves.
12. Carefully set aside both halves to cool down.
///////////////////////////////////////////////////
II.b: Heatgun
----Materials:
1Heatgun
1-a: Hairdryer
2: Butter Knife
3: Patience
----Comments:
Warning: Using a heatgun, or a hair dryer can be a risky odeal. Temperatures with low-costing heatguns have an extremely large range. As an exmaple: Wel-Bilt Heat Gun - 1600 Watt has two temperature settings: 572 and 932. Other heatguns have dial settings. Higher still, digital heatguns give precise control over the heat.
FYI: The lens of the headlights are made from polycarbonate plastic: (Wikipedia)
- Melting Point: 267�C (512�F).
- Heat Deflection : 128�C (262.4�F) @ 1.8 MPa (264 psi).
It should also be noted that heat guns need to be fairly close to the object to heat at that set temperature.
A hairdryer can be worse, settings wise. Most hair dryers do not advertise their heat settings. I would stay away from purchasing a hair dryer for this application. Atleast with a cheap heatgun you know the temperature. Hair dryers can range in watts and in my search of 20 hair dryers - ranging in price (upto $239) I have found no mention of actual heat temperatures. But, they do mention they have multiple heat settings. Vague? Yes, when im melting something that's worth $1000, I like to know what Im getting myself into. Stay away from these, if you can.
If you do choose to go with a heatgun, or hair dryer. Please keep in mind your model of heatgun or hair dryer. If your heat gun only has two settings - 572 and 932 - use the lower setting. I probably didn't need to mention that. For hair dryers, use a temperature guage - like ones for an oven. It's a cheap investment that may save a lot in the long run. To decrease the surface temp., you may need to prop the tool on a box and test the distance with both items propped up. You'll definitely need to get the digital oven sensor from walmart (19$) and youll need to test how far away you can keep the tool.
- Not always guanteed heat.
- You get what you pay for. Low models usually have not as many heat settings.
- You will be bored. It's going to take a long time.
- It takes a LONG time to do this method.
+ Precise control on the location of heat. There are benefits for using a heatgun, over an oven. As you do have more control over where the heat is applied, you can apply the heat directly to the seam of the headlamp. This means you don't need to find a way to remove all of the parts or worry about something that you just couldn't remove. I'm looking at you HID balast light-wire.
+ Safer... depending on what heating tool you're using.
----Directions:
Separating the headlamp assembly into quadrants, work with the outside corner (Reflector-side) first, bottom. I heated my headlamp higher than 220. I went to a full 350 (I got anxious really quickly)
///////////////////////////////////////////////////
II.c: Boiling
----Materials:
1x Pasta Strainer that sits in a counter sink.
1x Butter Knife
1x Huge Pot.
1x Enough water to cover the lens.
1x Make sure to have ample room as the boiling level will need to be at the final, "Raging torrent/Rolling Boil" stage to melt the sealant.
----Comments:
This is not recommended for those with HID bulbs. Water may affect the lens of the projector and creating a "frost" effect, or deflect the light in ways due to left over water residue.
This is a very intriguing method for me. I have not done it and will not. It doesn't seem like it would be as controllable. I'm also not partial to getting really hot water all over my pants or countertop.
///////////////////////////////////////////////////
II.c: Microwave
Do not attempt this method.
I included this section for those people that are just "wondering" if they could. No. Do Not.
Last edited by RogueTadhg; Aug 15, 2011 at 03:41 PM. Reason: Space. More stuff!
Thread Starter
Living is best Modified.
Joined: Jul 2007
Posts: 479
Likes: 1
From: South Carolina
///////////////////////////////////////////////////
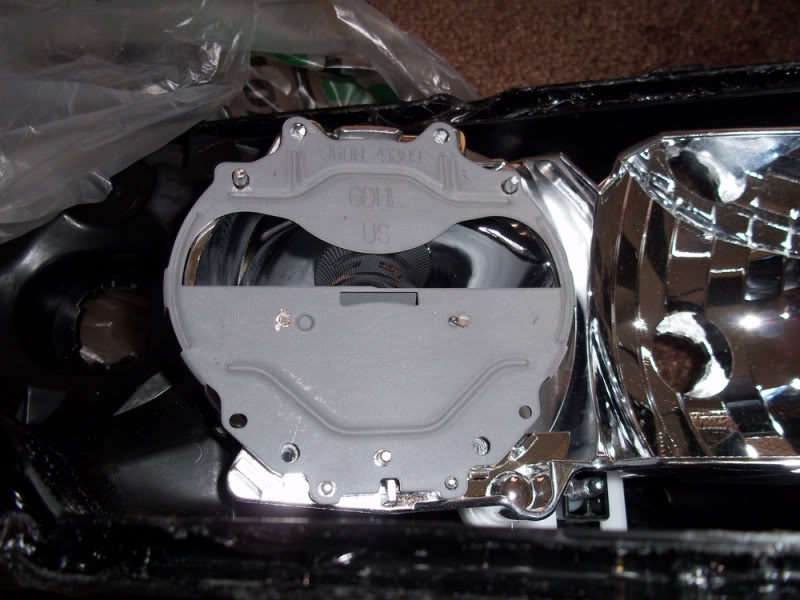
III: Headlamp Disassembled
From exterior towards the inside:
1. Lens
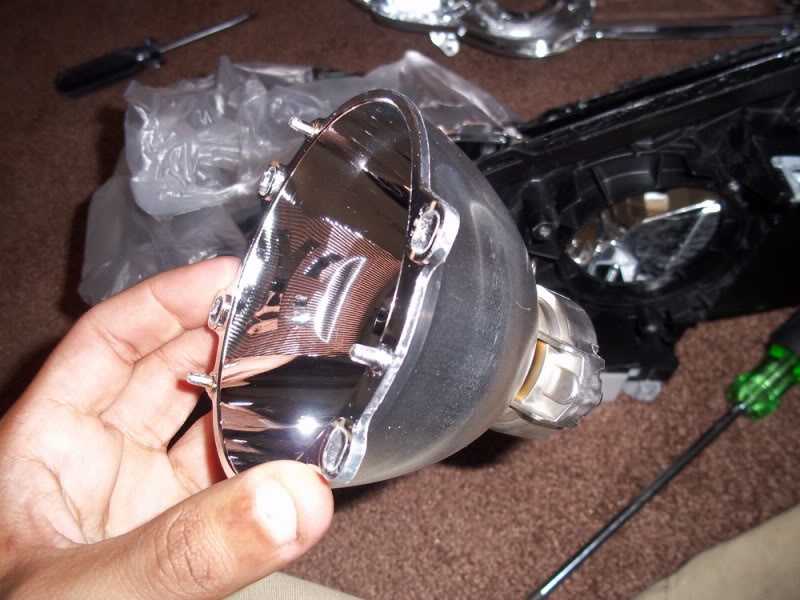
2. Matte Black Shield / Chrome Shield / Reflector
3. HID Projector / High Beam Reflector *
4. Back of headlamp *
To keep alignment: Do not attempt to try to move #3 from #4.
1. The lens separates from the chrome shield with three screws
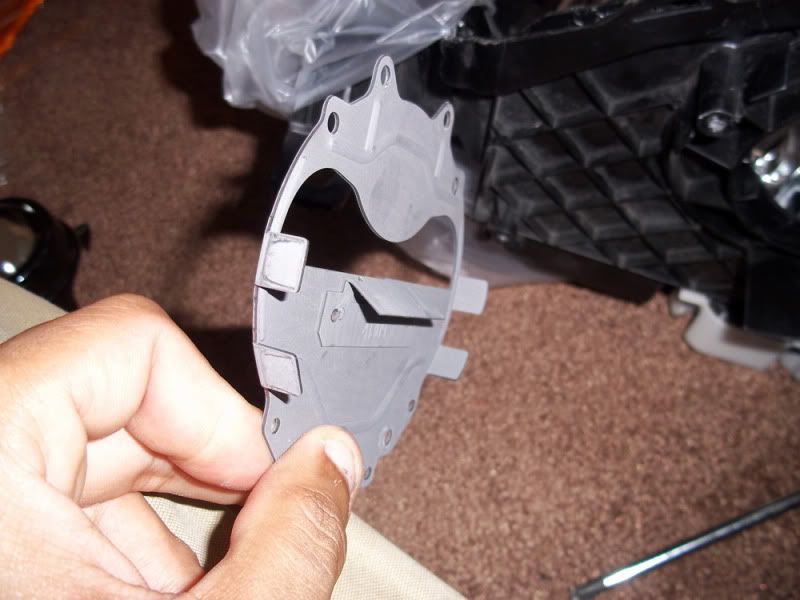
2. The Matte Black Shield is attached with a small tab on the top.
3. The reflector separates with 3 sections on the chrome shielding. The sides are locked into place with tabs, so it will need to be pressed down.
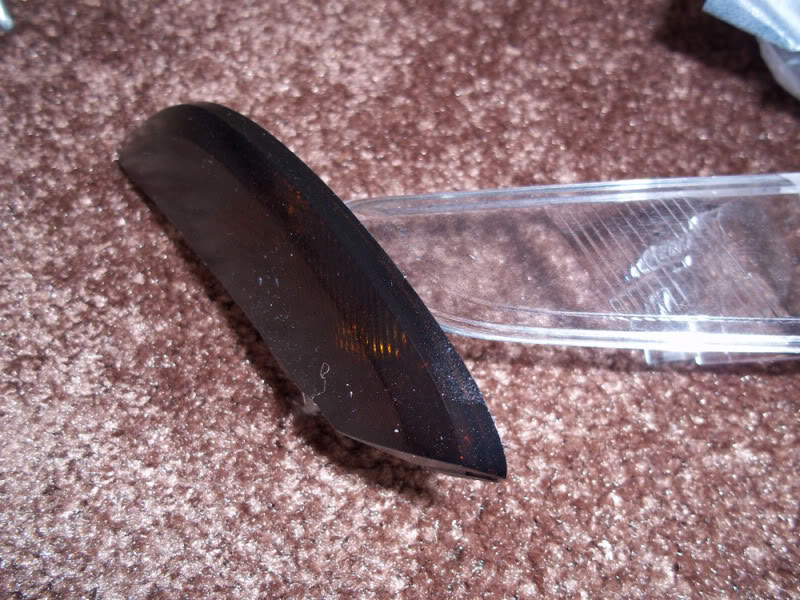
3-a. The orange reflector itself is connected by glue. I recommend keeping it for safty and trying to keep "legal".
3-b. I never said you couldn't tint it though
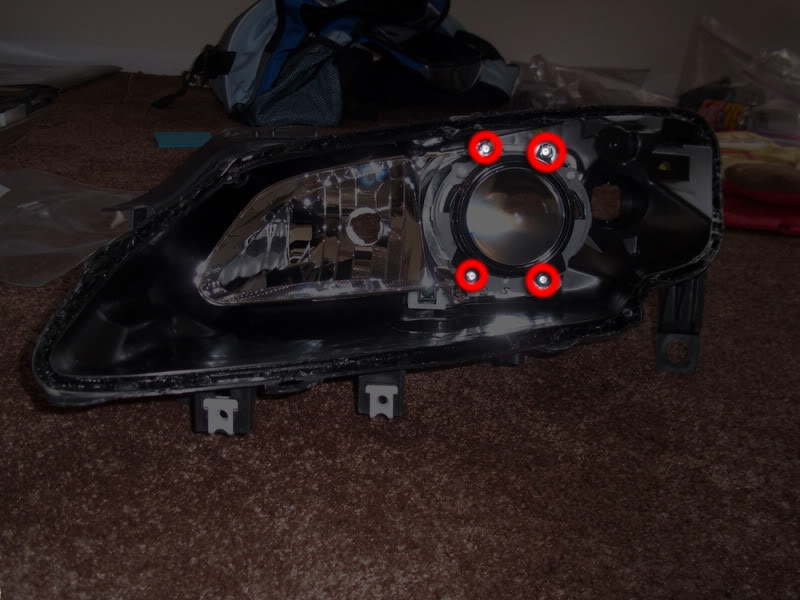
4. #1) Hid Projector. #2) Projector screws
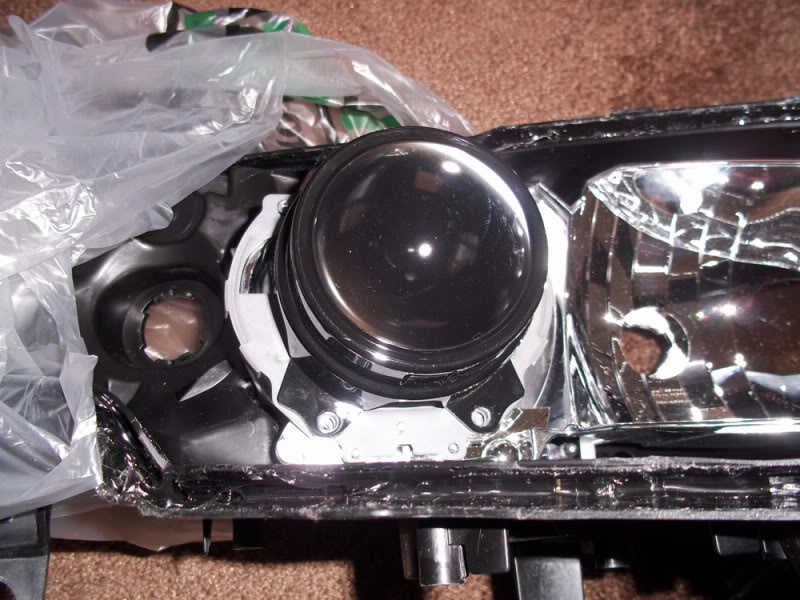
5. #1) Hid Shield. #2) Hid Shield squirel finder [gives a little bit of glare above the cutoff to shine on reflective signs and items]. #3) Reflective Chrome Backing. [Not Painted]
----Comments:
1. Paint stripper will not damage the chrome pieces. Paint Stripper will damage plastic pieces.
2. Store the items (Especially the projector Lense) in a plastic bags. These are sensitive materials and will impare your ability to drive at night when you need it the most
3. If you're painting: Use gloves, as you may need to turn, hold or twist the parts to paint it.
///////////////////////////////////////////////////
IV: Headlamp Sealing
There are a lot of ways to seal up your headlight. Some are very strongly recommended. Some other methods do work, but with catches. Going the cheap route may be much more expensive in the long run.
1: Butyl Tape (3M Windo-Weld Ribbon Sealant / Glass Setting Butyl Tape)
[Known 3m Part #s: 08610, 08611, 08612, 08620, 08621, 08622, 08625]
[Known Napa Part #s: 4196, 4195, 4194]
TheRetrofitSource - OCi Butyl Rubber Glue
1-A: Nissan Sealer (Nissan Butyl Rubber Sealant) [This is the most OEM-like sealant available. It is used by many car manufacturers.]
Other known-used Sealants: These Sealants have been used, but using them may cause problems down the road. Some may exceed the melting point for the lens, for example.
2: RTV Ultra Black Silicon Sealant [Possibly very Difficult to re-open, Withstands temperatures to 500F, the plastic become elastic well before 500F]
2-A: Normal Silicon Sealant
2-B: Silicon II sealer
2-C: Stock OEM Sealant (Reusing the sealant, not adding any) [May not seal correctly]
Note: You should have plenty of sealant left over for this method.
2-D: Polyouerethane Glue by WURTH [Difficult to re-open]
2-E: Hot Glue [Cold Climates may (or may not) cause cracking in the seal.]
----Comments:
Just like the ways to open the headlight, you can choose the heatgun (much slower) or the oven. I did both ways, and the oven I prefer due to speed and ease of getting the sealant to the headlamp.
----Materials:
I used Butyl tape. It does not take a lot of butyl tape to seal a headlamp. Infact all it takes is a very thin, pea-sized. Roll in in your fingers to flatten it. Press it on the seam of the headlamp. It's longer but I've found it's a lot less messy and more controllable this way instead of going through the pain of getting the exess butyl off.
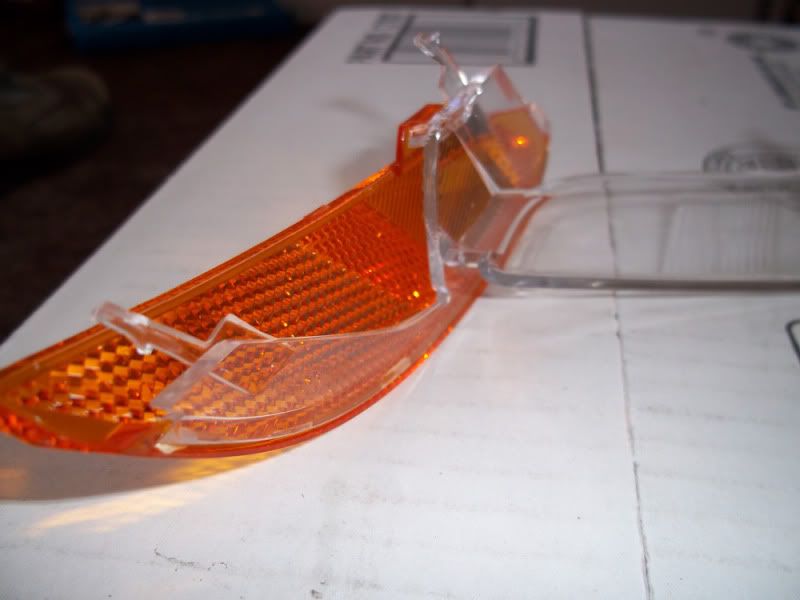
Next Picture: The right portion is the amount of butyl tape straight from the roll. It's huge, and its way too much. Left Side: After I pulled, peels and took a lot of the fat off. A little bit to cover the seam is needed.
Apply the strip into the channel on your headlight housing, press on the front lens, heat (265F for 7 minutes) and press the two halves back together. After cooling, slice off the excess with a razor blade for a clean, perfect seal." -The Retrofit Source
///////////////////////////////////////////////////
X: Faqs
Q: Water Leaks into the headlight
A: Buy either Silicon, or the recommended Butyl Tape. Re-bake the headlight, this will help to evaporate all the water. Make sure to retrace around the headlight again. Even though it does not seem like it, theres a hole somewhere in sealant. Rebaking the headlight will help to re-liquidfy the sealant, allowing the sealant to flow.
Q: I have Butyl Sealant on my headlight.
A: Use Mineral Spirit. Duplicolor Paint Prep for wax and grease. Works best when the sealant is not hard.
Q: I have sealant in my headlight. How do I get rid of the sealant?
A: Use Goo-Gone. Rinse with soapy water.
Q: Headlamp fogs up.
A: Drill 2 small holes in the headlamp to vent the air. Per variety of forum sources: Stock headlamps do not come with vents like most japanese cars these days. While this is the case for most headlamps- The headlamps in our cars (RX8) do NOT have any vents to help to equalize the air temperature.
Q: What do I do now I have the headlamp separated?
A: Do whatever you can image. Rearrange the lights, add color, more lights, change things, melt things... It's all in your hands what you do with the headlamp. Be sure to post your creation here!
///////////////////////////////////////////////////
XI: Other Tips
Painting Tip #1: This is the best way I found to make the bags to paint. Note I took off the projector lens just in case. The first time I painted I ended up with the bag moving, and sticking to the rim and essentially blocking the paint on corners.
Painting Tip #2: Make sure you take a little more time than you think. Be OCD. Use some more tape, more plastic bags,... Make sure it's exactly as you want it, and it's staying like that. You don't want overspray... I had a little bit on the left reflector so now I have a not-clear reflector and scatters the parking light:

Painting Tip #3: The high beams will be useless once you to paint the chrome reflector attached to the projector black. You'll need to either to a projector retrofit, or unpaint the chrome section beside and attached the HID projector. Note: I did try different types of paints (Metalcast Shadow, mostly) but I was unhappy with the amount of "black" so I painted it with the paint.
Painting Tip #4: Just in case it was missed: You can use Paint stripper to strip the paint off the chrome. That's safe. Do not use Paint Stripper on plastic parts - like the reflector (orange) or the reflector arm (clear). Above you can see the white light being scatter because of the paint stripper damage to the clear arm.
III: Headlamp Disassembled
From exterior towards the inside:
1. Lens
2. Matte Black Shield / Chrome Shield / Reflector
3. HID Projector / High Beam Reflector *
4. Back of headlamp *
To keep alignment: Do not attempt to try to move #3 from #4.
1. The lens separates from the chrome shield with three screws
2. The Matte Black Shield is attached with a small tab on the top.
3. The reflector separates with 3 sections on the chrome shielding. The sides are locked into place with tabs, so it will need to be pressed down.
3-a. The orange reflector itself is connected by glue. I recommend keeping it for safty and trying to keep "legal".
3-b. I never said you couldn't tint it though
4. #1) Hid Projector. #2) Projector screws
5. #1) Hid Shield. #2) Hid Shield squirel finder [gives a little bit of glare above the cutoff to shine on reflective signs and items]. #3) Reflective Chrome Backing. [Not Painted]
----Comments:
1. Paint stripper will not damage the chrome pieces. Paint Stripper will damage plastic pieces.
2. Store the items (Especially the projector Lense) in a plastic bags. These are sensitive materials and will impare your ability to drive at night when you need it the most
3. If you're painting: Use gloves, as you may need to turn, hold or twist the parts to paint it.
///////////////////////////////////////////////////
IV: Headlamp Sealing
There are a lot of ways to seal up your headlight. Some are very strongly recommended. Some other methods do work, but with catches. Going the cheap route may be much more expensive in the long run.
1: Butyl Tape (3M Windo-Weld Ribbon Sealant / Glass Setting Butyl Tape)
[Known 3m Part #s: 08610, 08611, 08612, 08620, 08621, 08622, 08625]
[Known Napa Part #s: 4196, 4195, 4194]
TheRetrofitSource - OCi Butyl Rubber Glue
1-A: Nissan Sealer (Nissan Butyl Rubber Sealant) [This is the most OEM-like sealant available. It is used by many car manufacturers.]
Other known-used Sealants: These Sealants have been used, but using them may cause problems down the road. Some may exceed the melting point for the lens, for example.
2: RTV Ultra Black Silicon Sealant [Possibly very Difficult to re-open, Withstands temperatures to 500F, the plastic become elastic well before 500F]
2-A: Normal Silicon Sealant
2-B: Silicon II sealer
2-C: Stock OEM Sealant (Reusing the sealant, not adding any) [May not seal correctly]
Note: You should have plenty of sealant left over for this method.
2-D: Polyouerethane Glue by WURTH [Difficult to re-open]
2-E: Hot Glue [Cold Climates may (or may not) cause cracking in the seal.]
----Comments:
Just like the ways to open the headlight, you can choose the heatgun (much slower) or the oven. I did both ways, and the oven I prefer due to speed and ease of getting the sealant to the headlamp.
----Materials:
I used Butyl tape. It does not take a lot of butyl tape to seal a headlamp. Infact all it takes is a very thin, pea-sized. Roll in in your fingers to flatten it. Press it on the seam of the headlamp. It's longer but I've found it's a lot less messy and more controllable this way instead of going through the pain of getting the exess butyl off.
Next Picture: The right portion is the amount of butyl tape straight from the roll. It's huge, and its way too much. Left Side: After I pulled, peels and took a lot of the fat off. A little bit to cover the seam is needed.
Apply the strip into the channel on your headlight housing, press on the front lens, heat (265F for 7 minutes) and press the two halves back together. After cooling, slice off the excess with a razor blade for a clean, perfect seal." -The Retrofit Source
///////////////////////////////////////////////////
X: Faqs
Q: Water Leaks into the headlight
A: Buy either Silicon, or the recommended Butyl Tape. Re-bake the headlight, this will help to evaporate all the water. Make sure to retrace around the headlight again. Even though it does not seem like it, theres a hole somewhere in sealant. Rebaking the headlight will help to re-liquidfy the sealant, allowing the sealant to flow.
Q: I have Butyl Sealant on my headlight.
A: Use Mineral Spirit. Duplicolor Paint Prep for wax and grease. Works best when the sealant is not hard.
Q: I have sealant in my headlight. How do I get rid of the sealant?
A: Use Goo-Gone. Rinse with soapy water.
Q: Headlamp fogs up.
A: Drill 2 small holes in the headlamp to vent the air. Per variety of forum sources: Stock headlamps do not come with vents like most japanese cars these days. While this is the case for most headlamps- The headlamps in our cars (RX8) do NOT have any vents to help to equalize the air temperature.
Q: What do I do now I have the headlamp separated?
A: Do whatever you can image. Rearrange the lights, add color, more lights, change things, melt things... It's all in your hands what you do with the headlamp. Be sure to post your creation here!
///////////////////////////////////////////////////
XI: Other Tips
Painting Tip #1: This is the best way I found to make the bags to paint. Note I took off the projector lens just in case. The first time I painted I ended up with the bag moving, and sticking to the rim and essentially blocking the paint on corners.
Painting Tip #2: Make sure you take a little more time than you think. Be OCD. Use some more tape, more plastic bags,... Make sure it's exactly as you want it, and it's staying like that. You don't want overspray... I had a little bit on the left reflector so now I have a not-clear reflector and scatters the parking light:
Painting Tip #3: The high beams will be useless once you to paint the chrome reflector attached to the projector black. You'll need to either to a projector retrofit, or unpaint the chrome section beside and attached the HID projector. Note: I did try different types of paints (Metalcast Shadow, mostly) but I was unhappy with the amount of "black" so I painted it with the paint.
Painting Tip #4: Just in case it was missed: You can use Paint stripper to strip the paint off the chrome. That's safe. Do not use Paint Stripper on plastic parts - like the reflector (orange) or the reflector arm (clear). Above you can see the white light being scatter because of the paint stripper damage to the clear arm.
Last edited by RogueTadhg; Aug 15, 2011 at 03:34 PM. Reason: I ran out of room.
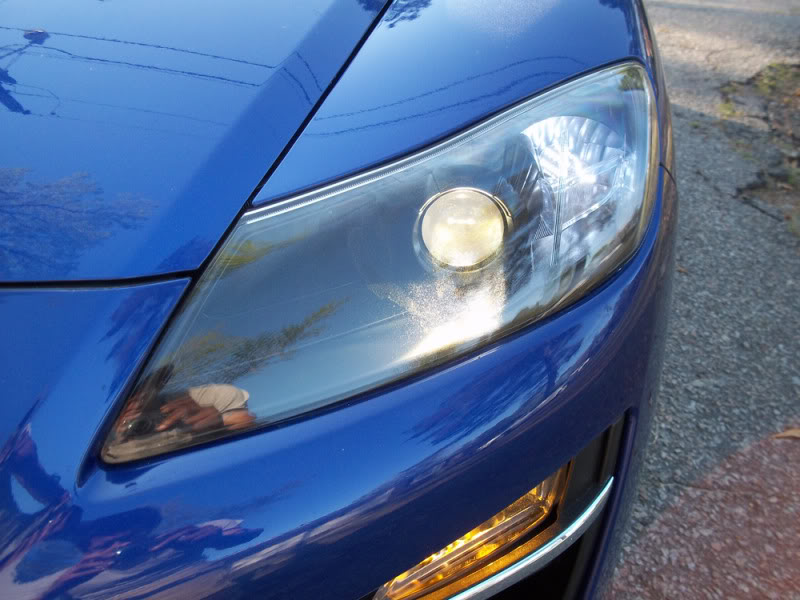
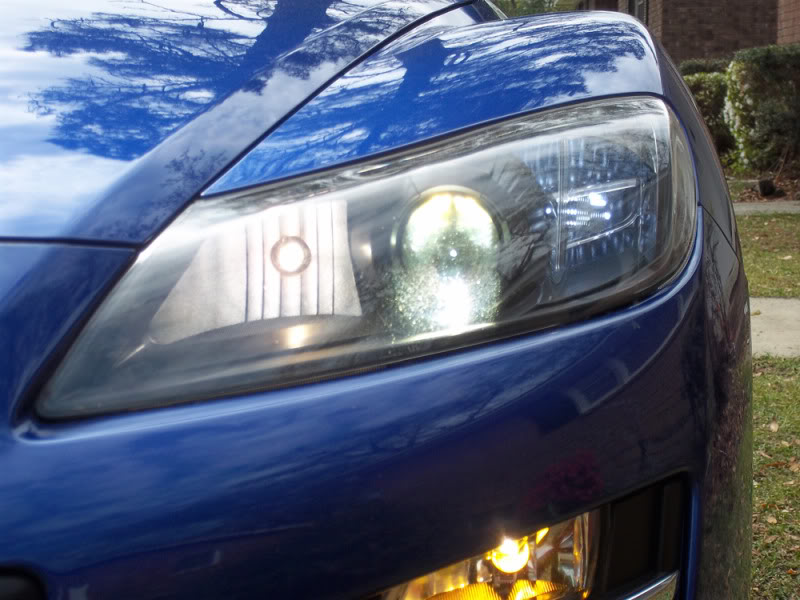
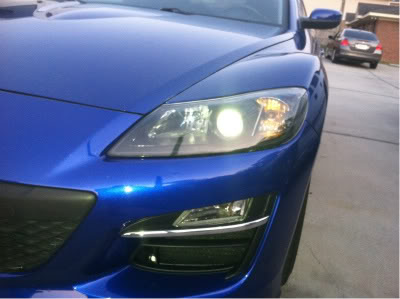
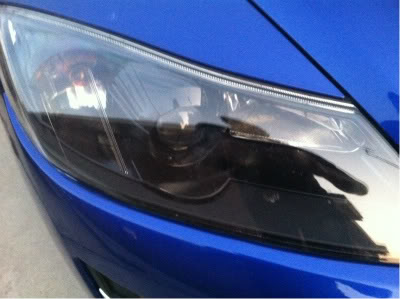
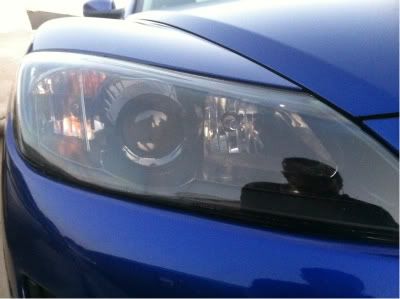
I will be the first to say that's pimp. Give us some close ups of the headlight without a flash and no glare. Very nice Sir.
Did you know how much those headlights cost before you did this? Just saying because it would be a major anxiety moment for me.
Clean work!
Did you know how much those headlights cost before you did this? Just saying because it would be a major anxiety moment for me.
Clean work!

Thread Starter
Living is best Modified.
Joined: Jul 2007
Posts: 479
Likes: 1
From: South Carolina
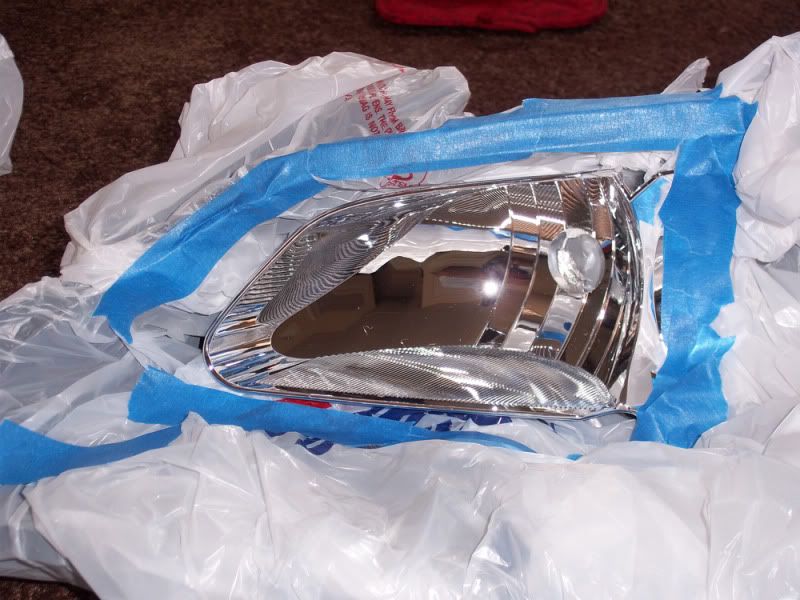
Yeah, I knew how much they cost. I choked and I definitely had second thought about it. But after seeing the chrome lights I decided I didn't care anymore.
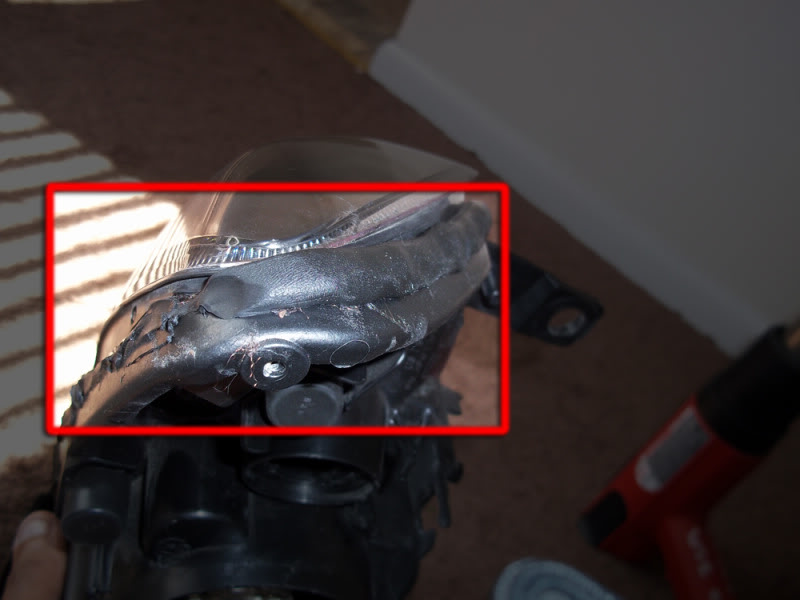
Too bad I can't say I successfully opened the tail lights
$719 for a new tail light. Too bad I've shattered the lens in three places now :P
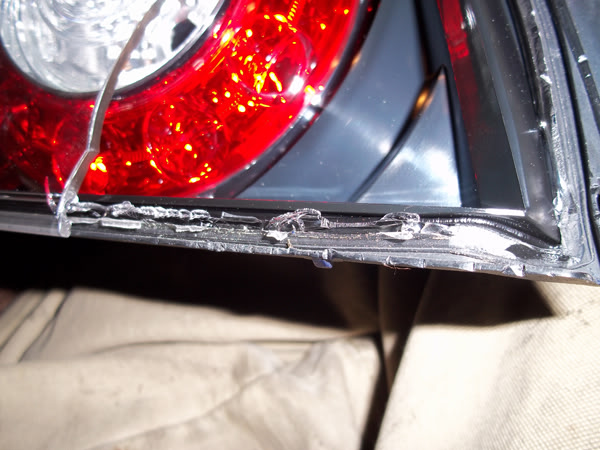
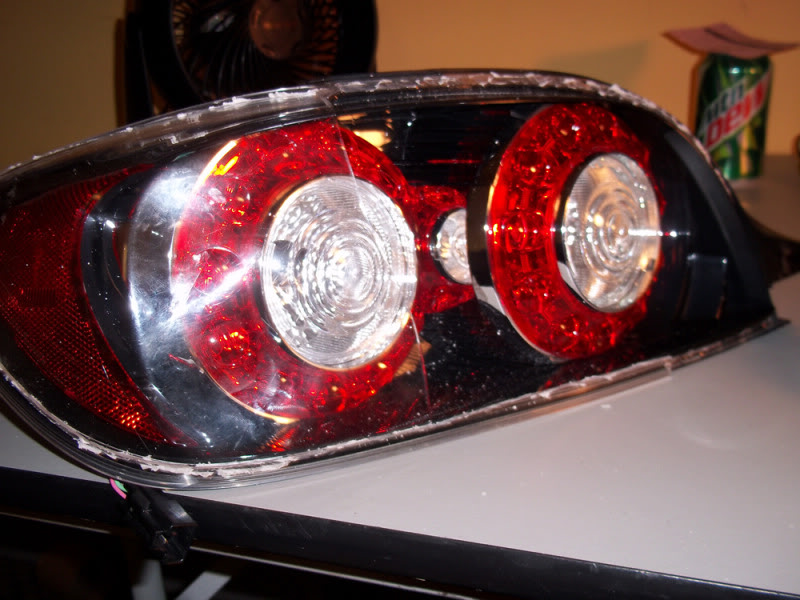
Before someone thinks im rolling in the cash to replace a tail light- I don't. but hell, its all in the name of RX8club and I enjoy opening/breaking things up.
Im still in the process of going through the technique to open up the tail light since I haven't been able to find any words about how. Yes, I'll break both tail lights if I need to.
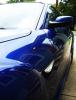
Heres some more of my headlights as you asked for them:
Too bad I can't say I successfully opened the tail lights
$719 for a new tail light. Too bad I've shattered the lens in three places now :P
Before someone thinks im rolling in the cash to replace a tail light- I don't. but hell, its all in the name of RX8club and I enjoy opening/breaking things up.
Im still in the process of going through the technique to open up the tail light since I haven't been able to find any words about how. Yes, I'll break both tail lights if I need to.
Heres some more of my headlights as you asked for them:
Last edited by RogueTadhg; Mar 23, 2011 at 12:14 PM.

Registered
Joined: Jan 2010
Posts: 45
Likes: 0
From: Philadelphia, PA
Yeah, I knew how much they cost. I choked and I definitely had second thought about it. But after seeing the chrome lights I decided I didn't care anymore.
Too bad I can't say I successfully opened the tail lights
$719 for a new tail light. Too bad I've shattered the lens in three places now :P
Before someone thinks im rolling in the cash to replace a tail light- I don't. but hell, its all in the name of RX8club and I enjoy opening/breaking things up.
Im still in the process of going through the technique to open up the tail light since I haven't been able to find any words about how. Yes, I'll break both tail lights if I need to.

Wow ... another incredible freaking tutorial from RogueTadhg, keep up the good work man. I want to take apart my headlights to retrofit a better lens and projector but I dont have the nutsickles to risk it
Thread Starter
Living is best Modified.
Joined: Jul 2007
Posts: 479
Likes: 1
From: South Carolina
Im running into bandwidth issues with picoodle.
mikeinquincy: Well, that could be why baking the tail lights had no effect on it :P The difficulty of opening the tail lights is compounded by the way the lens and the rest of the assembly is attached together, unlike some tail lights (Evo) the seam is mostly hidding away and protected by either lens or the assembly...
paimon.soror: Thanks After I sealed the headlights I wanted to take a measurement of the projector lens. since they come in different sizes. Getting the entire headlamp apart is going to take some tools I don't have yet. It's why it's generally noted to bag and paint the chrome.
mikeinquincy: Well, that could be why baking the tail lights had no effect on it :P The difficulty of opening the tail lights is compounded by the way the lens and the rest of the assembly is attached together, unlike some tail lights (Evo) the seam is mostly hidding away and protected by either lens or the assembly...
paimon.soror: Thanks
After I sealed the headlights I wanted to take a measurement of the projector lens. since they come in different sizes. Getting the entire headlamp apart is going to take some tools I don't have yet. It's why it's generally noted to bag and paint the chrome.
Basically they put the two pieces together and send a very high frequency vibration through them. This in turn causes the plastics to bind together with no extra adhesive or silicon. It basically makes an implementation of a once piece design that cannot be separated by conventional methods.

the other yellow meat
Joined: Apr 2011
Posts: 19
Likes: 0
great tutorial. however, in addition to the effort put in by words, pictures here's a video i found:
http://www.youtube.com/watch?v=ok1a9...eature=related
http://www.youtube.com/watch?v=ok1a9...eature=related
I drive an '09...
Joined: Feb 2009
Posts: 93
Likes: 0
From: Columbia, SC
New tail lamps for cheaper...
: ) Just so that you don't have to waste uncecessary monies. I was actually goign to attempt this, since I've got some condensation that Mazda won't fix...but headlights are tomorrow...I'm thinking about just blacking out the rears.
: ) Just so that you don't have to waste uncecessary monies. I was actually goign to attempt this, since I've got some condensation that Mazda won't fix...but headlights are tomorrow...I'm thinking about just blacking out the rears.
Last edited by Benz05ZZ; Jun 3, 2011 at 08:36 PM.
Thread Starter
Living is best Modified.
Joined: Jul 2007
Posts: 479
Likes: 1
From: South Carolina
Damn that's hot.
Wish I had found that site before. I'll be trying to do the rears again. I'm a Massacist and i'll be damned is sonic welded lights stand between me and happiness. Not to mention a complete tutorial.
@Benz: I'm going to add that link to the first post.
@Skubee: I'm going to add the link to the youtube to the top post.
Last edited by RogueTadhg; Aug 15, 2011 at 02:52 PM.
Thread Starter
Living is best Modified.
Joined: Jul 2007
Posts: 479
Likes: 1
From: South Carolina
Update: Yes this thread is not dead. I'm waiting on information and pictures from people that did get their lights cut - successfully. As much as I do enjoy tearing into tail lights...

I used this procedure to seperate a spare HID S1 healight and it worked perfectly. I did one thing different and that was to wrap the back part of the head light with aluminum foil; probably not needed, but there was one wire that I could not get out of the housing.
I havent' re-attached the lens yet, but I don't forsee any issues at all.
Thanks for the walk-through RogueTadhg
I havent' re-attached the lens yet, but I don't forsee any issues at all.
Thanks for the walk-through RogueTadhg
Thread Starter
Living is best Modified.
Joined: Jul 2007
Posts: 479
Likes: 1
From: South Carolina
wowo76: I'm glad it worked for you. I make my DIY's to help people!
As you can see, I've been able to open them and seal them. I'll be able to do it again too.
One thing about reopening the headlights, it's immensely easier to open. It's definitely a little messier.
_____________________
Update: I need to put this project on pause. Indefinitely, for how long, I don't know.
I went to the Emergency Room last sunday with a fever of a 104 degrees. Long story short- I just called the hospital to see about my bill.
The bill: $4041.73
Needless to say, I need to make sure that this is taken care of before anything else happens.
Im still trying to get my hands on a second set of tail lights. If I can find a great deal on one, i'll put time into this project again.
Last edited by RogueTadhg; Sep 13, 2011 at 07:19 PM.

Registered User
Joined: Feb 2011
Posts: 31
Likes: 0
From: Edmonton Alberta
I've been looking into ways to open the tail lights, I think the best way would be to use a hot knife and cut the lens out then glue it back in place when finished. I will try this method since my tails are in poor shape from pevious owner drilling holes in them.
Thread Starter
Living is best Modified.
Joined: Jul 2007
Posts: 479
Likes: 1
From: South Carolina
paimon: You can have people do it for you. The complete retrofit- I believe you can expect around 2k though - all the pieces, the labor and such.
Here's the forum: http://www.hidplanet.com/forums/foru...tting-Services
Here's the forum: http://www.hidplanet.com/forums/foru...tting-Services

Registered
Joined: Sep 2011
Posts: 156
Likes: 0
From: Toronto
Ok I know this thread is kinda old but I have a bit of a problem with my tail light... I was looking at it today after a wash and I noticed there was a dead spider inside my tail light assembly. Not only that, but his dead body is just lying up against the outer plastic in plain view and it seems like he was building quite a web inside there. I'm wondering 1) how the hell he got in there and 2) how the hell to open the assembly to clean it out.
From the previous posts if the tail light is sealed how did that bugger get in there? There must be an opening in mine somewhere... maybe due to a crack?
From the previous posts if the tail light is sealed how did that bugger get in there? There must be an opening in mine somewhere... maybe due to a crack?


Velocity Red R3
Joined: Jun 2012
Posts: 27
Likes: 0
From: Peoria, IL
Ok I know this thread is kinda old but I have a bit of a problem with my tail light... I was looking at it today after a wash and I noticed there was a dead spider inside my tail light assembly. Not only that, but his dead body is just lying up against the outer plastic in plain view and it seems like he was building quite a web inside there. I'm wondering 1) how the hell he got in there and 2) how the hell to open the assembly to clean it out.
From the previous posts if the tail light is sealed how did that bugger get in there? There must be an opening in mine somewhere... maybe due to a crack?
From the previous posts if the tail light is sealed how did that bugger get in there? There must be an opening in mine somewhere... maybe due to a crack?
I showed the Mazda dealer and they claim that this is not covered under warranty. They also claim that there is a plug at the bottom to allow them to drain condensation. I feel like they are giving me a bunch of BS as I did not see a drain/plug when inspecting prior to showing the dealer. Does anyone know if there is a drain or plug inside of the rear tail light? I am going to check again, if I don't see anything I am going to take the tail light back to them and make them show me.