DIY: Car Care Series - Exhaust Tips.
 03-12-2011, 06:15 PM
#1
Living is best Modified.
Thread Starter

Welcome ladies and gentlemen. It's spring time again, you know what that means... opening up the windows and letting that sunshine and fresh air come through. For my northern cousins, it'll be here soon enough 
One of the most neglected parts of a car, that's really really noticible and gets a lot of face time is the rear bumper. Today, I'm going to focus on the rear bumper for my R3- but just a little lower. The exhaust pipes of a car can range from flat, triangle shaped, multi exhaust, round, pointed downwards or straight back. But one thing is for sure - it gets dirty when the car is just sitting still.
There are a lot of methods to cleaning your exhaust tips. I'm going to try to round-up and give you the information that the wonderful interweb has to offer. I will also show you my technique for cleaning my R3's tail pipes and bringing it new life to a reliable friend.
---------------------------------
Materials: (Everything Labeled in dark red are optional materials. These are what other persons have suggested to work. They may or may not work.)
Materials Needed (Hardware)
1. #0000 Superfine or #000 Fine or Steel Wool. [Located in the paint-section of many hardware stores. (LOWES not SEARS, for example is where I found mine.)]
2. Flat-Head screw driver. (Optional)
3. 3x Microfiber towels.
3-A: Microfiber Applicators
4. Bucket of Car Wash solution. I used Meguiars Gold Class Car Wash. (I was washing my car.)
Materials Needed (Software)
1. Never Dull (Pic) - (Located at: Advanced Autoparts, OReily's or AutoZone)
1-A: Mr Clean Magic Eraser.
1-B: Chemical Guys Grime Reaper
1-C: Bug and Tar Remover
2. Meguiars Hot Rims Chrome Polish (#G16. Non-Spray)
2-A: Mothers Billet Metal Polish / Mag & Aluminum Polish / Power Metal
2-B: Meguiars Hot Rims All Metal Polish (For non-chrome tips. #G15. Non-Spray)
2-C: Bar Keeper's Friend
2-D: BORLA Exhaust Cleaner & Polish (Stainless Steel)
2-E: Optimum Metal Polish
2-F: Brasso (Credit: 9krpmrx8)
------------------------------
First Use-Technique: Unkept Exhaust tips for years? You'll need this technique.
A: If you know what grain your exhaust is, follow the grain with your wool. It's superfine, but it is still is made to cut into the material to clean.
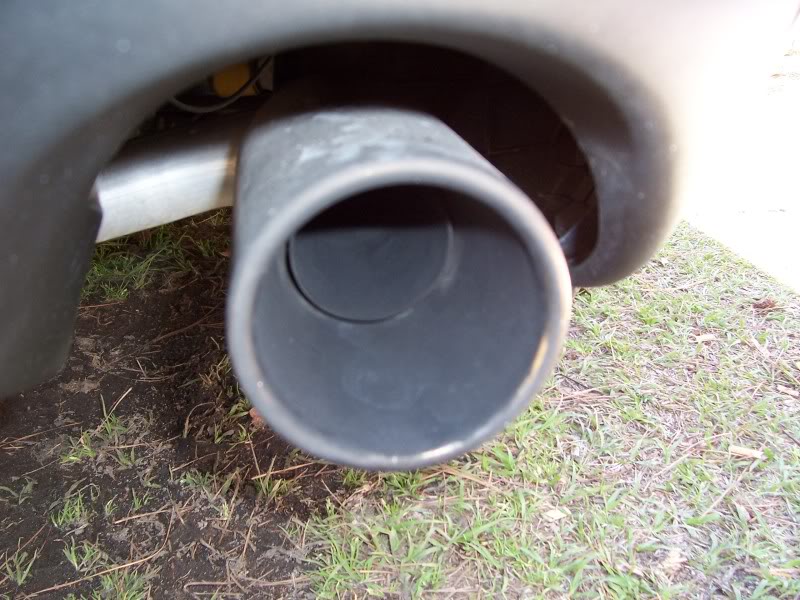
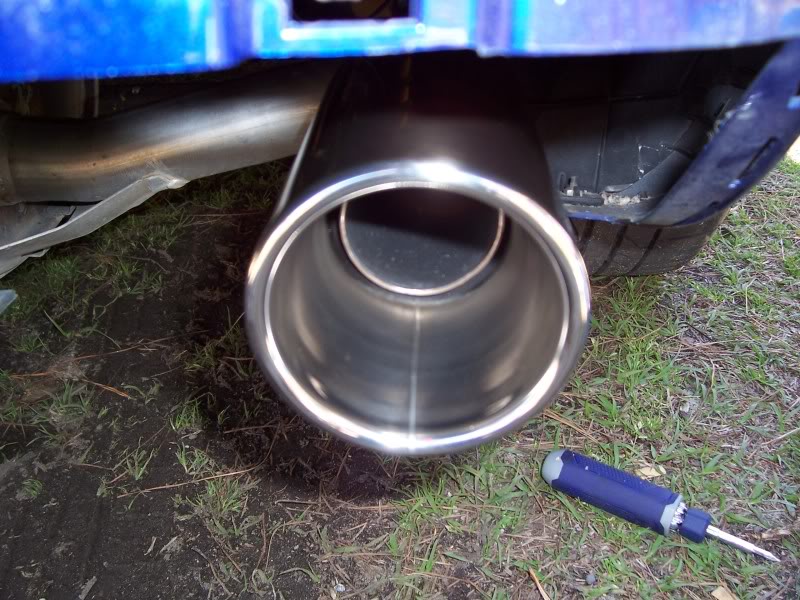
B: You may choose to remove the back black shielding, or not. If you have smaller hands you can get away with not removing the shield. But trust me, if you want the satisfaction of not overlooking anything - you'll remove it. This is how much of the tip I cleaned with a decent pass of NeverDull, reaching as deep as possible:

As you can see, I removed the black cover. I would've missed a good 50% of the tip with it on. My OCD wouldn't let me get away with just half-assing it
1: Wash: Wipe the exhaust down with the car wash solution
-- Light Presure. Focus on just getting the worst of the dirt off
2: ND: Grab a pinch of Never-Dull, wipe around the outside of the exhaust. Toss it away. Don't be afraid to use the rest of your hand as a balance so you don't get tired out.
3: Grab a pinch of ND again, this time for the interior- Make sure to use your two fingers to get inside the opening and around the interior of the tip.
4: 0000: Put the 0000 in the car was solution. Scrub the tip on the exterior. Don't squeeze the water out, it'll help you clean away the Neverdull.
5: 0000: Rinse off the wool in a rinse bucket, or running water (hose). Put the steel wool in the car solution. Don't squeeze the solution out of the wool, just place it on the inside and rub away in the pipe.
Progress so far:
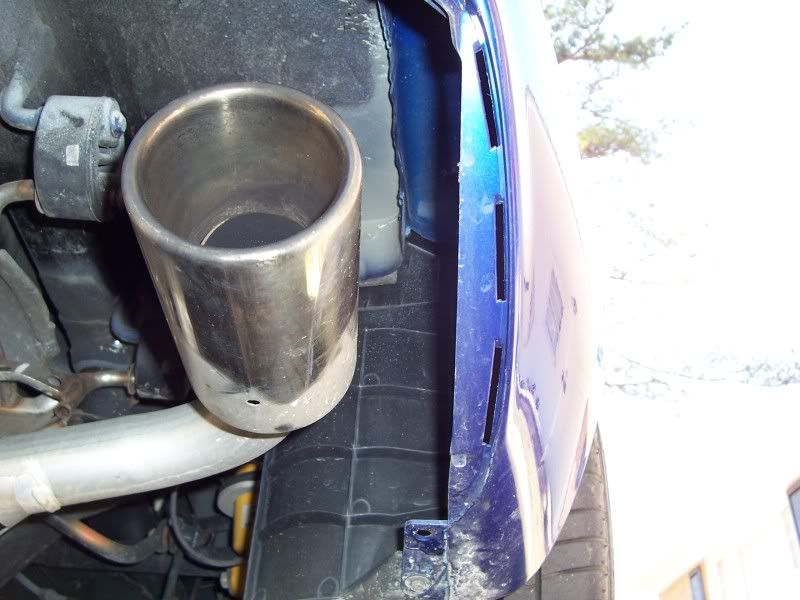
As you can see, we made a HUGE difference already. The steel wool and the ND is just too much power for the dirt to handle. It's still really dirty at this step. When I ran the Microfiber on the inside, I would still get a bit of Grey darkness. Not the soot-Black after just the first step.
--Moderate Pressure. Focus on getting what you missed the first time- Still, let the Hardware do the work for you.
6: ND: This time use this single piece for the inside and the outside, focus on getting ALL of the tip this time. Toss away.
7: 0000: Car wash solution, and focus on getting all of the tip with the wool. Don't miss a spot.
8: Repeat 6 & 7 one more time.
Progress so far:
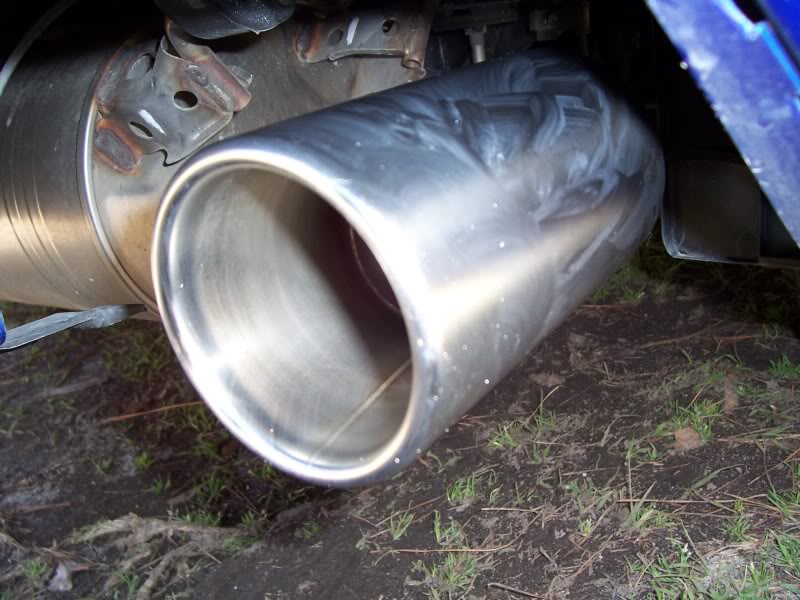
Its mostly clean, there's still spots and stubborn places where it's not going to come over too easy. Thankfully, I have Steel Wool.
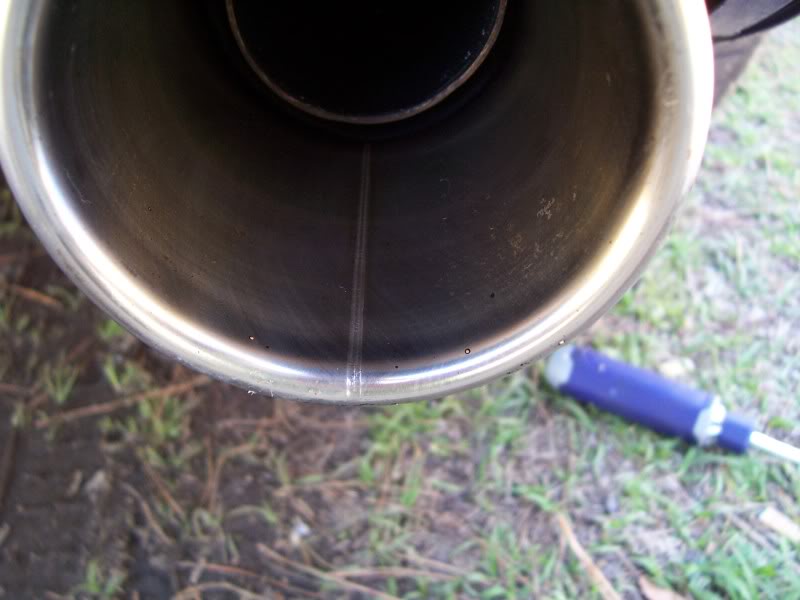
See those spots at the bottom of the tip. That's not a picture artifact, they're really there. And it feels like pebbles melted to the tip. Time to put the pressure on and do the final round of cleaning.
9: ND: Soak those stubborn spots with the NeverDull. Use some elbow grease and get all around those spots. Make sure to rub the NeverDull around the rim as well. This should be the last time you use it.
10: 0000: See those last spots that just don't want to budge? Well, It's on like Donkey Kong. Dunk that wool in the car wash solution, and rub. I rolled the piece of wool through my two fingers in a motion that made the wool go out around the rim, and back in again. This used the muscles that I haven't used. This is what I found worked best for me. The usual circle motions just didn't have the power to do it.
11: Microfiber: Place one in the Car Solution, wipe around the outside and the inside.
12: Microfiber: Use a clean, dry microfiber, dry off the tip.
13: Polish: Shake well, and Squeeze out some of Meguiars Hot Rims Chrome polish and rub around the outside and some in the inside of the tip. Really try to work that polish in. Keep in mind that the polish also acts as a cleaner, so it'll help to get rid of those stubborn bits and pieces.
14: Use the other end of that microfiber cloth and work off the polish.
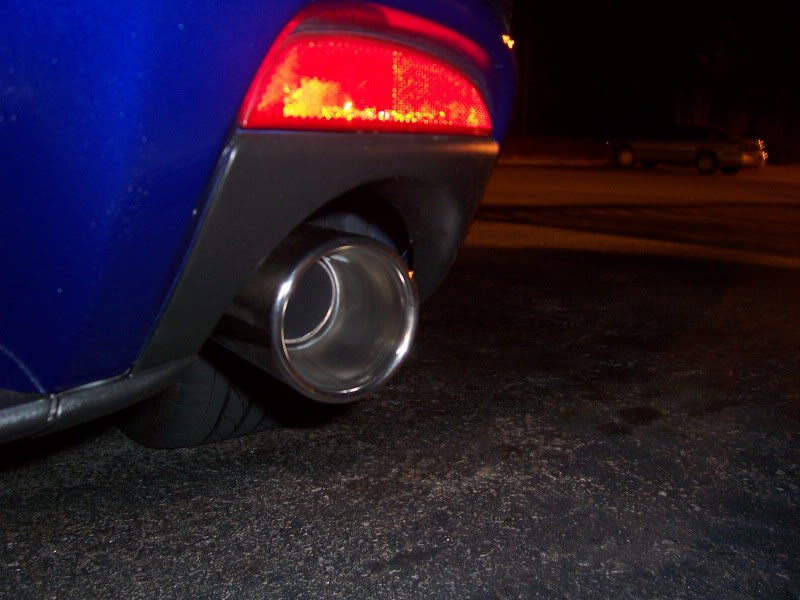
15: Check your work. Is it clean, really clean- as in: Is it girlfriend clean? Have your significant other join you in the fun and use her clean finger to test how clean it is. It's smooth enough to feel the weld seam.. Oh, yes. You know it's clean. And you're a hero at the same time.
Comments:
After the first, initial cleaning, above. You'll have a much easier time to upkeep these exhausts in the future. You wont be using that wool for a long while. Keep up those exhausts because a dirty exhaust makes a clean car look unfinished. Especially from the back.
It may take you less steps. It may take more. Your exhaust is not mine so the number of times you need to go in the "Never-Dull / Steel Wool" Cycle may vary than mine. Trust me, in the end you'll be rewarded with a new looking backend.
As another step: Waxing the exhaust tip. You may choose to go ahead and wax the tip. My personal opinion, I don't really see a need for it. The tips become very hot, I can not see how normal car wax will be able to stand up to the heat.
One of the most neglected parts of a car, that's really really noticible and gets a lot of face time is the rear bumper. Today, I'm going to focus on the rear bumper for my R3- but just a little lower. The exhaust pipes of a car can range from flat, triangle shaped, multi exhaust, round, pointed downwards or straight back. But one thing is for sure - it gets dirty when the car is just sitting still.
There are a lot of methods to cleaning your exhaust tips. I'm going to try to round-up and give you the information that the wonderful interweb has to offer. I will also show you my technique for cleaning my R3's tail pipes and bringing it new life to a reliable friend.
---------------------------------
Materials: (Everything Labeled in dark red are optional materials. These are what other persons have suggested to work. They may or may not work.)
Materials Needed (Hardware)
1. #0000 Superfine or #000 Fine or Steel Wool. [Located in the paint-section of many hardware stores. (LOWES not SEARS, for example is where I found mine.)]
2. Flat-Head screw driver. (Optional)
3. 3x Microfiber towels.
3-A: Microfiber Applicators
4. Bucket of Car Wash solution. I used Meguiars Gold Class Car Wash. (I was washing my car.)
Materials Needed (Software)
1. Never Dull (Pic) - (Located at: Advanced Autoparts, OReily's or AutoZone)
1-A: Mr Clean Magic Eraser.
1-B: Chemical Guys Grime Reaper
1-C: Bug and Tar Remover
2. Meguiars Hot Rims Chrome Polish (#G16. Non-Spray)
2-A: Mothers Billet Metal Polish / Mag & Aluminum Polish / Power Metal
2-B: Meguiars Hot Rims All Metal Polish (For non-chrome tips. #G15. Non-Spray)
2-C: Bar Keeper's Friend
2-D: BORLA Exhaust Cleaner & Polish (Stainless Steel)
2-E: Optimum Metal Polish
2-F: Brasso (Credit: 9krpmrx8)
------------------------------
First Use-Technique: Unkept Exhaust tips for years? You'll need this technique.
A: If you know what grain your exhaust is, follow the grain with your wool. It's superfine, but it is still is made to cut into the material to clean.
B: You may choose to remove the back black shielding, or not. If you have smaller hands you can get away with not removing the shield. But trust me, if you want the satisfaction of not overlooking anything - you'll remove it. This is how much of the tip I cleaned with a decent pass of NeverDull, reaching as deep as possible:
As you can see, I removed the black cover. I would've missed a good 50% of the tip with it on. My OCD wouldn't let me get away with just half-assing it
1: Wash: Wipe the exhaust down with the car wash solution
-- Light Presure. Focus on just getting the worst of the dirt off
2: ND: Grab a pinch of Never-Dull, wipe around the outside of the exhaust. Toss it away. Don't be afraid to use the rest of your hand as a balance so you don't get tired out.
3: Grab a pinch of ND again, this time for the interior- Make sure to use your two fingers to get inside the opening and around the interior of the tip.
4: 0000: Put the 0000 in the car was solution. Scrub the tip on the exterior. Don't squeeze the water out, it'll help you clean away the Neverdull.
5: 0000: Rinse off the wool in a rinse bucket, or running water (hose). Put the steel wool in the car solution. Don't squeeze the solution out of the wool, just place it on the inside and rub away in the pipe.
Progress so far:
As you can see, we made a HUGE difference already. The steel wool and the ND is just too much power for the dirt to handle. It's still really dirty at this step. When I ran the Microfiber on the inside, I would still get a bit of Grey darkness. Not the soot-Black after just the first step.
--Moderate Pressure. Focus on getting what you missed the first time- Still, let the Hardware do the work for you.
6: ND: This time use this single piece for the inside and the outside, focus on getting ALL of the tip this time. Toss away.
7: 0000: Car wash solution, and focus on getting all of the tip with the wool. Don't miss a spot.
8: Repeat 6 & 7 one more time.
Progress so far:
Its mostly clean, there's still spots and stubborn places where it's not going to come over too easy. Thankfully, I have Steel Wool.
See those spots at the bottom of the tip. That's not a picture artifact, they're really there. And it feels like pebbles melted to the tip. Time to put the pressure on and do the final round of cleaning.
9: ND: Soak those stubborn spots with the NeverDull. Use some elbow grease and get all around those spots. Make sure to rub the NeverDull around the rim as well. This should be the last time you use it.
10: 0000: See those last spots that just don't want to budge? Well, It's on like Donkey Kong. Dunk that wool in the car wash solution, and rub. I rolled the piece of wool through my two fingers in a motion that made the wool go out around the rim, and back in again. This used the muscles that I haven't used. This is what I found worked best for me. The usual circle motions just didn't have the power to do it.
11: Microfiber: Place one in the Car Solution, wipe around the outside and the inside.
12: Microfiber: Use a clean, dry microfiber, dry off the tip.
13: Polish: Shake well, and Squeeze out some of Meguiars Hot Rims Chrome polish and rub around the outside and some in the inside of the tip. Really try to work that polish in. Keep in mind that the polish also acts as a cleaner, so it'll help to get rid of those stubborn bits and pieces.
14: Use the other end of that microfiber cloth and work off the polish.
15: Check your work. Is it clean, really clean- as in: Is it girlfriend clean? Have your significant other join you in the fun and use her clean finger to test how clean it is. It's smooth enough to feel the weld seam.. Oh, yes. You know it's clean. And you're a hero at the same time.
Comments:
After the first, initial cleaning, above. You'll have a much easier time to upkeep these exhausts in the future. You wont be using that wool for a long while. Keep up those exhausts because a dirty exhaust makes a clean car look unfinished. Especially from the back.
It may take you less steps. It may take more. Your exhaust is not mine so the number of times you need to go in the "Never-Dull / Steel Wool" Cycle may vary than mine. Trust me, in the end you'll be rewarded with a new looking backend.
As another step: Waxing the exhaust tip. You may choose to go ahead and wax the tip. My personal opinion, I don't really see a need for it. The tips become very hot, I can not see how normal car wax will be able to stand up to the heat.
Last edited by RogueTadhg; 03-16-2011 at 08:33 AM. Reason: More chemicals that work.
 03-12-2011, 06:49 PM
#2
Filth in a world of Clean
iTrader: (2)

Join Date: Mar 2010
Location: Somewhere in 3rd gear
Posts: 517
Likes: 0
Received 0 Likes
on
0 Posts
Nice write-up.
I just polished my set up before parking her for the winter, so I will have to add this to the spring cleaning, (Still drove her once a week or so in the winter).
I just polished my set up before parking her for the winter, so I will have to add this to the spring cleaning, (Still drove her once a week or so in the winter).


 03-12-2011, 07:20 PM
#5
Living is best Modified.
Thread Starter
I will mention, just in case: Polishers do "Clean" but from what I found the polishers just don't have the cleaning power of a real cleaner. Never-Dull, as an example works wonders just wiping it around the tip without much effort and pressure. You're not poping out a muscle trying to loosen the dirt. Its pretty cheap, works fast and easy. Apply, Wipe off, Polish. Easier than waxing the car
Last edited by RogueTadhg; 03-12-2011 at 07:26 PM.
03-15-2011, 05:47 PM
#6
SARX Legend
iTrader: (46)

I'll just add that Brasso works wonders with ultra fien steel wool and a microfiber towel. Nothing else is needed. I also used mother metal polish to shine things up. Kind of pointless to do the mufflers But I had it off so what the hell.

Last edited by 9krpmrx8; 03-15-2011 at 05:51 PM.
 05-24-2011, 02:23 AM
#9
Registered

I just did this yesterday but all I used was some #0000 steel wool and a spray bottle of green disinfectant/cleaning solution(just needed something wet). Mine were about as black as yours and cleaned up very fast, I polished them afterwards with some never dull but it didn't really do anything, same shine as before the polishing. I didn't think it would look as good as it does, but it makes me happy to see the exhaust tips now it really does make the back of the car look 10x better.
04-01-2012, 05:20 PM
#10
Registered

Join Date: May 2010
Location: Omaha, Ne
Posts: 181
Likes: 0
Received 0 Likes
on
0 Posts
i did this about a week ago and hadnt cleaned them all winter. I cant think of a better way to clean these things than this. I followed the instructions exactly and used the 0000 steel wool, Meguiars gold class car wash, Never Dull and some chrome cleaner and polish from a spray bottle. thought i'd share the results and say thanks for a great DIY!!


Thread
Thread Starter
Forum
Replies
Last Post
Junirol
RX-8 Parts For Sale/Wanted
43
09-22-2015 06:02 AM
akagc
RX-8's For Sale/Wanted
7
08-11-2015 07:07 PM
dbarber
Series I Trouble Shooting
14
07-25-2015 01:34 PM