DIY: RX-8 Engine Removal How-to-with Pics

 07-20-2010, 01:32 PM
#51

You haven't demonstrated anything other than both failure points can be avoided. Of course they can be avoided. Don't be ridiculous.
The point is that it is very easy to mash the OMP and it is equally easy to remove the motor with the pulleys still in place. All you did was go out of your way to show how special you are in doing the opposite. Congratulations.
Now, for the rest of the people out there, mangling the OMP and pulling the motor with the pulleys still in place is the norm.
I've pulled the motor with the tranny still attached as well. Why bother? It takes 7 - 15 minutes to remove it first.
You are just running around and around in circles.
 07-20-2010, 04:29 PM
#52
kevin@rotaryresurrection
Thread Starter
iTrader: (3)

Join Date: Feb 2005
Location: east of Knoxville, TN
Posts: 1,415
Likes: 0
Received 57 Likes
on
35 Posts
Called out and disproved ("disproven" is not a word)? What are you talking about?
You haven't demonstrated anything other than both failure points can be avoided. Of course they can be avoided. Don't be ridiculous.
The point is that it is very easy to mash the OMP and it is equally easy to remove the motor with the pulleys still in place. All you did was go out of your way to show how special you are in doing the opposite. Congratulations.
Now, for the rest of the people out there, mangling the OMP and pulling the motor with the pulleys still in place is the norm.
I've pulled the motor with the tranny still attached as well. Why bother? It takes 7 - 15 minutes to remove it first.
You are just running around and around in circles.
RE: "disproven". IT is directly related to "proven", which is a registered word in any dictionary you care to check. Try again.
The following users liked this post:
BigBrae21 (05-26-2022)
07-20-2010, 05:49 PM
#53
You can't disprove something, so it can't be "disproven". You can "refute" an assertion and provide a logical argument against that assertion, but there is no syllogism to disprove something, which is probably the essence of why it isn't a real word in the first place. "Disprove" is also a word, but it is a transitive verb, hence the missing "n" at the end (and exists for the sole purpose of discussing the fallacy that it is).
Shall I quote you dictionary entries or will you be steadfast in researching this yourself?
You have made a whole bunch of assertions that you attempt to prove by omission and I am simply pointing out that just because you are able to do things a particular doesn't mean that it is the best or most practical way to do it.
I really don't see why you are getting your panties in a wad over this.
Pulling the motor out with the tranny attached is a wonderful bit of prestidigitation. But why bother? It just makes the job infinitely more difficult.
If you take the tranny off first, you won't bang the pulley. That is that. Really nothing else to comment on there.
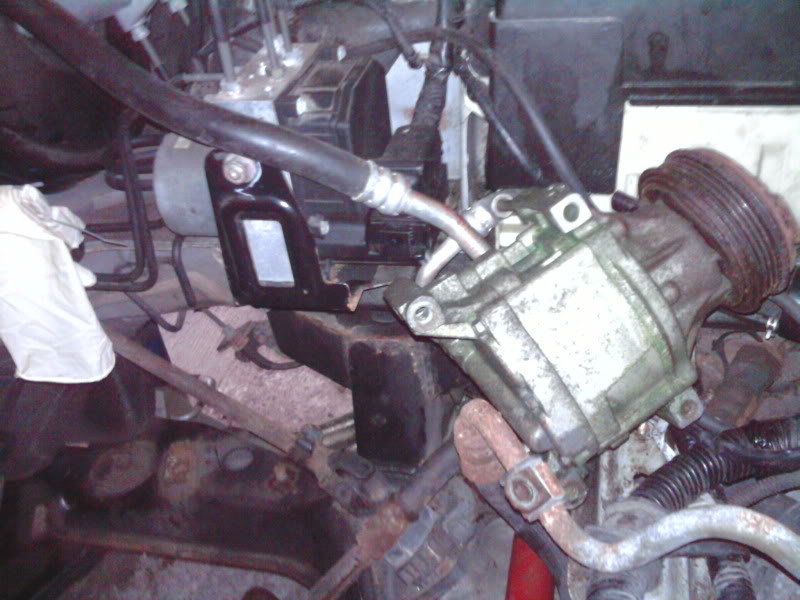
As far as the OMP and oil pressure sender goes, besides your pic not showing the full story (and I KNOW you know what I am talking about), the fact is that it is tight. There is a lot of stuff to worry about as you pull the motor up and out.
The ABS module is in the way. The A/C lines are fragile and the compressor is just dangling inches from harm's way (the '04 models particularly). etc. People smash both of those sensors. It's just a fact. I've sent out a LOT of replacement parts for that over the years. It happens.
Bravo that you managed just enough mechanical empathy to not do it yourself. You do this for a "living", don't you? I'd expect no less.
For average folks (which, I presume are the target of your DIY), the OMP sensor is a very expensive and virtually has a bull's eye on it.
Last edited by MazdaManiac; 07-20-2010 at 05:52 PM.
07-23-2010, 10:11 PM
#54
kevin@rotaryresurrection
Thread Starter
iTrader: (3)
Join Date: Feb 2005
Location: east of Knoxville, TN
Posts: 1,415
Likes: 0
Received 57 Likes
on
35 Posts
I also wanted to correct some other misinformation that's been posted in this thread.
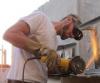
This is the correct way to remove the front 19mm bolt from the engine block/crank pulley. It is safe for the user, the engine, and the car. Using a breaker bar and a pipe propped against the ground is a completely improper procedure.

This is the correct way to remove the front 19mm bolt from the engine block/crank pulley. It is safe for the user, the engine, and the car. Using a breaker bar and a pipe propped against the ground is a completely improper procedure.
08-10-2010, 10:24 PM
#56
Diego
iTrader: (5)
Join Date: Nov 2007
Location: Cedar Rapids IA
Posts: 658
Likes: 0
Received 0 Likes
on
0 Posts
Improper: "unsuitable or inappropriate, as for the purpose or occasion"
I also think its the wrong way of doing it. Yes it can get the job done BUT if you mess up on the way you hold the bar or support yourself, you can get hurt.
So from preventing anyone to get hurt he shows the "PROPER" way to do it.
Proper: "adapted or appropriate to the purpose or circumstances"


The following users liked this post:
neophai (11-12-2022)
 02-13-2011, 09:49 AM
#60
Registered

Join Date: Feb 2004
Location: Tennessee
Posts: 464
Likes: 0
Received 0 Likes
on
0 Posts
What is the exhaust manifold bolt torque spec?
I've searched and searched, even have a shop manual, and can not find the torque spec for the bolts. I know they are self locking, but I don't want to over crush the seal or break anything.
I've searched and searched, even have a shop manual, and can not find the torque spec for the bolts. I know they are self locking, but I don't want to over crush the seal or break anything.
02-13-2011, 01:12 PM
#61
kevin@rotaryresurrection
Thread Starter
iTrader: (3)
Join Date: Feb 2005
Location: east of Knoxville, TN
Posts: 1,415
Likes: 0
Received 57 Likes
on
35 Posts
for me, hand snug plus 1/8 turn, which works for most any fastener on the car.
IF you're talking about the fasteners between the cat and manifold, well those studs almost always strip out or break upon disassembly no matter how well you lubricate them. I normally wind up knocking them out with a hammer and then using new non-mazda hardware.
IF you're talking about the fasteners between the cat and manifold, well those studs almost always strip out or break upon disassembly no matter how well you lubricate them. I normally wind up knocking them out with a hammer and then using new non-mazda hardware.
 03-25-2011, 10:24 AM
#65

trick i have discovered for me in regard to getting the trans mounted to the engine:
Dont TQ the pressure plate before you install the trans. Those dang spine line up tools are not that accuate and can be off--just a little. By leaving the pressure plate a little loose this allows the clutch to move a little when you are wiggling the trans.
You can TQ the pressure plate bolts from the started hole. Just rotate the engine to get to the bolts--not hard at all. Dont forget to use the right pattern in tightening them.
Made my life easier--always HATED trying to get the trans back in--the 09 is a little heavier and bigger in size which makes it a tad harder.
OD
07-21-2011, 07:15 AM
#66

Thank you so very much for posting this guide. I am almost done with getting my motor out. I have a few questions, mainly because i am nervous about a few things:
AC Pump, any pictures of the bolts i need to take out. I saw the diagram in the shop manual...however I don't want a face full of freeon.
Transmission, aside from moving the motor down to access the bolts...any further advise for getting that bad boy off. My pry-bars are ready.
Engine braces that rest on the motor mounts (i think thats the name), I put a 17mm socket on the bolts...but i can't get a solid grip. Might I be picking the wrong bolts? I stopped last night thanks to heat and the effects from fumes...PB Blaster, Coolant, and Fuel take there toll quickly, lol.
Last edited by L337fpc; 07-21-2011 at 07:17 AM.
07-21-2011, 11:56 PM
#67
kevin@rotaryresurrection
Thread Starter
iTrader: (3)
Join Date: Feb 2005
Location: east of Knoxville, TN
Posts: 1,415
Likes: 0
Received 57 Likes
on
35 Posts
Thank you so very much for posting this guide. I am almost done with getting my motor out. I have a few questions, mainly because i am nervous about a few things:
AC Pump, any pictures of the bolts i need to take out. I saw the diagram in the shop manual...however I don't want a face full of freeon.
AC Pump, any pictures of the bolts i need to take out. I saw the diagram in the shop manual...however I don't want a face full of freeon.
Transmission, aside from moving the motor down to access the bolts...any further advise for getting that bad boy off. My pry-bars are ready.
I do use a prybar when mating the engine back onto the trans later...line up the clutch splines until they engage and then pry between the subframe/PS rack and the engine lower front corner/front cover gently to seat the engine back onto the trans/dowels so the bolts can be started.
Engine braces that rest on the motor mounts (i think thats the name), I put a 17mm socket on the bolts...but i can't get a solid grip. Might I be picking the wrong bolts? I stopped last night thanks to heat and the effects from fumes...PB Blaster, Coolant, and Fuel take there toll quickly, lol.

 07-22-2011, 12:29 PM
#69
Thanks RR and THP.
Yea i got it off easy. The one thing i still didn't get was the oil line...i need a open wrench bigger than a 19mm thats for damn sure.
Or could i get away with unbolting it right from the block?
If all goes well i'll be back on the road again by tomorrow morning.
Yea i got it off easy. The one thing i still didn't get was the oil line...i need a open wrench bigger than a 19mm thats for damn sure.
Or could i get away with unbolting it right from the block?
If all goes well i'll be back on the road again by tomorrow morning.
Last edited by L337fpc; 07-22-2011 at 12:32 PM.
07-22-2011, 02:04 PM
#70
Thanks RR and THP.
Yea i got it off easy. The one thing i still didn't get was the oil line...i need a open wrench bigger than a 19mm thats for damn sure.
Or could i get away with unbolting it right from the block?
If all goes well i'll be back on the road again by tomorrow morning.
Yea i got it off easy. The one thing i still didn't get was the oil line...i need a open wrench bigger than a 19mm thats for damn sure.
Or could i get away with unbolting it right from the block?
If all goes well i'll be back on the road again by tomorrow morning.
10-22-2011, 06:25 PM
#72
Registered

Join Date: Jun 2011
Posts: 31
Likes: 0
Received 0 Likes
on
0 Posts
Check it! Time Lapse video of the procedure. Sorry it's so quick. This was my first try and I set the interval to be too slow.
http://youtu.be/9xnE9IkNNS4
Here's the tear down. This was the second try. I think it's better.
http://youtu.be/yKwWS2tiBVs
Wish it really went this fast.
Hal
http://youtu.be/9xnE9IkNNS4
Here's the tear down. This was the second try. I think it's better.
http://youtu.be/yKwWS2tiBVs
Wish it really went this fast.
Hal
11-02-2011, 09:49 AM
#73
New Member

Join Date: Mar 2011
Posts: 5
Likes: 0
Received 0 Likes
on
0 Posts
This write up was a great help. I took about an hour to convert it into a Microsoft word format that I could print and place in clear sleeves within a binder. Having that binder right there while doing with work was much less risky than having a laptop. So if anyone else likes to work like this, I've got the file to email you.
I tried to attach it but the site is saying the file is too large. Moderators let me know if this is something you can work out. I can email it to you.
Thanks! ALSO new engine in and car running great!
I tried to attach it but the site is saying the file is too large. Moderators let me know if this is something you can work out. I can email it to you.
Thanks! ALSO new engine in and car running great!
01-25-2012, 10:16 PM
#74
Registered

Join Date: Sep 2011
Posts: 71
Likes: 0
Received 0 Likes
on
0 Posts
I am in the middle of doing this as we speak. I am having a hell of a time trying to get the upper trans bolts off. im using multiple extensions, of different sizes and u-joint. But i still cant find the magin angle to get them off, i have the one bolt behind the slave line off, but cant get what i assume to be two more bolts towards the passenger side off or even get into a position that would make it possible... any suggestions?